A tatted tree
Grace did such an admirable job of creating a pair of
Christmas tree earrings in 3D, using the simplest of techniques and dressed up with
beads! How could one resist – 3D combined with freeform was calling out to me.
It seems like ages since I made something in 3D freeform – I’ve been
domesticated ;-P
3D Christmas Tree

A 2-shuttle pattern with rings thrown off a spiral
(Josephine) chain.
In size 20 thread it is 2 inches high (including the trunk)
»»»»»»»»»»»««««««««««««
Au Naturel !

My first test tat was without beads. I deliberately went for
a natural look, the intention being to wrap a string of beads later, like fairy
lights. This has taken a backseat coz the tiny tree became fiddly to work with and
gold thread was tangling up – need More Hands !!! But last night I had an idea
to anchor the tree while I wrap it. Hope it works.

TIP
: Tying/inserting a marker at end or start of each layer helps to keep track as
the foliage becomes denser. See the 2 threads knotted on the in-progress
foliage?
So much fun ! A simple string of mostly decreasing rings,
tightly packed down on a spiral chain –that’s it! Brilliant.
TIP
: Ensure the spiral chain stitches do not ‘unflip’ at any time, before working
on a new ring, and after closing it too. The core thread of chain should
continue to slide.
This may not be a problem for tight tatters, but for me the
half stitches did tend to unflip at times.
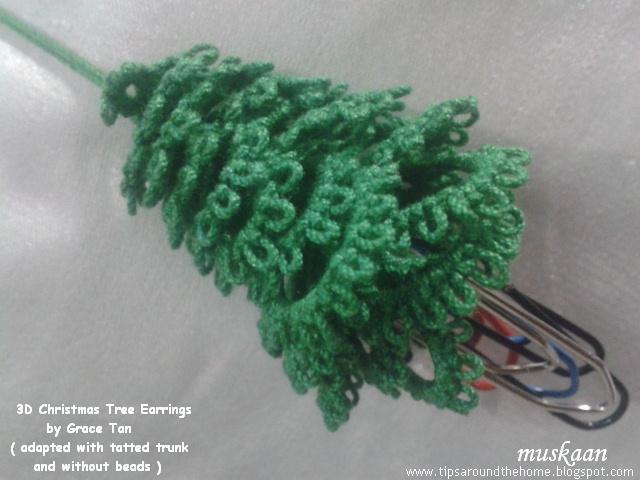
Couldn’t find a bead that would work as a trunk (didn’t like
the round wooden beads I had). Left paper clips in place of the trunk bead, to
allow core thread to slide.
This called for a trunk call to tatting! The tatted 3D trunk was sewn
on later (pattern at end).
DH can’t get over how Real this miniature looks - both the
foliage alone, as well as complete tree and I am very happy with it, though there
are a few slips (a definite advantage in freeform tatting!). It looks so cute, and
tiny – merely 2” high !
I used Red Heart green (229) and brown (341) in size 20
»»»»»»»»»»»««««««««««««
It is very quick to tat up sans beads & much more fun.
But beads add sparkle, character, and cheerfulness !
Au Noel !

Got out my shuttles and beads and stuff; sat in the sunlit
balcony, and strung beads. It went surprisingly smoothly - there’s nothing like
natural light !!!
I did have to load my shuttle thrice (Pony shuttles are
small), but fortunately I had strung around 200 beads on the ball thread, and
took only about one-third for each bobbin load cutting the thread and leaving
the rest of the beads on the ball thread.

I used Anchor green (0245) in size 20 for foliage here. Except for the gold beads, all are transparent seed beads; a star sequin graces the tip. Since the beads are plastic, they do not add weight to the tree. However, if using as earrings, a light starching might help to keep the foliage in desired shape. I didn't make earrings; can be used as tree ornaments or how about tassels for a Christmasy gift!
IDEAS : This pattern can be adapted to .....
... make 3D flowers in a jiffy ! Adjust ring count & size, and choose flowery colours, OR
make a twig with fir needles – long picots (snipped) on a spiral chain – how cool is that for a wreath ?!
... make 3D flowers in a jiffy ! Adjust ring count & size, and choose flowery colours, OR
make a twig with fir needles – long picots (snipped) on a spiral chain – how cool is that for a wreath ?!
»»»»»»»»»»»««««««««««««
Meanwhile for those interested, here’s the pattern for the
tatted trunk …..
I’ve been holding out on this pattern (a prototype peek here), wanting to add beads & colours to highlight the spiraling effect.
May be soon, now.
Tatted 3D Tree Trunk
pattern
pattern

2
shuttles CTM. Size 20 thread.
Ø
Each
ring, layered/stacked above the previous ring, creating a 3D hollow cylinder.
Ø
First
& last rings are normal rings ; all in-between rings are split rings.
Ø
Keep
the picots normal to slightly long, depending on how much distance you want
between the stacked rings.
Ø
Mock
picot (MP) is used to climb out of each ring.
Ø
Switch
shuttle (SS) after each ring.
Ø
A
total of 6 to 7 rings is sufficient for the tree pattern above.
Ø
See pictorials
on layered rings here , and here .
R1 : 4 – 4 – 4 – 4 . MP
** SR2 : 2 – 2 + 2 – 2 + 2 –
2 + 2 / 2 . MP. SS **
Repeat from ** to ** for desired
length (or height)
Last Ring : 4 + 4 + 4 + 4 .
Use the tail ends to sew to the foliage.
Tie ends and insert the tails through the hollow tube and snip.
Tie ends and insert the tails through the hollow tube and snip.
Many many thanks to Grace for sharing her delightful pattern with us !
Related Posts :
Thanks for blogging about my little 3D Christmas tree! I'm really tickled that your DH can't get over how real the miniature tree looks! ;-D
ReplyDeleteGrace, he liked both versions! And he was so impressed that he actually told me to buy a larger bead box !!!
DeleteThey do look pretty real :-)
So pleased about that! :-D I must try the tree with your tatted tree trunk. But right now, I need to rush to finish my own pair...
DeleteBeautiful Christmas tree earrings :)Happy holidays :)
ReplyDeleteA very merry Christmas to you, too, Anetta :-) These trees do brighten up the place.
DeleteI can't imagine wearing Christmas tree earrings, but I do really admire Grace's work and yours! The one without beads is impressive, but yes, you really need the festivity.
ReplyDeleteI agree, Jane :-) I don't wear such earrings, but the trees are very cute & fun to tat. I will keep them for decorating the tree.
DeleteAnd this practice helped me with my beading - not that difficult, once you get into the rhythm !
I love them both! Your DH is right, the au naturel is gorgeous. I can't figure this out though, I know when I see it, it will make complete sense-like the spiral chain did many years ago but I need a video. Any takers? Must find brown thread.....
ReplyDeleteThanks Michelle :-) Not sure which part you are referring to - if it is the foliage, then scroll down to the Midrib with Veins picture here : https://tipsaroundthehome.blogspot.in/2014/05/tatting-pattern-rustic-leaf-pendant.html. It has twisted picots on a spiral chain. Replace the picots with rings, and make the distance between rings merely 2 half stitches, and you have a compact conifer !
DeleteIn case you are referring to the tatted trunk, let me know & I will make a stepwise pictorial specifically for this.
Hope you find some brown thread & give this a tat - waiting to see it on your blog :-)
Hi, Michelle, I assume you have looked at my pattern? I'm still looking for ways to improve it. Maybe some progress pictures...
DeleteI have but for some reason, I'm dull witted here. Could be not looking carefully enough? I will when the guests leave.
DeleteGive my pattern a try - maybe it will then make some sense, or at least you can tell me what's puzzling you. I do find, though, that once Christmas is over I lose my incentive to make these little trees! ;-)
DeleteThanks, Grace :-)
DeleteMichelle, consider this 'transformation':
1. a regular chain with thrown rings (made with SH2) along it's edge
2. the chain has only 1 double stitch between each ring, thus bringing the rings close to each other.
3. Instead of a double stitch, you now make 2 half stitches of same type between each ring.
4. You now have thrown rings on a spiral or Josephine chain!
This is continued for a length, then the chain is pulled tight, snugging the half stitches and the rings together, while ensuring that the rings swirl around the chain core thread.
You have your compact foliage !
Does this transformational imagery help ?
Gorgeous trees I love the beads on them. Thank you for the pattern
ReplyDeleteGlad you liked the pics, Margaret :-)
DeleteWow! Two beautiful trees! Isn't it fun when hubby encourages the purchase of more tatting-related items?
ReplyDeleteThanks, Diane :-) One can only hope that the encouragement is not fleeting ;-P
DeleteMuskaan, your trees are gorgeous.
ReplyDeleteThank you Grace for the pattern.
So glad you liked them, Claire :-) Hope you enjoy tatting them as much as I did .
DeleteYou're welcome, Claire! :-)
DeleteI love this tree its wonderful I have not been blogging much at all and I feel I have missed a lot. Years ago someone did something like this and put it on top of a pencil!
ReplyDeleteChristmas all year round on the pencil 🌲🌲🌲 .... nice !!! Thanks, Carollyn
DeleteThat's an idea! But, how do you make it stay on the pencil? Glue?
ReplyDelete