First things first…
I was going to post some of these along with the answers to
my Set I questions. But This Way or
Tat? (see all related posts at end for all links) has been lapped up by Georgia Seitz for her Online Tatting Class on Oct 10th (wait for the official announcement, though, just in case!) :-P Thanks Georgia! Makes no sense in giving out
answers at this stage. Plus, it struck me, why should I give answers ? It is
the interested reader who should be sending in the answers if they wish, right
?! However, I will share some of the links later next week.
Also check out Eliz’s latest post comparing direction when tatting with left v/s right hand. Great pics and explanation.
And now, ladling out …..
a mixed bowl of tattiness :-P
Eliz Davis’ Ring Only Wreath – beads in
the soup !
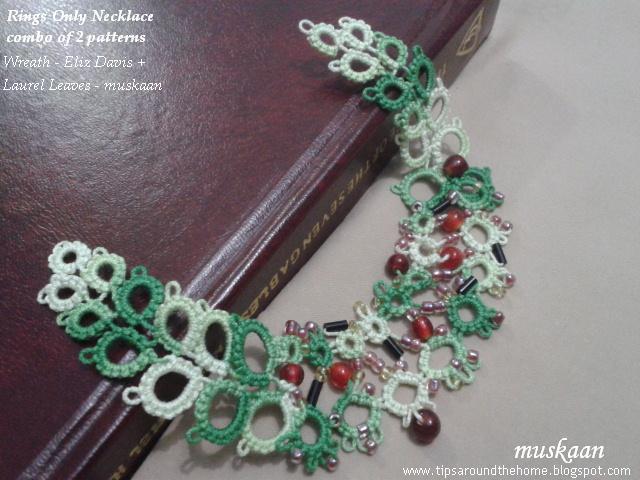

Decided to make the wreath more Christmasy with beads for bling and
‘red cherries’ for a crunchy topping. Strung all these beads (and more) while thread was still on the
ball, and then realized it was a short leftover thread :-( Restarted.


My Butterfly Liberated - can't escape now, booked for a serving !
Wherefore did this daguerreotype emerge ? The
House of the Seven Gables – that’s where.
 I’d read this long back, but picked it up
again by mistake, and decided to read again. I love these leatherbound editions
(although there are always some typos) with their attached satin ribbon
bookmarks. However, the ribbon is short & tends to fray. It s also difficult to actually find the page coz there's no long ribbon end to hold on to. Here’s my instant
solution (and expect many more such for all my other books in this publication)
I’d read this long back, but picked it up
again by mistake, and decided to read again. I love these leatherbound editions
(although there are always some typos) with their attached satin ribbon
bookmarks. However, the ribbon is short & tends to fray. It s also difficult to actually find the page coz there's no long ribbon end to hold on to. Here’s my instant
solution (and expect many more such for all my other books in this publication)
 My butterfly prototype with ribbon inserted & glued. Added just the right weight & stability,
too.
My butterfly prototype with ribbon inserted & glued. Added just the right weight & stability,
too.


TIP : My idea is also to try to string a few more butterflies
& flowers along the entire length…..must rummage through my stash of old motifs !
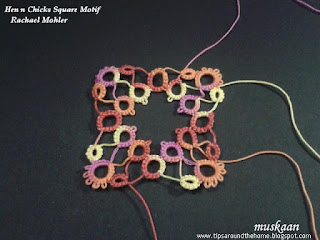
Rachael Mohler’s Hen
n Chick Square Motif – a mini coaster to set the bowl !

My first time trying out the Dora Young Knotless Method
(DYK) on a Ring ! Loved it! Opens up more possibilities. UPDATE: video link - https://www.youtube.com/watch?v=4SoGklhCqL0
 Unsure how the DYK rings would turn out, I had started with leftover threads. Hence the numerous tails.
TIP : Adding new thread to a bare thread pattern : Leave about 4-5" tail of previous ring. Start new ring with new thread by grabbing the old tail within the new thread loop, and tatting over the new tail for few stitches. This takes care of one tail. Later, sew in the old tail in this new ring. No Knots !!!
And I misspelled Rachael's name in the Set I pdf . So I took the plunge into Doc Hubs and figured out how to edit it, YAY! New downloads will have the correction, but those who have already printed it out, please make the correction.
It was also my very first Hens n Chicks working.

 But my MIL
had made several handkerchief edgings using this pattern back in the 90s for
gifting, etc.. Sorry about the blur - the original pics were small.
But my MIL
had made several handkerchief edgings using this pattern back in the 90s for
gifting, etc.. Sorry about the blur - the original pics were small.


Together we fly butterfly – it’s all in
the mix !

tattingweed’s Crinoline Doily – keep
stirring in all directions !

This gorgeous doily pattern by the talented Korean,
Hamigyeong, was added to the Craftree database yesterday. And the moment I saw
the pattern, I just Had to give it a go. See all the directional changes it
incorporates ? Wow ! Started in size 40, aiming for a glass window effect .
This has given me so much more thought for the TWoT series. Will share working
details later; this is just a quick peek ….
happy tatting always :-)
Wow, lot of work in the bowl! My favourite is the butterfly added to the ribbon in the book - great idea!
ReplyDeleteAnd it was so quick, too, Jane! Great way to use up little motifs & practice pieces :-)
DeleteMy goodness, you've been busy! I love the beaded necklace/choker. It's so colorful and cheerful!
ReplyDeleteThese colours were chosen from my limited stash to look like a wreath, Diane. If I'd known it would take this shape, then I would've chosen another combo :-)
DeleteWow!!! You sure have been busy!! Such wonderful looking projects!!! :)
ReplyDeleteI have a full-time job as a tatter, Sue ;-P
DeleteWhat a fabulous idea- you are doing a wonderful job here of collating these techniques and sequencing them for all of us! Thanks Muskaan - you are a gem.
ReplyDeleteThank you so very much, Fiona ! Appreciate it :-)
DeleteThat's great! So much fun going on.
ReplyDeleteI've just finished my version of the little butterfly, but it doesn't look as nice yours. My body ring remains stubbornly round, throwing the wings too close together at the top. I need to try again...
The Crinoline Doily by Tattingweed beckons to me, too. But first I need to finish her much easier butterfly coaster...
Waiting to see it, Grace :-)
DeleteI pulled the body ring into a longish shape right after tatting it - did not wait till the end. And I had left it just a tad looser when closing than I normally would. Could these be factors ?
Tatting is always fun :-D
Yes, I could try that. I was thinking of squeezing the ring into that shape. Or doing two little rings. Or doing something different with the head. Tim's butterfly has a round body, but its head fares better than mine... ;-)
DeleteGrace, once the ring is pulled into the desired shape, one can try to close it a bit tighter, keeping the shape intact.
DeleteI'm working on a tatting tension gauge - don't know how far it will be useful.
Just watched the paazeb video. It's really charming! :-) But it ended before the two paazebs were united... :-/
ReplyDeleteLike I said, Grace, Laila & Majnu (or Qais) are the Juliet & Romeo of English literature - the twain ne'er shall meet !
DeleteInterestingly, Casanovas are often referred to as 'majnu', too :-)
Oh, okay. Maybe it's better that way. Romeo & Juliet did meet and marry - with tragic results. :-/
DeleteI did a couple of the butterflies. Put them on my blog, if you want to see them. Those are fun to make. Thanks to you and Claudia for getting a pattern together.
ReplyDeleteWill check them out, Tim ! Waiting for Claudia before finalizing and adding to database. Glad you enjoyed them :-)
DeleteI'm going to try the butterfly and the doily! Thanks.
ReplyDeleteWould love to see your versions of the butterfly & doily, Grace :-)
DeleteLovely necklace! Green color is beautiful.
ReplyDeleteThanks, Marja :-) And it is all rings - can be tatted in one pass !
DeleteThis bowl of tattiness is an inspiring collection. I love what you did with the leaves and the section of wreath. I look forward to your working details on the Crinoline Doily. It's another of those projects on my 'to-tat' list, but it looks like quite a challenge.
ReplyDeleteThanks, Eliz :-)
DeleteThe Crinoline Doily is definitely not an easily memorized pattern, though there for some sections, there is a clear logical sequence. The directional changes need focus.
But in general, it is a rings and chains pattern with no advanced technique. I used a few 'tricks' to achieve the directional and colour changes.
Will share ....
Just thought through my version of the alternate Split ring. I thought I was doing it the way Rachael showed us. I'm not! I was anchoring the shuttle thread to the Bare Thread Space leading up to the Alternate Split Ring. I didn't realize since I was using such small thread. Note to self: Try new patterns with large thread even if there's just enough leftover of small thread on a shuttle!!
ReplyDeleteMel, that is exactly why I chose a larger thread size for this square! I needed to know and see what was happening with the DYK. It did help greatly, and untatting a stitch was so much easier, too.
DeleteI'm glad you tried it :-)