4 months of wiosna
lasting through the hot hot lato
& the muggy dreamy monsun
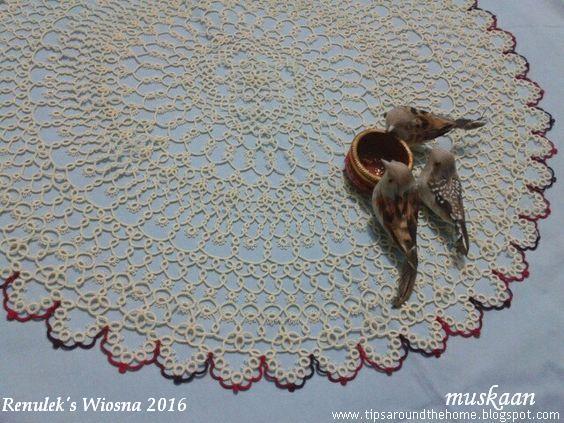
Renulek’s Wiosna
2016
A doily tat-along by Renulek
4 months of this glorious Wiosna,
spent with Renata (Renulek) has come to an end. Luckily, we all have something
material to show & display & ogle at for many decades, thus the
blissful lace carries on. This is her 4th doily I’ve tatted in 3
years - the Spring Doily 2014 ; Wiosna 2015 ; Snow Doily 2012

Not without a few boos-boos in the
last round, though …

Materials
: 2 shuttles
Anchor Mercer size 40 : cream 0300 ; shaded red w/ black :
1206
Techniques
I used : directional tatting, thrown Josephine rings, SCMR (to use last
lengths of thread)
the boo boos !

1st start – joined to wrong picot. Could’ve carried on,
but decided to snip it off so that I had normal (DS) rings & reverse order (RODS) chains.
2nd start – One
would’ve thought that at this age & experience, one has learned to count.
Huh, not so – 6 inner rings instead of 7! Another snip. Can’t afford too many snips, coz running low on thread !
3rd start – all is
well, phew.


¾ths of the way round, I came
across 1 snipped joining picot in previous round :-( At the time, in a panic, I dabbed some fabric
glue on the cut ends to keep them in place & continued with the ring,
adding a picot where it was to be joined. After completing the entire round, it
was time for repair. Here’s how I went about it – sorry no pics . It might have
been done before, but I haven’t come across it, hence sharing ….
Repairing a Chain with snipped joining
picot
- Unravel 1 half stitch on
either side of cut thus exposing the core thread. (preferably, do
not apply fabric glue, because it becomes extremely difficult to unknot).
- Insert a doubled-up scrap
thread length, & pass the looped end through the joining picot on next
round.
- Pass the 2 ends under the
previous round (where cut is), then over & through the loop. Tighten
& snug.
- We now have a double stitch !
This lies on the core thread exactly as a normal ds would.
- I whip-stitched the 2 ends of
the scrap thread on either side of the ring.
- I had to leave the cut picot
thread glued back, since it was very difficult to unravel.
- However, without glue, one
can unravel back along the chain on both sides of cut & use the scrap
length to make stitches along both sides just as in a split chain or
larkshead in macramé or in embroidery buttonhole stitch. Then hide all 4
ends.
the tweaks
(I hope Renata doesn’t mind)
(I hope Renata doesn’t mind)

This is a beautifully designed
round & I Love the slight overlap between the scallops in Renulek’s
working, but failed to achieve it in mine. Can’t understand why. Or was it merely because I couldn't block it properly ?

Made a couple of tiny tweaks, in
consultation with my DH. I was going to ask you wonderful tatters, but he was
already in sync with me ;-P Added some colour finally, as an outline to the
lovely rich cream. Since it was to be merely an outline, I left out the chain
picots.
Also, preferring curves & arches to points, I substituted the thrown ring
with a smaller thrown Josephine Ring – I love the perfect circle of a JR. This was done in directional tatting, starting with 1RODS, 10 1st half sts, 1RODS, post shuttle
& close.
TIP : to make the JR lie
flat, start & end with a double stitch.
in general

Used up 2 full balls, 20 gms each,
of size 40 thread. Wouldn’t have lasted if I’d made the last round as per
original pattern. This is all that’s left of this rich cream.
Here's an interesting observation - the first 13 rounds used up only 1 ball (20 gms), while the last 4 rounds consumed 1 ball !!!
Here's an interesting observation - the first 13 rounds used up only 1 ball (20 gms), while the last 4 rounds consumed 1 ball !!!

This “Roll & Store” using a
pillow cover is what kept the growing doily clean & flat. It was probably
the reason why unblocked doily pics in my previous post came out okay.
the learning
Large projects can be
time-consuming but they also offer the possibility to practice & improve. I
got to practice direct tatting (reverse stitch), gaining speed. Climbing out
with split chains also improved as the rounds progressed. I applied different
ways to add new thread & hide ends & loved the whip stitch to sew in
ends.
Made me think of the different ways
of keeping projects clean while working/storing, especially large ones.
I finally got nicely closed rings
in directional tatting due to experiments emerging while tatting this doily.

Working with a single colour has a
Lot of practical benefits, but it can get a
bit boring at times, especially when fellow tatters were using such lovely colours & transforming their work into a personalized statement.
I added colour in the last round, only for chains, as an indication of the finality of the tat-along; to give a feeling of closure to the single-colour pattern. This is what led to a major boo boo !
major boo boo
I love the variegated red w/
black. BUT the colour runs !!! Never faced this problem with Anchor threads.

When I dunked the doily in water
for the blocking process, I suddenly remembered the recent thread colour
travails of Eliz & Carolyn. Pulled the doily out, quickly laid it flat on
the marble & dabbed it with a white towel. Sure enough, there were reddish
imprints !!! Colour was just beginning to seep into some adjoining rings :-(
Worked super fast, dabbing the doily dry with the towel. Phew, saved for the
present. Might have to handwash it flat in the future, or experiment with small
pieces …

Funnily enough, while I’m happy
that this is over & I can shift my attention to other smaller projects, I’m
sad to let it go – kind of an empty feeling, you know ?!
Many many many thanks to Renata,
for sharing her elegant patterns
with us,
& organizing these tat-alongs …
it is always fun to tat along !
happy tatting :-)
Related Posts :
Pooh, I love the cream with just the color on the outside-glorious!
ReplyDeleteStunning!!! Great colors!!! :)
ReplyDeleteLove it, the last round is very pretty, It's a pity that the red runs with the water, maybe they in those shops can dry-clean it. Anyway it will last long before it will be dirty. I like a lot your method to repair the cut joining picot, so clever, I hope to remember this post in future.
ReplyDeleteA great color choice again. I love this doily.
ReplyDeleteWhat fun with ending color. I to had several false starts and snippet them off and I think removing the picots keep it from overlapping cause I just made tiny ones and it's looking pretty good. Your doily is great and congratulations it's done:)
ReplyDeleteThank you so very much, everybody :-) So happy that the colour addition is acceptable !
ReplyDeleteNinetta, if you think the repair method is clever then it Has to be clever - to me you will always be The Hiding Lady par excellence :-D
Good for you for completing another Renulek doily. I do like the look of the final round but too bad the dye runs. I have also found that a large project opens opportunities for perfecting techniques. Bravo.
ReplyDeleteThank you so much for your lovely comment, Bernice :-) Hopefully this is the last large project for this year ;-P
DeleteCongratulations!! It is stunning. I really like your outline. Horrified by colour run though, criminal that it could have spoilt all your hard work.
ReplyDeleteThanks, Jane :-) Let's see how it goes ... I'm thinking of ordering more cream thread & may re-tat the last round again (with colourfast maroon outline) sometime in the future when I feel like it. Increasing my options :-)
DeleteYour doily is absolutely gorgeous! I love the touch of color on the last round. How sad it is that the color runs. I agree with Bernice that larger pieces help us perfect techniques. Sometimes I just don't have it in me to work on larger pieces, so I tat a smaller pattern repeatedly. Some day I may even meet my own goals for perfection! ;-)
ReplyDeleteThanks for sharing your repair method. I've snipped picots on a chain before, but I wound up taking out a whole section to make the repair. Your method seems much less time consuming.
Thanks, Diane :-) Larger pieces do have their own advantages, besides getting a large piece of lace to display !
DeleteI want to do a bit more experimenting with my chain repair & take better pics. Let's see how that goes - yes, it was quicker than snipping away entire segments & increasing the tails to hide.
Beautiful doily, what a pity the red thread bleeds, perhaps with a couple of washes it might stop bleeding.
ReplyDeleteI am actually back tatting the snow doily, it's been sitting fur a long time waiting for me to pick up tge shuttles again, to be honest I get a bit bored and fed up so its my U.F,O
I loved the Snow Doily, Margaret - it had a lot of interesting features to decrease monotony of going round & round ;-P I hope you find the motivation to continue & complete it - I had a deadline coz it was a gift, so that kept me going. Must remember to post the finish, though
DeleteOh, the colored outline is a perfect frame to the doily. Well done!
ReplyDeleteThanks a heap, Eliz :-)))
Delete