Friday, 10 July 2015

Tail of 2 Bookmarks

Pin It now!
Tale of 2 Bookmarks or Bookmark of 2 Tails ?!
( all coloured bold fonts are direct links to site/blog/post)

Jane’s Bookmark
Designer : Jane  McLellan


Now here’s a pattern that I have adored & has been on my to-tat list for like ages !
Yesterday dawned with a refreshing monsoon shower & as we lazed on the balcony, I finally got around to tatting this. I also got the opportunity to tat with this new colourway – it was lying in my stash for many months now. The pics don’t do justice to the colourway …

This pattern can be downloaded from Jane McLellan’s site , & also from Jane Eborall’s Pattern pages (it was first published here).
Thread : Bliss size 7 (?)
The finished bookmark measures just under 7” in length ; 1” wide.

My  Notes :

  • FS/BS tatting all through. 
  • I made alternate Split Rings with the other shuttle, in order to consume the same length of thread from both shuttles, as well as keep the colourway even. This called for backside tatting of every alternate SR. Here’s how I tackle it : 
FS/BS  tatting  in  a  Split  Ring

Abbreviations : FS/BS – frontside/backside tatting ; SR – split ring ; fhs – first half stitch ; shs – second half stitch ; ufhs – unflipped fhs ; ushs – unflipped shs ; RODS – reverse order double stitch ; RORS – reverse order reverse stitch

SR  tatted  from  Frontside :
This is the normal way .
1st half of SR is made with normal Double Stitch (fhs, shs) ;
2nd half of SR with Reverse Stitch (unflipped hitches in reverse order) ie. (ushs, ufhs)

SR  tatted  from  Backside :
1st half of SR is made with RODS (reverse order double stitch) ie. (shs,fhs) ;
2nd half of SR is made with RORS (reverse order reverse stitch) ie. (ufhs, ushs). In other words, the 2nd half of SR is tatted with unflipped hitches, but the order is that of a ds.

This SR, when viewed from the front side, will appear ‘normal’, with complete double stitches throughout. 

  • In order to add a tassel, I made one extra small ring at the end. It was a SSSR (single shuttle split ring) with the thread ends hidden within. Nothing to tie & sew, since the threads that emerged from the SSSR were mingled with the tassel threads.
I enjoyed Jane's Bookmark so much ! It is so easy & quick to tat up :-)
Could I resist doing another ? No (sheepish grin)

@@@@@@@*********@

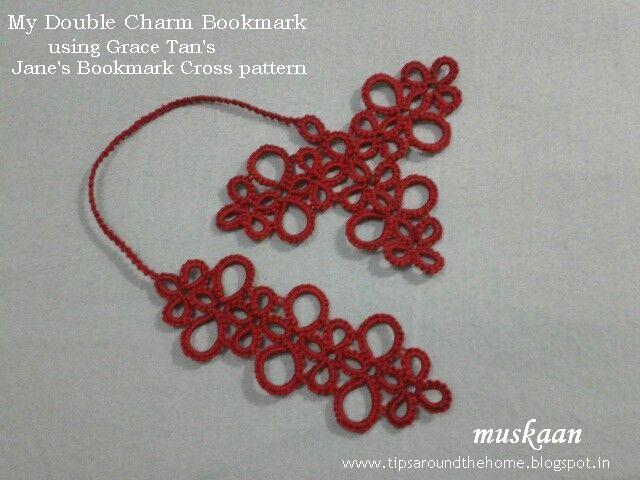
Double Charm Bookmark 
 pattern : Jane's Bookmark Cross by Grace Tan

This time I tried Grace Tan’s stitchcount  Along with Annie’s Granny’s triangular ‘faux pas’ (she’s made a Square, too) in size 20 thread (Anchor MC 4054-0020 maroon)

Looks like a tail with 2 charms …. I will be using these as charms (especially the short straight sections) for future bookmarks, as well !

Thank you, Jane, for such a fun & versatile pattern :-)
Check out Jane’s other clever, creative patterns at her site here!

@@@@@@@*********@

Robin’s  Frauberger  Bookmark


I had finished tatting the tails & charms to Robin’s Frauberger Bookmark soon after posting the bookmark , but was going to show them along with a post on Cluny Tatting. Turns out that post is going to be fairly long (as usual !), with lots of pics.
I added 2 tails to the bookmark. I’ve done this earlier with Gina Brummet’s Spiral Bookmark, here.


So, Why  Does  a  bookmark  need  TWO  Tails ?!

Here are the choices :
  1. Playful fun 
  2. Whimsical quirk ?
  3. Aesthetical proportions ?
  4. Practical functionality ?
All of the above or None of the above ?

For the Spiral bookmark, it seemed like a fun, quirky idea to use up the 2 small shuttle shaped motifs as charms.
And then there was the practical aspect – when using a bookmark in a reference book, one can bookmark Three places at the same time !
For instance, Nicholl’s book (in the photo) has the text on one page & the images/Plates on some distant other. It can be quite a chore to frequently flip from one page to that other. The 2 tails, with charms helps me keep track, without disrupting my reading ! And each time I stop/pick up the book again, the places are already marked.

For the Double Charm Bookmark above, it was again bit of a fanciful flight !

For the Frauberger Bookmark, it was proportionality. The body is broad (2”) & a single tail in the same size 40 thread seemed disproportionate. A 2nd tail filled up that ‘space’. And I really needed to practice making tallies/clunies. Despite that, each tally has it’s own Tale to tell ;-P!

UPDATE : This is how it looked with a single tail & charm. It just Had to have 2 tails !

And this bookmark goes into my knitting book … how many times have I needed multiple bookmarks/page holders when trying to choose patterns ?! Two tails ? Hey, more than 2 tails would be even better ;-D   This is also a note to self to make more 2-tailed bookmarks for my other pattern books !

Tail & Charm  for  Frauberger  Bookmark :

  • Tally/cluny leaf alternating with a Split Ring (8/8) in size 40 thread.
  • I didn’t keep count of weaves in the cluny … to much concentration was required just to get the shape okay. Each tally was eye-balled to an approximation.
  • Charms follow the same pattern as the bookmark. The only addition/tweak I made, was to add a very small anchoring picot at base of chain & trefoil on either side. This prevents the trefoil from possible flopping.

Books  in  Photo :
The Country Diary Book of Knitting by Annette Mitchell
The Stories of English by David Crystal
Tatting Technique & History by Elgiva Nicholls

@@@@@@@*********@

While checking the motif number, I noticed that my 2nd round of the 25 Motif Challenge comes to an end ! How time flies when one is having fun ! Most of my inclusions involved getting out of my comfort zone by learning something new, applying it, tweaking something,  or creating my own pattern. Time to start the 3rd round ? :-D

Motif # 25/II for 25 Motif Challenge 

My sincere thanks to All designers mentioned in the post
We have all gained due to your sharing 


Wednesday, 1 July 2015

Robin's Frauberger Bookmark

Pin It now!

Frauberger Bookmark
Original (1919) : Tina Frauberger
Reworked (2015) : Robin Perfetti


I was determined Not to be tempted, distracted, Until I had completed Renulek’s Wiosna that’d been left at a crossroad ! Look, I even had all the materials for the next mini project all ready & lying in front of me, but I persevered with temptation staring so directly in my face ! One day, 2 days, …. 
Could I resist ?
Well, yes & no. 
I resisted this new project & persevered with the doily. 
I saw Robin’s beautiful rendition of the Frauberger edging here. Fine, something to do down the line. 
But then she shared her pattern notes here !

Down went the doily shuttles, up went the bookmark shuttles ! Actually, I already had one almost full shuttle from my Mystery Doily project . Back to size 40. Easy to succumb on both counts ;-P


Thread : Anchor Mercer Crochet Cotton . Size 40
Yellow : 0302
Measurement : 7”x 2” 

Techniques : 2-shuttle tatting throughout
For Main Body :
CTM (if using single colour)
Concentric Circle/Onion Rings
Floating/Thrown rings (rings on chain)
Catherine Wheel Join (CWJ)
Frontside/Backside tatting (optional)
For Tail (WIP) :
Split Rings
Cluny Tatting
For Charm (proposed) :
Concentric Circle/Onion ring
Floating Ring
CWJ

The original pattern was published in Schiffchenspitze (1919) & can be downloaded from Georgia Seitz's Archive of Tatting Books in the Public Domain, here.

Robin has reworked the original stitch count . It works beautifully, lays flat & is very elegant. Thanks for doing all the hard work for us, And sharing :-)

  • It is a 2-shuttle pattern where ALL rings are Floating/Thrown rings !!!
  • Her pattern diagram shows 2 colours coding one for each shuttle. The point to keep in mind is that the colours denote which thread will show up, Not the Core thread. (that created a bit of confusion as I was tatting, because I kept thinking it was the core thread. The pattern was working Great, but the shuttle sequence seemed odd to me. But that’s just me being me).

  • The use of CWJs is superb !

The only thing I did ‘different’ here, was to have 7ds+CWJ for the left half part of concentric chain, & CWJ+6ds for the right side.

TIP : The outer concentric rings respond strongly to one’s tatting tension & other factors. Hence it is a good idea to tweak the stitch count to suit one’s tatting.


  • For FS/BS tatting, the portions in red in Robin’s diagram need to be directional (RODS). All the rest are tatted from the front normally. Indicated by arrows in above image.
  • RW : Work is reversed Only once for each repeat : When going from the completed onion ring to connecting chain . Indicated by thick arrow in above image.
UPDATE (March 10, 2017) : click here for a stepwise pictorial applying this pathway to a similar situation/motif.

Oops ! One missing ring in the turning repeat !
Should I cut it all off ? Wait ... read on

  • On day 2, I missed one ring at the turn of pattern (top right in image above). Since it was nighttime, I thought I’d snip off the portion & tat it correctly the next day. Some wise person (must’ve been a tatter surely) has said that one should sleep over a problem. And hey presto ! Next morning, instead of snipping & tying & hiding all those ends, all I did was a SSSR (single shuttle split ring) by joining auxiliary thread close to the picot (this can be finger-tatted, but I had some remaining thread in another shuttle ...) !!! So happy with the simple solution ! (SSSR in progress in image below) 
Using auxiliary thread & SSSR to add missing ring !


The pattern, as worked out by Robin, using 2 shuttles & floating rings, but no SLTs, is the Same as what Iris Niebach did in the TIAS Doily. Except that in the doily, each shuttle held a different coloured thread & one had to RW & SS to get the right colour. In both patterns, the designer mentions the thread that will show, irrespective of the core thread. So, if one can work through this bookmark, they can very easily work through Iris’ pattern !

It’s odd that of all the lovely patterns Robin has shared, & I have downloaded/printed, the 2 patterns I did make so far have been from her pattern notes !!! The first one was her gorgeous Design Pattern Snowflake (which I tatted the very same night) & she gave a sneak peak of the pattern diagram here.  … Oh, and Both are in size 40 !!! What a coincidence :-)
This bookmark pattern will be uploaded by Robin shortly. 

Completed ! Can you spot the SSSR ?
I still need to make a tail & charm for this bookmark & have a pattern in mind. But it will take some time …. I intend to make a braid using Cluny tatting (Yay! I finally learned the basics last week) – giving me the much needed practice. For the charm, I intend to repeat the concentric/onion ring with trefoil.
I will post along with my thoughts/tips/tricks on Cluny Tatting . 

And in case you are curious .... yes, the Wiosna is finally over :-D


I seem to be on track on my 2015 resolutions for the most part ! Well, the Spring Doily will have to stay as it is - can't find the right colours to continue. And, instead of 2 snowflakes per month, I Have tatted quite a few earrings (single only), which will adorn the tree; after all, they're already hooked ;-P


happy tatting :-)
and thank you, Robin :-)


Friday, 26 June 2015

Mystery Doily

Pin It now!
* click for direct link to pattern (free membership)

Confession #1 : I would never have chosen this doily to tat, despite it’s simple beauty. I would’ve argued that it’s all simple rings & chains, nothing new to learn. Well, it Is after all a Beginner’s doily.
But I so wanted to try out a doily in size 40 thread, after seeing all those lusciously dainty laces belted out by many of my talented fellow tatters. (Many in size 80 , 100, .... I can't even count beyond that !) But 40 is as far I can go for a large project).
So this seemed like the perfect opportunity. A beginner’s doily pattern being revealed in stages…. The Tat-Along began on June 1st & the last (9th) round was revealed on June 21st.


Confession #2 : I Love it ! I enjoyed it all through … waiting eagerly for the next clue. And I am so happy I made it. 
Also, now I’m hooked to size 40, at least for larger projects. (I Will need to finish off my huge size 20 & 10 stash, but those will be for smaller projects). The doily looks so delicate & dainty to touch. Perfect !

Threads Used :
Anchor Mercer Crochet Cotton size 40 .
Brown : 0355
Yellow : 0302
Colour choice was by default. I don’t have many to choose from in this size, & these 2 were bought back in 2002 for a different, large project, that barely got off the ground.
Measurements at end of each round are given under respective image.

Techniques involved :
Single shuttle & ball tatting ; Lock Join .
The pattern can be needle tatted easily, as many participants did.
Optional techniques : beads, decorative picots, split chain, split ring .


A Few Notes

  • This 9 round pattern is by an Unknown designer, but presented in modern format by Kersti. She uploaded 2 versions for each round : a Beginner’s version & an Advanced version, accompanied by diagram. She also indicated joining picots & decorative picots.
  • Accordingly, I made the decorative picots longer , but graded for most rings & chains. No picot gauge (I don’t like the pauses). The graded effect is not clearly visible, especially in photographs ; but it made the process more interesting.
  • The pattern mentioned Tie & Cut after each round. This can be avoided by use of split rings or split chains easily. However, I largely stuck to tie & cut this time …. It was so Easy to thread a normal crewel needle & sew in the tail ends ;-P
  • And I also used Weaver’s knot (tatman’s video) when adding thread. Unlike size 20, in size 40, it just does not show !
  • I adjusted the stitch count in a couple of rounds to avoid cupping/tightening. Details under respective photo.
  • Frontside/Backside tatting throughout.
  • I am generally very pleased with the long chains in size 40. I used size 20 thread in Renulek’s Wiosna here (notice the black chains ?!), & I never know how much to snug the stitches …. If I do it too tight, well it buckles; if I leave it a bit slack, then the chain slackens even more later ! But with size 40, there is less elasticity in the thread, & one cannot over-tension the stitches !
  • It was the perfect foil to Iris’ TIAS doily which I was tatting simultaneously (along with other new learning/projects) ; with the added advantage that this simple pattern could be tatted while watching the Roland-Garros French Open & Gerry Weber Open ! But I Did have to keep a magnifier at hand Always ;-P

The Rounds !

Round 1 : Measures 1½” across

                      Round 2 : Measures 2” across. Forgot to take a photo. No need to tie & cut after this round.

Round 3 : measures 2¾”/ 7cms across 
At this stage, it looked like the centre of a Sunflower ! 
So I switched colours, took a leap of faith & decided to go with solid yellow for the ‘petal’ effect. 
Round 4 : measures >3½” or 9 cms across
Round 5 : measures 5” across. 
Halfway along, the round felt slightly tight . Thenceforth, I added 1 ds to the chains.

Round 6 : measures 5¾” across (15 cms)
 Neater double chains …
I was unhappy with the long 'double' chain joins in this & the previous round. 
A tweaking experiment was called for! I reduced the stitch count by 1ds on the returning chain (7ds instead of 8ds), and was pleased with the result! The before & after are visible in the image from the white oval point …


Round 7 : measures 7” across 
Changes made to double chain as indicated in previous pic.
 Colour Choices 
With only 2 rounds remaining, I wanted to bring back brown. But wasn’t sure where to use it. 
Did a quick coloured sketch with 2 options & asked my DH. He went traditional & chose brown chains.
Round 8 : measures 8” 
Added 1ds to chains to avoid tautness.
This could well be a final round, especially with the brown acting as an outline, bringing it all in.
Round 9 : measures 9½” across . 
Added 2 ds to ring where it joins between the chains of previous round. Worked well.
Also added 1 very small picot to anchor the long chains between adjoining scallops.
Some of the graded picots in most rounds are visible here.
************

So that's it ... the ta-da... moment. LOVE the scalloped edging !

I should’ve ironed it … but was too lazy – heavy weather here ;-(

That’s it for the present. I hope my Doily-Mode lasts a tad longer so that I can finally complete the Wiosna .


happy tatting

Motif #24/II  for 25 Motif Challenge