Friday, 22 May 2015

Curled Ring final options and a free pattern

Pin It now!
Jewelry Medallion (free pattern)

Curled Rings Options (Final)
 
As promised, this is the last post on the subject. Thank you, dear readers, for your immense patience & support. There are many more ways these rings can be used to great effect. It is up to you to discover them now ;-P

I. Large Ring    
A simple coaxing will make the large ring turn into figure ‘8’.
When curled up (picot folded from front to lie over the base of ring)
Curling behind gives a better shape 

II. Large Ring with offset picot   
‘Normal’ curl leads to an asymmetrical cup with great potential for 3D applications. 
Think of a bead within ! Or if picots are added, then these can be joined later to other elements.
Or coax the ring into an '8' & curl. Interesting effects ! 

Both the large rings (I & II) were used in the pendant I shared here


III. Bead at Base of a Curled Ring (outside) :


This is how I added a bead at the base of rings in the Curly Cross Pendant :(all beads shown with an asterisk in the notated pic in post).  The Curl & Bead are made at the same time, with a single join.
Please note : There may most certainly be better methods suited for this. I hope to improve as I learn more. This method is something I figured was working fine (I had the bead exactly in the spot I wanted) without causing me to loose focus hunting around.


IV. Bead inside a Curled Ring

Just as one would for a normal ring, the bead is held at back of thread around the hand 
& brought into position when the ring is closed. Curling is done, as usual, later.


V. Curled Ring around a Split Ring

Ninetta has used these in her bookmark tail, here. 
She recommends leaving a length of thread space to continue between the SR & CR.


VI. A Curled Single Shuttle Split Ring (SSSR)
Since the bracelet was already made, I used some auxiliary thread to add an SSSR & curl it, 
in order to get a toggle here. 


VII  Inverted Tatting Curled !!!
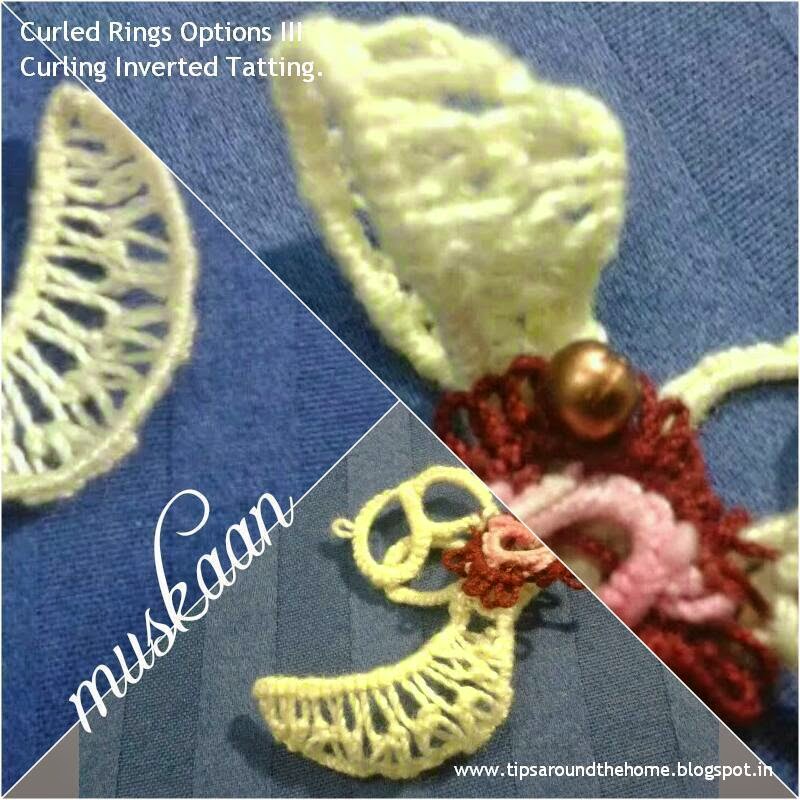
Simply experimenting with the curled look. Makes for a gossamer petal ! 
Definitely going to use this in future 3D projects

ooooooooooooo

My final thoughts / observations

As with so many techniques, some factors are universal, to bring out their real effect & aesthetics .. .

Thread Colour :  Lighter shades if using a single colour . Variegated ?
Thread Size : Finer threads – upto size 20.
Joins : Choice would depend on colour(s) used, how the rings are to be curled, etc.
Eg. Lock join is preferable for free-standing multiple curled rings, since it provides greater stability.
Adjacent CRs can be joined to each other like normal rings, as well as to other elements through the inclusion of picots . eg. the Jewelry Medallion, etc.
Picot Length : Small picot preferable. I experimented with longer picots, but it did not work out. However, I still believe, if done correctly, it should work. Experimentation for the future.
Rings : Split Rings,  Josephine Rings, small rings (less than about 20ds) will be difficult to curl, if at all.
Sides : There is a distinct front & back side in curling. For Curl Over rings, it does not matter much & convenience is paramount. However, in Curl Around , etc. care should be taken ; here, the curl should be from back to front, such that the picot is lying above the base. The difference is clearly visible in the mistake (shown within ring) I made in the golden Curly Cross Pendant .

Notation for Ninetta's Curled Rings :In response to a thread in Craftree, Judith Connors points out that these curled rings are “more of an effect than a technique”. Hence notation/direction can be added after the ring count, with an explanation for the type of curling used either there, or in the glossary.
eg. R : 12-12. Cl. CR  or    R : 6-6-6-6 . Cl. Curl Around chain.  [Cl – close ring ; CR Curl Ring]

For a great tutorial on how to make a Curled Ring from the master designer herself, check out the Curled Rings Pendant lissted in the Patterns page on Ninetta's blog.
ooooooooooo

Jewelry Medallion
a free pattern
A very simple, beginner's pattern. I am, myself, just starting out with beads & have probably used some very basic methods. Although yet to try any of her gorgeous patterns, I am certain this medallion (especially the placement of 4 silver beads) was inspired by some of Corina Meyfeldt's pieces.
Click to download pattern in pdf format :  Jewelry Medallion   
UPDATE : The pattern now has a diagram to go with it . You can download it here : Jewelry Medallion [Earrings]
In order to add findings to the tip of a diamond arrangement of beads on a ring, here is a pictorial 
Hope you enjoy the pattern & share or give feedback 


happy tatting :-)


Motif #20/II for 25 Motif Challenge

Related Posts : my 3D pendant

Saturday, 16 May 2015

more options & a curly pattern

Pin It now!
O, the layers hidden in a curl !!!
Who would've thought that a simple experiment to showcase the various styles/effects/options of Ninetta's Curled Rings, here would lead to a pattern as well as a serious learning of some basic bead-adding methods ?!
As you scroll down, you will see for yourself how the pattern emerged from randomness.
But first, to continue with a few more effects (that have been used in the pendant) 

(click on picture for larger images & slide show)
OPTION  4
Curl Features : Onion Ring, Up , Out ,  Lock Join 
Onion Ring
Curl Up (ring tip lies over ring base)
Curl Out (the cup-shape is outward facing)
Lock Join
TIP : I find that a Lock Join works better at times, as when curled in Option 4, 
& especially since an onion ring is 'heavier'/bulkier & here it is 'free-standing'.
Ninetta has made exquisite use of this option in her edging with curled rings here. In fact, the onion rings in her clover fold upon themselves, with no chain or ring in between.
I used a triple Onion ring to act as a hook for my pendant here

OPTION  5
Curl Features : Onion Ring, Up , Around , In , Picot Join 
Onion Ring
Curl Up (tip of ring will lie upon the base),
Curl Around
(ring being curled around a chain)
Regular Picot Join,
Curl In
(the cup-shape faces inwards)
Bird's-eye view of 5 styles/effects of Curled Rings
Ninetta has used this along the entire outer edge in her bookmark pattern here.  
Also used in my pendant in round 2 - the 2nd ring, in the middle of 2 large rings.

OPTION  6
Curl Features : Multiple Rings around single element
Up , Around , In , Picot Join  


2 Curled Rings around a single larger ring.
I curled 3 single rings around a single larger ring in the Curly Cross Pendants
6 Options depicted so far.
And does it not look like a cross ?! 
No option but to create a pattern ;-P So here it is ....

Curly Cross Pendant
© muskaan  May 2015

I will share the written pattern in pdf soon. Till then, here's the notation in the pic below.
I will upload pictures of how I added the beads at base of curled rings (shown by red asterisk) in a later post. More for my own records coz all of you are already adept at adding beads :-)
However, the tutorials I used were these : 
Karen Cabrera’s Lesson 100 (how to add bead in center of rings)
Jane Eborall’s Placement of Beads in Work 


Pattern notations for Curly Cross Pendant
I hope you like the cross pendant. This one, worked in AMC size 40, measures 2½” x 1” . 2 beads are loaded in Shuttle 1, 1 bead in Shuttle 2, & 6 loose beads.
The gold one above, worked in size 20, measures 3” x 1½”. But there are a few errors in it ....

UPDATE : Curly Cross pattern, with beautiful stepwise pics published in De Frivolité(k)ring 2017 #2 (34)
  
happy tatting :-)

Motif # 19/II for 25 Motif Challenge

Related Posts : Concept of Curled Rings

Wednesday, 13 May 2015

Tatting Tutorial : Curled Ring Options

Pin It now!
Curled Rings . 3 Options
Bird's eye view of 3 Options - front & back
Finally starting with the pictorials on some of the options/variations on how to make the Curled Rings pioneered by Ninetta, and the resultant effects. For the most part, the pictures, & notations therein, will do the talking . And for quick referencing the terms used, I am copy-pasting a part of the previous post on concepts here. It relates to the minor differences in making the curl, joining the curl, the final look of the curl, etc.
(Please note : the terms below are for reference & not necessarily part of the tatting lexicon unless it catches on.)
  • Curl Up / Curl Down : Is the tip of the ring (picot) brought up to lie over the base when curling ; or is the tip folded in downward direction so that the base lies on top of the picot when joining ?
  • Curl Over / Curl Around : Does the ring curl over itself or does it curl around a chain or ring, thus encapsulating that element?
  • Curl In / Curl Out : Does the curl face inwards or outwards ? Usually, a Curl In encapsulates an element.
  • Join : Curl can be anchored using a Normal Picot Join, Slope & Roll Join, or a Lock Join.
  • Curl can be Single or Multiple – in the sense that the curl/join is made through a single picot (normal ring, onion ring, split ring) or the join is made through several rings simultaneously.
♤ The initial options have more detailed steps, which will peter out going forward to avoid repetition.
♤ There is no particular sequence that is being followed. Just trying to cover as many bases as possible in some cogent fashion.
♤ 2 colours have been used for clear distinction & demarcation of elements, joins, etc.
♤ Stitch counts are indicated for each element/round, for practice purposes.

OPTION  1
Curl Features : Down , Over , Out ,  Lock Join , Multiple

Curl Down (folding ring downwards), 
Curl Over (folding on itself)
 Images 3 to 6 are views from the back, to show the join at work. 
Curl Multiple (3 rings being curled & joined together)


Lock Join (through 3 rings simultaneously)
TIP : A Lock Join is preferable in this case, as it will secure the multiple rings firmly in place.

Image 7 shows the curled rings from front. 
Curl Out (rings curling/facing outwards)
I used Option 1 for the brown center of the Pendant here, except that the 3 rings were not joined to each other.


OPTION 2
Curl Features : Up, Over, Out, Picot Join , Single


TIP : A Slope & Roll Join could also work in 2 coloured tatting, to avoid colour blips !
I used Option 2 for the calyx in the Morning Glory flower, here.

OPTION 3
Curl Features : Up, Over, In, Normal Picot Join , Single


Ninetta has photographed this option in her earring pattern here.
UPDATE : 
This style is demonstrated by Karen Cabrera in Lesson 145 here. She calls them Folded Rings. 

Did you notice or have an Eureka moment for this last Option ?
Does it not strike you as being an attachment to previous round/row ?! We always use a picot for this purpose  ; and here, an entire ring is performing that very function, with a fashionable turn :-D
It's really that simple and brilliant . So while designing, if you forget to put a picot in previous row, but feel the need to join while working the subsequent row, you now know what to do !

That's it for this time. If you feel inspired, please go ahead and play & experiment & enjoy :-)
happy tatting :-)

Related Posts : concept