Saturday, 22 March 2014

Tatting a Doily - I

Pin It now!
      Renulek's 2014 Spring Doily/Napkin - My Work

Renulek started posting her pattern for the 2014 Spring Napkin/doily from February 10 onward. I got to know of it a week later & when I saw the photo with 3 rounds, I immediately liked the pattern & decided to follow along. 


My Interpretation / Conceptualization :

The major hurdle starts right at the beginning !!! What colors to use , where, when, ... which elements/rounds to highlight, which should go into relief.... Yeah, the traditionalists had it easy - with single white/ecru tatting all over :-))) Anyway, so all this went into how I chose & applied colors. To me, Rnds 2 & 3 looked like little flowers or petals going all around a central circlet of stigma & anthers. Hence the napkin began taking the form of a large Pink Chrysanthemum (read 'Peach') , intertwined with leaves, vines, stems .... I hope that has come through ...


Threads used, with Shade number

             
Note : Round 3, here, is circular. But one of the popular pins on my pinterest board, has the very same pattern (I haven't checked the stitch count yet) as a  Straight Edging / Bookmark  !!!


TIP : I'd like to share a great tip I got on InTatters (Comments #94 & 94) about why it is better to "tat the rings as true rings with the same thread used to tat the chains.... to keep the nice chain arches it works best if the core thread is a continuous uninterrupted thread that slips in the chain to adjust the tension. If it is rerouted up into the ring you loose that ability and it also breaks the continuous chain..." .     


I stopped at Round 8 for the present.
Reasons : 
1. Totally ran out of the peach color & this color is out of stock in the e-stores I checked. And if the official Shade Card is updated, then this shade is no longer being produced :-(
2. Didn’t know what to do with the doily. The size thus far, is something that can be sewn on to fabric, used as a table centerpiece, (or gifted) … & I can always continue in future.
3. I learned my lessons in these 8 rounds & wanted to get back to learning & familiarizing myself with tons of other techniques & tutorials

However, the doily, till Round 12 (& just one last round to go) looks so beautiful that I Am itching to continue….

I have tabulated my entire experience, with remarks & jottings, links to pattern for each round, etc. etc. in my previous post . It will be a kind of ready-reference for the future, just in case.

Thursday, 20 March 2014

Crunchy Dry-Roasted Nuts Without Extra Oil !!!

Pin It now!
Faced with hunger pangs & snack cravings between meals ?
Looking for healthy snack options ?
What can be healthier than dry fruits/nuts ?!

Roasted dry fruits/nuts offer a crunchy, tasty, high-fiber, healthy, easy-to-digest option to nibble on without any guilt. And one can avoid additional calories by Dry-roasting the nuts ie. without any additional fat/oil, while retaining all their natural flavors.

Here's how to :
Cooking time : 2-4 minutes (per 100-150 gm)  Estimated time.  
Standing time : 20-60 mins (depending on ambient temperatures)

All you need :
Nuts such as peanuts, almonds, cashews, walnuts.
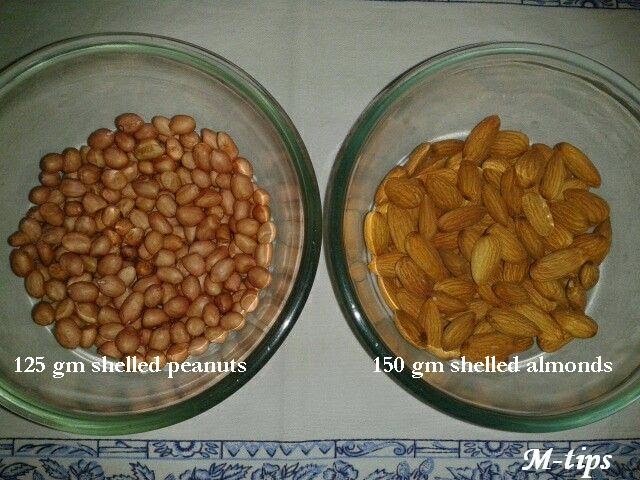
I used 125 gm shelled peanuts in one bowl & 150 gm shelled almonds in another bowl.
Microwave-proof bowl(s). (I used Borosil bowls.)
Any spatula / spoon / fork to shuffle the nuts
Seasoning & Dried Herbs (optional)

Put nuts in a microwave-proof bowl.  Place bowl in microwave oven.
Microwave at High/100% for about 2 minutes.
Remove bowl, shuffle the nuts a bit (for even roasting) & return to oven.
Nuke at 100% for another minute or so.
In case of almonds & peanuts, one can hear crackling sounds. That is the time to stop.
Remove, let cool completely. Add seasoning, spices, dried herbs.
Voila! Crunchy, all-natural, healthy nuts are ready to munch :-) 
Store in air-tight jars. These last for weeks & months.


Important Notes & Tips :

  • Always roast each type of nut in a separate bowl as roasting time for each varies (cashewnuts & walnuts usually take lesser time than almonds & peanuts.)
  • Avoid nuking for more than 2 minutes at one go, since roasting can cause smoke build-up in oven. Hence it is always a good idea to nuke in short spurts of 2 minutes for 1st round & 1 or less in subsequent stages.
  • Total time required to roast may vary with size & type of oven, water content in nuts, quantity of nuts, etc.
  • While roasting, the nuts do not become crisp after 2-3 minutes. However, since they Retain a huge amount of heat, the slow cooking/roasting Continues even After the bowl is removed from oven.
  • Standing time is extremely crucial since the tasting / cooking / crisping carries on well after the bowl has been removed from the oven. Ambient temperature will determine the standing time. If , after some time, you feel that the nuts are still not as crunchy, simply transfer the bowl back to the oven & nuke some more. 
  • It is a good idea to use a broad-rimmed bowl or container to microwave, since it has a larger surface area for the nuts to be roasted evenly. This, however, can be countered to an extent, by mixing/stirring/shuffling at intervals to bring the lower nuts to the surface ... 
  • No oil or butter is required. Nuts already have their own natural fat which is sufficient for roasting. However, if you like a little sheen or glossy coating, add a teeny tsp of olive oil by all means.
TIP : Sprinkle pepper before roasting for a stronger smoky pepper flavor.

One can season & flavor with choice dried herbs if required. I prefer without any salt, to savour the natural nutty, mildly sweet flavors.

TIP: Roasting nuts in batches in one go can save a lot of time & repeated effort of roasting handfuls. Then, after completely cool, store in air-tight containers or mason jars – they keep for a long time.
I store each nut in a different mason jar, to be used as desired. This gives me the option to mix a different combo of nuts or to use any choice of roasted nut as garnish in other dishes immediately.

Store dry roasted nuts in air-tight containers

TIP: After all nuts have cooled, one can mix in a few raisins, black currants, etc. too. Raisins can be dry-roasted in the oven as well. But do it on medium ~70% microwave setting. Keep a close eye on them. As soon as they start to bloat up, remove from oven. They will shrink back & crisp while cooling.

Yes, that’s all there is to it.
Now you will always have healthy crunchy munchies to snack on !

Monday, 17 March 2014

Vintage Embroidery Patterns I

Pin It now!

Abstract Floral Motifs 


Over the decades, I've collected a number of embroidery patterns from various sources & people. Some of these probably date back to the 19th century or very early 20th century ! I have a magazine page cutting dating back to 1934!  Hence, I trust there will be no copyright issues. I will provide the Exact source wherever possible, and will willingly include sources, if anyone can direct me to them.

At the turn of the millennium, I painstakingly carbon-copied each pattern on to notebooks/pads with grids. Then I went over the carbon lines with gel pen. I used a grid background in order to be able to enlarge a pattern easily. However, now technology has made it so much easier & quicker :-)

Here's sharing my first pattern sheet, along with my own embroidery samples ....


Circle o' Blooms


Pattern A from Plate #4 (scroll down to end of page)
Thread used : Silk thread 
Number of strands used : Single / one strand.
Hand embroidery stitches used : 
Buttonhole stitch for flowers ; 
a tiny Daisy stitch in black for center.
I added a few single satin stitches in between some buttonhole stitches wherever there was a larger gap.

This pattern is hand-embroidered on a handkerchief corner.
I machine-hemmed the hanky with decorative zig-zag in orange.

TIP : Making the blanket stitch lines of 'uneven' length, creates a nice, more 'naturalized' effect, besides filling up the area.


 Clematis 


Pattern E from Plate #4 (pattern below)
Thread used : Anchor Embroidery thread
Number of strands used : Single / one strand.
Hand embroidery stitches used :
Romanian embroidery stitch for petals ;
Satin stitch filling for center ;
Stem stitch for stems & vines ;
Fishbone stitch for leaves .

This is also a handkerchief corner, with zigzag machine hemming in purple.


Pattern Chart # 4

Abstract Floral Motifs 

These 6 vintage motif patterns are ideal for decorating corners for handkerchiefs, napkins, pillow cases, towels, etc.
One can also use them in bunches or spread in repetition to cover a large fabric.
Another use is in decorating quilt blocks.

I've embroidered patterns C, D, & F each, on corners of a table napkin set. No longer with me...

Vintage Floral Motifs


Have a nice day :-)
For more patterns, check out my pinterest board