Showing posts with label dry roasting. Show all posts

Tuesday, 29 March 2022

homemade oregano

Pin It now!

It is unbelievable how profusely and quickly the ajwain/oregano plant is growing! Something had to be done. I didn't want the leaves to grow yellow and wilt! And since the cooking experiments with fresh leaves didn't really work for us, drying the leaves seemed a good option. I do it for other herbs, too, but these leaves are thick and have a lot of water and needed a different approach. 

I snipped off a few twigs, rinsed and dabbed them dry on a kitchen towel. And plucked off each leaf.   

Time for the microwave. Placed the leaves flat on a stoneware dish. At 30%, nuke them for 2 mins, flip, repeat. Do it 1 or 2 times more till the leaves are completely dry. Tweak the time as required. Within a few minutes the entire bunch was dry and crispy.

TIP: In fact we can nuke and flip them twice, then gather the semi-dry leaves and after all batches are similarly done, gather all those leaves and give  or 2 final nukes till completely dry and crispy. Saves time and effort.

Crumble and store in air-tight container. I used an empty herb bottle. 

The one on the left is from my previous batch on the hot girdle. I was experimenting with about 8 -10 leaves and followed this Foods and Flavors video on How to make oregano seasoning - https://youtu.be/Zp6k29TSuSo (from 1.00 min onwards) She places each leaf on a warm flat girdle, flipping them frequently. It is fine for a limited number of leaves. But cumbersome for a bunch of twigs laden with leaves.

The colour is darker but would need to be made in small batches; each batch requiring the almost the same amount of time as the mirco-wave ones, along with constant vigil.

I've used the powder in salads, etc. and hubby likes it! Yay!

And this is how the plant is after 10 days! On the right you can see the the snipped twigs, while on the left the leaves are ready for picking and drying.  

Thursday, 20 March 2014

Crunchy Dry-Roasted Nuts Without Extra Oil !!!

Pin It now!
Faced with hunger pangs & snack cravings between meals ?
Looking for healthy snack options ?
What can be healthier than dry fruits/nuts ?!

Roasted dry fruits/nuts offer a crunchy, tasty, high-fiber, healthy, easy-to-digest option to nibble on without any guilt. And one can avoid additional calories by Dry-roasting the nuts ie. without any additional fat/oil, while retaining all their natural flavors.

Here's how to :
Cooking time : 2-4 minutes (per 100-150 gm)  Estimated time.  
Standing time : 20-60 mins (depending on ambient temperatures)

All you need :
Nuts such as peanuts, almonds, cashews, walnuts.
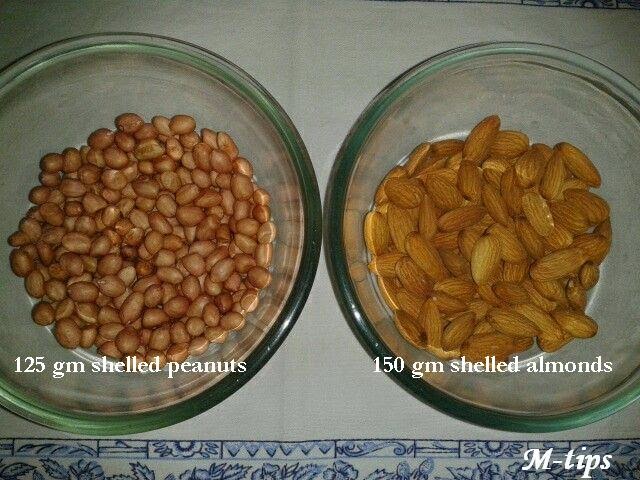
I used 125 gm shelled peanuts in one bowl & 150 gm shelled almonds in another bowl.
Microwave-proof bowl(s). (I used Borosil bowls.)
Any spatula / spoon / fork to shuffle the nuts
Seasoning & Dried Herbs (optional)

Put nuts in a microwave-proof bowl.  Place bowl in microwave oven.
Microwave at High/100% for about 2 minutes.
Remove bowl, shuffle the nuts a bit (for even roasting) & return to oven.
Nuke at 100% for another minute or so.
In case of almonds & peanuts, one can hear crackling sounds. That is the time to stop.
Remove, let cool completely. Add seasoning, spices, dried herbs.
Voila! Crunchy, all-natural, healthy nuts are ready to munch :-) 
Store in air-tight jars. These last for weeks & months.


Important Notes & Tips :

  • Always roast each type of nut in a separate bowl as roasting time for each varies (cashewnuts & walnuts usually take lesser time than almonds & peanuts.)
  • Avoid nuking for more than 2 minutes at one go, since roasting can cause smoke build-up in oven. Hence it is always a good idea to nuke in short spurts of 2 minutes for 1st round & 1 or less in subsequent stages.
  • Total time required to roast may vary with size & type of oven, water content in nuts, quantity of nuts, etc.
  • While roasting, the nuts do not become crisp after 2-3 minutes. However, since they Retain a huge amount of heat, the slow cooking/roasting Continues even After the bowl is removed from oven.
  • Standing time is extremely crucial since the tasting / cooking / crisping carries on well after the bowl has been removed from the oven. Ambient temperature will determine the standing time. If , after some time, you feel that the nuts are still not as crunchy, simply transfer the bowl back to the oven & nuke some more. 
  • It is a good idea to use a broad-rimmed bowl or container to microwave, since it has a larger surface area for the nuts to be roasted evenly. This, however, can be countered to an extent, by mixing/stirring/shuffling at intervals to bring the lower nuts to the surface ... 
  • No oil or butter is required. Nuts already have their own natural fat which is sufficient for roasting. However, if you like a little sheen or glossy coating, add a teeny tsp of olive oil by all means.
TIP : Sprinkle pepper before roasting for a stronger smoky pepper flavor.

One can season & flavor with choice dried herbs if required. I prefer without any salt, to savour the natural nutty, mildly sweet flavors.

TIP: Roasting nuts in batches in one go can save a lot of time & repeated effort of roasting handfuls. Then, after completely cool, store in air-tight containers or mason jars – they keep for a long time.
I store each nut in a different mason jar, to be used as desired. This gives me the option to mix a different combo of nuts or to use any choice of roasted nut as garnish in other dishes immediately.

Store dry roasted nuts in air-tight containers

TIP: After all nuts have cooled, one can mix in a few raisins, black currants, etc. too. Raisins can be dry-roasted in the oven as well. But do it on medium ~70% microwave setting. Keep a close eye on them. As soon as they start to bloat up, remove from oven. They will shrink back & crisp while cooling.

Yes, that’s all there is to it.
Now you will always have healthy crunchy munchies to snack on !