Sunday, 9 March 2014

Learning was Fun with TIAS !

Pin It now!

Lessons Learned from Jane’s TIAS 2014


I wrote about starting my Jane's TIAS 2014 journey in a previous post where I also gave reasons on how & why it was Fun learning from a Tat It And See project ! I included Days 1-8 there. Here are the rest of the photos - images from Days 9-16, along with some jottings about the techniques I learned along the way. At the end, I've listed a few links to tutorials that came in handy.


CTM - Continuous Thread Method                     

Flowers in an open box !

I got the lengths right Only once ;-/ . I had a tendency to use slightly longer thread than that called for, in fear that the exact measurement Might prove short for me.
Anyways, longer is better than shorter ….

How to make SRs - Split Rings

Oh, Jane gave us huge practice with SRs ! And all fear of SRs vanished.

The main & probably Only point to remember is : Keep the core thread Taut when working the second half of SR. If thread remains taut, the stitches will Automatically remain Unflipped !

More than just learning this technique, I gradually came to see
how they’ve been applied, how & where they can be used,
how to avoid tie & cuts after each round/row, & so on.
The possibilities are endless !
And now I go about de-constructing all patterns much more easily
than I could previously.  


How to join the 2nd half of SR

This wasn’t very difficult once I got to managing how to handle the SR. After all, the concept is essentially the same. It is fun to kind of 'hear/feel' the stitch go "pop", thus confirming that it is now free to slide over the core thread.
Initially, I had to check each time to confirm that the core thread moved freely, but soon this check was not required.

SCMR – Self Closing Mock Ring

Another first for me. I had huge fun doing this. Pretty simple actually. I noticed that I didn’t really need to attach a pin/clip or hold the loop with my little finger – once I’d made the first ds carefully, I could leave the loop ‘hanging’and continue with the mock ring without fear of the loop closing !
Piece of cake this one !

Could make a broad border !

CWJ – Catherine Wheel Join

Now this was tricky at first. Had to unravel many times. Even when I got it right, it was like a stroke of luck, without any clue as to how it really turned out fine. That was when I decided to start a 2nd piece alongside so that I could practice more.
After a few trials, I understood the concept & then it was easier &
I got along without constant referencing to diagrams.
Unfortunately, after a few weeks, I now have to refer
back to the diagrams again.


LJ – Lock Join

This is nothing to write home about. Very easy. I’d been doing this for ages without knowing that it had a ‘name’.

How to avoid Color Blips

Okay, I’d never been bothered about color blips before.
But as I completed the last part (mast), the blips
glared out accusingly ! However, there were also some blip-free joins. That got me thinking & experimenting … and I discovered (too late to save my TIAS pieces) that it was very much possible to avoid all blips !!! I will share my simple technique in a subsequent post, along with pictures.


AND  THE  FINALE :

Correct version, except for color blips

Mistake in mast, hence added a flag to compensate

Some Useful Tutorial Links :

Saturday, 1 March 2014

Muskaan's Knit Top 2014

Pin It now!
My Knit Top 2014

Bored of the same old Rib Borders ?!
Wish to try some Patterned border for neck & arms ?
Read on …

Finally !!! My lone knit project for 2013-14 winter season is finally over ! This was a truly lean season as far as knitting went. And tatting is to blame ;-)) Anyways, with this project out of the way, & winters just on the verge of ending, I can take up tatting full-time, without any guilt !

I created this design as a combination of 2 different patterns that kept alternating in strips :
Broad strip : Pattern Chart #192 from The New Knitting Stitch Library by Lesley Stanfield
( 23 stitch & 6 row repeat )
Narrow strip : Pucker Cable stitch  ( 5+3 stitch & 4 row repeat )

Yarn : Vardhman Little Angel (baby wool)
White : Shade # LAL065
Blue : Shade # LAB026

Needles :
UK #12 for waist border (rib stitch) 
UK #10 for main body And neck & arm borders.

I tried out some new techniques which I’m listing for all my future projects since one cannot rely fully on one’s memory ;-))

1. Slip Stitch at beginning of Each Row.
I’d always had trouble imagining How one could keep slipping a stitch Without knitting it. But, this time, I gave it a go & boy was I amazed & hooked at the result !
Loved the smooth, even, neat edge that this created !
And so very easy to sew the panels together because each stitch is distinct.
Invaluable for knit blankets, etc. even if one does not want a separate edging… If only I’d known then !

2. Hiding the yarn ends.
This time I tried out a new method for hiding the tails. I can’t find the exact source (will add link when I come across it again). Instead of going in a U formation through stitches from the back, I sewed the tail, in sinusoidal fashion, along each half of a knit stitch – for a distance of 1-2 inches.
This technique is especially useful for Lacy patterns such as this where there are spaces in between.

3. Pattern Borders for Neck & Arms.
As the main knitting came to an end, I couldn’t bring myself to add the usual Rib stitch borders to neck & arms. Instead I tried something new by using the Pucker Cable stitch pattern as border.
I added 1 more stitch, thus casting on 9 stitches instead of 8. This extra stitch served as a smooth straight & even outer edging (selvedge?). Again, 1st stitch of each row was slipped.
After trying out the patterned border with both #12 & #10 needles, I decided to go along with the latter & adjust the tension while sewing.

TIP : The extra stitch for selvedge needs to be on Opposite sides for respective arms : On the right/starting end for right arm border & on the left/last end for the left arm border.


4. Separate Strips for Neck & Arms.
I have always picked up stitches (or included the ones left on holders) along the neck & arm line. This time, since I went in for the patterned border, I had to knit each strip separately to required length & then sew them on to the sweater edge.
I used just the slightest bit of tension while sewing the strips since these were also knit with #10 needles as the rest of the sweater.
Since I wasn’t very sure of the exact length ( I’m Always bungling there ), I began sewing Before the strip reached it’s final length, so that I had enough play to add the rows required before casting off.


5. Color Coordinated Border for Arms.
I doubt an all white strip would’ve looked good with the blue part at lower ends of each arm. Using an all-blue strip would’ve been nice for a younger person. But at my age, I wanted a bit more staidness ;-). Hence I had to make the arm strips using Both colors along the respective lengths.


One thing I did Not do, which I should have :
Mitered Corners for the Square Neck !
I was in too much of a hurry to just complete this project – it has been a WIP almost the entire season. So, not having done a mitered corner ever before, And having to deal with a pattern to boot, I developed cold feet at the prospect of learning & applying mitering to the neckline border strip.
I settled for ‘mitering’ while sewing on the strip ! It obviously added a triangular bulk inside, but who’s gonna see ;-)))

Task for next season : Learn to miter the corners, especially as my next project is going to be Quilt/Afghan #4 !!!


Just one last point. The use of 2 colors brought out the natural waviness of the pattern, creating a sinusoidal yoke naturally , instead of a boring old straight yoke.  Here is another picture of the full blouse (yes, I wear it with a sari !) - the back view.

My Knit top/blouse 2014

The New Knitting Stitch Library by Lesley Stanfield 

My favorite go-to book for knitting patterns !
There are over 250 Charted patterns, categorized into knit & purl, Cables, Laces, etc. etc. 


Adieu to knitting till next winter :-)

Sunday, 2 February 2014

Tatting Tutorial : Closing the Gaps -I-

Pin It now!

Closing the Gaps in Shuttle Tatting : 

"OTM" : Overlap, Tug & Manoeuvre Technique 

Annoyed at 'gaps' between tatting elements ?
Can't get the elements lined up closely ?
Suffer from gapsosis ?

We have All faced this problem, especially when learning to tat with a shuttle ! With practice, conscious effort, & individual inventiveness, this can be overcome for the most part. But it can still sneak up on us if we let our guard down for those brief moments !!! 

I have been tatting solo ever since I learned how to tat - about 3 decades ago! Consequently, I had to develop my own ways & means to improve & keep pace with the pattern. Over the years, I successfully conquered this nagging gap issue by my "OTM" method (I've coined the term especially for this post!). 

I never thought much of it, until I came across a query on InTatters about inadvertent space left between elements when tatting with a shuttle. Experienced tatters have chipped in with tips, advice, & tutorials. I thought I'd add my 2-bits as well, captured in photographs. Verbal explanation is not always enough! I'd have preferred to upload a video, but working alone, I could manage only snapshots. Hope it will be of some help at least to beginners. 


Now, for my well-entrenched & personally successful technique - I think I'll call it 
"The Overlap, Tug & Manoeuvre " or "OTM" !

I have tried to show how to close the gaps in 3 situations :
1. when making a chain after a ring
2. when making a ring after a chain
3. when making a ring after a ring.
(please excuse the quality of pics & the horribly intrusive thumbnail!):

I . From Ring to Chain :

Image I-A : After making the ring (in blue #20), the work is reversed (RW) & one is ready to make a chain using a contrast color thread (peach #20).

I-A. Starting a Chain after Ring

Images I-B & C : Make the first half of ds (FHS), extremely close to base of ring, almost overlapping the thread to the ring. ( Unable to show in still photograph, but the chain thread of FHS can be held in an overlap position in a pinch & the threads pulled - tugged & manoeuvred till the FHS is in place )
Then carefully, & slowly, pull the thread tight to close the FHS. If required, fidget with the shuttle (blue) thread to bring the half ds Flush against the ring - as close as possible!
When you are satisfied, pinch this half stitch & ring base tightly between your thumb & finger before you continue, so that the position is stabilized & maintained.

I-B. Manoeuvre FHS to base of ring
I-C. Tug, position, pinch/hold


Images I - D & E :
Now make the second half of the ds (SHS) & bring it close to the first half without messing with the position. ie. keep a tight pinch till the second half is extremely close to the first half, the 'close' & tighten it. Remember, tighten Only After you feel it is in the right position & the earlier half has not moved at all.
This explanation may seem more complex than the actual working; and with a little practice, it becomes second nature !

I-D. Complete the ds
I-E. Chain after ring with no gap!


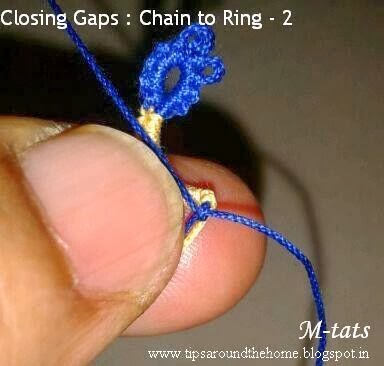
II. From Chain to Ring :

II-A. Overlap Ring thread to Chain End
I think this is much much easier.
Once the chain is made & tightened, one can start the loop of the ring from the very tip, overlapping the
chain slightly. Then start with the first half of the ds over this 'overlapping' loop.
Make it loosely, position it Flush against the chain (keep tugging & manoeuvring till you feel that the ds has reached the end of chain & has no more place to move). Only then, tighten the FHS; keep a firm grip over this
half ds between thumb & finger, & make the SHS, thus completing 1 ds of  ring. Remember, tighten Only when in position.


II-B. Start ring with overlapping the chain
II-C. Flush FHS against chain & hold tight


II-D. Make SHS, position & tighten.
II-E. No gap between Ch & R


TIP : Whenever one tats, it is extremely important to keep the yarn from twisting. If yarn twists, it becomes difficult to close a ring properly or to make the stitches correctly/neatly. The simplest way to untwist the yarn is to suspend the shuttle by the thread till it stops twirling around.

III. From Ring to Ring 

In the next post, since this is way too long already ! 
(Tatting Tutorial : Closing the Gaps -II - )  .... I will add the link later.

Now, a few more tips & links to what some other truly Experienced tatters have already done / shown / said in the same InTatters' Closing-the-gaps thread or elsewhere 
[Please note that there may be many more tips on other sites, but these are what I've come across so far. Feel free to add more links & tips in Comments] :
  • One superb tutorial is from Jon who coined the adorable & very apt term 'gapsosis'. I have been using this technique very successfully, for clovers, & larger rings or between continuous rings. It is truly ideal for clovers, etc.  (However, when working with a smaller & single ring & switching to a chain, I find this a bit difficult to apply. eg in my Waves edging. Instead, I fall back on my own method detailed below)
  • Through pinterest, I stumbled upon another great pictorial comparison of frontside/backside tatting . If one is just beginning, this, too, will prove a valuable experience.
  • Making an 'extra' half ds before continuing with the pattern. (I like this tip & will definitely try it out next time)
  • Closing the ring very tight can cause a gap to appear in the next element. Hence avoid a tight close. ( I am sometimes guilty of this tight close. Must watch out !)
How do You tackle this issue ?