updated on May 13, 2017
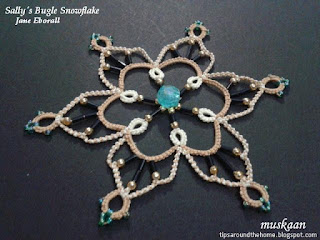
Sally’s Bugle Snowflake
Jane Eborall
Jane has been truly prolific with this lovely pattern,
displaying such a range of colour combinations on her blog. When she uploaded the pattern, I had to give it a go.
The highlights of this pattern,
to me, are the beads radiating in the centre and the lock chains forming a
lovely petal shape. Jane’s tutorial on how to add beads that face outwards
helped a great deal.
My Notes & thoughts
- 12 seed beads (size 11) are needed for the long beaded picot (LBPbug) in center. Since my bugle beads are shorter (4mm instead of ¼ inch), I used size 8 or 9 beads in gold, thinking that these would make up for the length.
- When loading LBPbug, make sure the loop for ring still slides.
- Also, managing the 5 LBPbug with dangling paperclips can be a bit tough. I had to make certain each time before joining to them in next round, that they were in the correct sequence and not twisted around. I did use different colored clips for each, to keep track of sequence.
- This technique for loading beads on a long central picot such that they radiate out, was first described by Frivole and also demonstrated here.
- These kind of reminded me of LTRORs (loop tatted ring on rings)!
- The central picot should’ve been more tightly snugged.
- As in my previous forays, I again used picot gauges for the LBPbug on chains (as seen in pic above). 2 sizes were required for the beads I chose – ⅜ inch and ⅝ inch. And this time I used thread to load the beads later (one of the many ways of adding beads in Jane's tutorial).
How does one gauge
the length of picot ?
Well,
load beads as instructed and hold with paperclip. Tat the next couple of
stitches. Then remove the clip and beads and measure. Voila . No hanging clips
getting in the way and slowing one down. Once the length is known, use the gauge for future beaded picots, adding beads only at time of joining.
And the added benefit is that one can usually use beads from one's stash rather than order new ones if the pattern calls for a size one may not have.
And the added benefit is that one can usually use beads from one's stash rather than order new ones if the pattern calls for a size one may not have.
- The lock chains could’ve been a tad longer for a more graceful curve as in Jane's snowflakes. One additional stitch would accomplish that for my tatting tension.
- The split rings are another spot of genius ! They look like thrown rings, but being split rings, they become well-anchored with an ever so slight broad base.
In order to hide the space in
center where some bare thread is visible, I placed a large crystal bead in center.
Doesn’t it perk up the flake even more ?!
Techniques used
: 2 shuttles, lock chain,
beads on central picot, lock join, picot gauge, beads on picots, split ring.
Many many thanks to Jane for all
her lovely patterns and tutorials
happy tatting always J


You've really done justice to Jane's pattern - gorgeous!
ReplyDeleteI was pretty satisfied overall, Jane, considering the central beads were a first and needed quite some management. Thanks :-)
DeleteThat looks awesome!! :)
ReplyDeleteI so appreciate your support, Sue :-)
DeleteThis is NOT the same technique as Frivole used so perhaps that's why you got a 'gap' in the centre and had to add a bead to cover it. I saw that somebody had problems with the space due to a gauge being used in Frivole's pattern (which I don't have, by the way) so found a way round that problem. Gauges are fine but not everybody tightens their thread in the same way so the results of using one vary. This technique is described here http://janeeborall.freeservers.com/BeadFaceOutwards.pdf and no gauges are used.
ReplyDeleteI forgot to include the link to your technique, Jane (I was distracted with a ‘teacher-tatter’ e-talk going on with 2 tatters separately, and missed out a few more sentences I’d had in mind to write ;-P), but the gap is solely my own clumsiness with beads and is no comment on your lovely pattern or using a picot gauge.
DeleteI didn’t use the gauge for the central picot ; only for the LBPs on chains later, which has always worked for me.
Ditto for the lock chains – I would’ve liked mine to be as elegant as yours are, but that again is probably because of individual tatting tensions and one more stitch for me would’ve worked.
Thanks again for sharing this lovely pattern and technique, Jane. I owe my first lessons in transitioning to modern/advanced tatting to you.
I am updating the post with link.
Hugs
Beautiful snowflake and interesting pattern:)
ReplyDeleteYes, Annetta, and I enjoyed tatting it :-)
Delete