Pin It now!
She Popped Out !!!
What can I say, look for yourself :
Isn't she adorable ?! As soon as I completed
the main pattern by Endrucks, I couldn't wait to tat her.
Some figuring out was required to tat her in one pass, since in the main pattern, she spans both rows partially.
All the tatting was done ages back. However, preparing the diagram & writing the pattern took a while. I was hoping to post it sooner .... still, hope this little angel brings joy & happiness to your homes & hearts :-)
Derived
from
* Click on names for respective pattern downloads
I am sharing a few process pics that I thought might help. The
complete pattern can be downloaded here.
1. After step #12, make a very small picot & turn back up to continue step #13. This is how it looks so far.
Rings A,B, & C are split rings. Rings D & E are thrown/floating rings.
I used CWJs in places where the chain edge was contiguous. However these can be substituted with Lock Joins throughout.
2.
1st of 6 pearl beads in shuttle 1 is brought forward after closing ring F. The concentric chain block to the right has fewer ds as compared to the left one since this curves inwards & one is tatting from the outside to the inner chain. However, I was still not able to eliminate the angularity. Any thoughts ?
3. Here, we have reached step #21 with a long beaded picot holding 18 beads & a chain or 9+9 below. The tatting in upside down wrt angel. Hold the 18 beads a bit loosely on the long picot, so that when joined, there is enough slack for a nice curve.
4. This is the complete diagram. Diagram is for the main version only. Version 2 has only a few changes, which are
detailed in written pattern .
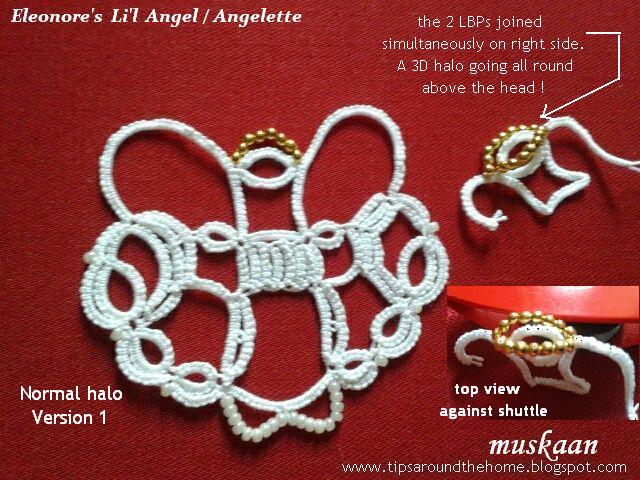
5. Main version of Eleonore's Li'l Angel done in size 40.
6A. Even as I tatted, I wondered if the halo could be made 3D, going all round the head. Above is the first solution I came up with - hold the beads in 2 long picots & then join them together in a single join, at the other side.
6B. This is how it looked in comparison with the original. The halo goes nicely over the head !
Note: I only tatted part of the wing & head as trial.
7.
Version 2. In this, I had to preload Shuttle 2 with the gold beads (unlike the previous trial in 6A,B where loose beads were used). The beads were brought forward in a picot-like fashion & tatting continued. On reaching the other (right) side, a normal join to this beaded ring was all that was required.
TIP : After the beaded 'picot' I made 1ds, then ring for head. However, this causes the halo to sit low down on the head. Instead, make 2ds or 3 ds between the gold beads picot & the head ring. Make the same adjustment while joining on other side. It will have an added advantage : the complete halo will be visible !
8. Trying to show the complete halo in Version 2. I added graduated picots to the wings in this version. Makes the wings a bit more interesting, I think.
The Li'l Angels measure just over 2"x2" in size 40 thread.
Hope you enjoy the patterns. Feel free to contact me for any questions or help ...
Happy
Tatting :-)
♫♫♫♫♫♫♫♫♫♫♫♫♫♫
I still have a few snowflakes to blog about, as well as a few "new" effects I've been trying out sporadically over the past few months. May be a sneak peek of the latter before the year is out, till I develop them further, ... but days are short & cold :-(


Very avant garde angels! Thanks for the pattern which look like a lot of work!
ReplyDeleteInteresting you should say that, Jane, for a pattern derived from a vintage pattern :-) Kudos to the designer who could span these decades !
DeleteThe tatting doesn't take time, although one does have to refer to the pattern frequently.
Lovely angel :). Thanks for sharing the pattern :). I think I might need a year off just to tat patterns or try new techniques from your blog :). Keep them coming :).
ReplyDeleteThat's exactly how I feel, Jenn, when I browse through many sites/blogs - there is a Wealth of patterns, ideas, tweaks, inspiration & creativity that has been shared & we hardly have time or lives to do it all :-)
DeleteNice angel!! :)
ReplyDeleteThanks, Sue :-) You are enjoying a very productive tatting spree yourself :-)
DeleteVery cute will look great with an angel collection too. A must have for any tatter!
ReplyDeleteNow that's an idea, Carollyn ! :-D
DeleteYour tatted Angel is precious. I have yet to learn either needle or shuttle tatting. Maybe this year.
ReplyDeleteThank you so much :-) I'm sure you will be just as creative with tatting as with quilting, etc. There's always a race against time for any new learning/venture ....
Delete((Hugs))