Monday, 21 December 2015

angelette pattern

Pin It now!
She Popped Out !!!

What can I say, look for yourself :
Isn't she adorable ?! As soon as I completed the main pattern by Endrucks, I couldn't wait to tat her.
Some figuring out was required to tat her in one pass, since in the main pattern, she spans both rows partially.
All the tatting was done ages back. However, preparing the diagram & writing the pattern took a while. I was hoping to post it sooner .... still, hope this little angel brings joy & happiness to your homes & hearts :-)

Derived from 
* Click on names for respective pattern downloads


I am sharing a few process pics that I thought might help. The complete pattern can be downloaded here.

1. After step #12, make a very small picot & turn back up to continue step #13. This is how it looks so far.
Rings A,B, & C are split rings. Rings D & E are thrown/floating rings.
I used CWJs in places where the chain edge was contiguous. However these can be substituted with Lock Joins throughout.
2. 1st of 6 pearl beads in shuttle 1 is brought forward after closing ring F. The concentric chain block to the right has fewer ds as compared to the left one since this curves inwards & one is tatting from the outside to the inner chain. However, I was still not able to eliminate the angularity. Any thoughts ?
3. Here, we have reached step #21 with a long beaded picot holding 18 beads & a chain or 9+9 below. The tatting in upside down wrt angel. Hold the 18 beads a bit loosely on the long picot, so that when joined, there is enough slack for a nice curve.
 4. This is the complete diagram. Diagram is for the main version only. Version 2 has only a few changes, which are detailed in written pattern .
5. Main version of Eleonore's Li'l Angel done in size 40.
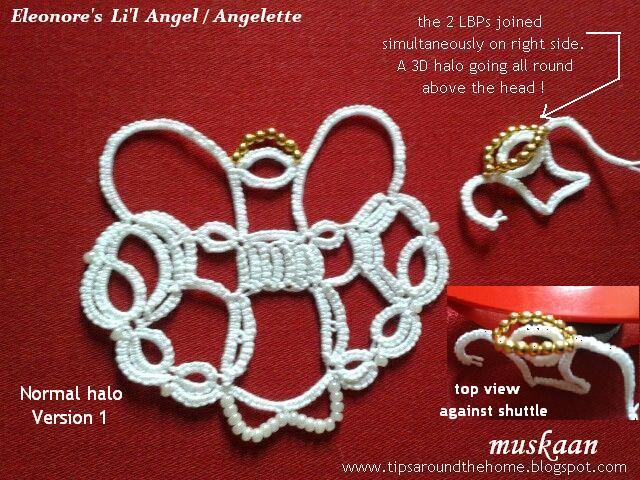
6A. Even as I tatted, I wondered if the halo could be made 3D, going all round the head. Above is the first solution I came up with - hold the beads in 2 long picots & then join them together in a single join, at the other side.
6B. This is how it looked in comparison with the original. The halo goes nicely over the head !
Note: I only tatted part of the wing & head as trial.
7. Version 2. In this, I had to preload Shuttle 2 with the gold beads (unlike the previous trial in 6A,B where loose beads were used). The beads were brought forward in a picot-like fashion & tatting continued. On reaching the other (right) side, a normal join to this beaded ring was all that was required.
TIP : After the beaded 'picot' I made 1ds, then ring for head. However, this causes the halo to sit low down on the head. Instead, make 2ds or 3 ds between the gold beads picot & the head ring. Make the same adjustment while joining on other side. It will have an added advantage : the complete halo will be visible !
8. Trying to show the complete halo in Version 2. I added graduated picots to the wings in this version. Makes the wings a bit more interesting, I think.
The Li'l Angels measure just over 2"x2" in size 40 thread.

Hope you enjoy the patterns. Feel free to contact me for any questions or help ...
Happy Tatting :-)

Related Posts : Eleonore's Angels

♫♫♫♫♫♫♫♫♫♫♫♫♫♫

I still have a few snowflakes to blog about, as well as a few "new" effects I've been trying out sporadically over the past few months. May be a sneak peek of the latter before the year is out, till I develop them further, ... but days are short & cold :-(


Wednesday, 16 December 2015

Sparkle pattern

Pin It now!

Snowflake  Sparkle

For this pattern, I’m trying something a wee bit different. I will upload a proper pdf in my Patterns page after a few days. And being a simple pattern, I have put it all in a one-page layout inspired by the style of some designers. This gives me an opportunity to proofread & correct any late changes to pdf (which I always seem to need), while still being available to anybody who wishes to give it a tat.
Center ring is a self closing mock ring (SCMR) with twisted picots alternating with very small picots. Climb out with a mock picot, the same size as the previous vsps.
One can avoid SCMR & make a normal ring instead. But in that case, load all 6 gold then 18 silver beads on to shuttle 1.
Tutorial for Twisted Picots here.

No RW, but SS where required. Tatted in one pass in clockwise direction.
Twisted picots in 2nd round chains are of different lengths for a bursting-out effect.

Following Frivolé’s recent tip to capture the sparkle as well as the gold & silver beads.
Tatted in size 40 thread, the finished snowflake measures 2" from picot tip to tip & 1" from ring tip to tip.

As one progresses, the long picots do tend to come in the way, making it a bit fiddly to handle.
Some stiffening will be required obviously . This is not stiffened yet.

And what if I stiffened it in this whirled fashion ?! It reminds me of the spinning wheel firecracker, or a cosmic phenomenon . It could be used as a symbolic motif for Diwali, with the use of multicoloured beads !

Here is the concise layout of pattern & the pdf download for easier printing


Many thanks to Robin for her Excellent Inkscape tutorials ! This was drawn after reading & applying part 1 (11a) of her latest in the series here. I think the diagram has emerged much better than all my earlier drawings, right ? I have been exploring a teeny tiny bit, but still a lot to learn from the Master.

Play out your own variations & hope you share a pic or link & any feedback . In case it is not possible to print out the pattern, feel free to leave a comment & I will convert to a pdf download.

happy tatting :-)

Motif #15/III for 25 Motif Challenge


Related Posts : Twisted Picot Tut


Monday, 14 December 2015

Flakes n Flowers

Pin It now!

Snowflakes - “The Flower Within”

Snowflakes are beautiful. Tatting patterns of snowflakes are beautiful & enticing. Hidden within these cool snowflakes can be a spring flower to warm the heart ! This is my attempt to keep spring alive during the cold winter months.

♪¤☼¤♪♪¤☼¤♪♪¤☼¤♪

(click on asterisk for link to pattern/site)
Anchor #40 . White & Aqua Blue 4054-0185
Rnd 1 :1¼”    ;    Rnd 2 : > 2½”    ;     3½” tip to tip

I try to avoid using SLTs. But that creates a problem if one wants to customize the placement of colours. After 1st round (the picots are not even enough, hence the swirl), I planned on using 3 shuttles with some encapsulation to hide the unwanted colour. Doable. But the mood left me – perhaps another time. I ended up continuing a 2nd round with only the aqua blue chains, adding a tiny picot at tip for joining. T&C.

Then I did the remaining white part as a 3rd round ! Again, instead of Split Chains & Split Rings to climb out/connect, to tat in one pass, I ended up doing it in segments ! Cutting & hiding ends after each segment. This was the phase when I was writing up my pds post here & was tatting only for pleasure – experimentation had to take a backseat..... 
♪¤☼¤♪♪¤☼¤♪♪¤☼¤♪

(Pattern can be bought at her etsy shop)
AMC #50 White & #40 Variegated Maroon (4054-1206)
Rnd 1 : ¼”  ;  Rnd 2 :  1”  ;  With twisted picot : 4”  ;  Without twisted picot : 3¼”

Remember my test tat here, with the twisted picots ? I just Had to make a 2-colour version.

♪¤☼¤♪♪¤☼¤♪♪¤☼¤♪

Anchor #40 White & Lavender (4054-098)
Rnd 1 :1”   ;   Rnd 2 : ~2”    ;    ~3½” tip to tip

A breeze to tat up ! And the picots give such a lacy flurry look.
Update : Realised months later that I inadvertently tatted 7 points/sides !!! Yet it all stayed flat & pretty :-)

♪¤☼¤♪♪¤☼¤♪♪¤☼¤♪


Anchor #40 White & Lavender (4054-098)
Rnd 1 : 1¾”  ;   3¼” tip to tip
Tatted & posted last year, here, but have not been happy with the pic. Love the pattern !

♪¤☼¤♪♪¤☼¤♪♪¤☼¤♪

Coats Unknown

Anchor#20 Blue (0131) & White

An old motif. Made quite a few just coz I liked the pattern ages back. Haven’t used them anywhere yet. Want to make another in #40 thread this time. I can see the difference in my tatting of 15 years back & now …Anybody know the source ? Please let me know so that I can give due credit.

♪¤☼¤♪♪¤☼¤♪♪¤☼¤♪


I enjoyed tatting all these snowflakes – relaxing, with a touch of colour for added excitement. I’ve been tatting many more snowflakes – hope I don’t forget to post.

Thanks to All designers for sharing their wonderful creativity 

happy tatting :-)

Motif #14/III  for 25 Motif Challenge

Related Post update : Day 2 Snowflake as part of the flower within series.