(this post has two parts - scroll down for a preface to a soon-to-be-posted series)
 So happy was I to have finished one WIP, and so eager was I
to strike it off this list. Sat
down to write the post and while referring to the book, a glaring mistake
dawned on me!
So happy was I to have finished one WIP, and so eager was I
to strike it off this list. Sat
down to write the post and while referring to the book, a glaring mistake
dawned on me!
 As others have noticed, it is simpler to start with Ring 2,
then Ring 1 (both normal rings), & continue thereof, all tatted in one pass,
from the front side.
As others have noticed, it is simpler to start with Ring 2,
then Ring 1 (both normal rings), & continue thereof, all tatted in one pass,
from the front side.

To tell you the truth, I had started this snowflake in green & cream ! And I took a printout of the pattern in order to play with colour placement. The different rings (normal, SR, double core SSSR) were also marked on the sheet. Since I kept making mistakes, & unknotting, retro-tatting, this was boxed & I picked out 2 different colours more in keeping with my darkening mood.
 To climb out to outer round, 2 rings were worked as double
core SSSRs, enabling me to hide (encapsulate) the lavender & get all-blue
rings.
To climb out to outer round, 2 rings were worked as double
core SSSRs, enabling me to hide (encapsulate) the lavender & get all-blue
rings.
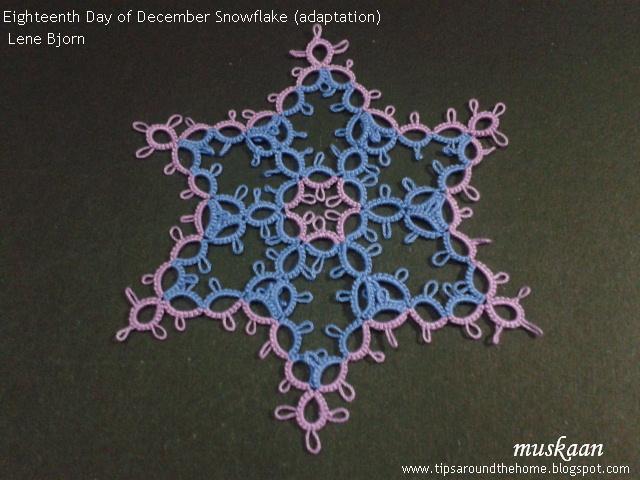
The Un-Mistaken One !
 Measures : 3¼”
Switched colours to see effect.
 Both snowflakes together …. love the effect ! In above pic they are placed on a chikankari saree with mukesh work. Below, the correct version is placed above the 'adapted' one.

Related Post : double core SSSR
 For the above two snowflake repeats, I deliberately chose to
tat in a different direction. (And it threw up interesting ‘changes’ when
combined with directional tatting, as pointed out in the TIP). I had experienced the same discomfort when
tatting the Melt into Spring Snowflake in counterclockwise direction as the diagram called for.After snipping and re-starting in clockwise direction, the
tatting went very smoothly.
For the above two snowflake repeats, I deliberately chose to
tat in a different direction. (And it threw up interesting ‘changes’ when
combined with directional tatting, as pointed out in the TIP). I had experienced the same discomfort when
tatting the Melt into Spring Snowflake in counterclockwise direction as the diagram called for.After snipping and re-starting in clockwise direction, the
tatting went very smoothly.
If you think these questions deserve answers, and the answers interest you, look no further. I will start posting soon, along with practice patterns for all who are interested. The first post will be an introduction to the document with a quick practice pattern where the tatter can choose her/his own path since I will provide only the stitch count with no other instructions.
Are you up for the challenge ? Do I hear a resounding YES ?
Set I - RINGS ONLY post with pdf
Left-handed tatting by Eliz Davis
Well, no, I wasn't tatting in the dark, but the light in my
brain/mind was surely switched off! How else can this be explained, how else
can it be rationalised ?! This is the third snowflake in a row that has a fraternal twin !!!


Reflected
Nights
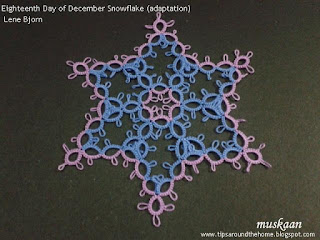
Pattern : Eighteenth Day of
December Snowflake
Designer : Lene Björn
Book : 24 Snowflakes in Tatting
For : 2016 Snowflake Challenge on Craftree

True, I was tatting this in very short, interrupted spells – a ring here,
another there.
True, I was getting a bit uncomfortable following the
sequence.
True, I had been having trouble with the inner trefoil
cluster - kept wondering why there was so much overlap. Cross-checked not
once, not twice, but almost every time ! Yet no light shone through :-( and I
put it down to the joining picots being too small.
Sigh, nothing to it but tat again. There's a saying in Hindi idiom that fits in perfectly. It basically bemoans the fact that at a time when one
is totally broke (financially), the dough (flour/food) too gets ruined. In my
case, I was ‘broke’ for Time.
Might as well make the most of it & bring in a bit of
change. But first things first ….
Materials used : 2 shuttles; size 40 Anchor cotton (blue-4054-00131, lavender-4054-078); picot gauge (⅛th inch vertically or ¼th inch horizontally).
Techniques I used : directional tatting (RODS – reverse order double stitch), rings, split rings (SR), double core single shuttle split ring (SSSR), turn work (TW), switch shuttle (SS)
The
Mistaken One !
The inner round is worked clockwise while the outer
counterclockwise.

To tell you the truth, I had started this snowflake in green & cream ! And I took a printout of the pattern in order to play with colour placement. The different rings (normal, SR, double core SSSR) were also marked on the sheet. Since I kept making mistakes, & unknotting, retro-tatting, this was boxed & I picked out 2 different colours more in keeping with my darkening mood.
I was working with 2 colours, hence all 6 innermost rings
are SRs.
 To climb out to outer round, 2 rings were worked as double
core SSSRs, enabling me to hide (encapsulate) the lavender & get all-blue
rings.
To climb out to outer round, 2 rings were worked as double
core SSSRs, enabling me to hide (encapsulate) the lavender & get all-blue
rings.
To work the rings at the tips, TW, SS, RODS ring, TW, SS
& continue.
Shuttle 1 with blue thread consumed 1 full
bobbin load ; Shuttle 2 with lavender used up only half a bobbin.
Measures : 3½”
Measures : 3½”
The Un-Mistaken One !

Switched colours to see effect.
Tatted outer round in clockwise direction.
Yay, worked really well !!!! The tatting went much faster &
smoother. Mental grasp was easier, too.


Used the picot gauge horizontally (parallel to the core
thread). Again, worked much better than vertical, especially since the thread
was not easily visible. When I first did it for the Elizabeth medallion , it didn't appeal much! Goes to
show that one can always reset one’s comfort zone. Perhaps when working with
finer thread, it is advisable to use the gauge horizontally ? What is your
experience ?
TIP : One
interesting observation : In first snowflake, when tatting went
counterclockwise, the outer ring at tip had to be worked in RODS ; in this
piece, where tatting was in clockwise direction, the ring at inner end had to
be worked in RODS.


Related Post : double core SSSR
Quo vadis ?!
This Way or Tat - Preface
 For the above two snowflake repeats, I deliberately chose to
tat in a different direction. (And it threw up interesting ‘changes’ when
combined with directional tatting, as pointed out in the TIP). I had experienced the same discomfort when
tatting the Melt into Spring Snowflake in counterclockwise direction as the diagram called for.After snipping and re-starting in clockwise direction, the
tatting went very smoothly.
For the above two snowflake repeats, I deliberately chose to
tat in a different direction. (And it threw up interesting ‘changes’ when
combined with directional tatting, as pointed out in the TIP). I had experienced the same discomfort when
tatting the Melt into Spring Snowflake in counterclockwise direction as the diagram called for.After snipping and re-starting in clockwise direction, the
tatting went very smoothly.
But have you ever faced this dilemma where you Think you are
going to be tatting a row/round in one direction, but turns out it wants to go
in the opposite direction ?!
I have had this encounter many a time, in projects that have
multiple rounds, irrespective of whether I was tatting with regular double
stitches throughout or with directional tatting; whether I was cutting off the
thread after a round or climbing out. All four of my Renulek’s doilies are
witness to this dilemma and I have detailed my direction enigma for most of
them.
Always wondered why, but it was my Scarlet O’Hara moment
‘hmm, I’ll think about it tomorrow’! Well, many tomorrows came but no thinking
ensued. After all, an experienced tatter can easily make the shift - much easier to do for a simple symmetric pattern, but can be done nevertheless.
That tomorrow finally arrived when a question was forwarded and
I had to sit down and really think about it.
Started with a few illustrative diagrams, it soon stretched to a series of diagram sets detailing situations and
options. It even led to the discovery of some common rules/observations and the
factors that affect the outcome.
But before I start with the 'This Way or Tat' series, the following scenarios
might strike a chord somewhere?
- Whatever you are tatting right now, which direction is your tatting going ? Seems like a simple question, but there are 2 answers/parts to it. I’ll let you figure it out for now.
- Are you working directional tatting (frontside/backside with reverse order of double stitch) or simple double stitches all through? Do you think the former would make a difference to the direction of progression?
- Do you sometimes use direct tatting (reverse or unflipped or wrapped stitches as when working the split ring)? Have you noticed any difference in direction?
- Has it happened that the pattern/diagram calls for you to take a certain direction, but you find yourself tatting in the opposite – either deliberately or accidentally ?
- Have you faced the same dilemma when you climb out of one row/round to the next using a split ring or split chain? You thought you’d be going this way, but the shuttles are wrongly positioned?
- In multiple row/round patterns, how would two colours be positioned for next round after we climb out with a split ring or split chain?
- Similarly when working with colours in regular tatting. Have you wondered how to get the right colour in the right position/element ? There are some that flow naturally in a certain direction but in others we use a SLT. Are there other techniques or tweaks that could accomplish the same? How to decide what to employ and when?
- Would you much rather work from the front? How will the traditional pattern behave and how would we apply our choice?
- Do you sometimes wish the pattern diagram had given some indication of the direction in which to go?
If you think these questions deserve answers, and the answers interest you, look no further. I will start posting soon, along with practice patterns for all who are interested. The first post will be an introduction to the document with a quick practice pattern where the tatter can choose her/his own path since I will provide only the stitch count with no other instructions.
Are you up for the challenge ? Do I hear a resounding YES ?
happy
tatting always :-)
UPDATE (Oct 8) : INTRODUCTION pdf with exercise posted hereSet I - RINGS ONLY post with pdf
Left-handed tatting by Eliz Davis
Yes, yes! I've found myself tatting in a different direction to the original diagram several times in the last few months. One of the rounds of the doily I'm calling the Geocities doily turned out to be an unexpected challenge when I found myself needing to tat it in the opposite direction.
ReplyDeleteLove your enthusiasm, Eliz, and your supportive feedback Looking forward to your Geocities doily :-)
DeleteI like your more open version! I have had occasions when I've found a different direction more comfortable. I don't do fs/bs tatting, but I have worked with unflipped stitches for this reason or that. I'm not sure I'll carry out your challenge, I have a couple of challenges on hand already, but I'll certainly be interested in what you have to say.
ReplyDeleteJane, I like the open version, too :-)
DeleteAnd it's fine if you don't join along - all I ask is your continued support and encouragement :-)
you got my YES!
ReplyDeleteYay, Ninetta, I hope you find it useful although you probably already know it all :-)
Delete4 and 5! But I can't participate unfortunately. School is a bit overwhelming right now...
ReplyDeleteJust drop by when you can, Michelle. The posts will be here to pick and choose :-)
DeleteI like your "mistake" better than the original :)
ReplyDeleteI do, too, Robin :-)
DeleteBoth snowflakes are awesome!!! :)
ReplyDeleteAnd I love how they combine together to make such a beautiful design(one on top of the other)!! :)
I agree, Sue. Putting them like that actually gave me an idea if I had the same pair - we can join 2 similar snowflakes together and decorate tree. Use some stuffing/backing in between if required. And, if using colours, use in reverse way, so that when the flake rotates, an optical illusion is created .
DeleteI would try for something transparent.. at a first some bubble wrap, not a whole sheet, just bits, and see if you like the effect.
DeleteThat is a great idea, Just4tatts !!!
DeleteAnd sprinkle some glitter on the transparent sheet ;-)
Thanks
Excellent work in color placement on the snowflakes. I found several things out about my brain: 1) When I find a pattern I imagine with split rings in 2 colors, I force myself to tat a pattern in plain thread first. That way I have less details to learn as I'm playing with colors. 2) I just can't get the hang of using a picot gauge vertical. Laying it horizontal along the core is the only sure way of accuracy. 3) Monster Doilies have intimidated me primarily because of the clockwise/counter-clockwise dilemma. 4) I love challenges!!!!
ReplyDeleteLooking forward to the next post.
We all have such individual paths to learning and comprehension, and to resolving our issues, Mel, & it always intrigues me.
DeleteLove your response and am looking forward to your creative participation :-)
Post should be up in a day or 2.
Two lovely snowflakes. You put together two lovely colours together.
ReplyDeleteI am behind now a long way, I was going to do some on holiday but it was too hot and so I never got around to them. Oh well I am sure I can catch up hopefully after the eye treatment next week.
Sorry this is a late comment I have been on holiday
Hope you had a swell holiday, Margaret :-)
DeleteI'm still behind with the challenge. Would've been 3 snowflakes along if they hadn't craved for a fraternal twin to play with ;-P
Both snowflakes are beautiful! I sometimes get puzzled as to which direction I should be heading. However, I've never really tried to figure out what is going on. If the pattern is too challenging, I simply move on to something else. I will be reading your posts with great interest!
ReplyDeleteThanks, Diane :-) Yes, when faced with such situations, I simply figured out how to tat in a mirror image kind of way. Only now, when a new tatter asked this question, did I really sit down to delve into answers and common patterns/factors have emerged. This series has been a big eye-opener for me.
DeleteThere is a Mary Konior pattern that kills me regularly, I get started and then something goes wrong and I'm totally lost. I have to work her patterns out with arrows on each chain and ring. I try to work clockwise, but these don't want to go that way.
ReplyDeleteThen, I hope the series will be of some help, Just4tatts .... With a great number of scenarios diagrammed and common patterns/factors emerging, I'm sure one of them will apply.
DeleteThe Table in my latest post on the Introduction pdf may also be helpful in tabulating observations and discerning patterns. If not, wait for subsequent pdfs on each set ...
Do let us know what happens :-)