Sunday, 15 June 2014

Free-form Tatting Adornments

Pin It now!
Original Free-form Patterns

Applying free-form tatting to classic patterns


With online tatting resources at one’s "command", there is no dearth of learning that can go on. 

But what does one do with this new knowledge & skill ?
Does one blindly follow existing patterns ?
Why not have some creative fun by applying new ideas to old patterns?

This is what I tried to do is some small measure, by simultaneously learning And applying.
I also realized that I am much more comfortable creating freeform tatting patterns than designing the lie-flat-without-any-ruffles patterns. A free-form v/s classic tatting dilemma, perhaps ? One has to, therefore, work within one’s limitations till one can surmount them …


Anastasia’s “Crowning Glory”

I enjoyed tatting Kersti’s Anastasia Tatted Bookmark for its own sake. But after it was completed, I did not much care for the large negative spaces left by the long chains on top. Fact was that without blocking or stiffening, the long-chained arches were bound to alter their shape. 

Now how could I fill in the gaps, while staying true to the original elements ?

My first thought was little rings. But that would mean snipping out & retatting the purple part with well-placed picots where I could attach the rings. Or if I joined through the chains, it would perhaps not come out neat since I snug my ds pretty close. More importantly, the rings would need to lie flat, yet not detract from the beautiful arches. My skills were found wanting.

I turned to free-form tatting : Creating a narrow strip of tatting that could be inserted & interweaved through the arches. With the added attraction that it could lend a 3D effect !!!
For this, I chose a single strand of very fine gold rayon/metallic thread. Gold is an indispensable part of royalty & all its finery, after all, and what better color than gold for its crowning glory ?!

Thread is wound on to 2 shuttles, CTM. 
The twine is made of simple rings (as leaves), onion/concentric rings (as roses), chains with normal ds & Reverse stitch (for vines). Stitch-counts are entirely up to the tatter.
(I will be doing a separate post on this shortly, along with an accidental technique used here, as well as more detailed stitch-counts &/or process) 
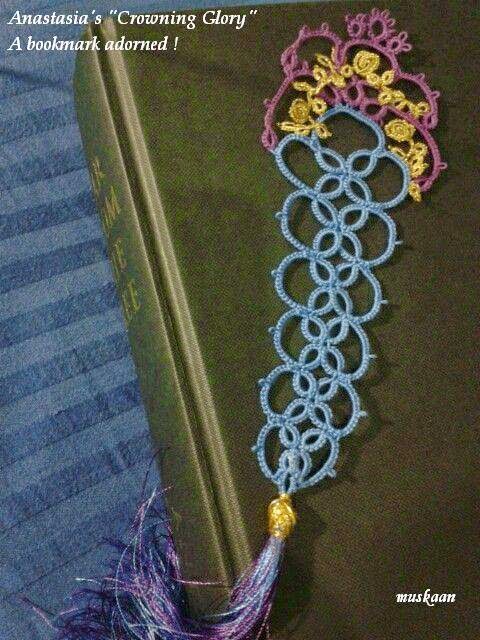


To bring it all together, I covered the tassel knot with gold thread too. 
The image on right is a scanned close-up of the adornment.

TIP : This is a dainty, elegant, feminine design for bracelets, & other jewelry too ! 


Motif #7 for 25 Motif Challenge


Coiled Comfort

Now here was an edging sampler I’d tatted a while back & converted it into a bookmark, adding a braid & tassel (variegated silk/rayon thread) at one end. I have been using this bookmark ever since. AMC size 20 in Brown - 4054-0355.

However, I was not too happy with the tatting & decided to have another go recently,  after having learned SLT, Reverse Stitch, & other similar techniques.
This time I chose Aqua Blue (4054-0185) in AMC size 20. It was still meh !

Along came a photo on InTatters (by Patty Dowden) where her project had the most perfect circular coiled chains ! She willingly told me that they were all just Long normal chains!

What was the fun in simply trying out a chain with no application ?! So I jumped directly into the bookmark, to adorn it as well as to stabilize the fairly ‘open’ edge.

First I made some tiny flowers, all from leftover threads in size 20.
Each flower has 4, 5, or 6 petals & each petal is a Ring : 3-1-3pds(2)-1-3. Cl.  Picots of adjoining rings/petals are joined.
Now I loaded my shuttles with white thread & began to tat long chains. It was Such a pleasure to watch the chain coil !!!


If you notice, there are gaps in the adornment. Reason is that I just did not know how to proceed & had to cut off the thread. But I gradually got the hang of it & as you can see, the pieces kept getting longer, with more chains & coils, as one descends down the edging.
I kept joining flowers to the white chain at intervals and also joined the chain to any picot I could find on the edging. In addition, since there were large negative spaces on the edging, I could slip in the shuttle to intertwine the adornment – under & over. I've included photos of the wrong side to show attachments & intertwining, as well an one close-up.

This is still not aesthetically appealing, but it was part of my learning process.

TIP : And it is a swell adornment idea for head bands, bracelets, belts, collars, tiara, etc.


Motif #8 for 25 Motif Challenge


Abbreviations used :
ds : double stitch
CTM : continuous thread method
SLT : shoe-lace trick
pds : padded double stitch
Cl : close
AMC : Anchor Mercerized Crochet Cotton

Thursday, 12 June 2014

Tatting Away

Pin It now!
Tatting Away

What do you do when you want to relax ?
Well, I tat, just like you :-)
Practice makes perfect, I hope !


Sharing a few things I've tatted over the past several days/weeks. 
Since the patterns are already online, I am only adding relevant names & links. 
In no particular order ....


1. Robin’s Design Tutorial Snowflake
  
Designed by Robin Perfetti

Made with size 40 AMC threads, in white & lavender 4054-098. 

As soon as I laid eyes on her snowflake, I just Had to make it ! Especially since I was dying to use a new ball of lavender thread (I had ordered size 20 but they sent me size 40 - but who's complaining ;-))). I did this in one sitting, referring to the diagrammatic sketch she had uploaded. She intends to name this Isis & will be uploading the detailed pattern shortly. (At present, she has a wonderful tutorial series going on, about designing on an iPad) .
I enjoyed tatting this immensely.
And this time I added an entire set of needles to my work-box so that I could hide the ends immediately.

Update : This pattern has been uploaded in pdf format & I have linked it above. For a printable diagram : http://tattingbythebay.blogspot.com/2014/06/printable-pattern-and-new-page-for.html 

Motif #4 for 25 Motif Challenge


2. Kersti's Anastasia Bookmark


Tatted with size 20 AMC in Dark Blue 0131 & Purple 0101. 
For the long tassel-tail, I used Art silk/rayon threads in Blue & Purple shades.

This was a slightly intriguing pattern. The lower part was broadening of a common-enough edging pattern, but the upper "crown" was interesting. I wanted to use 2 colors, both representing royalty, hence the combo of deep blue & purple.


Motif #5 for 25 Motif Challenge


3. Victat’s Roses are Red with Martha’s Shamrock


Rose made with AMC size 20 : Pink w/White 4054-01201
Shamrock made with AMC size 20 : Green w/White 4054-1213

These were part of my learning process. I loved the way the continuous chains took the shape of a beautiful large rose & also the way the shamrock leaves folded in !!!
This could make a very nice brooch or pendant or even a hair-clip ornament ! Or how about appliqueing to any dress !
I made some more of Martha's Folded Rings patterns & was thrilled to see them turning & folding ;-))


Motif #6 for 25 Motif Challenge


I immensely enjoyed my tatting for leisure, learning, & practice ! But this is just the beginning :-)

Wednesday, 28 May 2014

INTERLOCKING RINGS using Shuttle

Pin It now!
My thoughts
Love Celtic tatting ?
Need to make Interlocking Rings ?
Can only shuttle-tat ?

I consider myself fortunate that tatters before me have openly shared all their experiences, trials & techniques on the net, so that we do not have to reinvent the wheel. Instead, we can simply read/watch/learn & then pick & adopt whichever technique suits us best !

This is exactly what happened with Interlocking Rings (IRs)
Ever since I laid eyes on Celtic/Irish tatting, I was enamoured by the interweaves & overlaps ! Took me a while to realize that tools & techniques, other than my normal shuttle, were required . Since I am a shuttler, I needed to find tuts/techs that taught how to make IRs using a shuttle, & not needle.


First stop : 
An initial search led me to a step-by-step pictorial by Sue for InterlockingSCMRs using shuttle. I tried very hard but failed – my SCMRs kept “opening up” as soon as I looked away ! Hence, shelved for later, & on with more searching …   


Second stop :
Karen’s video tut on Single Shuttle Interlocking Rings . Finally got the hang of making overlapping rings. However, try as I might, I could still not get that last ring to overlap correctly ! Notice the last ring in adjoining image - Both sides are going under the adjacent rings !

After many trials, some ending in the dustbin, I renewed my internet search.


Third stop : 
Wow ! I found Jon’s write-up & diagram explaining how to get that “pesky” little final ring to overlap correctly. Without Jon’s diagram, I had almost given up.


Armed with these trials, I attempted Frivole’s Rose & Crown motif. This motif was the immediate motivation to advance my learning in the first place!

Attempt 1:
( Anchor size 20 Cadmium Orange 4054-0307 shade )
The IRs overlapped correctly, but there seemed to be a tightness in the center. That called for another attempt.

Attempt 2 :

( Anchor size 20 Purple 4054-0101 ) . 
Yay ! I was happy with this trial. Although all tutorials pointed out that each subsequent ring needs to be started without leaving any space, I found that if I left a tiny length (just about 1 mm only) before starting the next ring, it helped to keep the structure even & lie ‘flat’.


Fourth stop :
The above motifs were done a few weeks back & I went on to other things. Suddenly I chanced upon Another tutorial – this one by Kathy. I quickly scanned through the 2-part detailed pictorial &  pinned it for future reference, if necessary.
Then, while working on a free-form bracelet, I made an “error” which caused the ring to twist a bit & also caused the next ring to overlap !!! That reminded me of Kathy’s pictorial & off I went to check it out in depth & put it to practice. Interlocking Rings made with Shuttle part 1  & Interlocking Rings made with Shuttle part 2  

Attempts 3 & 4 :
( Anchor size 20. #3 : Maroon 022 ; #4 : Royal Blue 4054-0133)
I started on the 3rd motif ( Anchor size 20 Maroon 022 ) directly. Kathy’s technique was so very simple & easy to remember !!! And the IRs came out perfectly. I did have to leave the 1mm thread space though.
I was so excited that I started a 4th motif in Royal Blue 4054-0133. Successful again.


Some notes based on my experiences :
Leave a 1 mm, or less, thread space before starting subsequent rings. This works for me.

Karen’s technique:

  • This video opened the door to my shuttle-made IRs.
  • One has to remember to make the loose half stitch before closing each ring. There were numerous occasions when I forgot & had to open up the ring & accommodate that posting of shuttle with half stitch.
  • For the life of me I could Not get that last ring to overlap in same direction. 

Jon's diagram:

  • An extended explanation to Karen's video. Hence, one follows Karen's method but works the last ring based on Jon's diagram & clarification. That diagram is a life-saver if I can be dramatic ;-))


Kathy’s technique:

  • Easiest to follow & apply.
  • One does not have to remember to make half-st & post shuttle before closing each ring - major advantage!
  • One is basically tatting on the ‘wrong side’ & the rings are then kind of ‘flipped’ or rotated to get them in position. But it all comes together beautifully.
  • I agree with her about keeping the starting tail intact. It helps in identifying the 1st ring And its position & overlap of subsequent rings. I had done this through All my attempts.

There is just one drawback to Kathy's method, if I can call it that. One has to unwind the shuttle before starting last ring, & then rewind it again. This can get a bit tiring if one has to make a large number of motifs with IRs.
This can be easily taken care of as follows :.
TIP : Get an idea of the length of thread required to make that one last ring. Unwind this length + a bit extra, & cut the thread. Tat the last ring with this length. (It is up to the tatter if s/he wishes to rewind this length or simply forge ahead without rewinding.) Once the last ring is closed, tie, cut & hide ends.
You still have plenty of thread in the shuttle to start the next set of IRs ! So, basically, one can start with a fully loaded bobbin/shuttle & make many IR motifs before the thread runs out, instead of winding only for each motif.


Motif #3 for 25 Motif Challenge