Showing posts with label CWJ. Show all posts

Thursday, 26 February 2026

CWJ for EP tuts

Pin It now!

 You might remember that I have been mentioning a resource document (EP Tutorials) from the perspective of Endrucks' original patterns and derivatives. Ninetta and I decided to restrict the technique tutorial links to our respective blogs, and the Endrucks 1920 Project, without any outside source. To that end we even created some new pictorials and/or videos - some of which are still underway. 

The Catherine wheel join (CWJ), however, is something both of us had in our folders for the last several years but hadn't shared it online. My pictorial is from 2020 which I did for my Lock Join Plus series aka Reposition Methods, while Ninetta's diagrams were also drawn many years back. Bringing the two together, we present this PDF. https://drive.google.com/file/d/1UmmjBqNwwQYIb9Ms9_-T5K6dPnZENCwl/view

A few selected pics from the pictorial -


In the same 2020 folder I have the pics for working the CWJ backside, but have not presented them here. Perhaps at a future date I will work on that presentation and include it.

And Ninetta Caruso's diagram page - 
        Download the PDFs :
Lock Join Plus aka Reposition Options series - https://drive.google.com/file/d/17zsM3JaLO7r0ajg8VOnv5IcJ-kLNqEiU/view
And in case you want a practice pattern, here's a quick one - E28 Heart by Muskaan - https://drive.google.com/file/d/1-rWqmDAd51VwxOqtt9spD-FIX5zYDAUE/view

There are already plenty of tutorials, including video demonstrations on this join, links to which you can find by clicking on the Tatting Resources tab above. I am of the opinion that there is no such thing as too many resources. Each of us learns in their own way and one never knows which tutorial will click for an individual. So, hope some of you find this helpful.
Happy tatting!

Friday, 12 July 2024

what the heart wants

Pin It now!

.... the heart follows! I hadn't planned on playing the game of this month - Pattern Me Endrucks (July2024) because I wanted to focus on other tasks and had told Ninetta. Yet the heart yearns and one gives in to that knotty call. 

E43 Pattern pdf https://drive.google.com/file/d/1JRu7OggaSna0eXDRA2P18dRu6uE4-1J7/view

Some entries have already come in and wow, each of the participants has seen a different aspect in this motif and followed that direction! Can you blame my heart for wanting to join them? I could see an orange segment, but you know my penchant for complicating my life. So, while not a very unique idea or shape, I decided to go for a 3D flower.

Mind you, this is a prototype with a few mistakes, lots of retro-tatting, and Dr. Downplay ruling. Hopefully the next petals will turn out better.

My goal was to deviate as less as possible from the original pattern. 

My Notes, TIPS, and Future Ideas 

Since I wanted to work with two colours, here's how I started without tying the threads together -

A] Started with false CTM, pulling out a short length (A). from the shuttle.
B] Attached a marker/luggage tag loop to the starter picot (B).
C] Using A as core thread, finger-tat the chain using thread (C) from shuttle for the stitches.
D] 2nd shuttle with thread in another colour was added at the end of the chain. The A thread is cut short and hidden in the next element (tat over tails).
For more False CTM scenariosPart 1 ; Part 2 .

  • The tatting proceeds from right to left, unlike the diagram. I think the reason could be that if one direct tats the chain (reverse stitches), it will proceed from right to left. This dawned on me when I noticed the inset diagram showing the start! The written instructions are for normal tatting.
  • As it turns out, on reaching the other end, I decided to keep the chain maroon, hence you can see the colour difference between left and right.
  • In order to position colours lots of Reverse Join (RJ) is used.
  • Midways I decided to use the Catherine Wheel Join (CWJ). However I was tatting the return chain backside. I have done the CWJ from the back before, several times, including my cheat trick of a half-stitch shift! However this time I watched Marilee Rockeley recent video CWJ from the back sidehttps://www.youtube.com/watch?v=EqxTqb8UMww

  • The outer row of chains is done with Victorian sets or zigzag tatting. Continued down.
  • The left chain was made first and is a bit longer than needed.
  • I decided to use the small motifs on the sides (in original pattern) to cover some of the negative space. Added a 3rd colour to make the twin rings and cut off the thread. I've deliberately left short tails instead of hiding them.
  • Then picking up the original shuttles I continued with the chains to complete the first petal.
The shuttles are still attached and I can easily continue with the next petal. I'm thinking a total of 3 petals should complete the flower. While I'm not too thrilled with my colour choices, Dr Downplay rules! 
I have deliberately created a 3D version for the petal. Otherwise the motif lies flat.
You can find tutorial links to the terms mentioned, here - https://tipsaroundthehome.blogspot.com/p/tatting-resources.html

FUTURE IDEAS

  • This same petal, with a bit of tweaking can become a peacock plume! 
  • Or joining 3, 4, or more motifs in the round to create a broad round for a doily. And then design inner and outer rounds to complete the doily. This, however, will be a big project for another year!
  • And of course, orange fruit carpels/segments!

Do you have any suggestions for improvement or any more ideas? Please share ....

More to come; hoping to finish tatting this today so that I can get back to the other stuff.

Many thanks to Maria Grazia and Ninetta Caruso for the reworked pattern, and to Marilee Rockeley for her demo.

Related Posts -

Monday, 5 June 2023

yet another heart

Pin It now!


We can never have our fill of heart motifs especially if they provide us a means to empty our shuttles! This one is derived from Endrucks' doily #28 and the pattern pdf can be downloaded by clicking on this link - https://drive.google.com/file/d/1-rWqmDAd51VwxOqtt9spD-FIX5zYDAUE/view

Remember my Crown Jewels? ( https://tipsaroundthehome.blogspot.com/2023/05/crown-jewels.html )
On the left is the prototype and on the right is the bejewelled version. I could see a heart shape if the chains were elongated and just had to give it a whorl resulting in the heart at the center.

This is cute little motif to use for learning and applying techniques and effects (this one has CWJs and dot picot string); to embellish with beads or decorative picots; to use as a charm; to use as jewellery; .... Let loose the imagination to play and decorate!

I sent Ninetta the pdf for a quick scan and she surprised me by quickly tatting it too! In her own words -

"Thread is S-lon 0,5 usually sold for micro-macramè, it is thicker than a size 10. I'll use it as a charm. At the end of the heart I tatted a chain with 40 first half stitches and finished it with a ring with 12 ds."

So what are you waiting for? Use up the scraps.

💖 Many thanks, Nin, my partner in crime in the Endrucks Project 💖

Saturday, 20 March 2021

happy sunflowers

Pin It now!

Adaptation of Endrucks' pattern #1 edging into a circular coaster/doily.

HAPPY HANDS SUNFLOWER
by Meenakshi (muskaan) Jain
adaptation of Endrucks-Leichtenstern's pattern #1 
from her book ‘Die Schiffchen-Spitzen’,1920
UPDATE (Nov 2021): pattern now in pdf... click to download -
The large one on the right is a prototype from 2015. The upper WIP is halted due to cupping. The lower left one is the final version, with pattern below.

6 years in the making! In 2015, it was tempting to convert Endrucks' #1 edging into a circular coaster. Every other year I would pick it up, sketch or tat a center and fail. For a long time I thought of it as a sun/corona. I also wanted some block tatting inside. 
Till that aging process resulted in my own maturation and this center materialised from yet another failed attempt at tatting a reflection of the happy hands, large ring facing inward (like our reflection in water). That proved too large, but led to this idea which worked! 
Design Tip: Notice the cupping in above WIP model? I believe it happened because in my 2015 model there was space at base of large ring and arms on either side. In new model there is no such space.
The lower center was tweaked with shorter chains.

ROUND 1 - center medallion pattern


Ball and shuttle, continuous thread. Joining picots are small. Start with a large ring (starred in pic). Tatting moves counterclockwise.  
    R1: 4-4-4—4-4-4. rw
    C1: 5-5. rw
    R2: 4+(R1) 4-4. rw
    C2: 5-5. rw
    R3: 4+(R2) 4 +(R1) 4—4-4-4. rw
Continue around (total of 10 rings). 
NOTE: Remember to join last 2 rings to the first ring. The red lines in
 the top right pic show the last large ring is joined to 2 previous rings on the left, and one join on the right to the 1st large ring. The final small ring is also joined to rings on either side.

ROUND 2 - circular edging/petals pattern
For stepwise edging pictorial, with sequence, legend, links, etc. refer https://tipsaroundthehome.blogspot.com/2021/03/balancing-act.html and the notes below

    2 shuttles, ctm.
    A ring: 4-4-2—2—2—2-4-4. rw
    Bchain: p 4•4•4-4. rw
    C ring: 8-2
6. dnrw, SS
    Dchain: 4CWJ 4• SS
    E ring: 2
2-4. SS
    Fchain: 4CWJ 5+
    Gchain: p 4•4•4-4. rw
    H ring: 8+2--6. dnrw, SS
    Ichain: 4CWJ 4• SS
    J ring: 2
2-4. SS
    Kchain: 4CWJ 5+ . rw
    Lchain: 5+(Rnd1) 5. dnrw, SS
First Motif Complete.
    **Leave space
    Aring: 4-4-2—2—2—2-4-4. Rw, SS
    Make B,C,D as before
    Join to E above and lock join to A below. Keep Both threads on same side ( I prefer to keep them above). 
    Continue chainF
    Make picot join and continue to other side, as in 1st motif, and complete the 2nd motif.
** Repeat ** to ** till all 10 motifs are made and joined back to the first motif. Tie & cut.

Model worked in Anchor size 40 (00269 & 00302) measures 7.5 cms. Round1 medallion is 3cms. 
In Anchor size 20 (the prototype model), it measures 4cms inside and 11.5 cms final.

I sought the advice of my Endrucks 1920 Project partner Ninetta (thank you!) when there was cupping and her tips along with my own ideas helped me arrive at a model that lies flat. A very close inspection will reveal discrepancies as I implemented changes on-the-go. But I am fairly confident this is good.

NOTES / THOUGHTS
  • To work petals in 2 colours, see pictorial for colour placement options and methods.
  • All joining picots are very small.
  • CWJ is optional but gives a smoother outline.  
  • For fs/bs tatting, I did a bit of cheating with the CWJ – I made 1 less half stitch on the backside chains, and formed a normal CWJ. Thus when seen from the front, they appear as a complete stitches.
  • I did not count the CWJ as a stitch.
  • There are chain segments with 1 more or less half-stitch-a judgment call. 
  • Simple blocking on completion will give it a neat finished look. 
  • All decorative picots are deliberately kept long. Picot gauge is optional.
In my 2015 prototype I had used double and triple picots which are now changed to regular long picots. I think it gives a way better look!
If you look closely you will see the tweaks I made in the light yellow center, trying to settle on the right count.

FUTURE IDEAS :
  • For a more natural look, vary the length of the petals by adding or reducing chain segments by 2, 3, or 4ds.
  • We could try to do away with the 2 rings at the periphery, replacing them with chain segments and picot for joining.
  • Add more layers of petals for a beautiful 3D flower.
  • Add more colours. Hubby insisted on just these 2 and I obeyed (sometimes I behave ;-P).
  • I am working on a 3D 3-petal earring/pendant/brooch adaptation that I think should work - simple tatting and a beaded version.
So, keeping my fingers crossed that you remain sunny and cheerful for future posts, without ennui setting in ;-D
And I welcome somebody to test tat this and send in their feedback. I hope there is no mistake. I will convert the pattern into pdf format at a later date.
happy tatting and adapting !

Wednesday, 3 March 2021

lounging by the sea

Pin It now!

...if only ;-D But one can always bring the sea home or a friend can send us the sand and waves, sprinkled with pearls!  

This is a slight adaptation, in trying to manifest Ninetta Caruso's Heart by the Sea in thread, which is the reason for this unusual colour combo. An island surrounded by the sea and pearls, and palm trees!
It'd been ages since I picked my shuttles and you can see how my first attempts failed due to uncooperative threads. The yellow one is in metallic-wound size 20 which was no fun this time. The beige one got stuck while closing! 
So, in my 3rd attempt, I worked the hearts as mock rings (SCMRs). Worked. Notice the extra hearts? I wanted to show partially open oysters with a pearl inside. Not my best effort, but Dr Downplay came out to play :-) I really just wanted to enjoy some tatting time.
And for fun, I used a CWJ to join the small heart to the lower large one. Hmm, please don't, unless the picot is long! While the small heart had a smooth outline, it distorted the large one slightly.
I love the flower she inserted! I chose tinted green to represent a palm grove and the brown crystal could be coconuts?
The tiny seed beads represent the frothy waves on pristine blue waters, hitting the shores! The almost white sands and brilliant blue sea is an image stamped in my mind from the outskirts of Perth (Australia).
TIP: If you start the heart frontside, the pattern will move counterclockwise unlike that indicated in the diagram (starting with A). I was following the diagram only, and hence all my subsequent rings were worked backside. It is only now that I noticed her stepwise pics showing her counterclockwise WIP pics!
In Anchor Pearl cotton size 8, the heart measures 5cmsx5.5cms.
TIP: I started the green motif at the ring marked E in diagram, moving clockwise, so that there was more open space to close out the motif in the end.
Beads used - size 10/0 pearls (rescued as can be seen in their darker tinge!); 2 pearls - 4mm; crystal size 9/0; silver seed beads size 26/0.
For all pearl beads, I used my Floating Beads method - no need to load beads on a shuttle! However, I added one more step - capturing the bead within the first half stitch as in this onion rings method. It was Kathleen Minniti who captured the 'floating ring' in our round robin doily instead of simple FB method. 

This lovely pattern and instructions can be found here - https://ninettacaruso.blogspot.com/2021/02/hearts-friends-and-flower.html I had not realised until I read her post, that the heart is derived from her doily - one that was already on my to-tat list! 

Many thanks to Ninetta for sharing her pattern and also for creating a lovely pictorial for my Block Heart ( I need to update the post). Both were chosen for the Un Coure Per Te event in the very active and inspiring Italian facebook group - Chiacchierino:Filo, Amore e Fantasia. My heart is late for the event, but I'm happy to have tatted something! And there's an event every fortnight, so join in!

Sunday, 10 November 2019

frozen or flowing?

Pin It now!
Snowflake #17 in Land of Laces’ 25 Snowflake Project

This is a very basic design, but highly adaptable and versatile in the effects that can be created. I have tons of ideas (listed at the end) for the icy rivulet flowing between the glaciers or bergs.
I deliberately used colour blip as a design element here by joining a bit differently.
And I also discovered something that I will share in another post with proper pics!
The one in cream+blue, was worked first and some of the kinks were ironed out in the smaller one. I am preparing a 3rd model using Lizbeth size 20, along with a pictorial on how to join the 2nd round. It will be included in the pdf.

But pattern first… (be warned – there are going to be more!). You may use your discretion to tat this in one pass, in one colour, etc. Following is what I did …

Find tutorial links here for : add new thread to chain ; dot picot ; dot picot string ; false CTM – parts 1 & 2 ; Catherine Wheel Join (CWJ)
Josephine Ring with picots by Nadezhda Malysheva : https://youtu.be/HFCimyOpoXI  (Thank you Barbara Slodka, for sharing this video link!!!)


Icy Rivulet Snowflake

In Anchor size 20 it measures a tad over 5cms.
2mm picot gauge for JR

Round1: one shuttle only.  --- = long or double picot
Ring1: 5-1—- 6-6—-1-5.
[Ring2: 5+1+6-6—-1-5.]x5, joining last ring to the first. Tie & cut.
Alternate: climb out with split ring.
Round2 (Rivulet) : one shuttle only, in contrasting colour
Join to lower beam/bar of the double picot, from behind.
Dot Picot String: 4 dot picots, closely spaced, lock join, 4 dot picots, lj to lower bar of double picot & upper bar of picot. Repeat 5 more times.
Instead of cutting, I continued the next round using this as core thread and adding cream thread for the stitches.
Round3 : 2 shuttles
[Chain: 6, switch shuttle, Josephine Ring: 1ds, 20hs (with 2mm long picots held on gauge), 1ds., switch shuttle, lock join, 6, CWJ to upper bar of double picot.]x6

NOTE :  The intention is for all arches to lie close to each other, without overlapping. Hence a bit of tweaking may be required. Some of segments are not symmetrical (1 extra stitch or dot picot), but not visible.

Icy Rivulet Star

Can you see the white ‘V’ with a bit of colour in the center, at each joining point? 
This is deliberate but will show better with more contrasting colours.
In Anchor size 40 it measures 3½cms.
2mm picot gauge for JR

Round1: one shuttle only.  --- = long or double picot
Ring1: 5-1—- 6 vsp 1 vsp 6—-1-5.
[Ring2: 5+1+6 vsp 1 vsp 6—-1-5.]x4, joining last ring to the first. Tie & cut.
Alternate: climb out with split ring.
Round2 (Rivulet) : one shuttle only, in contrasting colour
Join to lower beam/bar of the double picot, from behind.
Dot Picot String: 3 dot picots, closely spaced, lock join to 1st vsp, bare thread, lock join to 2nd vsp {this bare thread acts as a picot to link next round}, 3 dot picots, lj to lower bar of double picot & upper bar of picot. Repeat 4 more times.
Instead of cutting, I continued the next round using this as core thread and adding cream thread for the stitches.
Round3 : 2 shuttles
[Chain: 6, switch shuttle, Josephine Ring: 1ds, 12hs (with 2mm long picots held on gauge), 1ds., switch shuttle, lock join to mock picot below, 6, CWJ to upper bar of double picot.]x5


Future Ideas :
I want to see how it looks with more rivulets flowing between the ice.
I also want to change the nature of the rivulet by substituting dot picot string with a beaded string, Josephine chain, picoted chain, lock chain, and many more.
I might even try adding a few picots or beads to the outermost round.

Let your imagination lead you on :-)

Question – Do you like the denser Josephine ring better or the one in the star? Or perhaps somewhere in between? I will hold off the 3rd round in my Lizbeth model till I hear back from you.


Congratulations to Georgia Seitz and her team – 
the Online Tatting Class celebrates it’s 20th birthday today !!!

Tuesday, 25 September 2018

Usha's motifs

Pin It now!
PLEASE NOTE : The sequence of posts has altered when I was updating my posts yesterday, causing my newest post in the Cluny tatting series - hitch the loom - to mover 2 posts down, in case you were wondering or missed it. Blame it on Blooper's (err Blogger's) whimsies.

  
For the last few days I’ve been tatting up a mini-storm of Blossoms Motifs while working on the numerous pictorial presentations. A quick break was in order when Usha’s Split Ring triangle motif turned up.
The near-perfect circular rings attracted me in the first place. And circles that formed an equilateral triangle. It is certainly impressive to successfully convert such a shape into actual tatting.
Large rings - whether normal, split, or scmr - often close into a circle rather than teardrop.


In Lizbeth size 40, the sides measure 1½”.
Having mistakenly made a picot at the corner of the first ring, I repeated it for the other 2 corner rings.
In the pattern all rings are split rings. However, one can start the motif with a normal ring, and add new thread for the 2nd ring and onwards.
I ended with a normal ring, sewing in the tails. But one Can hide tails in the last split ring without sewing.
Future Idea : It would be interesting to see this motif repeated as a magic pathway to form a larger lace fabric! And notice how one can form a diamond by removing 2 and adding 1 ring ?!

Many many months back, I had also attempted Usha's Fringed Petals motif but worked only the first 3 rounds. What I liked about this is how the clever designing of 3rd round lifts the rings of the previous round, ending in a raised and curved textural effect! Notice how they are ‘normal’ in the 2nd round (above pic), but suddenly acquire that 3D look when the next round is worked (pic below)?

However, the working was fiddly and I was not quite happy working through it. I would definitely like to see more of that curving effect, though !! 
My apologies for not completing the motif - I intended to, but never got around to it. I might some day when I find where it's run off to ;-D
This motif also uses long picots with CWJ (lp_cwj), notes for which I shared here and again in the beaded version here.

An enjoyable break, thanks Usha :-))) Now back to some more pictorials - I'm on a roll and want to make the most of it while I can (but can I beat my own record of 15 posts in Sept 2017?!). I hope you will be tolerant through it all :-D

Monday, 21 May 2018

stabbing at tidbits

Pin It now!
A few small pieces, mistakes and all ….


Started with Lavi’s new Wheat Circle earrings. I miscalculated and made only 9 rings. 
Although I liked the small circle I wasn't happy with the teardrop suspension.
With my new bead-stabbing, I was enthusiastic to have another go. 
This time will all 12 rings and the teardrop pierced with a jump ring, 
then suspended on a double chain of beads. 
I also increased the number of seed beads on the bare thread. 
Much better but wish I’d stuck with the earlier shade of green thread.
Both worked in Anchor size 20

In between the two, I worked this long overdue Sunflower in Maltese Tatting by Jane McLellan. I need occasional refreshers for some of these techniques and this is such a pleasant project. But I had beads left – hmmm! Not that it shows much.
While blocking I deliberately went with angular petals and noticed one was way smaller 
– hey, that’s to give it a ‘natural’ look ;-P
Yellow is Anchor size 20 and black is size 40.

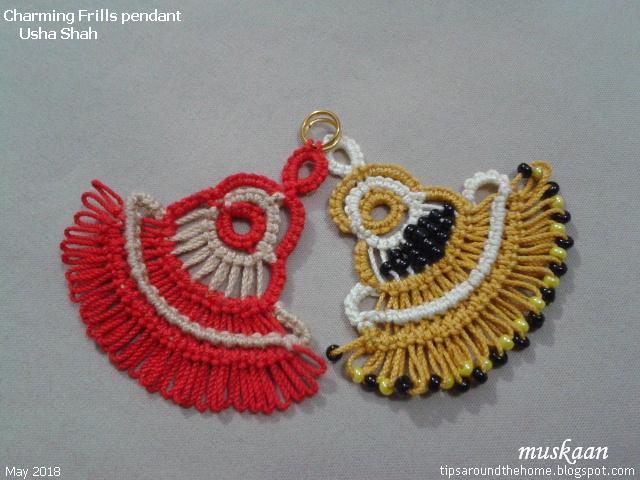
Lastly, as I mentioned in my earlier post, I wanted to see how Usha’s Charming Frills looked with beads. Had another stab at it. 
Oh and another reason was that in the last fringe row, I had made 2 CWJs in one picot (since it was not clearly specified at the time – the pdf has been updated now). I thought that was the reason my pendant was broader, with the stitches all neatly lined up.
As it turns out, the last row is a chain with alternate CWJ and double stitch, with long picots between each obviously.
The black beads in the center are in a diamond formation. For this I reduced one long picot 
(only 7 instead of 8 and following with multiples of 7 in subsequent rows).
Too late I noticed the threads were tied off at the wrong point (gap seen on left side)! 
I had worked the first pendant from the prototype while the pattern was still being polished for presentation. So I’m happy to have made it again as per the final.
Worked in Anchor size 20.


many thanks to Lavi, Jane, & Usha for sharing their lovely patterns

happily tatting always – beads and mistakes and all  ;-P