Showing posts with label mock rings. Show all posts

Sunday, 30 January 2022

who knew

Pin It now!

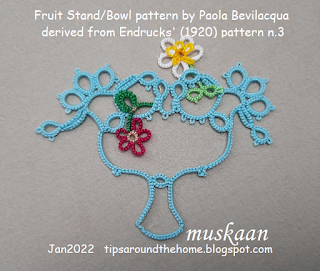
 ... who knew a fruit stand or fruit bowl would emerge from an edging pattern! Who knows what a designer's imaginative eye can see?!
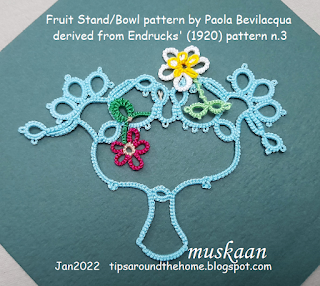
Endrucks' n.3 edging pattern gave rise to 2 square motifs and now the seed has sprouted a fruit bowl, thanks to Paola Bevilacqua. Recently she shared her prototype, with sketched pattern, in our Endrucks 1920 Project Facebook group and the very next day she tweaked the count and posted a beautiful new version with modified count, in stepwise pics and diagram. It immediately caught my fancy and I quickly tatted it up.
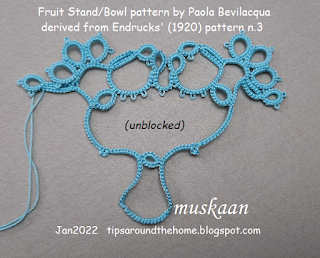
This is fresh off my shuttles, unblocked. And I was trying not to snug the chain stitches too tightly, resulting in uneven lengths on either side. Lesson re-learned: snug tightly; you are no good with loose tension ;-P Or, apply Anita's tip to measure the chain but using a grid paper background to assess the curve as well.
As I worked the motif, so many minor details emerged making me truly appreciate the thought Paola put in!

My Thoughts/Notes -
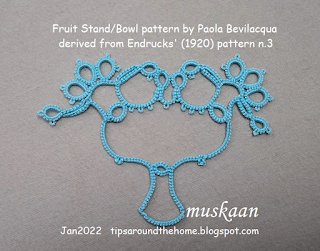
1. I started at the leftmost single ring.

2. Techniques: 2 shuttle tatting, fs/bs tatting, thrown/floating rings, changing the direction of a chain, inward picot, lock join, mock ring using a lock join.

(refer to pic below)
3. Inward picot - the orange arrows show where I used a folded chain to flip a picot down - set-a (picot, 2fhs) and set-b (2shs, p) because I wanted a bit of space before the thrown ring. At other places I used a paper clip.
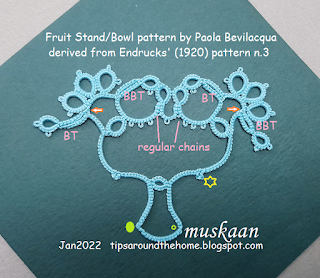
4. There are 3 types of paired chains! 
    BT: worked as block tatting - parallel chains where the new chain lies above the previous one and a lock join is made through picot; 
    BBT: worked as block below tatting - parallel chains where the new chain lies below the previous one and is joined normally through an inwards picot;
    regular chains: where the stitches face each other and the chains are joined normally. Now here's an idea for yet another Block Tatting effect !!!
5. Tiny Mock Ring -The yellow star is another important designer detail. This is a 3ds chain lock joined at the base to form a mock ring. Now if it was a SCMR, we would've had a clear point/break/dip in the chain's inner edge. By using a lock join, the picot creates a kind of continuum with barely a break in the inner edge!
I should add small mock ring to my Mock Ring series since the visual effect is different from that of  larger mock rings

6. Pointed Chain - The small green ring is where I tried to make a 1ds SCMR to create a point, and failed miserably, forgetting that the chain turns course at that point. 
Hence I followed Paola's example for the left one, switching shuttles and reversing/turning work to continue. The point is more marked here. 

In Anchor size 20, it measures 10.5cm x >7cm at the extremes. I rummaged and found these 2 daisy picot flowers to add some colour and density. When I tat this again, I'd like to add lots more colour and picots for a bowl of flowers, and/or strategically placed beads to enhance the effect! 
It could well be a trophy, too, right?!
This is very appealing to applique or glue to a card topper. Otherwise it needs stiffening to hold it's shape. Of course the bowl outline can be padded tatting (either BDS or inserting extra core thread). Perhaps some graduated treble tatting, too, especially at the base!

Many many thanks, Paola, for stretching the boundaries!

Please don't go by my sub-par model.... once we have her permission, we can put her model and pattern in our Project doc here -

Friday, 17 July 2020

lock join plus

Pin It now!
Many months back, in response to some curiosity and confusion among several tatters, I decided to illustrate the simple progression and functional similarity between a few techniques. Here the underlying common factor is the ubiquitous Lock Join. Add one extra step to the LJ, and it opens up the canvas to change colours, shuttles, and even direction of chains.
I took stepwise pics for each of the combinations back then, but preparing a proper stream-lined article has taken way more time than intended. I am immensely grateful to Anita Barry, Master Tatter, for her proofing and editing.


In order to make the document manageable, it is uploaded as a series of 5 pdfs, each a stand-alone (click on each title to download) –
PLEASE NOTE - Most of these are also Reposition Methods which can be used even without a lock join to change direction, create points or curves, etc.

  1. Lock Join Plus – Executive Summary and practice Patterns for further exploration. (3 pages)
 
How one extra movement after a lock join can open up the canvas to change colours, shuttles, and even direction of chains. 

For starters, a simple 2-colour motif is used where all chains face the same direction. But for further exploration, more patterns are listed. 

  1. LJ Plus - Lock Join (LJ) pictorial (1 page)
 
How to make the lock join using both up and down loops. 

Notice how the colour blips in the 2 right joins are larger than the remaining 3. If the down loop LJ is followed by a 2nd half-stitch, the blip is almost hidden completely.
Links to undo a LJ and variations that include making a LJ with 2nd shuttle.
See also Lock Join in Mock Rings - 


  1. LJ Plus – Reposition pictorial (1 page)
 
A laissez-faire crossing of threads. Simple, quick, vintage. Compare how chain segments change colour and the slight overlap at the start of each chain.

  1. LJ Plus - Shoe Lace Trick (SLT) pictorial (1 page)
 
Tying a half knot outside the LJ – overhand tie or SLT. Again chain colours get switched. SLT also allows us to switch the core thread in instances when the shuttle is running low on thread.

  1. LJ Plus – Reverse Join (RJ) pictorial (2 pages)
 
Encapsulating or entrapping the other thread within the LJ. Created by Elaine P Gan (tattingbox). 

Pics showing an up loop and a down loop. The latter 
minimises the colour blip in a RJ as well.

Functionally the same as crossing and SLT after LJ, but more elegant and efficient – a smooth transition.


After each or either of these, if we turn work, reverse work, switch shuttle, and/or direct tat (unflipped stitches) the next chain, we add another dimension – changing the direction of the chain! Along with colour. Our choices multiply! And we might even be able to work throughout with just one shuttle and ball. To explore these choices, some practice patterns are listed in the main pdf. Besides block tatting, think also of filet tatting, especially in 2 colours, where these can be used effectively. I forgot to mention the role of lock join plus in mock rings and mock onion rings, but you get the idea, right? Wherever you have 1 or more chains joined below, play with LJ Plus!
I used all the above 4 in this vintage edging from Priscilla Tatting Book3 Fig 29 where the chains move to and fro. We can turn work after each chain or we can work every alternate chain directly (reverse stitch - unflipped). I started with LJ, then tried reposition, SLT, and RJ after every 3rd chain. Shuttle in hand changes depending on our choices.

So I'm sure there is no need to spell out why I presented this article/pdfs in the way I did? There is lot of scope to play and design because each method has it's own pluses and minuses!
Do you see a butterfly in the above arrangement? Time to pick up my shuttles again and work out a pattern ;-D
Before that you might get fed one more lesson, so stay locked in ;-P

UPDATE 1: (2021) When working with only one shuttle and ball, changing the direction of chain using direct tatting - https://tipsaroundthehome.blogspot.com/2021/06/2nd-shuttle-or-ball.html 
UPDATE 2: (2021) Carrying on with functional movements, see pictorial Twist Work (TwW) -
UPDATE 3: (2026) The Catherine Wheel Join pictorial accompanied by diagrams by Ninetta Caruso- https://drive.google.com/file/d/1UmmjBqNwwQYIb9Ms9_-T5K6dPnZENCwl/view  
UPDATE 4: (2026) Beaded Lock Join (based on Vicki Clarke's suggestion) - https://drive.google.com/file/d/1rL7ZLsSUwKqmkZy210yqP03RgVAsUOxN/view  


Thursday, 2 July 2020

what an intrusion

Pin It now!
A few weeks back, while tatting the doily, a simple mistaken intrusion brought on the realisation this could become a new picot method! Hence I'm calling it the Intruding Picot for now. Suggestions for a different name are welcome.

And as I thought over it, more and more applications arose, making this picot not just practical, but versatile. Some applications are not visibly elegant, while for others it seems tailor-made. A peek into my first trials .....

The topmost scroll shows a picot, including 3 graduated picots in 3rd, intruding in the ring space.
In the 2nd ring, a direct comparison can be made between normal picots and this slightly textural one.
On chains, I tried directional tatting with these new picots.

Tried it on onion rings. The sequence of tatting is altered - outer ring made first, with one intruding picot in the middle. Then the inner ring is worked and joined to that picot. The extra length works as a decorative picot.
I first came across this altered sequence by Ninetta (please see details in section 1.3 here). But there is no need for 2 picots with this unobtrusive intruding picot as you can see below ....

Next the outermost chain/mock ring was worked and joined to that Same single intruding picot!
Nifty, eh?! And pretty invisible, too.

And finally for the present - mock rings. No more holding the core thread with a paper clip! Make intruding picot, tat the 'ring' segment, and join to the picot. That's it!
Oh, no there's more... unlike the paper clip inward or core thread picot, we can actually alter the length of the picot. Notice the difference in the base of each mock ring - the variability in 'distance' is deliberate.
There is a slight twisting of chain segments near the picot - needs work and practice.

There are a couple more ideas I want to try out (one as a ring filler), but couldn't resist sneaking you a peek! So, what do you think? And can you guess how it's done? It is so simple, you'll be stumped!
Do you think it is worth sharing - will you be willing to try it/use it? Can you think of more applications? Waiting eagerly for your comments and suggestions .... please don't disappoint :-)))

Related Posts showing pictorial and effects - 

Saturday, 19 October 2019

false CTM Part 2

Pin It now!
Continuing the concluding Part 2 of false ctm. As expected (see comments in Part 1), most of us already use this trick in some form or situation. Now we have a name for it (thanks to Jane McLellan), and a number of situations listed together for easy reference. 

Combining CTM and False CTM

Following are examples where one set of ball and shuttle is wound ctm, but a 3rd shuttle/thread is also at play. The first shuttle or the ball is used only later.
Can we call this false ctm?  Or is it delayed ctm?! ;-D

4. False ctm in 2-colour tatting
In the doily I started, I wanted to add colour only in the center, and the next few rounds were to be in ecru, worked continuously. Here’s what I did –
Wind 1 shuttle fully, but keep the thread connected to the ecru ball as in CTM (NOTE: ball can be replaced with a 2nd shuttle; here I used ball). Wind another shuttle with some green thread for the rings.
I started with the green ring, using the ecru ball for chain. The ecru shuttle lies to the side and will not be used in this round.
Notice there is only one green tail at the beginning, hidden in first ring!
After working the last chain (seen from back in first pic), cut the green thread, join to base of 1st ring, and hide tail on the other side of same ring (or under next row element).
I now have 2 ‘continuous’ ecru threads ready to start the next round!
If pattern calls for 2 shuttles, pull out thread from the ball and wind 2nd shuttle – a ‘false ctm’ – or continue with ball and shuttle.

5. False ctm in SCMR
[ SCMR – self-closing mock ring ]
A mock ring is often used as a central ring/medallion to climb out into the next round. Usually the ring is made separately if using 2 colours, or we climb out using a mock picot for which CTM is required. Following are examples where false ctm is used effectively.

I like to use a different colour for the ring. Pull out a length and wind in blue shuttle to make the SCMR. When the ring is closed, make a mock picot to climb out (#5 in collage above. If the pattern calls for it, we can tat a split ring to continue in ring/chain round). Now add new thread to the red shuttle, ie. on the core thread, and continue with next round.
Notice in step #8, 3 shuttles are still attached. This gives me a choice of which shuttle to use to continue, if I have sufficient thread in each.

This heart is another example of 2 coloured tatting using red mock rings in center. The false ctm involves 2 balls and one shuttle (yellow is ctm ; yellow shuttle & red ball is false ctm). Since the outer round is simple rings and chains, I snip off and later hide the red tail, continuing only with yellow ball and shuttle. 

Above is an example where a ball and shuttle are used, but the threads are cut/different colours. Use shuttle to make the mock ring (tatting over ball tail) and climb out. Hide the shuttle tail in next element.
Ball can be replaced with a 2nd shuttle. Colours can be switched. Possibilities galore.


In summary,
Anything that we do with CTM (continuous thread), can be done with False CTM, and much more, since the latter allows use of different colour. The main thing is to Look before starting and review choices. We don’t Need to start CTM every time a pattern calls for it. Use your discretion to convert it into false ctm, if required and play with leftover threads and colours.
My pictorials depict a sequence where the threads are in position for the next element or row. However, we can use a shoe lace trick (SLT) to change positions.


And don't forget to join me in my next post - I have a New snowflake that I am itching to show you, along with a pattern!!! 

Tuesday, 1 October 2019

a plump crown

Pin It now!

Anita invited me for a duo tat-along. Life and time zones got in the way of simultaneous tatting, but it was still fun. Someone had sent her the image. I traced it back to the original. Not difficult really – look for some watermark or notation, such as MC…H in this case. 

It struck a memory, and I typed “MC…H tatting” in Google. The search took me to pinterest, and after going round in circles for a bit (blame it on my Opera browser), I found her Instagram account.  And am I glad for taking that time/effort. She’s the one who tatted the World Map! Check it out, if you haven’t – she has pics of the map taking shape. What an impressive project.
It has consumed such large pearls and become plump!
Did it think it was Cleopatra?

A one-pass motif using a split ring to climb out, hence 2 shuttles required.

The boring stuff –
Anchor Pearl Cotton size 8 (shade 00297).
4 Crystal bicone beads size 8/0. 4 Pearls 10mm (this should be smaller!).
12 gold seed beads in shuttle1. 5 gold beads in shuttle2.
Final measurement : 2” wide x 1½” high.
   

My notes -

  1. The middle row has 4 large Mock Rings – chain is lock joined at both ends to the same picot. It was Anita who noticed it (thank you). 

  1. I had a vague idea of where I wanted some beads. Hence I had to unwind my shuttles before the last row to string the gold beads. The others were loaded on a long loop using #13 crochet hook.

  1. The pearls are too large, causing the crown to become flatter and broader, besides stretching out the rings. My apologies to the designer.

  1. An opportunity to practice beaded centers - 2 methods. I went through a lot of tuts/demos and liked a method I first saw in Carollyn’s blog for the crystal bicones. It had been done before by Maranta . Karen Cabrera has included it in her lesson 162 - Two ways of adding beads to center of a ring.  
  1. Some elements got stretched or misshapen - very unhappy, but if I make it again, I can do better. Choose beads of right size, and make the row2 picots longer (the ones seen in the collage pic).  

  1. I wanted to add a single gold bead at the intersection between row2 rings. Problem solved as follows – lock join chain as normal ; move bead from core thread ; make Another lock join in same picot, but on other (right) side of bead.
    Raised Beads (alternate method)
    Voilà, the bead lifts up! The bead in center of cross is added in same way, although I should've added in after the 2nd segment. The view from back shows those beads are invisible.
I then remembered coming across Raised Beads in Jon Yusoff’s blog. Went hunting later and found that she already has the bead within the joining picot. 
In case we forget to add bead(s) to the picot beforehand, or decide later, the alternate method can be used. 
So, there are Numerous solutions to any beading dilemma, as evidenced by my Floating Beads method !

  1. Made the cross on top with chains facing inwards. Couldn’t be sure of how Hatsu did it. Anita made the chains facing outwards, hence must’ve used held the picot open on core thread. 

Excellent diagram, clearly showing which element has the picot and which element is linked to it… thus establishing the sequence. Moreover, regular picot join is indicated by a line, while a lock join is shown with a dot followed by line.
There are so many things I should incorporate in my own diagrams. Must remember.

A pic of her wearing the crown as earring! And some more of her free patterns. I especially like her star.


Many many thanks, Hatsu. Your tatted world map is Incredible!
And thank you, Anita, for including & inspiring me.


Friday, 29 June 2018

Mock Rings 2 Lock Join

Pin It now!
Time passes swiftly!
The third post in the Mock Ring series … 
Before I begin, there are a few resources and examples that I have been collecting, some of which could have been included in the previous segments (under-over join). eg. Frivolé used the U-O join to great effect in the Victorian Trellis Doily here. (This doily, as well as many broad collars with mock rings, is from The Priscilla Tatting Book, 1915).  And Eliz’s exploration here. 
These, and more, will be listed at the very end of the Mock Ring series.

Lock or shuttle join is a more frequently used join to make mock rings. Many different variations are described in segment 2.

Mock Rings 2 : Lock Join  

For ages a lock join has been used to create a mock ring out of a chain. Many antique patterns are testament to this. Even today, lock join is more common than the under-over join as far as mock rings are concerned. Variations arise depending on where the join is made.

 Lock Join to earlier picot(s)
A chain can be tied down at both ends, through a picot on an earlier row/element to create a loop resembling a ring. It may be through a single picot or two closely placed picots. 

To distinguish separate rows, Row1 here is tatted in cream (shuttle & ball thread continuous). 
A 2nd row is worked over this, using the small picots to make mock rings. 
For Row2 shuttle contains cream thread joined to a ball of variegated thread for clear distinction.

2A. Lock Join: to same picot
A chain is linked to a previous picot to start a mock ring, and again to the same picot at the end of the ring. Thus the mock ring starts and ends at the same point.

 
When the picot on a previous row is reached, the chain is lock joined to it. 
Pull a loop up through the picot and pass shuttle through this loop. Then tension the loop.


Continue tatting the chain for desired length; 
pull up a loop through same picot to make another lock join...

A mock ring is formed. 

2 such mock rings separated and flanked by chains are made.
In 2nd mock ring, instead of pulling a loop up, the loop is pulled down through picot and shuttle passed for the lock join. This creates a tinier footprint as is visible when the 2 mock rings are compared.

2B. Lock Join: to separate picots
Picots may be placed close together on the previous row (the ring in Row1). Mock ring is formed by making a lock join each in separate picots, 1 or more stitches away. This gives a slightly open ring since the ring starts and ends at different points.

After anchoring the chain to one picot with lock join, 
continue chain and lock join to another picot.
Go around the ring joining to alternate picots. 
Antique patterns often cite these as mock or false rings, though modern notations simply instruct us to make chains.

There are more variations in this category. Perhaps you can guess which? 

…. to be continued

Mock Rings 2 LJ mock onion rings

Pin It now!
Continuing from the last post … I’d like to point out that the categorisation I have adopted is not watertight. This is the closest I could get to organising the various types/styles of mock rings in an orderly fashion, choosing one main feature for grouping so that it becomes easy to remember and recall. Along with the similarity it highlights the slight variations.

Lock Join - Mock Onion Rings 

In previous segment the chain was converted into a ring by joining to picot(s) on a previous row. Now we move closer home with the join coming at the ‘base of the ring’. Here the ‘base of a ring’ refers to the bare thread between rings in a previous row or to a previous element.
When the chain is very close to the ring edge, it creates the impression of an onion ring. 

Traditionally an onion ring is made of usually 2 true rings encircling the previous one in flat layers - all starting and ending at a common point. However, if the layer(s) is worked as a chain, it becomes a mock onion ring.

2C. Lock Join: to bare thread between rings in previous row

In this variation, the join is made to bare thread between rings in a previous round. These chains give an effect of another ring encircling the earlier ring – a ‘rudimentary' mock onion ring.
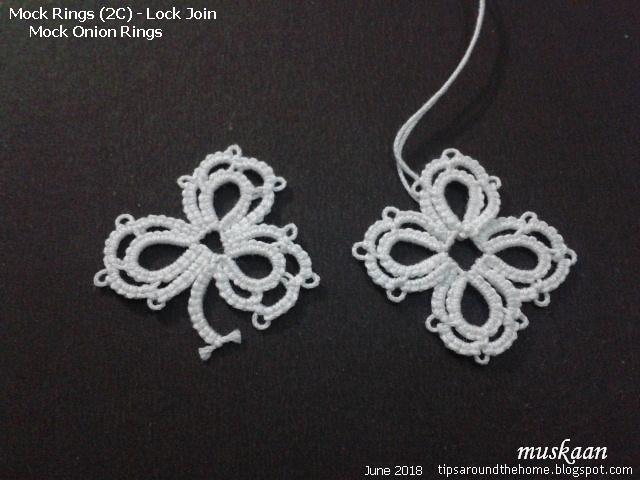
The Shamrock Leaf in above collage is made in 2 continuous rounds. The medallion of 3 free rings is made first, leaving a bit of bare thread space between each. These are true rings.
An outer chain round is then added. Each chain is lock joined to the bare thread between rings, giving the impression of onion rings.

[ Reference for section 2C is from the Craftree thread: Are these very old onion rings?. It refers to a pattern on p.28 of The Ladies’ Worktable (1871, March 4). ]


2D. Lock Join: to bare thread/base of previous element 


In onion rings, with each additional layer, the size of ring increases and a large ring is difficult to close. So, instead of true rings, the outer layers are worked as chains in both needle and shuttle tatting. Each chain layer is lock joined to the space at the beginning of that layer. It now resembles a ring.
In the above collage, the 2 inner cream rings are true rings followed by a chain using ball thread. After encircling the rings, the chain is lock joined to the tiny space between two layers. We can continue to add more layers in similar manner.
In the Dancing Peacocks medallions, only the innermost ring is true. Switching between 2 shuttles with different threads provided alternating colours.

In the lead pic, the mock onion ring on the left is made with twin true rings, followed by 2 mock ring layers or chains joined back around. 

[ For more details on onion rings and mock onion rings - Types of Rings by Judith Connors
(free sign in to Craftree to access document) ]

This concludes Category 2 - Mock rings made with lock join. Even though lock join is an essential feature of the next set of mock rings, the 3rd category will focus on linking to a picot at the start/base of the chain itself. 

....to be continued

Related Posts

Tuesday, 29 May 2018

Mock Rings 1 U-O Join continued

Pin It now!
In my haste to upload, I missed adding some details to the pics in previous post. These have now been notated and updated.

Continuing from previous post ….


The following are again mock rings made using the Under and Over Join. But we now have a tiny picot at the start of the chain. When the chain is joined back to this picot, it creates a mock or false ring.


1C. Under and Over Join: With joining picot; Unattached rings

 
 Make a small picot at the base of the chain before tatting the ‘ring’ portion.
Since the mock ring is unattached, it is easy to place 
one thread above and other below the chain.

 
Pull up a loop of ball thread through the picot, pass shuttle, and snug. 
A simple picot join converts this chain into a mock ring. Continue tatting.
Note: Although we have made a picot join, this arrangement of joining an overlapping chain is included in under-over join. 

 
This time the shuttle thread is below and ball thread above.
Pull a loop of ball thread down through the picot, pass shuttle and tension the join.
Two unattached mock rings made with under-over join 

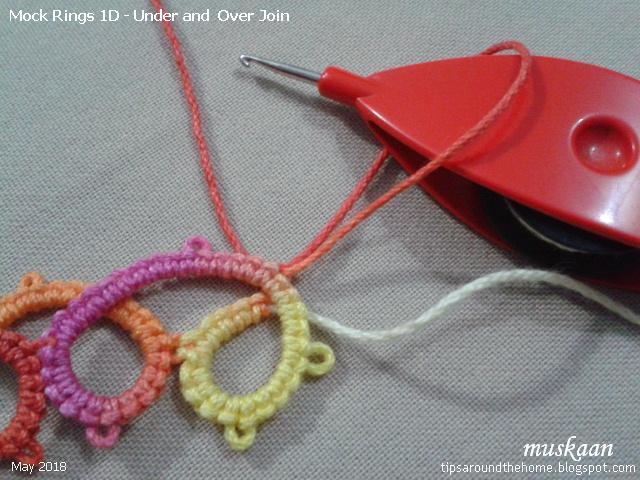
1D. Under and Over Join: With joining picot; Attached rings

 
Here the ‘ring’-chain is linked to previous ring and both threads are above the chain.
Pull ball loop down through picot, pass shuttle and make the join.
This is reminiscent of the down join.
 Continue tatting.

 
For mock ring #8 both threads are below the chain. 
Pull up a loop of ball thread through picot, pass shuttle and snug the join.
Notice the change in overlap between mr7 & mr8! Continue tatting.


as seen from the back.
This above sampler, with joining picots and overlapping chains that form loops is also known as the Running Scroll, for it’s flowing cursive style.


This join can also be used to create a line of back to back rings – called a Cord of Loops. We now prefer to work this as a split ring braid or mock rings with a flatter closure. The latter will be discussed in future posts.

Observations
  1. In all these mock ring instances, the core thread remains free to slide.
  2. They can all be worked with a ball and shuttle.
  3. All mock rings face the same side as the normal first and last rings when we reverse work after first ring.
  4. The under and over join creates a slight overlap/layer when crossing over, giving the mock ring a dimensional effect rather than lying absolutely flat.
  5. The overlap changes depending on which type of crossover we choose.

This completes the first category of mock/false rings using a join across a chain.
But there are so many more ways of joining or closing a chain to create a faux ring. While I work on that presentation, I invite you to sit back and recall all the different ways in which you may have made mock rings. It is quite an eye-opener. Please share your list in the comment box in case I have missed some.


Main references:
Tatting Technique & History – Elgiva Nicholls, 1962. (running scroll & cord of loops explanation  on p94, models on p96)
An Illustrated Dictionary of Tatting – Judith Connors, 2007.

…. to be continued 
See also -
https://tipsaroundthehome.blogspot.com/2018/05/mock-rings-1-under-and-over-join.html
https://tipsaroundthehome.blogspot.com/2018/06/mock-rings-2-lock-join.html
https://tipsaroundthehome.blogspot.com/2018/06/mock-rings-2-lj-mock-onion-rings.html