Showing posts with label quatrefoil. Show all posts

Wednesday, 6 October 2021

did it work?

Pin It now!

 Over the last several weeks I've been getting a lot of requests for sharing my old patterns. During one of Google/Blogger's updates, there was this notification that old urls might change. I didn't pay much attention till these requests started showing up through Google Drive. 

Fortunately there is an option right in the email itself to share the document. Now the reason I write this post is because I have no idea whether it has worked or not since nobody came back with any feedback, though I had asked a couple of emailers. 

So, if you had requested permission, it would help if you let me know whether it worked. Because when I click on the links in my blog, they open fine.

Here is one of the many requests from my Quatrefoil series from 2017 -

The pentagon and hexagon patterns are not yet uploaded ....

...but this flower and the triangle and square patterns are in public domain. 

You can find more than the motifs in this fun range by clicking on this tag - https://tipsaroundthehome.blogspot.com/search/label/quatrefoil 
And direct pattern pdf links to Quatrefoil Triangle - https://drive.google.com/file/d/0B5MqI5ByadI4RzNtR0U3MUg1ajA/view


I chose this because I wanted a few pics from this pictorial for another RR I have in the works and the request happened to come in. Yes, I have a lot of stuff going on at my end, including completing The Big E Project, but sadly no time to compose proper posts to share. But I am also happy to see some of my snowflakes popping up in Facebook posts! 
More fun news soon ....

Friday, 13 April 2018

magic pathways for fortuna square

Pin It now!
On seeing the Fortuna Squares tessellated into a coaster/mat, I was asked whether it could be worked as a magic square. Always up for a challenge especially puzzling out a maze!

Yes, it can be worked continuously and infinitely using only split rings! You can make it as large as you want. And you can choose between two easy pathways, neither of them diagonal! Moreover, the square motif is completed before moving to the next one, making it easy to keep track.

 Magic Pathways for Fortuna Square
Pattern is Fortuna Square by Henna J Hwang for Tat a Brussels Monument in Pink.

   If you want a pdf download of this notated pic, please let me know
Disclaimer: Since I haven't actually tatted the lace fabric, despite spending hours mentally figuring it out, you might find a mistake or surprise - please do share your feedback with everybody. 

  • Notice that the very first square (red) starts with 2 back to back inner rings and has a single SR to climb out.
  • All subsequent squares will have 3 split rings and are basically worked like the 2nd square (blue) .
  • This numbering sequence (red/blue) follows directional (fs/bs) tatting where the inner rings are worked backside. I chose this because I find it easier to work & keep track of such patterns when worked clockwise. Note that here the motif itself is worked clockwise.
  • The numbers in orange & yellow are for traditional tatting. Notice that tatting is counterclockwise for first motif and when we climb out, the next squares and pathway will follow suit.
But we need we need to decide which path to take after climbing out of the 1st square.

Pathway #1 : Along a Straight Line (pink arrows)
This pathway is ideal for a large rectangle. 
Fig 1
Fig 2
We can continue upwards along a column/side to desired length, then move to the right, tat a square, and move down, joining to the motifs in the previous column. (Fig 1)
Eg. the red/blue numbering with backside rings in fs/bs tatting. 
Instead of up, if we work the 2nd square to the left of the 1st one and continue down this side, then we will be adding new motifs along a row. At the end of row, make a motif to the right and move back down the row. (Fig 2)
Eg. the orange/yellow numbering in traditional tatting.

Thus we can move up & down in columns and new motifs will be added to the right; or we can move across in rows and the fabric will increase downwards.

TWoT Notes : If the first square motif is worked in clockwise direction, then the column pathway will move from left to right. If it is worked in counterclockwise direction then the pathway will move from right to left.
Opposite is true for the row pathways.

And here’s an interesting observation : After completing one pair of columns/rows, we will need to switch the way we do the elements for the next pair of columns/rows. So if we started with shuttle1 as the dominant shuttle for 1st & 2nd columns/rows, when we turn back for the 3rd column/row, shuttle2 will become the default in next pair; and back to shuttle1 for next two .... 

Pathway #2 : Along a Spiral (green arrows)
This pathway is ideal for a large square.
Fig 3
Fig 4
Here we tat squares 1 & 2 (red/blue) as notated in the main image, then instead of moving along upwards, we move to the right to work the 3rd square, and again to the right to work the 4th square, joining back to 1st square. We now have a larger square made with 4 motifs! (Fig 3)

Continue on to the right of 4th motif and then around the four squares as shown in the grid. The next round will have 16 motifs, and this can continue infinitely in an ever-increasing spiral.

For the orange/yellow squares, the spiraling movement will be counterclockwise. (Fig 4)

TWoT Notes : If the first square motif is worked in clockwise direction, then the spiral will also move clockwise. If it is worked in counterclockwise direction then the pathway will move counterclockwise.

Here is a trial of the Quatrefoil Square magic pathway (scroll down to end of post) using this spiral method. 
Note that each individual square motif is worked in clockwise direction, and so the larger 4-square fabric also follows that clockwise spiral, starting from bottom right. 


Now the question arises - Are the above fabrics magic squares or simply pathways? I will discuss this in my next post, and after that there's an edging/necklace pattern that I'm working on.
till then, happy tatting always :-)

Related Posts :

Friday, 24 November 2017

multi-tatting

Pin It now!
squared and then some...
I’m getting pretty sick of pink, aren’t you? No option here....


Facebook-ers are already aware. I came across it on Craftree. Tat a Brussels’ monument in pink . Cathy de Greef (Canarithy) is calling for a tatted square in pink to turn the global spotlight towards tatting as well women’s rights. She already has a pattern here. However as long as the finished square is 1.18x1.18” in size 20/30 one can use any pattern.
With Anchor 20 this works out to 1.25”.
I started with a ring and went down instead of around. This is a medallion with a central/shared picot on first chain ! Switching shuttles accomplished the entire piece. The picots linking adjacent chains could've been slightly longer.
She will sew all squares together and adorn a monument with the fabric. The FAQ has all details. I’m not mailing it, just showing my support here. Many tatting groups around the world are already on the task - come join in.
ËÌËÌËÌËÌË

Friendly Anita Barry sent me a delightful presentation titled Taboo Tatting. Print the document on both sides of a page and fold to get 8 little pages of tips, patterns, and ‘puzzles’! It is very handy for travel-tatting. I love how inventive she is!   
eg. she chose a vintage square pattern. You know the 8 alternately small and large outward rings? And all those ways to avoid a twisted picot when joining last ring to first? Here, gasp, she deliberately chose to twist the picot when linking to previous ring.
And I thought I was so smart, thinking ‘why not increase the length of the picot slightly so that the twist is more visible?’ Dummy!! It simply increased the distance between rings!!! Unlike a regular long picot which can be squished and pulled into an elegant double picot, the twisted one will tend to stay straight and in place. I couldn’t accommodate all 8 rings without ruffling. Lesson learned – the square becomes a diamond.
Instead of regular decorative picots, I used my twisted floating picots.
ËÌËÌËÌËÌË

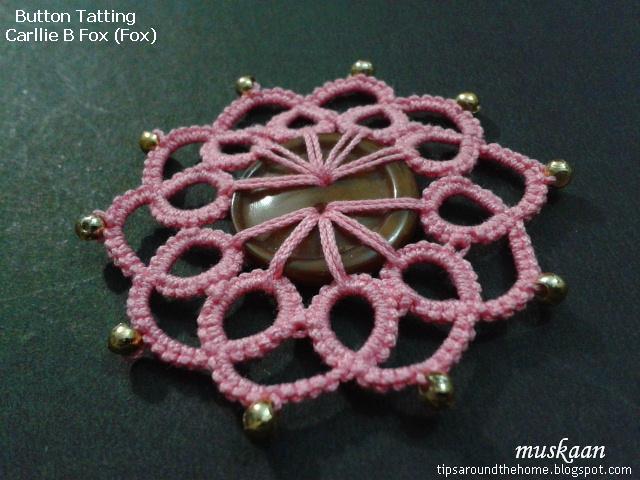
Still had 2 lengths of pink thread left over and some time. Beaded the ball thread and wound both scraps on a shuttle. The only ‘decorative’ button I could find in my stash only had 2 holes. But I finally tried out Fox’s enticing button tatting!  Oh it was so quick and enjoyable and instead of 12, only 10 repeats sufficed. 
Here I was smart ;-P I worked 5 rings in one hole then continued to next hole. It was easy to see that 5 more rings would take me around. Otherwise I could add one to the first side later.
I can see why this can be addictive, except I don’t really know where I’d use them all. She's been adding a tail to use as a bookmark. I can see this as a bookmark charm or pendant/jewellery.
The button is 2cms and with tatting it comes to 5cms across. An enclosed space medallion where the central space is covered with a button.
ËÌËÌËÌËÌË

Here I travel back in time. Without changing the stitch count, I worked my one-pass quatrefoil square medallion in the traditional way – tatting individual quatrefoils and joining as you go. One can play with colours in a different way here.
ËÌËÌËÌËÌË


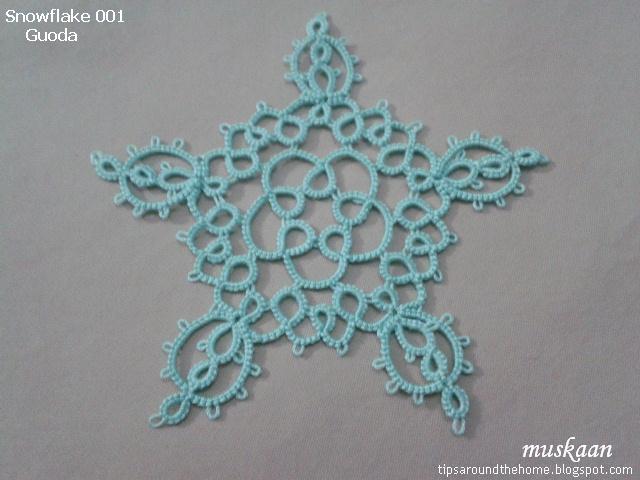
Last but not least, I test tatted Guoda’s lovely first snowflake pattern. Her way of notating conflicts with what I am used to or familiar with. But then there are so many ways to skin a cat! Once I changed the diagram to my comfort, it worked smoothly.
I enjoyed working the LTROR (loop tatted ring on ring), and didn’t mind when the thread broke while closing the ring on 4th repeat. Not many patterns use the LTROR, preferring to substitute it with a SCMR. 
In size 40, it measures 8cms across. I can do a better job if I tat it again.
ËÌËÌËÌËÌË

hmmm, one square meal or tatting a square ?
Which would you choose ;-D

Friday, 18 August 2017

hiding ends knot-free

Pin It now!
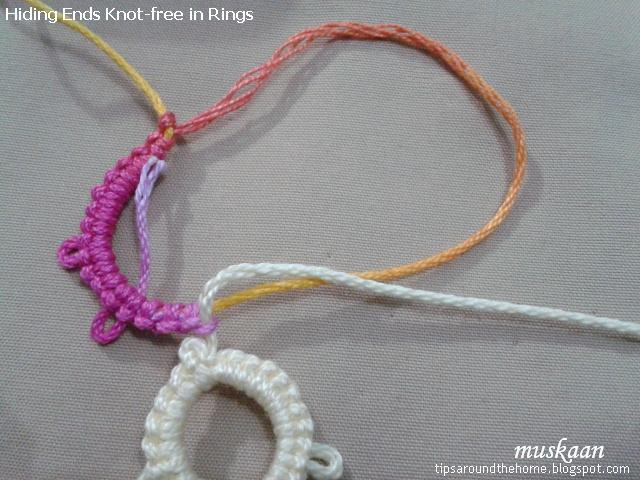
Hiding Ends Knot-free in Rings
aka
How to start and end patterns in the Quatrefoil Series


I’ve been meaning to share how I start and end the quatrefoil patterns. There are 4 tail ends to hide, 2 colours, and 2 types of rings at start and finish.
There are numerous methods to choose from, many listed here. So we are actually spoiled for choice.
My personal preferences are  -
  1. to hide tails in separate segments and avoid bulk
  2. to avoid knots while starting or ending
  3. to tat over the starting tails, ending in the ‘middle’ of a stitch ('the middle path').
  4. to whip stitch the end tails.
All these have been incorporated in how I start and end my quatrefoil patterns. Sharing a few process pictures here using Quatrefoil Square -

Leave a very tiny space at the beginning while tatting over tail in first ring. 
This ring is tatted backside (optional).
UPDATE: This loop is used for the final join and Dale Pomeroy coined the term Shepherd's Crook Join for it.
I follow the middle path when leaving tail
 Reverse work and attach shuttle 1 thread, tatting over tail in the ring.

Leave both tails unclipped for now. 

At completion, cut a long tail and thread needle through shuttle 2 thread. 
Pass needle through the space left on ring 1. 
Tug the old tail to bring the rings closer and to eliminate the space. 
Then whip stitch back through second half of last ring.
This is how the 2 tails look. Give another tug and it is now safe to clip the extra lengths. 
For shuttle 1 thread, pass needle through base of second ring, 
and whip stitch back through the last ring. 
All ends clipped after ensuring they are snugged tightly. 
The starting tails were tatted over ; 
the end tails were whip-stitched back through their respective rings. 

Notice how the space between 4 rings is consistent with the space in other 3 clusters (see lead pic) and there is no visible bulk or tell-tale tail ends.
This is merely my process. What is your preferred method(s) ?

Also, I have figured out a way to hide ends in a split ring without any sewing! I still need to take pics but will hopefully share soon.

happy tatting always :-)

Thursday, 3 August 2017

Q squares and flower

Pin It now!
Sharing the square patterns in the Quatrefoil series – 2 versions and a happy bonus !

Quatrefoil Square Flower !

But first things first ….
These are the 2 versions of the square medallion, worked in size 20 and size 40. 

More pics, along with a larger square arrangement - to be converted into a magic square.
I traced out 4 different pathways for a quatrefoil magic square - 
triangulation , squared , zig-zag, and spiral ! 
Tatting trials of the first 2 are shared here. Zig-zag is what I have used for the upcoming bookmark, and spiral is something that popped out when I arranged the 4 tatted medallions for the above pic ! Some of these pathways are rings-only, while some require a short chain to span, especially if one wants to work with 2 colours. But more on that in future posts.

Jane has joined 6 individual triangles to create a circle ! Yet another shape :-)

Each version laid side by side.

Basic Quatrefoil
I have been including a Basic Quatrefoil diagram/pattern with the pdfs. Here is a complete explanation of what a quatrefoil is, and what factors affect and effect the final shapes created from repeating the quatrefoil. The above sheet can be downloaded as a pdf here.
Once the basic working of each shape is understood, the basic pattern for quatrefoil is all that is needed. 

The trial motifs have grown almost exponentially it seems. So I moved them all into a transparent plastic envelop. I took out 2 of my prototype squares when working on the final pattern, and they came out with a phase shift one on top of the other. Voilà it bloomed into a flower medallion ! 
This bonus pattern is included in the pdf. While tatting there is ruffling – an inherent design feature. However, if picot gauge is used as directed, the final piece will lie flat after a bit of blocking.
I tried to add picots to the inner rings, for more of a floral effect. I don't think they add much.

Just ideas if the flower medallion is used as a motif ….
I do want to add a couple of rounds to one of the flowers to create a coaster. Don't know how successful it'll be - my first time !


My next post will be another vintage edging, after which I hope to share how I end my quatrefoil medallions along with the 4 pathways (on paper).

till later then,
 happy tatting always :-)


Saturday, 29 July 2017

tatted triangles pattern

Pin It now!
I had to start somewhere sometime! Already much delayed. Instead of putting all 4 shapes in one document as previously stated, I will be releasing them separately. This will give us all time to work. 
Quatrefoil  Triangle  Medallions


The Quatrefoil Series starts with the smallest medallion, the Triangle - a good, quick way to familiarize oneself with the sequence, general pattern, etc. 

In order to make them ‘universal’, I’ve used Lizbeth threads and whatever else went with it in size. Hence a paucity of options, since my Lizbeth stash is limited to 3 balls ;-P
Size 40 Model – Lizbeth , 2 strands of Anchor embroidery thread. Each side measures 3cm.


Size 20 Model – Lizbeth , vintage Anchor Mercer. Each side measures 4cm.

Note :
Picot length between the split rings plays an important role in keeping the piece flat. The mock picot should be double the size of the inner ring picots. These, in turn, need to be of normal size - err towards small. This will keep the inner circumference small, giving sufficient room for the longer mock picots to span the distance.


Instead of mock picots, one can make a small 2/2 split ring. It creates a solid well-defined outline and changes the shape of the inner colour, too.
Version 2 worked in size 40 Anchor Mercer. Each side measures 3cm.

I hope you enjoy working this triangle. Go crazy :-)
And please don't hesitate - ask questions or leave suggestions.

It is indeed a blessing to have friends who step in to help. I can’t thank Jane McLellan (janemactats) enough for her valuable feedback & suggestions on the pdf presentation. (((Hugs)))

UPDATE (Aug 2, 2017): Jane is joining the motifs into a hexagon.
Below is the pic I had posted here to show one possibility arranging my trials. It can be done in one pass, to be shared ....One path is spiral and easy to work out ... game anybody ?

As for the Quatrefoil Magic Square – I am working on it at intervals and it is throwing up some interesting patterns (and difficulties) because of 2 colours.
Here’s how far I reached with the triangulation method – I’m sure you must’ve already seen Robin’s excellent tutorials on the same.
I could retrace my steps around the pink corner to continue, leading to a much larger piece. But I have cut off the threads for now, in order to work on the simpler sequence of squares. I definitely intend to return to the former, once I can upload more patterns in the series.


Here there are 4 squares, creating one complete magic square using the 'easier' pathway of working entire squares rather than triangles. Since I did not think too far ahead, there is a horizontal pink line on the right which can be corrected easily enough. 
But notice how the inner ecru has created rectangles in this pathway, with a short connection in the center. Also, I have exited in the 'centre' instead of corner and I haven't had time to work further on this. 
I ran out of pink thread here. Instead of continuing with this piece, I have started yet another, using this pathway, but keeping the pink out of the way. Not enough progress to show.

happy tatting everybody :-)

Monday, 17 July 2017

off to The Pentagon !

Pin It now!

I totally forgot to post the pentagon trials in my previous post! These were accomplished before I started on the triangles.
I realize you may be getting bored seeing the same stuff in the same colours. 
No, I do Not like pink! Which is why I chose it for trials – trying to finish off the ball ;-P
However, I think it goes fairly well with the ecru.

I’ve made 5 of these with slight tweaks in stitch count. Arranged in a semi-circle they make a lovely collar. Or continue around to complete the circle fore a lacy edging.
The best part – it can be tatted in one pass !!!! Easy to trace the path, if you enjoy a bit of a puzzle :-)

I'll have to consult my sketchy notes to determine the details here & that is all boring stuff. (In fact I stopped writing notes early into the project, shhhh!)
The size 20 one is ready, so that's what matters.

I've found that size of picots makes a difference in these shapes lying flat. 
The placement of joining picots in inner rings also makes a difference.
And where the ring is split causes the shape to widen/spread out or remain closely packed. 
Fun to experiment with these factors, especially since all rings are 24ds each. And working it in 2 colours adds to the fun factor.


With Wimbledon over, I’ll be able to get back into this pattern-writing and diagramming stuff more seriously & diligently now.
I’m thinking of sharing all 4 shapes in one pdf.
Next I’ll do the bookmark in a separate pdf.
After that I hope to tat these one-pass magic shapes and share as I go. And I promise to use different colours, but in size 40 - it's the size I enjoy working with.

I’ve added ‘quatrefoil’ to the Labels’ list on the right panel. Click or use the search engine to scroll through my previous posts.

 happy tatting always - whatever the shape/size of the building :-)))