Showing posts with label LTROR. Show all posts

Friday, 24 November 2017

multi-tatting

Pin It now!
squared and then some...
I’m getting pretty sick of pink, aren’t you? No option here....


Facebook-ers are already aware. I came across it on Craftree. Tat a Brussels’ monument in pink . Cathy de Greef (Canarithy) is calling for a tatted square in pink to turn the global spotlight towards tatting as well women’s rights. She already has a pattern here. However as long as the finished square is 1.18x1.18” in size 20/30 one can use any pattern.
With Anchor 20 this works out to 1.25”.
I started with a ring and went down instead of around. This is a medallion with a central/shared picot on first chain ! Switching shuttles accomplished the entire piece. The picots linking adjacent chains could've been slightly longer.
She will sew all squares together and adorn a monument with the fabric. The FAQ has all details. I’m not mailing it, just showing my support here. Many tatting groups around the world are already on the task - come join in.
ËÌËÌËÌËÌË

Friendly Anita Barry sent me a delightful presentation titled Taboo Tatting. Print the document on both sides of a page and fold to get 8 little pages of tips, patterns, and ‘puzzles’! It is very handy for travel-tatting. I love how inventive she is!   
eg. she chose a vintage square pattern. You know the 8 alternately small and large outward rings? And all those ways to avoid a twisted picot when joining last ring to first? Here, gasp, she deliberately chose to twist the picot when linking to previous ring.
And I thought I was so smart, thinking ‘why not increase the length of the picot slightly so that the twist is more visible?’ Dummy!! It simply increased the distance between rings!!! Unlike a regular long picot which can be squished and pulled into an elegant double picot, the twisted one will tend to stay straight and in place. I couldn’t accommodate all 8 rings without ruffling. Lesson learned – the square becomes a diamond.
Instead of regular decorative picots, I used my twisted floating picots.
ËÌËÌËÌËÌË

Still had 2 lengths of pink thread left over and some time. Beaded the ball thread and wound both scraps on a shuttle. The only ‘decorative’ button I could find in my stash only had 2 holes. But I finally tried out Fox’s enticing button tatting!  Oh it was so quick and enjoyable and instead of 12, only 10 repeats sufficed. 
Here I was smart ;-P I worked 5 rings in one hole then continued to next hole. It was easy to see that 5 more rings would take me around. Otherwise I could add one to the first side later.
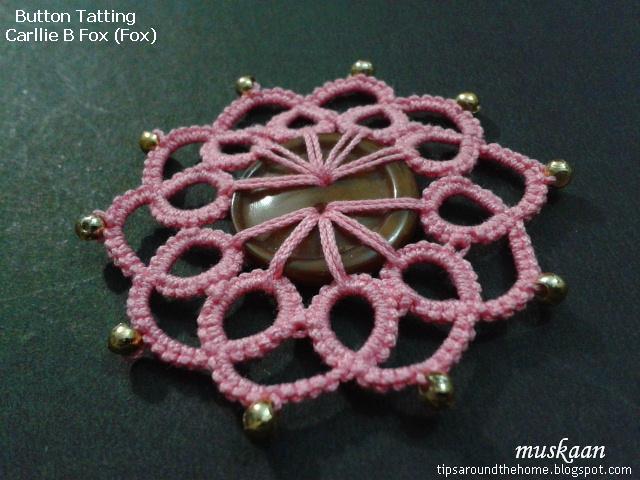
I can see why this can be addictive, except I don’t really know where I’d use them all. She's been adding a tail to use as a bookmark. I can see this as a bookmark charm or pendant/jewellery.
The button is 2cms and with tatting it comes to 5cms across. An enclosed space medallion where the central space is covered with a button.
ËÌËÌËÌËÌË

Here I travel back in time. Without changing the stitch count, I worked my one-pass quatrefoil square medallion in the traditional way – tatting individual quatrefoils and joining as you go. One can play with colours in a different way here.
ËÌËÌËÌËÌË


Last but not least, I test tatted Guoda’s lovely first snowflake pattern. Her way of notating conflicts with what I am used to or familiar with. But then there are so many ways to skin a cat! Once I changed the diagram to my comfort, it worked smoothly.
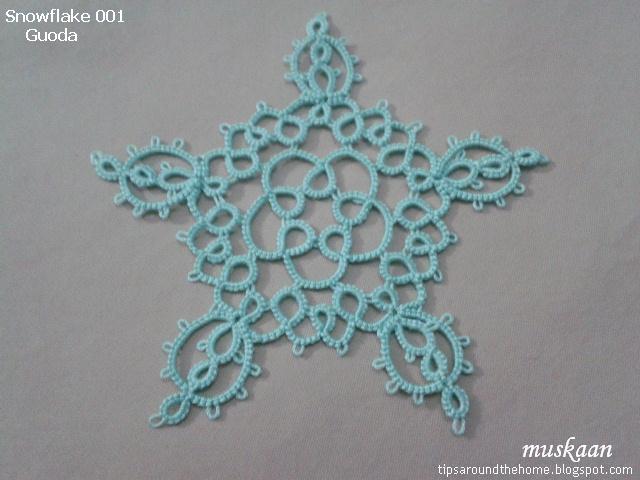
I enjoyed working the LTROR (loop tatted ring on ring), and didn’t mind when the thread broke while closing the ring on 4th repeat. Not many patterns use the LTROR, preferring to substitute it with a SCMR. 
In size 40, it measures 8cms across. I can do a better job if I tat it again.
ËÌËÌËÌËÌË

hmmm, one square meal or tatting a square ?
Which would you choose ;-D

Thursday, 28 July 2016

refresher

Pin It now!
The weather calls for frequent cool refreshments; my memory calls for frequent refreshers !
This post is a refreshed version of my previous post where I had a posted a hasty response as update. I was not fully satisfied. 
Reason : I had tatted the SQDR in 2014 ; then the RR in 2015 ; and was writing the post in 2016. During the intervals neither of the two techniques were used. High time for a refresher course, right ?! And I needed to confirm my explanation/comparison. 

This time, trial tats are included for easy comparison.
Also, as I hunted online, I found a few more tutorials/videos. Incidentally, I had already tatted samplers of some, & only later found that videos were already online. So here I go again ….

Practice Pattern Used :
SH1 – pink ; SH2 – shaded green.
2 colours used for clear distinction. Variegated thread gives more idea of the direction & progression.
I start with a 1” long lock chain to show clearly where the threads emerge after central ring is closed.

Disclaimer : This is not a tutorial but a collation/annotation of methods, with a few trials thrown in. The terminology, origin, & collection is limited to and limited by the knowledge & comprehension of the blogger, and to the resources consulted to date.

Common threads Set II : Rings On Ring
or 

The traditional method of tatting the ‘daisy medallion’1 is to make a central ring with picots, then cut & restart the next round, or climb out with a mock picot. The next round consists of rings that are joined at each picot either at their base when using single shuttle (with bare thread between rings) or at their tips with chains between adjoining rings when using shuttle & ball.
But tatters have long since hit upon ways to tat rings directly on the central ring. These are called thrown off rings, thrown rings, or floating rings. No picots or second round  required – all tatted in one pass. The thrown rings can also be Josephine rings.
I was interested in seeing whether one can throw multiple rings off a central ring, yet emerge out at the starting point. There seem to be at least 4 main ways to achieve this goal :
  • Loop Tatted Ring on Ring
  • Wrong-Way Tatting or Reverse Ring;
  • Split Quadruple Directional Ring  aka Ring Off Split Ring;
  • Mock Ring or Self Closing Mock Ring

I continued the experiment a bit further, branching out to separate exit points or using 2 different ways to throw rings off the 1st side of a split ring. But these are off-shoots of the above set. One can also tat the central split ring using Dora Young Method and throw rings off it2, but it is rarely used for SRs any longer. If one is working with a single shuttle, then this can be an option.
I must also admit that with the ease of tatting a SCMR, many of the other methods have limited use.
A 3-page pdf includes the 3 pics above. Click here to download pdf . 
Since it is all tabulated/notated, I am restricting textual explanation here to comments/pointers & some tutorial links.

1. Loop Tatted Ring on Ring (LTROR)

Most useful when tatting with a single shuttle.
Some dexterity with finger-tatting is required (although loop can be inserted into a shuttle temporarily). 
Size of central ring & number of thrown rings are limited since the central ring is a true ring.
LTROR with pattern by Sabina Carden-Madden 2008 , diagrams by Jane Eborall 2012 and diagrams by Jane Eborall and by Anastasija P. Yelisejeva 2012 , video by Karen Cabrera 2013


2. Wrong-Way Tatting or Reverse Ring (RR)


Tatting direction is opposite to that of LTROR, and central ring is tatted with reverse stitch instead of double stitch. Core thread differs from stitches, hence 2 shuttles required. Care must be taken when starting the ring. Limitations similar to LTROR. 
This method of tatting may be ‘normal’ for left-handed tatters.
Rebecca Jones' 1985 book 'The Complete Book of Tatting' calls it Method Five - Wrong-Way Tatting (p26)3; Ruth Perry's Tatted Reverse Ring with Rings Thrown Off video & her RainBeau hedgehog pattern 

3. Split Quadruple Directional Ring (SQDR) or Rings Off Split Ring

The central ring is a split ring, with thrown rings on the 2nd side. If the 1st side has a single DS as in this pattern, then the threads exit almost at the starting point as in LTROR & RR. If both shuttles have same thread, the split is almost indistinguishable. Teri Dusenbury 1998 named it SQDR, with instructions & pattern. This term has been substituted by the Ring on/off SR - diagrams by Jane Eborall 2008, and video by Karen Cabrera
The 2nd model on right side has more DS on 1st side for comparison, but notice the exit of threads. 

Loop Tatted Ring on Split Ring (LTROSR) 
Major limitation of Rings on SR is that thrown rings are made only on the shuttle2 side.
This limitation can be overcome by throwing LTR (loop-tatted rings) on side 1, as seen below, But threads will exit from a point other than the starting point :
See also MROR below.

4. Mock Ring (MR) or Self Closing Mock Ring (SCMR)
This technique has solved all problems or limitations of above techniques. Rings can easily be thrown anywhere around the central ring; both central & thrown rings can be as large as one wants; the threads will emerge at the starting point; all tatting is from front in clockwise direction, using only DS.
The only limitation is if one wants thrown rings in 2 different colours.
Mock Rings have been around for over a century4, although SCMR is a relatively recently coined popular term. Diagrams by Jane Eborall 2008

Mock Ring in Split Ring (MROR)
I have included this method to compare with LTROSR. It uses MR to throw rings on side 1 of a central SR, although strictly speaking the threads will not exit at the starting point ...
 
Interestingly, side 2 is tatted first, then side 1. Multiple rings can be thrown on side 1 of the central ring, but the multiple loops are difficult to control. Moreover, since the loops remain open till the very end, size & number of rings need to be curbed. Requires quite a bit of practice, but if one single thrown ring is required, this can be adopted. 
diagrams by Ninetta Caruso 2012,  as well as stepwise pictorial with tatting ; video by Karen Cabrera

Here are my trials with the MROR ... even with these many trials, I could not control the shape & the central ring tended to lose it's curve.
Tried multiple little tweaks & kept referring back to the pictorial, diagrams & video. Finally I have come to 2 conclusions : the thrown ring has to have a certain minimum stitchcount for a good shape & control ; it may not be advisable to have a large central ring, or multiple thrown rings. One medium to large MR on a SR is ideal for me.

To Summarize :
This compilation has explored the various choices one has. But with the ease & scope of a SCMR, this has become a bit of an academic exercise. Notwithstanding, each technique can have it's advantages in specific situations, to get out of a tight corner, or for a designer.
How one chooses a particular technique of a combination of one or more, may be determined by :
  • pattern requirement,
  • colour placement when working with 2 colours,
  • size of central ring,
  • number of shuttles being used,
  • number, size & position of thrown rings,
  • exit or climbing out point(s) of threads,
  • skill & comfort level of tatter. 


Phew !!!! Hope some of this is helpful to someone ! free pdf download

happy tatting :-)

1 Elgiva Nicholls' 'Tatting: Technique & History' 1984
2 discussed by Patty Dowden in this Craftree thread
3 cited by Judith Connors' in this Craftree thread
4 Judith Connors' An Illustrated Dictionary of Tatting'

Related post : Ring with Thrown Rings

Friday, 22 July 2016

the hedgehog turns !

Pin It now!

The Hedgehog Turns !
(tatted on July 28, 2015)
While deep into the Cluny Tatting series I posted last year, some relaxation & distraction was in line. 
It came in the form of this cute hedgehog pattern that I first saw on Craftree, here . What drew me to the pattern was the use of Reverse Ring (RR) . I hadn’t done this since my first time in Teri’s Dandelion ChainLink Bookmark ! High time I tried it again. (In 1998, Teri called it the Split Quadruple Directional Ring (SQDR).

And sure enough I had forgotten ! SQDR or RR is tatted all from the front, including the thrown rings that emerge from it. But I used reverse order stitches in the thrown rings. That’s how the hedgehog turned !!!

Ruth Perry (Rozella Linden) 
Materials :
Anchor Mercer Crochet Cotton Size 20. Shade White w/ Tan 4054-1218
2-shuttles CTM.
It measures approx. 3”x 1½” 
Techniques used : 
SQDR or RR, fs/bs tatting (RODS), decorative picots, thrown/floating rings, padded double stitch, SLT (or turn work/folded chain or direct tatting) , split ring, lock join.
Abbreviations :
CTM - continuous thread method of winding 2 shuttles
LTROR – loop-tatted ring on ring
pds- padded double stitch
RODS – reverse order double stitch (as in frontside/backside tatting)
RR – reverse ring
SCMR – self-closing mock ring
SQDR - split quadruple directional ring

My Notes
The central ring can be tatted in at least 3 different ways:
i.         SQDR / RR (remember to tat from front only & post shuttle 2 before closing ring)
ii.       Mock Ring ( preferrably SCMR) with thrown rings
iii.      LTROR (loop-tatted ring on ring) 
We are quite spoiled for choices :-)

As mentioned above, I tatted the thrown rings in RODS. Decided to continue with RODS in chains, resulting in a hedgehog that faces the opposite direction to the one in the pattern ! This pic shows the hedgehog from the back side.

Added more picots for a fuller spinier back. At one point I thought of making twisted picots (floating) but wasn’t in mood to do the twist. 

I most probably skipped the SLT for snout. Either made a folded chain (vsp, 2 half stitches) to turn the chain; or I may have switched shuttles for direct tatting (reverse stitch). I don't quite remember after 1 full year.

Used padded double stitch for tail : 1pds(3,3), 1pds(3,2), 1pds(2,2), 1pds(2,1). Tie & cut.
Basically, 4 padded ds with decreasing number of wraps .

I could’ve added a black seed bead for eye. (shown in the pic is a painted black eye).
The piece is unblocked - fresh off the shuttles.


Many thanks to Ruth, for sharing this cute & fun pattern


happy tatting :-)


I'm on a tatting-free break for the past week in order to recharge my batteries. Yes, there is a whole backlog of posts (projects, tat-alongs, tutorials) & tatting to accomplish, but it was getting stressful & slow-paced. I am, however, taking this opportunity to upload some such old projects & reduce the backlog a tad.

update : 
This segment is in response to a question in the comments below.
It is a quick post, & limited to my understanding at this point in time. Hope there are no errors !
common threads - SET II 
Ring with thrown rings

I have included 5 techniques by which we can have thrown rings on a ring : SQDR, RR, SCMR, LTROR.

What is Split Quadruple Directional Ring (Teri Dusenbury) 
or Reverse Ring (Ruth Perry) ?

(( Direct tatting aka reverse stitch, wrapped stitch, unflipped stitch, hitch, encapsulation, 2nd half of split ring stitch. ))
  • I learned Split Quadruple Directional Ring SQDR from Teri’s instructions & diagrams which form part of her bookmark pattern. Can perhaps be called Split Ring with thrown rings or Rings off Split Rings. 
  • I don’t have Ruth’s tutorial or instructions for Reverse Ring (RR). But her RainBeau hedgehog pattern instructions/diagram seemed to suggest that it was very similar to SQDR.
  • So what is SQDR or RR ? It is a ring worked with direct tatting or like the 2nd half of a split ring.
  • We start with a loop of SH1, but use SH2 to make the unflipped stitches, thus moving in a counterclockwise direction.
  • Rings can be thrown off this central ring, using SH2.
  • The entire central ring can be completed in this fashion & it will be a RR, as in the hedgehog above.
  • The central ring can be started as a split ring (SR) & then worked in direct tatting, making it a SQDR. (in this case, rings can also be thrown off with SH1 on the 1st side of SR), as in the Dandelion ChainLink bookmark pattern where the first part of central ring starts with a single double stitch. The rest of the pattern is worked as a reverse ring with thrown rings.
  • In both cases, we are tatting True Rings.
  • We need to remember to post the shuttle through ring before closing it.
This video of Rings off Split Rings by Karen Cabrera will give a very good idea of how to work such rings, and the possibilities can be visualized.

  • We can get the same effect using SCMR, which is perhaps easier if one is not used to direct tatting. In Self Closing Mock Ring, the central ring is a Mock Ring - a chain, from which rings can be thrown off. It is worked in clockwise direction, with normal Double Stitches. And we need to post the shuttle through the loop left at the beginning, before tensioning it. 
  • In SCMR, all thrown rings are limited to SH2 (as in RR).

  • Another technique where we can throw rings off a ring is Loop-Tatted Ring on Ring (LTROR). 

I came across this term & tutorial/diagram from  Anastasija P.Yelisejeva
In relation to the above : It is a True Ring. The thrown rings are also true rings, tatted using a loop pulled out from the ring loop itself. Tatting follows a clockwise direction. 
I used LTROR for part of Iris Niebach's doily It has an added advantage of being naturally blipfree, unlike a SCMR.
Another advantage : these can be worked with a single shuttle.
Karen's video for LTROR

To Summarize :
  1. In all the above 4 methods, multiple rings can be thrown all around the central ring. And when the central ring if finally closed, the thread(s) emerge at the base/start. 
  2. SQDR & RR are worked in counterclockwise direction, and we need to tat the thrown rings from the backside of the work ; LTROR & SCMR are worked all from the front, in clockwise direction.
  3. SQDR, RR, SCMR require 2 shuttles ; LTROR can be done with single shuttle & finger tatting.
  4. SQDR, RR, LTROR are true rings ; SCMR has a central mock ring.
Which technique one chooses will be determined by ...
  • colour placement, when working with 2 colours 
  • skill level, 
  • pattern requirement, 
  • number of shuttles used, etc.


all about the padded double stitch
LTROR in Niebach doily, with notes
SSSR with thrown rings in Sunshine Snowflake Lace
Common threads Set I


Tuesday, 23 June 2015

Iris Niebach Doily

Pin It now!

Iris Niebach
* click for direct link to site

This is the Tat It And See (TIAS) that Iris Niebach shared in 5 stages in 2009.

To me, it is a designing marvel . Brilliantly designed to create an elaborate medium-sized doily All In One Pass !!! And with a minimum of “advanced techniques” used !
Yes, it does take time to get one’s head around the orientation of some elements as one tats … Instead of moving in a circle as one is used to, here, we have to move in all directions : back & forth, up & down, in & out, ….
But it is all so much fun because of this challenge .

I found it easy enough to remember the stitch counts (pretty consistent), but the sequence was a whole other dimension even after 2 repeats ! So, to get my head oriented correctly, I notated the step sequence on the Day 5 pic (please scroll down for notated image) . Worked smoothly from then on.

Hats off to the earlier tatters who actually worked the pattern 
without any diagram or picture to guide them. 
At least I had the comfort of seeing some of their work posted on their blogs & knew what to expect .

Threads/Materials Used :
Anchor Mercer Crochet Cotton in Size 20 .
DC (Dark Colour) :  Khaki Brown : 4054-0359   approx. 45m/50yards used
LC (Light Colour) :  Ecru/Cream : 0300   approx 27m/3yards used
Picot Gauge
Measures 9½” across.

Techniques Required :
2-shuttle tatting, SCMR , Double Picot, Lock Join.

Click on each Day for direct link to written pattern


corrected version of Day 5 pattern here


Notes about the Pattern

(Iris has graciously permitted me to share the sequence notation, as well as a few minor typos, etc.)
  • The instructions are succinct & direct.
  • RW is not always mentioned ; but Reverse Work when switching colours.
  • Day 4 of TIAS ends at #37, but Day 5 starts with #39. Day 5 should start with #38 & follow on from there. Thus the total number of steps will be 50, not 51. Note : There is no change in Pattern ; only in the numbering. I have used the amended step numbers in the notation.
  • Notations of step numbers on the pic, helped Immensely. The sequence to follow became clear instantly. If encountering problems, print out the notated pic & follow sequence.
  • There is a correction made to the Day 5 pattern, which Iris includes in a later post here. All that is missing is a join to an earlier ring, nothing major.
  • After Day 4, there are 2 heart patterns that become visible !!! (images lower down)

Notated Sequence of Steps

  • #3, 10, 41 & 48 are SCMRs, indicated by a white connecting line.
  • Some numbers are in black Only to show up clearly against the background. No significance should be attached to the colour
  • Some steps in the notation indicate 2 parts (a & b), merely to highlight that ‘a’ is made first, then ‘b’.
  • #38 is the DC chain, as indicted by an arrow. It was too cramped for numbering.

2 Heart Patterns Within !!!

small heart
large, stylized heart


 My Notes

  • FS/BS tatting throughout. Initially I tried all frontside, but it was becoming too complicated …
  • I tried the LTROR (just to challenge myself & see whether it works), instead of the SCMR. It worked great ! So this doily has Both SCMRs & LTRORs.
TIP : LTROR has one advantage over SCMR when working with 2 colours  ... no colour blips to hide (no extra step required). 
When closing the LTROR, softly, but persistently tug the loop to overcome inertia.  After that initial resistance, the ring closes Very smoothly. 

  • In later repeats, I added an anchoring tiny picot at base of either end of long chains in step #24 & 25 and adjoining chains were joined after 1ds. 
  • Now that I have experienced the pleasure & effect of size 40 thread (Craftree Mystery TAL), I would’ve loved to try it in the finer thread !
  • Blocking was required.
  • I’m not completely satisfied with my tatting. Could’ve made the double picots a tad longer so as to stand out clearly. 


Abbreviations  used  above :
RW – reverse work
FS/BS – frontside/backside tatting
SCMR – self closing mock ring
LTROR – loop tatted ring on ring
TAL – tat along

Tatting Resource/Tutorials Used:
Karen Cabrera’s  Lesson #111  Loop Tatted Ring 

Inspiration from some participants :

Vinnie
SingTatter
LadyShuttleMaker
(and don’t miss all the other lovely tatting in their blogs !)
http://tatitandsee.blogspot.com/search/label/Iris%27s%20TIAS – I came across this only now, while confirming some of the links !


My sincerest thanks to Iris, for sharing her expertise & brilliance

I hope this post inspires a few to tat this, too :-)
happy tatting :-)


Motif #23/II for 25 Motif Challenge


Sunday, 7 June 2015

Tatting Away XIV : Earrings

Pin It now!
I won’t ask whether you missed me or not … coz,
If you say “yes”
then god bless ;
If you say “no”,
then I don’t wanna know ;-P


While my blog lies neglected, my shuttles & threads are at work. 
Also learning & trying new things, including beads. 
It’s tennis season, & a lot of balls are up in the air !

●●●●●●●●●●●●●●●●●

Free Earring Patterns  
Let’s first get my pattern downloads out of the way (click for direct download).
  1. I have included a diagram for the Jewelry Medallion (Earrings) (blue one in lead pic)
  2. Trailing Hearts Earrings pattern  (red one in lead pic)
●●●●●●●●●●●●●●●●●

I joined Georgia Seitz’s Online Tatting Class a couple of weeks back & am having such great fun there, while learning a lot & bouncing off ideas. Sharing my ‘homework’ here, as part of my bead-learning experience, and in keeping with the theme of this post, viz., Earrings.

Click on titles for link to pattern  

(June 2, 2015)
Adapted by Martha Ess
A re-purposed pattern based on Motif #20 by Nellie Youngburg (Forty Original Designs in Tatting).

This was a fun fun project. It was made so simple by Martha’s excellent diagramming & perfect instructions. Went smoothly, without a single hitch ! And it was easier to work with larger beads, of course.

AMC size 20. Aqua Blue : 4054-0185
Measures 2½” along sides & 2” high

My Workings :

  • FS/BS tatting .
  • Chains at base of corner clovers/trefoils are joined by a very small picot to keep them steady (recommended by Georgia).
  • For the hook, though, instead of keeping the 6 beads in rectangular formation, I joined through the center, getting 2 ‘floating’ triangles, in keeping with the triangular theme of this earring. Just experimenting ;-)
Martha has also turned this pattern into an Angel for Palmetto TatDays 2015 !

●●●●●●●●●●●●●●●●●
(June 5, 2015)
Designer : Patricia Vera-Camacho

This pair of earrings caught my interest Immediately because they have rings within rings ! (I seem to be going round in circles/rings lately) . Clever !!! 

Verah proposes a pair of thin shuttles to make the interlaced rings. But, of course, I don’t have a set, I haven’t gotten around to making one from any old plastic/cardboard …. So, Could I possibly make them with Normal shuttles – like the Interlaced Rings tuts I posted here ?!
Did a quick practice ring with scrap threads. It worked !!! 
One does require a 3rd shuttle on the go, for the 2 side rings only; and the sequence of tatting changes because the infinity trimming is not added later, but simultaneously.

My Workings :

1. “Infinity Trimming” with normal shuttle :
Tat Ring 1. But do not close it.
Wrap Shuttle 3 thread around hand as to start a ring, But bring the shuttle Up through R1 from behind/under, on left side, to make the wrap. You will notice that the main ring gets enclosed within this wrap.
Complete & close the Interlaced ring on left side of R1.
Similarly, start the 2nd part of infinity trimming, bringing Sh3 up through R1 on right side.
Complete & close the interlaced ring. (chose favorite method to hide ends).
Now close R1 & continue with 2 shuttles.
The same steps will be repeated for Ring 3 on other side.

2.  Rayon Thread 
I had to make life difficult for myself, of course. Verah listed size 60 thread for the Infinity trimming. I used a double strand of rayon thread, which seemed too tiny when the rings were tatted. Hence increased stitch count to 20 per ring, & also added 2 extra rings, making the total 4 !

3.  Diagram & Beads
I had a bit of trouble with the written instructions, but focused on the diagram, especially for the placement of beads.
This is the sequence of beads as loaded on to shuttles (I am still learning, so this may not have been required) :
Shuttle 1 : 1bB, 1B, 2bB, 1B  ;  Shuttle 2 : 1bB     [ bB- bugle bead ; B – green bead ]

4.  LTROR instead of SCMR 
This was merely for my learning practice.  
Miranda (tattingfool) has an excellent pictorial on how to make the LTR (loop tatted ring) , & also a modified method for closing LTR, here. I used the same to make & close the LTROR (loop tatted ring on ring). It works great ! One needs to tug a bit for the final close, but once ‘hooked’ it rolls through smoothly. I’m certainly hooked to this & tried it on Iris’ TIAS doily as well . An added benefit is absence of any colour blip when working with 2 colours.

5. Threads & bead sizes forced me to
  • leave out the 2 crystal beads on side of central bead
  • add another ds to chain around the center bead
In White size 20 (Anchor Mercer) thread, the earrings measure approx 1¼” x 1½”.  

●●●●●●●●●●●●●●●●●
I apologize to the designers for making little tweaks --- it was simply my way of learning & applying newer techniques, & experimenting , with no intention of redesigning or changing . I chose the patterns because I liked them in the first place & really had fun  :-) 

My sincere thanks to All the individuals mentioned above, 
for sharing their lovely patterns, their expertise & wisdom.


Motifs # 21-22/II for 25 Motif Challenge