Saturday, 31 December 2016

chirPINg yarn

Pin It now!

bird and nest made with yarn

It's the last day of the month, and we know what that means - yes, the pinterest challenge ! 

While browsing through some crochet patterns, I stumbled upon a cute domherre made with yarn and it immediately called to me. There was an added incentive when she mentioned a Christmas connection – perfect timing! Google landed me with this Christmas story written by Richard W. O’Donnell  about the most famous of Christmas carols (guess which ?)
It is very easy and with different yarn colours, we can whip up many different birds in a jiffy !!!
I inserted blue pearl pins for the eyes.
The feathers appear a bit ruffled – what would you expect, when confronted to such curious scrutiny by the sparrows?! Although it did appear to be having a swinging time when rid of the company ;-)
TIP : Use fresh yarn, or straighten it out! This grey was the last of a ball of yarn and hence some strands are not as straight.

Be warned  -- These next pictures are Not for the faint-hearted bird lover ! ☺

When I pierced the eyes, it struck me what a great pincushion this would make! For that, the bird needed to sit comfortably. Tried a glass bowl which seemed to work okay. Then, I also came across a pin showing how to weave a small basket , which seemed very easy & fun to make. Well, I adapted it as a nest for this bird, leaving off the handle & fabric base.
I cut the circular card stock into 9 equal slits (at 40º angle). Also, I could weave the entire basket and crochet the edge all in one continuous process, without cutting off the yarn !  
Even DH had fun watching me weave the basket - he & BIL are constantly telling me that I still haven't grown out of my childhood ;-P I agree :-D

Bird measures : 3” head to tail, 1½” top - down
Nest measures : 1” high, 2¼” across top, 1¾” across base

Do you recognize the coincidental symbolism? Bird that symbolizes happiness, Christmas but is also migratory, and the pins that could well be pins from pinterest.com !!! And wonder what project eggs it's sitting on ;-P

This has been a happy pinterest challenge journey through the year - I accomplished my personal objectives to a satisfactory degree and hope to continue -  but I must fly away for at least a year.
Who can tell about 2018 – I might like to be back with the lovely pin chicks again ! They are such an inspiring lot – coming up with exquisite pieces despite many personal pitfalls. It is a pleasure getting to know Suzanne, Margaret, and Margaret-2. Carollyn was already a friendly correspondent.

January 2017 starts a new pinterest challenge, and this time they will be posting every two months. You are cordially invited to join in - merely post a project inspired by pinterest, every 2 months ! Simply leave a comment on any of the pin chicks' blog/post to tell them you'll be one of them :-) It is fun !

Currently, the nesting bird pincushion is perched on my bedside cabinet – on hand ! That's the lamp base in the background, and my tablet in foreground. Took away my pencil stand & moisturiser to avoid cluttering the pic.

Related Posts :
click on ‘pinterest challengetag for all twelve challenges of year 2016
The October post has jumped to December.

abcd
And before I leave my readers this year, to meet again next year .....

good health, peace and prosperity to all
a very happy new year 
abcd

Tuesday, 27 December 2016

a free pattern fluttering in

Pin It now!

October to December – a long journey for this little butterfly pattern !

Remember the sneak peek of this joint project on Craftree? Claudia was asked by someone to locate or correct a tatted butterfly pattern. It had been tatted ages back and the original pattern was lost. When we couldn’t find the designer online, Claudia did the stitch count & I diagrammed and christened it. Finally, the pattern is shared here.

Together We Fly Butterfly
a joint project on Craftree 
designer – unknown ; stitch count – Claudia Huber
diagram & pdf - muskaan
If tatting with single shuttle and ball, pull out a 12-15 inch long tail from the shuttle before starting head. This tail will be used to complete the 2nd half of split ring which constitutes the body.
This is how the butterfly can be tatted in one pass, using split ring and mock picot to climb out.
Claudia’s TIP shared here : “The butterfly had to be made wet and putting in the final form as the body should be oval, and not round, but it laid flat already before, now it looks nice, without fixing and blocking etc.”  
I like the slightly oval look. Also, I found it easier to pull the ring After starting the chain, so as not to hamper the ring closure. 
The butterfly can be worked in opposite direction to that notated in diagram (see below), as seen in this 2-colour version using single shuttle and ball. In this case, the split ring body will be worked as:
        SR-B : 4 – 3 – 4 long picot 4 / 4 – 3. Mock Picot to climb out for wing.

Also, in above model, I made the 2 rings, then joined the solid purple thread for chains, tatting over tails. Unfortunately, the variegated thread soon broke and this model was discarded.

After completing Wing #1, we need to cross over across the neck, to continue with Wing #2. This can be accomplished using an over-under or alligator join. On trying it, I did not like the horizontal bar it makes.
I opted for 2 lock joins in same picot, but on either side. It stabilized the head as well.

TIP : If desired, the 2 stitch chain on either side (seen in blue in diagram above) can be increased to 3 double stitches. With only 2 stitches, the head is nestled too close and the wings have to be pulled outwards to finish.

The single colour version, using 2 shuttles, CTM

I tatted a new model, this time using 3 colours. Head & body are tatted in brown (4054-0359) and tails hidden. Then I joined the maroon (4054-00022) and golden yellow (4054-0307) for the wings.
Twisted picots make perfect antennae ! But a double picot works well, too, snipped later.
TIP : Add beads for eyes and/or antennae.

One and three colour versions. In size 20 Anchor mercer, they measure 2¼” x 1¾”  

The 2-page pdf consists of a full-body diagram with notations, and one page written pattern.
Hope you give these cuties a tat and enjoy them as much as I did ! 

Many thanks to Claudia and the unknown designer !

happy tatting always with a ☺ 


Related Posts 

abcd


Friday, 23 December 2016

miniature conifer

Pin It now!

A tatted tree

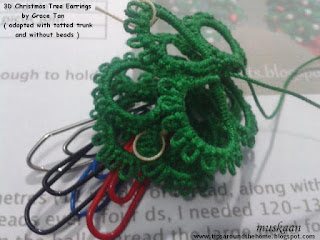
Grace did such an admirable job of creating a pair of Christmas tree earrings in 3D, using the simplest of techniques and dressed up with beads! How could one resist – 3D combined with freeform was calling out to me. It seems like ages since I made something in 3D freeform – I’ve been domesticated ;-P

3D Christmas Tree
Earrings by Grace O B Tan 

A 2-shuttle pattern with rings thrown off a spiral (Josephine) chain. 
In size 20 thread it is 2 inches high (including the trunk)
»»»»»»»»»»»««««««««««««
Au Naturel ! 
My first test tat was without beads. I deliberately went for a natural look, the intention being to wrap a string of beads later, like fairy lights. This has taken a backseat coz the tiny tree became fiddly to work with and gold thread was tangling up – need More Hands !!! But last night I had an idea to anchor the tree while I wrap it. Hope it works.

TIP : Tying/inserting a marker at end or start of each layer helps to keep track as the foliage becomes denser. See the 2 threads knotted on the in-progress foliage?

So much fun ! A simple string of mostly decreasing rings, tightly packed down on a spiral chain –that’s it! Brilliant.
TIP : Ensure the spiral chain stitches do not ‘unflip’ at any time, before working on a new ring, and after closing it too. The core thread of chain should continue to slide.
This may not be a problem for tight tatters, but for me the half stitches did tend to unflip at times.
Couldn’t find a bead that would work as a trunk (didn’t like the round wooden beads I had). Left paper clips in place of the trunk bead, to allow core thread to slide.
This called for a trunk call to tatting! The tatted 3D trunk was sewn on later (pattern at end).

DH can’t get over how Real this miniature looks - both the foliage alone, as well as complete tree and I am very happy with it, though there are a few slips (a definite advantage in freeform tatting!). It looks so cute, and tiny – merely 2” high !
I used Red Heart green (229) and brown (341) in size 20

»»»»»»»»»»»««««««««««««
It is very quick to tat up sans beads & much more fun. But beads add sparkle, character, and cheerfulness !
Au Noel !
Got out my shuttles and beads and stuff; sat in the sunlit balcony, and strung beads. It went surprisingly smoothly - there’s nothing like natural light !!!

I did have to load my shuttle thrice (Pony shuttles are small), but fortunately I had strung around 200 beads on the ball thread, and took only about one-third for each bobbin load cutting the thread and leaving the rest of the beads on the ball thread.
TIP  : The lower half contains large rings. To keep track of the stitches, I listed the picot count for ring in that layer. Eg. Layer 1 rings have 10 picots; layer 2 rings have 13 picots, and so on. Helped me immensely.

I used Anchor green (0245) in size 20 for foliage here. Except for the gold beads, all are transparent seed beads; a star sequin graces the tip. Since the  beads are plastic, they do not add weight to the tree. However, if using as earrings, a light starching might help to keep the foliage in desired shape. I didn't make earrings; can be used as tree ornaments or how about tassels for a Christmasy gift!

IDEAS  : This pattern can be adapted to .....
... make 3D flowers in a jiffy ! Adjust ring count & size, and choose flowery colours, OR
make a twig with fir needles – long picots (snipped) on a spiral chain – how cool is that for a wreath ?!

»»»»»»»»»»»««««««««««««
Meanwhile for those interested, here’s the pattern for the tatted trunk …..
I’ve been holding out on this pattern (a prototype peek here), wanting to add beads & colours to highlight the spiraling effect. May be soon, now.

Tatted 3D Tree Trunk 
pattern
2 shuttles CTM. Size 20 thread.
Ø       Each ring, layered/stacked above the previous ring, creating a 3D hollow cylinder.
Ø       First & last rings are normal rings ; all in-between rings are split rings.
Ø       Keep the picots normal to slightly long, depending on how much distance you want between the stacked rings.
Ø       Mock picot (MP) is used to climb out of each ring.
Ø       Switch shuttle (SS) after each ring.
Ø       A total of 6 to 7 rings is sufficient for the tree pattern above.
Ø       See pictorials on layered rings here  , and here .

R1 : 4 – 4 – 4 – 4 . MP
** SR2 : 2 – 2 + 2 – 2 + 2 – 2 + 2 / 2 . MP. SS **
Repeat  from ** to ** for desired length (or height) 
Last Ring : 4 + 4 + 4 + 4 . 

Use the tail ends to sew to the foliage. 
Tie ends and insert the tails through the hollow tube and snip. 


Many many thanks to Grace for sharing her delightful  pattern with us !

happy tatting always 
and happy holidays :-) 


Related Posts :
Layered or stacked Rings how-to method 1 ; method 2


Tuesday, 20 December 2016

drop by drop

Pin It now!

tatted ornament/jewelry/cabochon using large glass beads, mirrors, etc.
edited Dec 21, 2016

I caved. What do you expect, when Diane keeps dropping off these gorgeous little beauties daily on her blog?! Instead of working on my planned projects, the mood got to me. I gathered all the materials, strung the beads, wound the shuttle, refreshed Diane’s excellent stepwise pictorial, and went to play, basking in the warm winter sun.

 Ice Drops
Diane (lace-lovin’ librarian) Cademartori

 Magnified !
 
A while back, some 3D movie promo scheme had sent in a pair of glasses with magnifying lens. Don’t know why I kept it, except that the lenses looked very cute. Tore off the paper specs & got to work with the lens.
The lens is a bit flat for this ornament, but had to make do for now.
It is a bit over 1”, hence strung beads for 8 repeats; 7 repeats sufficed.
Unfortunately the transparent beads don’t show up clearly in the pic, but the ice drop looks Fantastic – DH was impressed and considered it a pendant. He guessed right for a change, coz I wanted to keep my options open & didn’t tie any ribbon, string or tatted braid.
TIP : I used a Fujito Join slope and roll join for the second round. The Lock Join didn’t seem to come out right for me. So instead, I pulled out a loop with the ball thread & passed the shuttle through. That’s all.
There are a few mistakes in round 2, which I noticed later – a bit of twist in a ring & a chain.
Here's how it looks from the 'back' ...

Mirrored ! 
My second Ice drop is made with 2 mirrors glued back to back. This idea had been on my mind ever since the pattern was shared. I checked the edges & they were smooth. A tad less than 1” across.
Everything went very smoothly. A vintage size 20 thread, which is slightly thinner than the newer one I used above.

TIP : For directional tatting (frontside/backside) :
Round 1 (the back of the bead) – tat rings frontside, RW, and chains frontside as well.
Round 2 (front of bead) – tat rings frontside, RW, chains backside.
Finished off with a beaded loop. Absolutely reversible.

I can vouch for their "addictiveness" ! Wanted to keep making them – they are so quick to tat up and look oh so pretty in real, even though I didn’t have the specific materials. The only downside (always) was stringing beads. Should stick to larger pearls ;-)


many thanks to Diane & Edda Guastalla
for such a delightful addiction !

happy tatting always :-)


Monday, 19 December 2016

an undesired switcheroo

Pin It now!

blogger made some pretty visible changes recently.

One of the undesirable changes is that if you edit a past post, it springs to the most recent spot ! It had happened with a previous post - an October post gatecrashed into December (fall in winter!!!), and now again. my troll is hiding behind my maple leaf !

Note that nothing else changes - the date of posting, the url, etc. everything remains unchanged except the recency. The blog/reading list in other's blogs continue to show the troll pic, but if they visit my blog or click on Home, then they will see the maple leaf first, causing some confusion.

Well, I can see the logic - once a post is published, it is in public domain and readers have a right to know when and what changes are made to the content.

What I wish, though, was that we had the Option of having the post spring up as latest or simply informing readers that changes have been made .... Circumstances permitting, I often go back to earlier posts to include related links, etc. for future readers. Guess I won't be doing that any more !

I tried to bring the troll back in line by editing the post. BUT it wouldn't return :-((( Hence this new trick ...
Once I publish this message, Then maybe I can coax the troll to fall in line ;-P
Let me give a try .... please don't be confused if you see a switcheroo - desirable this time.


Of course, it can also be desirable if one wants to revive an old, forgotten post !!! Always 2 sides to everything ☺
BTW, blogger has a range of emojis to choose from - or so they would have us believe. But only the smiling face emoji works ☺

keep  !
Hope you are all enjoying your holiday tatting and partying ☺


Saturday, 17 December 2016

falling over

Pin It now!

tatted maple leaf

My very first balls of Lizbeth threads arrived after a 3 week wait !!! The first to tumble in was Falling Leaves in size 40. Well, a fall leaf just Had to be tatted. Here is the lovely ….

 Tammy Rodgers
a free pattern from Georgia Seitz's vast collection 


It was a pleasure to tat. But I did get confused about direction. I had started with ball & shuttle as mentioned in pattern. But I decided to tat the center trefoil in clockwise direction, and that resulted in the overall leaf being worked in counterclockwise direction, as seen in pic below !

Here's my working and notes....

1. Shoe lace trick or Two Shuttles ?
If working with single shuttle & ball, you need to do an overhand tie or SLT (shoe lace trick) for Ring D & also the last ring.
Rings D & U act like thrown rings, because of the change in chain direction to & from the ring, hence the need for a SLT or a second shuttle.
I try to avoid SLTs . Instead cut ample thread from ball & wound it CTM to Shuttle 2 at this stage.  

Please note that the SLT instruction is missing from an otherwise Excellent diagram.
There is also a bit of confusion about when not to reverse considering our more modern-day working. I would've explained just a bit differently, for tatters like me - I racked my brain trying to accomplish what was written. But it wouldn't work without a SLT or 2 shuttles.
This pattern was taught in the Beginner Class, but I haven't read the logs. This might have come up in the discussion. 

TIP : Brainwave ! Just struck me that I could've continued with ball & shuttle by working these 2 rings as Reverse Rings !!! Now that's a neat functional use for reverse rings. (more about RR in my next post. More synonyms & resources - scroll down to RINGS  - Thrown/floating rings).
ps : I tried it and it does work !  


2. Frontside/Backside Tatting :
If you prefer to tat rings frontside & chains backside (reverse order double stitch – RODS)), then make the first 3 rings RODS & adjacent chain frontside. From rings D through U, all can now be tatted frontside & chains RODS.
I forgot my own TWoT directions & ended up tatting All outer rings backside !


3. Stem
For a thicker stem I used padded double stitches or pds (2,2) for a decent length.

Should've blocked the leaf, coz I made a mistake in the first chain itself ! Only 15 stitches instead of 20 :-(

many thanks to Tammy and Georgia's Online Tatting Class 
for making this pattern available to us !

I have lots of fall leaf patterns in my collection to use this colorway. The thread works well. Took the plunge because Handy Hands is now listed in Amazon world & I can pay in Indian currency. But what a high price (with shipping & import duty) !!! For a total of 3 Lizbeth balls (not much choice in colours so far), I could’ve bought 43, yes forty three Anchor balls!!!

Ah well, what can you do if one has intentionally decided to fall :-D 

happy tatting always :-)

Friday, 16 December 2016

a new look or ...

Pin It now!
… turning over a new leaf ? mocking or reversing ? Fancy a tatted troll !

For Georgia’s Online Class one of the patterns shared was a troll pattern! Reverse rings again – caught my fancy, as well as it’s potential to turn into an angel (but that for another day). Time for yet another refresher.
Small, cute, beckoning. Found a shuttle with some size 20 white thread left. Perfect. Completed within minutes.

Troll with an Afro !
Slight adaptation of 


First off, this rings-only pattern has 2 central rings (head & body) with thrown/floating rings for limbs and ears. There are multiple ways to work this, as annotated and compared here
Further, the Reverse Ring can easily be substituted with a mock ring – the SCMR (self closing mock ring) !

Body and Head
I followed the pattern instructions, using a single shuttle & reverse rings.
But I pulled out a long tail from the shuttle – enough to wrap around your hand for the 2 central rings plus the bit that is used up as core thread inside these 2 rings. 10-15 inches is more than sufficient, in size 20.
For eyes, string 2 beads on this long tail (not in original pattern).
This tail is used to wrap around hand as core thread, over which Reverse stitches (unflipped) are made/wrapped as in second half of split ring.

TIP : Loop the long tail. This can be done in 2 ways.
  1. as we do for a split ring (SR) – over and around finger to hold in pinch ; or
  2. as for left handed tatting – under and around finger to hold in pinch.
In both cases, the loop is made with tail and the unflipped stitches with the shuttle.
Yes, you guessed right – reverse ring is a split ring without the first half – it is all second half !  ...

UPDATE (Dec 27, 2016) :  A short explanation of how to work a Reverse Ring... Wrap the ring thread exactly as you would for a SR, with hand in the SR position ('dead spider'). Pretend you are about to start a SR, BUT, tat Only the unflipped stitch or 2nd half side throughout. Unlike a SR, where we usually begin with 1st half (normal double stitches), then work the 2nd half with 2nd shuttle in Reverse/unflipped stitches, in RR, we do Only the 2nd half for entire ring using 2nd shuttle.

Appendages
Hands, legs and ears are all thrown rings around a central ring. I tatted them as backside rings using the reverse order half stitches (RODS), and posting the shuttle before closing each ring. Posting shuttle keeps the ring from curling when closed.   
Eyes
Bead for eyes was brought forth 1ds away from the ear, without changing the overall stitchcount.

Afro cut
Long picots, snipped across at end. Each cut tail was rolled between fingers to untwist – this is super fast! Leave as is, after trimming. Original pattern calls for fraying and lovely fluorescent threads are used!
Okay, this is an aging troll with thinning hair ;-P Should we give him a wig?
I skimped on the hiding ends procedure by tying a bow around it’s neck with the tail ends.

Georgia shared a cute idea in class – fold the limbs & stiffen the troll into a sitting position !!! I would love to do that – if only my thrown rings weren’t so firmly in place with no wiggle room.

many thanks to Ruth & Georgia for sharing this enjoyable pattern

SCMR and Reverse Rings  

This revisiting of reverse rings and the SCMR option got me thinking of their characteristics and the outcome is this tabulation. It is based on my present comprehension, and if there are any errors, Please let me know before the mistake(s) spread.


Sufficient conditions are listed; there can be exceptions and situational tweaks. 
Mock it, Reverse it - nothing is written in stone ! 

For Reverse Ring tutorials/videos, synonyms, options, scroll down to Thrown/Floating Rings here
Please note that reverse rings can also be worked if one is using 2 shuttles. But a single shuttle suffices if there is thread from the ball to loop for the ring.

An understanding of the characteristics of each, can help us choose one technique over the other, play with colour placement. eg., tatting a 2-coloured onion ring might be more convenient if tatting the inner ring as a reverse ring. 

Download pdf here : SCMR vs RR Table


Download pdf here : SCMR vs RR Table

see also Central Ring with Thrown Rings

happy tatting with a :-)


Tuesday, 13 December 2016

headless chicken

Pin It now!

Yup that's exactly how I feel -- a headless chicken running amok. OR perhaps ... it is all the other tatting & blog-related stuff that is running amok! Yes that’s it. Definitely.

Inching it’s way ….
For instance, another Inchie jumped up - it was lying coiled beneath some other stuff in the box, and then after a few hours, went back into hiding! So no pics yet. Don’t remember tatting it; still attached to the shuttle.

Crossing all limits !
Next, consider the SOUP ribbon bookmarks post. It actually broke the time space barrier and jumped from Oct to Dec ! How ???? And how do I get it to go back with no head to think with. Okay, I had opened that post to upload a link to the Crown bookmark (found the source); no idea what happened next. Fortunately the old link still works. Notice the date in the url - it still says 2016/10. Huh.

Swept away !
Time crawled very slowly for the last many days as I tried to overhaul My Patterns Page. I couldn't get thumb nails of each project to load. So, with a bit Inkscape I tricked blogger into running with old style film strips. Took up a huge amount of my time coz I kept reorganising and regrouping, deleting and reformatting, etc.  Mind you, I enjoyed it, but kept wondering why bother – what possessed me to undertake such a huge task?! Desperately need elves here. I’ve published the half-done page for now & should get all links up in a couple of sittings.

Any thoughts on this new-look page ?

Running Loose !
Bobbin shuttles often face this problem – the bobbins run loose after a while. Pony shuttles are particularly susceptible. In response to a question posted on Craftree, I took this composite pic to explain what I have been doing for many years now. Works well for me, especially the use of everyday materials and quick ‘conversion’ to a firm bobbin. 

Method 1 : Rubber band & Tape
From left to right in pic : Insert a smallish rubber band inside the bobbin hole.
Cover both open ends with a bit of tape.
Voilà ! If it is still a bit loose, add another layer of tape. That’s all there is to it.
The 3rd bobbin shows how the tape indents slightly after a bit of use. The rubber band provides enough spring to keep it all in place while tatting.
4th bobbin is how it looks after reloading bobbin many times, ie. after a lengthy use.
At this stage, re-tape!
Tape & rubber bands are now part of my work basket.

Method 2 : Pencil Eraser
Extreme right you see the long pencil eraser. Insert into bobbin hole, and cut with craft knife. Voilà!
In the beginning the bobbin is a bit too firm, but once the soft rubber settles down & shapes itself to the dome, the bobbin becomes freer.
After long usage, one may need to add tape to both ends. But it obviates the need for rubber bands.

Concept : The rubber in the band or the eraser provides the spring/tension, and the tape holds it inside. It works beautifully.
Maria had shared a great pictorial using wire tubing to recondition the bobbin shuttles ! 


That’s it for this post. Tomorrow I will share my working of 2 quick projects – yay, I’m back to tatting !!! 
I think my posts should be shorter, hence the ‘break-up’ -- wouldn't want to scare away my 2 followers ;-P It will also give me time to get my chickens all lined up☺


Saturday, 10 December 2016

SOUPin' the books

Pin It now!
NOTE (Dec 11, 2016) : This is Not a new post. 
It was uploaded & shared on October 31st, 2016. I don't know how it has pushed itself to December, and don't know how to push it back! 
Fortunately, the url remains unchanged)

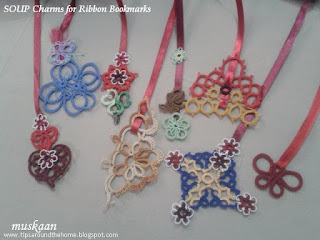
My Pinterest Challenge (click on tag) this month is simple, but practical, and helps to clear away our tatting orts (scraps, morsels). To refresh memory, SOUP is an acronym I created for "Sewing On / Using Pieces" of tatting. The pieces are ones I’ve left aside (discarded, but not binned), prototypes, practice pieces, or just some odds and ends. I've sewed them as appliqué on my apron and tea towels, and also glued them to cards and envelopes (all in first link).

This idea was carried on to a bookmark charm on pre-bound satin ribbon bookmark, and now added to more books. I've picked up the smaller Classic Library books from one of my shelves to do this challenge. These books are about 7.5”x 5” and the red ribbon is just the same length! Grasp is a problem, as is finding the marked page quickly. These charms add thickness and/or length, making it easy to grip and to find the page.
I’ve tried to create some sort of theme related to each book, and chosen a name conforming to it. Each book is opened at a page/chapter that has something relevant.
You may recognise some pieces from my posts. Pattern details and links to the pattern/post are listed alongside. 
In case of multiple motifs, pattern details start from the motif at the tip & move upwards.
Ladling out some hot SOUP - good for a cool wintry night, snuggled under an afghan with a good book for company - hope you are Charmed :-)

SOUP Charms for Ribbon Bookmarks


1. Butterfly Liberated
The House of the Seven Gables by Nathaniel Hawthorne
In some sense, this book is all about liberation – liberating ourselves from the past, the overbearing traditions, the ghosts in our closet, the cobwebs in our life...and life is short, live it to the fullest. What better symbol than a butterfly ?!
You might remember this very first one I shared here, made with my very first butterfly pattern.


2. Blue 
Far and Near by Pearl S Buck
Book opened to “Home Girl” because I found the word ‘Blue’ there, which is the thematic colour of this charm. But really, the story is about a charming Japanese girl Etsu. I liked most of the stories in this book (different cultural perspectives), although the last one did drag on for quite a bit with constant repetition of ‘Eleonore’ - errrrgh !
The blue motif is my experimental piece using different techniques for tatting large mock rings .
Pattern (with 3 rings) is : Motif with Mock Rings by Looping Chain on Itself by Eliz Davis
To hide the large central space, I glued Mlle Reigo’s Raised Star practice piece while trying out layered picots on a ring.   
Edging nearer to the 'flower' is Butterfly with Overlapping Picots by Ninetta Caruso


3. Idle Love
The Idle Thoughts of an Idle Fellow by Jerome K. Jerome
If there is talk of Love, then hearts can’t be far from our mind’s eye. 
If there are hearts, love cannot be far away – whether idle or passionate :-)
My first attempts at turning/folding the chain and I didn’t do justice to her cute hearts. I have wanted to get back and tat these again. Hopefully for next Valentine ...
Three Little Hearts by Grace Tan 


4 Mossy
Selected Short Stories by Joseph Conrad.
I know I’ve read at least a few of the stories, but can’t remember any. Time for another read. I opened the page to a story titled ‘The Lagoon’, in keeping with the mossy essence of this charm.
All 3 are my own patterns – a Layered Flower, my attempt at a freeform Holly Leaf, and the Double Daisy flower.


5. Billy the Hedgehog
The Wind in the Willows by Kenneth Grahame 
Need I say more ?!
Ruth Perry’s RainBeau Hedgehog pattern - yes, the one that turned !


6. Zany !
Literary Lapses and Nonsense Novels by Stephen Leacock
‘How to be a Doctor’ is one of my favourite stories from this book; one that I have shared with my pulmonologist ;-P
Fandango Motif by Jane Eborall with Double Daisy Flowers for a zany (nonsensical) mischievous spirit.
My first motif (partial here), trying to practice split rings during the 2014 TIAS. Left out joining an arm within. This is hidden by the bling-on flowers glued above.
A totally nonsensical charm – the colours don’t match, the shape is blah, the elements are all wrong. I really love the Fandango pattern, but this charm needs to be binned. May be I'll cut it off and change the charm later.


7. Crown
Prince by Niccolo Machiavelli
From this angle, it kind of looks like a pretentious crown, so perfect for this book, opened to the chapter on Hereditary Principalities ! I thought this book made a lot of sense. It may not be politically correct in many respects, but in the real world, a lot of what Machiavelli lists down actually happens. It is human nature and history has innumerable examples. Read this many years back; would be interesting to read again.
An InTatters (now Craftree) member had trouble with this pattern. It is from a Russian site and I tatted it in response to that question. If I remember right, this is part of a lovely tatted necklace. Collar schema are shared on the page. I added the black central ring later, to give stability.

8. Nature’s Charm
Essays and English Traits by Ralph Waldo Emerson
Book opened to a short poem in Nature chapter. I have yet to read this book fully.
Martha Ess’ Shamrock is easily recognizable – my practice piece for folded rings.
The red rings-only motif is among my first needle-tatting pieces - by Totus Mel I think. My June 2014 notes say it's a "Roselle". Double Daisy flowers to spice it up.


SOUP gift tag for Diwali
Besides the bookmark charms, I rustled up a super-quick last-moment gift tag for Diwali using scrap medallions again. This is probably a 3 or 4 inch card made from scrap handmade paper with embedded rose petals. The tail ends of yellow motif are glued in the shape of a flame ;-) 


Phew, it's taken me much longer to photograph, arrange, link, and present, than it did to glue them !!! If you've stuck by me this far, then you deserve a treat - a candy perhaps, or a toffee ?

Please take a moment to be amazed at what the other Pin Chicks have rustled up …

But before I go blog-hopping to check out what these super-talented ladies have made, here’s wishing you lots n lots of candy treats for Halloween ! And I just found out that there's a Candy Corn Day (Oct 30) !!!

Halloween Candy ?!
Georgia is going to use the Holi collage for today’s Halloween class. A confluence of cultures and ‘Holi’days, but how exactly she brings about this convergence should make for an interesting discussion. We can always rely on her to bring in a new perspective :-) I'm very curious, to say the least.
And here’s some more tatted candy ….
It is Usha Kota’s Toffee pattern from her “Tatting, Tea, Toffee” 2014 Palmetto’s Logo Competition. Martha Ess won 1st place, and Usha got an honorable mention at 2nd place.
Tatted in size 20 threads, the toffee measures 1½”x ¾” max.


happy tatting & happy pinning everyone :-)))