Showing posts with label reverse ring. Show all posts

Thursday, 25 July 2024

multifascination

Pin It now!

 This time I have not delayed, not by much essentially. A couple of months back I came across an Instagram post on tatting and their profile said they were a German group of 15-20 members with a common passion for occhi! I messaged them about our Endrucks 1920 Project and so began a lovely friendship with Elisabeth Dobler (she manages the account and is the founder of the group 'Occhi Freunde Oberschwaben'), a very talented tatter who enjoys pushing the boundaries and exploring new techniques.

Inspired by my E25 palm leaves, she belted out a range of effects from one basic model! We decided to call these Multifaceted Leaves. She graciously accepted to share the pattern and we worked together to create a presentation that is hopefully clear and easy to follow. She also made a presentation in German. Here are the links to both -
E24 Multifaceted Leaves by Elisabeth Dobler - https://drive.google.com/file/d/1ywaZcQP8b1M86jo4yLIwpH5fZ5kQ0_tX/view
E24 Facettenreiche Blätter by Elisabeth Dobler - https://drive.google.com/file/d/1-uFBNdM9aFOPUDCJyWC_dy1R_nyC4KRw/view
 
Multifaceted Leaf #1 (basic) 
This is the basic pattern which can be embellished as desired. She has worked the leaves in a clever and interesting fashion, entailing encapsulation. 
While the detailed pattern for this basic leaf is given, for the others an explanation of the effect/process is provided. Instead of repeating the description here, I request you download the pdf and understand the intricacies.

Multifaceted Leaf #2 - 
She has used metallic thread to embellish the leaves.

Multifaceted Leaf #3

Multifaceted Leaf #4
Maltese Rings adorn this leaf.

Multifaceted Leaf #5
Here the leaf starts at the mekik oyasi ring with cut picots and progresses back and forth to ensure it is worked in one pass. The crosshatch filling is so impressive.

Multifaceted Leaf #6

All six leaves together. 
Would these make a bushy mustache or even eyebrows, LOL? 
Simply add a stemmed flower in the center for a nice composition.

This is but a small slice of the enticing array of possible effects one can play with, using the basic model!

🍃🍃🍃🍃🍃
Patterns 24 and 25 from Eleonore Endrucks' 1920 book, Die Schiffchen-Spitzen, are very similar; E25 has a bit extra on the E24 as base. E24 was reworked by Ninetta Caruso for the Endrucks 1920 Project and you can find her work here ---
https://ninettacaruso.blogspot.com/2020/10/eleonore-thats-difficult.html - notes.

🍃🍃🍃🍃🍃

Elisabeth Dobler has published two books with tatting patterns - Tatted Necklace with Roses, and Tatted Faces! Oh the faces book is really interesting and fun! 

Just like with Sally (in my previous post), it is always a pleasure to correspond with someone who is receptive, prompt, and willing to learn and share mutually! Seeing her interest in new techniques and effects, I told her about Ninetta's flickr account and blog and her new Captured Picot. Elisabeth got right down to it, diligently learning the captured picot, teaching it to her group and also applying them creatively! Wish I had taken her permission to share the pics here ... perhaps in future. But you can check out her Insta posts with all her wonderful displays here - https://www.instagram.com/occhi_freunde_oberschwaben/

These Multifaceted Leaves and many other leaves (seen in Elisabeth's Insta feed) will be displayed in the Austrian Lace Association's Congress 2024 - Participation Leaves in Linz from 11th to 13th October. Wish I and our group could've participated - hopefully next year.

Many many thanks to Elisabeth and looking forward to more creations.

Related Posts - Palm Leaves from E25

Friday, 4 December 2020

picot join to right part 4

Pin It now!

I haven’t picked up my shuttles in a long time despite spending all my free time in tatting-related activities and interaction. And I’ve been neglecting my blog, too – can’t let that happen!

Well over a week back, this is what I made quickly for an experienced friend.  She, too, like I, avoids the folded join when making a picot join to the right. I prefer to rotate the work slightly on my hand, repositioning the picot on the right such that it now comes to the left, and then execute the join normally. These are my detailed pictorials and article on the topic -

http://www.tipsaroundthehome.blogspot.com2016/03/demystifying-joins.html - about picot join
https://tipsaroundthehome.blogspot.com/2018/09/picot-join-to-right-part1.html - outward facing rigs
https://tipsaroundthehome.blogspot.com/2018/09/picot-join-to-right-part-2.html - chains and down join
https://tipsaroundthehome.blogspot.com/2018/10/picot-join-to-right-part-3.html - where we need this join.

What I did not explicitly show in Part 2 was what happens when all rings face inwards. She was under the impression that 'with inward facing rings no such rotation is required to execute the final join  since we are working counterclockwise'. Visuals are better than words, hence …

Picot Join to the Right – Part 4 

(joining last inward facing ring to the first using Rotate Work)

The following motif comprises single inward facing rings (4-4-4) separated by bare thread and joined to each in the round. 
 
1. 6 rings have been worked and the last, 7th ring is started. It needs to be joined to Ring. 6, so pull up a loop through the picot of previous ring. This picot is to the left of current work and we perform the action almost on autopilot, without any extra movement.

2. The same as #1, but laid flat to see clearly, The knotting thread is pulled through picot. Note- this can be pulled down for frontside tatting.

3. Now comes the point at which Ring7 is to be joined to Ring1. 
Where is this joining picot in relation to this last ring? It is to the Right. Try making the join without shifting the motif. 
4. Hence some form of picot join to the right is needed - be it a folded join, or a simple rotation, or whatever you are comfortable with.

5. Since we are avoiding the folded join, notice the slight counterclockwise rotation of motif while still in hand, to reach the picot. The movement is so subtle, that it goes unnoticed, unlike in a rosette with outward facing rings (Part 1
My own theory is that we need to rotate more when rings face outward, hence it is immediately noticed.

6. Loop pulled up through picot and shuttle being passed through it.

7. Join made and ring closed.

8. Motif complete. Tail ends hidden.

The principle to remember is this (TWoT Notes): Whether overall work (motif or lace) progresses clockwise or counterclockwise, whether we are working on the front or the back, the current element - Ring - is Always worked clockwise*, and Chain is Always worked from left to right. Hence when joining in a circle (last to first), whether the rings or chains face inward or outward, the joining picot on the first element will be to the right of current element, and a Picot Join to the Right will be needed.

*The only exception that comes to mind is a Reverse Ring where stitches are being added counterclockwise. 

UPDATE: A tatter graciously shared her feedback after trying it - this method works well in needle tatting as well!

Practice Patterns : 
For further practice, try this R1:4-2-4-2-4. bare thread. R2:4+2+4-2-4. and so on ... where each ring is joined to the previous ring through Two picots on each side. The last ring will need to be joined to the first 2 picots on Ring1.

Also consider inward facing trefoils or clovers instead of single rings. 
eg. this Clover Wreath Poinsettia is good practice for the picot join to right. It has both inward facing clovers as well as outward facing thrown rings that need to be joined in a circle.

Wednesday, 4 March 2020

climbing out with mock picot

Pin It now!
A question was posed in a facebook group and my first answer was incorrect. Got my shuttle, thread and beads out, and gave it a few whirls. Wahoo, got it! (I'm getting good with bead solutions ;-P) Later, Lee Buchanan posted another option.

Climbing Out with a Mock Picot …
with a bead at the base!
What’s special or new about climbing out with a mock picot, you ask? Well, this time there was a bead at the base of the ring and a long picot over it. Looking back it seems, huh, what’s the big deal. Try it with a normal ring, and you’ll discover the issue.
This may have been done before but I’d like to keep a record on hand for future. Sharing both methods here.

For this pictorial, only 1 shuttle is used, with a long thread left attached (ctm).

Method 1 : Mock Ring
1. String beads on the shuttle thread and start a mock ring. I find the self-closing mock ring (SCMR) is neatest and the closure almost ‘invisible’.
Leave a loop and slide a bead after each double stitch (or as per pattern). I have 6 beads here. 
2. After sliding last bead, do not make any more ds, pass shuttle through loop ...
3. ...and close the mock ring. 
4. Leave bare space for the mock picot and make a lock stitch or overhand tie (SLT). Continue with pattern.


Method 2 : Reverse Ring
Lee Buchanan got into the swing of things and offered this RR solution!
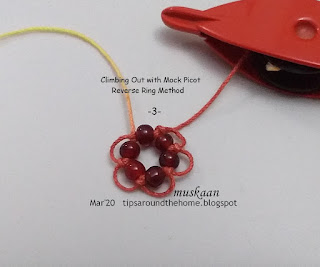
1. Start a reverse ring (tutorial links here). A reverse ring or wrong-way tatting starts on the opposite side of a normal ring, and has reverse or unflipped stitches. Make sure the beads are within the loop of the ring, and slide a bead after each reverse stitch. 
2. After sliding the last bead, close the ring. 
3. Threads emerge on either side of bead. 
4. Make a mock picot by securing the bare threads with a lock stitch or SLT and continue with next element in pattern.

As you can see, the end result is the same. Of course, getting that last picot to look unbroken is unavoidable, Unless the next element is a split ring in which case no lock stitch or shoe lace trick is required.

TIP : If beads are on the picot (up beads), one can climb out with a mock picot as in this beautiful Sitka Rose motif here.

Thank you Sheetal. Each time a question is asked, 
there is an opportunity for mutual learning and improvement!
Thank you Lee, for being such an enthusiastic and adventurous tatting sport! 

PLEASE NOTE: If you wish for a pdf of any of my posts, let me know. I now have a mail app thatnallows me to convert any post into a pdf easily.


Thursday, 12 January 2017

snowflake and TIAS

Pin It now!
blocks in snowflake and first block of TIAS !

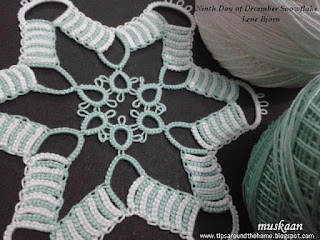
Ninth Day of December Snowflake
Lene Björn

I was inspired by the same 2-colour working of this flake on Craftree as credited and also worked by Eliz here. And so, one of the threads had to be white.

I raided my size 20 stash looking for a colour to go with the white (which is a bit thicker than it’s counterparts), checking each by sight and feel despite my catalogue . I found only one that came closest in thickness – this aqua blue-green 4054-0185 !
For block tatting, equal thickness is critical.

I followed the same block tatting method as described in this snowflake. It works for me. The switching shuttles is too cumbersome. I prefer the flipped/unflipped (DS/RS) with a half stitch riser.

TWoT (This Way or tat?) note : For directional tatting or fs/bs tatting, start the chain backside with reverse order of half stitches. The thrown ring will also be tatted backside.
The snowflake is tatted in one continuous pass in clockwise direction overall.
But can it be tatted all from the front ?

Experiment with all frontside tatting : I tried a little experiment here. Since it is tatted in one pass, I wondered whether I could avoid reversing the work (RW) by using direct/reverse stitch chains and a reverse ring in the centre and tat the whole snowflake from frontside only.
Yes, reverse ring can be applied to thrown ring in this situation.
But I did not like the effect. As you can see, the chain arch is not as smoothly curved, and the base picot space is of 2 colours since core thread is white and ring stitches are green !
Better to avoid the reverse ring and stick to reverse work and normal thrown rings !
BUT, I now realise that I made a mistake in making the ring. If done correctly,  it would work except for 2-coloured base 'picot'.

Future Idea : Using a largish picot at both the inner and outer turns, tat the entire medallion in block tatting. An undulating braid of block tatting !

Techniques : block tatting, thrown rings, fs/bs tatting
Finished Size : 3½”

I Love the negative space in this flake. I'm pretty happy with this snowflake working – blocks and all. Do you share my feeling?

 YYYYYYYYYY

Tat It And See 
2017
Jane Eborall

And now for Day 1 of Jane’s TIAS that has TatLand excited … Yes, the fun has begun !


This little worm creeps out to see
the world in all it’s glory
What will it grow to be
we’ll have to wait, won’t we ?!

Her diagram seemed to indicate spaces between the rings. I hope it is so.
Lizbeth size 20, Vineyard Harvest..


happy tatting always Y

Saturday, 17 December 2016

falling over

Pin It now!

tatted maple leaf

My very first balls of Lizbeth threads arrived after a 3 week wait !!! The first to tumble in was Falling Leaves in size 40. Well, a fall leaf just Had to be tatted. Here is the lovely ….

 Tammy Rodgers
a free pattern from Georgia Seitz's vast collection 


It was a pleasure to tat. But I did get confused about direction. I had started with ball & shuttle as mentioned in pattern. But I decided to tat the center trefoil in clockwise direction, and that resulted in the overall leaf being worked in counterclockwise direction, as seen in pic below !

Here's my working and notes....

1. Shoe lace trick or Two Shuttles ?
If working with single shuttle & ball, you need to do an overhand tie or SLT (shoe lace trick) for Ring D & also the last ring.
Rings D & U act like thrown rings, because of the change in chain direction to & from the ring, hence the need for a SLT or a second shuttle.
I try to avoid SLTs . Instead cut ample thread from ball & wound it CTM to Shuttle 2 at this stage.  

Please note that the SLT instruction is missing from an otherwise Excellent diagram.
There is also a bit of confusion about when not to reverse considering our more modern-day working. I would've explained just a bit differently, for tatters like me - I racked my brain trying to accomplish what was written. But it wouldn't work without a SLT or 2 shuttles.
This pattern was taught in the Beginner Class, but I haven't read the logs. This might have come up in the discussion. 

TIP : Brainwave ! Just struck me that I could've continued with ball & shuttle by working these 2 rings as Reverse Rings !!! Now that's a neat functional use for reverse rings. (more about RR in my next post. More synonyms & resources - scroll down to RINGS  - Thrown/floating rings).
ps : I tried it and it does work !  


2. Frontside/Backside Tatting :
If you prefer to tat rings frontside & chains backside (reverse order double stitch – RODS)), then make the first 3 rings RODS & adjacent chain frontside. From rings D through U, all can now be tatted frontside & chains RODS.
I forgot my own TWoT directions & ended up tatting All outer rings backside !


3. Stem
For a thicker stem I used padded double stitches or pds (2,2) for a decent length.

Should've blocked the leaf, coz I made a mistake in the first chain itself ! Only 15 stitches instead of 20 :-(

many thanks to Tammy and Georgia's Online Tatting Class 
for making this pattern available to us !

I have lots of fall leaf patterns in my collection to use this colorway. The thread works well. Took the plunge because Handy Hands is now listed in Amazon world & I can pay in Indian currency. But what a high price (with shipping & import duty) !!! For a total of 3 Lizbeth balls (not much choice in colours so far), I could’ve bought 43, yes forty three Anchor balls!!!

Ah well, what can you do if one has intentionally decided to fall :-D 

happy tatting always :-)

Friday, 16 December 2016

a new look or ...

Pin It now!
… turning over a new leaf ? mocking or reversing ? Fancy a tatted troll !

For Georgia’s Online Class one of the patterns shared was a troll pattern! Reverse rings again – caught my fancy, as well as it’s potential to turn into an angel (but that for another day). Time for yet another refresher.
Small, cute, beckoning. Found a shuttle with some size 20 white thread left. Perfect. Completed within minutes.

Troll with an Afro !
Slight adaptation of 


First off, this rings-only pattern has 2 central rings (head & body) with thrown/floating rings for limbs and ears. There are multiple ways to work this, as annotated and compared here
Further, the Reverse Ring can easily be substituted with a mock ring – the SCMR (self closing mock ring) !

Body and Head
I followed the pattern instructions, using a single shuttle & reverse rings.
But I pulled out a long tail from the shuttle – enough to wrap around your hand for the 2 central rings plus the bit that is used up as core thread inside these 2 rings. 10-15 inches is more than sufficient, in size 20.
For eyes, string 2 beads on this long tail (not in original pattern).
This tail is used to wrap around hand as core thread, over which Reverse stitches (unflipped) are made/wrapped as in second half of split ring.

TIP : Loop the long tail. This can be done in 2 ways.
  1. as we do for a split ring (SR) – over and around finger to hold in pinch ; or
  2. as for left handed tatting – under and around finger to hold in pinch.
In both cases, the loop is made with tail and the unflipped stitches with the shuttle.
Yes, you guessed right – reverse ring is a split ring without the first half – it is all second half !  ...

UPDATE (Dec 27, 2016) :  A short explanation of how to work a Reverse Ring... Wrap the ring thread exactly as you would for a SR, with hand in the SR position ('dead spider'). Pretend you are about to start a SR, BUT, tat Only the unflipped stitch or 2nd half side throughout. Unlike a SR, where we usually begin with 1st half (normal double stitches), then work the 2nd half with 2nd shuttle in Reverse/unflipped stitches, in RR, we do Only the 2nd half for entire ring using 2nd shuttle.

Appendages
Hands, legs and ears are all thrown rings around a central ring. I tatted them as backside rings using the reverse order half stitches (RODS), and posting the shuttle before closing each ring. Posting shuttle keeps the ring from curling when closed.   
Eyes
Bead for eyes was brought forth 1ds away from the ear, without changing the overall stitchcount.

Afro cut
Long picots, snipped across at end. Each cut tail was rolled between fingers to untwist – this is super fast! Leave as is, after trimming. Original pattern calls for fraying and lovely fluorescent threads are used!
Okay, this is an aging troll with thinning hair ;-P Should we give him a wig?
I skimped on the hiding ends procedure by tying a bow around it’s neck with the tail ends.

Georgia shared a cute idea in class – fold the limbs & stiffen the troll into a sitting position !!! I would love to do that – if only my thrown rings weren’t so firmly in place with no wiggle room.

many thanks to Ruth & Georgia for sharing this enjoyable pattern

SCMR and Reverse Rings  

This revisiting of reverse rings and the SCMR option got me thinking of their characteristics and the outcome is this tabulation. It is based on my present comprehension, and if there are any errors, Please let me know before the mistake(s) spread.


Sufficient conditions are listed; there can be exceptions and situational tweaks. 
Mock it, Reverse it - nothing is written in stone ! 

For Reverse Ring tutorials/videos, synonyms, options, scroll down to Thrown/Floating Rings here
Please note that reverse rings can also be worked if one is using 2 shuttles. But a single shuttle suffices if there is thread from the ball to loop for the ring.

An understanding of the characteristics of each, can help us choose one technique over the other, play with colour placement. eg., tatting a 2-coloured onion ring might be more convenient if tatting the inner ring as a reverse ring. 

Download pdf here : SCMR vs RR Table


Download pdf here : SCMR vs RR Table

see also Central Ring with Thrown Rings

happy tatting with a :-)