Pin It now!
A gentle generous tatter asked for help with Ninetta's lovely gold rope chain. Hmmm, time to study interlocking split rings - chain maille (or mail) style! This post was my starting point, but stumbled at the very first step. The video was confusing, despite my intuition that it is basically similar to the Interlaced Split Ring braids I did earlier. For my own future peace of mind and reference, I undertook a systematic study and am uploading my pictorials, although Ninetta's collages are fairly clear. This is Part 1 of 2.
Interlocked Split Rings - chain maille style creates interlinked split rings that are perpendicular to the previous.
A. Interlocking Split Rings - Chain Maille
ref: Karen Cabrera's Lesson 78 video and Ninetta's Method 1 instructions.
Red is Shuttle 1; yellow is Shuttle 2.
I started with a simple split ring in 2 colours. Each split ring is 8/8.
A-1 : Tat split ring (SR) but do not close. Post (or pass) shuttle1 back to front through the open ring.
A-2 : The shuttle is now in front.
A-3 : The loop (indicated by hook) will start the next ring. To close the SR, tug on the left side thread of the hooked loop - it is the core thread.
A-4 : SR is closed and thread for next SR is locked in.
A-5 : Loop the earlier hooked part around your hand to start next SR. The 'joined' part is to the left, and the running part which goes through the previous ring, is on the right.
A-6 : Without leaving any space, tat 8ds for 1st side of SR.
A-7 : Before starting the 2nd side of SR, make sure shuttle2 thread is in the position shown (inside the loop). If it is not (as seen in A-5 & A-6), then first post shuttle2 front to back through open loop.
A-8 : Wrap loop around hand in split ring position and start the 2nd side without leaving any space.
A-9 : 2nd side also complete.
A-10 : Repeat the steps, starting with posting shuttle1 back to front through open SR.
A-11 : Time to start the next interlocked SR. Notice that shuttle2 thread is already within the open loop (as in A-7).
A-12 : 5 interlocked split rings completed and ready to start another.
B. Interlocking Split Rings - Chain Maille
ref: Ninetta's Method 1 variation.
This is basically the same as the previous method except for one difference - there is bare thread space left before starting the next SR. This bare thread allows for more play between rings. But sometimes a bit of bare thread is visible between rings.
B-1 : Follow all steps from A-1 to A-5. Leave shuttle1 bare thread between previous ring and first stitch, as indicated by hook. 1st side of SR is complete.
B-2 : Similarly, leave shuttle2 bare thread between previous SR and first stitch of 2nd side of SR as indicated by hook. Make 8 unflipped stitches.
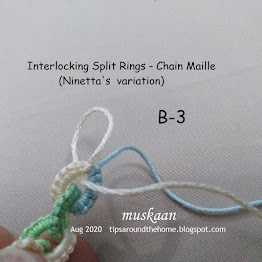
B-3 : Before closing SR, pass shuttle 1 back to front and start next interlocked SR.
B-4 : 4 interlocked split rings completed using Ninetta's variation.
Above is a visual comparison of both methods. Please read
Ninetta's post for front and back pics and more information.
Method 2 in Ninetta's post is the same as above, except that the indicated loop in A-3 is wrapped around the hand and Then the previous ring is closed. It is a matter of what the tatter is comfortable with.
Part 2 will show Method 3 from Ninetta's post and continue to make the rope chain including with beads.


