Tuesday, 31 May 2016

coming together for a cover-up !

Pin It now!


I didn't want to enter the kitchen so soon ! But a tummy needs what a tummy needs, no matter sun or rain, muggy or cold. There's no grumbling with rumbling. Leftovers, you say ? Yes, of course, but one still has to make something in order for there to be leftovers, right ?
And one doesn't want to get one's pretty dress dirty in the process !
So off I crawled to the kitchen, .... taking a little detour through time and the sewing room. 

'Make something' first !
Stepping back a couple of years.... My MIL needed nightwear ASAP due to an emergency hospitalization leading to a long recovery/rehabilitation thereafter. Luckily I had recently bought a lot of cotton fabric for both of us and could sew them out quickly. Here is one such, a hand-block printed Bagru cotton :
 
There was no time for anything fancy ...
But still too simple, so I rummaged through my frugal button stash and found some matching buttons to put along the front … (these buttons were left over from a 2nd birthday dress I had sewn for my niece).
And the sleeve, though not clearly visible, has an open box-pleat at the base and a minimal puff at shoulder.

One of the advantages of sewing oneself, is you get to keep all the leftover fabric pieces :-D  
There was a decent-sized rectangular piece that could be used for an apron, since it was pure cotton.


Apron from 'leftovers' ! 
My pinterest challenge for May 2016


What pattern to use ?
Tropical weather can be quite hot & humid as we approach monsoons, and add to that the heat in the kitchen. Even the thin apron strap round the neck can cause discomfort & perspiration ! I have been looking for apron patterns that circumvent the neck strap/string & saved a few on my DIY-Sewing board.
Despite the lovely ideas, they all had a kind of skirt around the waist, and wider straps behind needing much more fabric than I had or wished to use. These projects gave me a very good idea but customization was called for. 

Firstly, I had only about 35”x 22” (plus enough seam allowances all around) of this material. Plenty for a straight-cut apron; not enough for pleats and skirts.
Secondly, the fabric suddenly seemed a bit thin for a durable apron; not enough body.
Rummaged through my fabric stash & found this plain blue fabric.

A double-sided/reversible apron ?
Yes ! Keeps the boredom away ;-D

How to adorn ?
Tatting
Another rummage, this time through my tatting stash.
I had 30 blue & white motifs in 3 sizes which had been sewn on to a blue silk sari & gifted to my MIL in 2000. Unfortunately, the sari colour ran & the white turned pale, spotted blue :-(  Eventually she removed & returned the motifs, knowing I would put them to some sort of use, & wore the sari plain.
Perfect for this fabric print & colour ! Picked the ones where the white thread was more evenly ‘dyed’. 
3 small motifs & 2 medium motifs were arranged & sewn only through the printed fabric.
The pattern is from the only tatting book I had for decades (gift from a dear friend) “Tatting Favourites” from Anchor Design Center

…. and Painting !
My idea was to do some freestyle monotone fabric painting on the plain blue side. That was the reason I used dark blue sewing thread on the light blue fabric. But practicality ruled. See, once the front is ironed, it will leave an ‘imprint’ on the back; so it would not really be a reversible apron. The blue would just have to settle for being a lining.

How to strap it on ?
Still strapped with the neck 'strap' problem….
I couldn’t decide whether the strings should go straight down the back or make a cross. This led to difficulty in estimating their length and position (one should have a mannequin or a live model!). Hmm, as I write this, it occurs to me that I could've used crocodile clips to estimate !!!
So the decision was postponed – 4 strips were sewn – 2 on top & 2 for the belt.
Meanwhile the remaining sewing, including hand-hemming the bottom seam was completed.
I was still lost, and the last day of May to post the pinterest challenge was fast approaching… take a deep breath and Think girl !!! 
Rummaged through my meagre leftover neural stash .... and  Eureka
Adjustable strings !!!
Rummaged through my closet & cut out an old beige bra & removed the ahem “bra strap adjustment slide rings” – quite a mouthful (hmmm, didn’t know the term, but Google always obliges).
 Once I saw that it would work, I cut out another black one for black rings.
One ring went into each belt, and the rings for adjustment went on each shoulder strip.
The adjustable segment was hand-sewn.
The belt rings are free-sliding at present, leaving me the option of wearing the strings straight or across my back. The final tacking down of the rings on the belt will have to wait till I wear the apron for a bit & adjust to comfort.

The belt strings are left long enough to be tied in front .

That’s my challenge completed & solved to my liking, literally using leftovers – quite a cover-up!


Aren’t you just curious to see what the other pin chicks are up to? I am.
Let's visit them and check out their immense creativity at
& our newest member


Related Posts : pin chick in the bed room ,
the kitchen,
the bathroom,
the dining room


Saturday, 28 May 2016

making her teachers proud !

Pin It now!

Meet Annie Sukanto from Indonesia . She is a member of Cyn's Beginners Class & Georgia’s Online Tatting Class. She is a relative beginner in tatting but her tatting is so beautiful & precise, so patient & perseverant. I don't think our paths have crossed in class, but we have communicated via email.

I often get emails asking for help with my tatting patterns or tutorials. And I always give them top-priority, answering back immediately, even on my tablet. You know that feeling of getting stuck mid-way – it can be so frustrating to have to leave off when one has just settled down to start a project, or when in the mood ! So as soon as I come across a tatting-related question, whether in my inbox or on Craftree, I try to answer as best I can.

Sometimes one hears back from the asker, sometimes not. I enjoy the entire process anyways :-D Teaching aids and consolidates my own learning. 
Tatting and teaching - my two passions coming together, what more can I ask ?

Imagine my immense surprise when I downloaded Annie's tatting pics on the desktop & saw some writing on them . I am truly humbled. This is so sweet and kind of her.
Click on picture to enlarge


Now you can understand why I continue to grind out tutorials and other tips/details, despite the drawbacks of lengthy and repetitive posts , and some advanced tatters feeling bored ;-)

In fact if this return to Ikuta’s Picots with tat-along exercises helps somebody, we can thank Annie for it. A few weeks back I had notated & sent some of my old pics (which were in the pictorial pdf) to explain each step to her. Moreover, individual pics were larger, unlike the reduced collaged ones in the pdf. She successfully completed the loops. So when Georgia again mentioned some confusion about them in class, I offered to write another post, and upload the pics since they were already notated.  

But then the teacher in me took charge. What started as a mere re-upload, turned into a full-blown project – if I was going to revisit the topic, why not do it systematically ?! Specific point(s) of confusion had not been identified, but I had gained some more clarity, having tried it on the chain. So I re-photographed everything, and laid it out in an easily-followed format. I am so happy with the effort, and am so thankful to Georgia who has made it possible for so many of us to get acquainted with the old and new, to keep learning, sharing, evolving.

 
Isn't that just sweet ?!
Thank you, Annie. You are very kind. Your work is lovely and your progress is truly inspiring :-)

Wonderful teachers on InTatters/Craftree initiated my own transfer from traditional to 'modern' tatting 2½ years back, and bloggers & OTC have built on it.
All this has been made possible by the power of the web ! It is amazing how the internet master weaves us all within it's web, linking us to each other across time & space zones, allowing like minds and creative hands to congregate virtually, to help & share, to support & inspire.
We are all trying to pass it forward....

For more of Annie's tatting, please do visit her album (slideshow) at the Tatting Homework blog, hosted by Mel.

A few more of her Super 17 butterfly, with which she had needed a spot of help  ...
I can never decide which pics to pick - they all look lovely :-)

 
“He who can, does. He who cannot, teaches.” I really believe this applies to me and I am a very proud ‘teacher’, but will forever remain a learner.

Don’t you just love it when your ‘student’ outshines you !  
((( Hugs, Annie :-)))

happy tatting with a muskaan* :-)

* muskaan means smile :-) 

Related Posts : Super 17 Butterfly patterns
Ikuta's Picots pictorial pdf and related post, tat-along Part 1 and Part 2


Friday, 27 May 2016

Part 2 present and past

Pin It now!

continued from Part 1 - Ikuta's Picots on a Chain

Here is the second part of the tat-along exercise on Method 3 of Ikuta’s Picots.
But besides this, there is something wonderfully interesting at the end !


After the 1st exercise, we now have some understanding of how each picot effect looks (layered and overlapping) and how it is constructed on a chain. The same basic principle follows for the ring.


IKUTA’S PICOT EFFECTS ON RINGS
PART 2 of tat-along exercise

A ring, unlike the chain, is a closed loop, increasing the difficulty a bit. Yet, we can still identify the commonalities between the chain and ring arrangement, as shown in the combined picture below. 

On the left is the chain which we have already made ; on the right is how the elements for a ring will be laid out.
In the ring,
  1. think of the ring loop as the blue scrap thread of chain
  2. yellow scrap thread remains the same - a chain thread
  3. the blue shuttle thread in ring replaces the red core/shuttle thread in chain
For the sake of continuity, clarity, and comparison, the same 2 visible colours have been used. 
The red core thread of chain has been replaced by the SH1 blue thread.
ALL TATTING IS DONE BY THE BLUE SHUTTLE 1 THREAD, ALTERNATING BETWEEN THE RING LOOP (blue) AND THE CHAIN THREAD (yellow)

The above picture shows how we can loop and hold the threads taut. Holding the threads in this manner, we can work alternately on the ring loop and the chain thread without having to drop & pick repeatedly.  

Personally, I had to drop the ring loop when making the yellow stitches, since I am used to wrapping chain thread very loosely once around the pinkie. So, do whatever is comfortable. (Please read related discussion on how to construct below)

To start each part of this tutorial, make a ring loop with SH1 blue thread, 
and attach SH2 yellow thread to the base.   

We will follow the same sequence as in Part 1, starting with the easier layered effect.
Download my previous pictorial on Ikuta's Picots (Method 3) for tips and suggestions on how to start & end a ring, how to connect, and much more.  

V. Layered Picots on a Ring

As the term suggests, the picots are in two distinct layers, just as we saw in the chains in Part 1 of the tat-along. This is in Section V (page 8) of my pictorial pdf 
These picots do not require a 2nd shuttle (unless using 2 colours) and can be replaced with a ball and single shuttle, without cutting off the thread, ie. by continuous thread method.  

Start as shown in Pic 21, and make 3DS on the ring loop with the blue SH1. 
Leave yellow picot space & make 3DS chain with yellow stitches. 
(this was termed 'chain segment' in my pdf) 

Keep yellow SH2 to the left, pick up the ring loop, leave blue picot space & tat 3DS . 
(this was termed ring segment in my pdf)

Again wrap yellow SH2 thread around pinkie, leave picot space & tat 3DS , as in pic 22.

Repeat these alternate blue and yellow segments till end. Close ring.

Notice the placement/layering of picots : each picot is separate, but yellow picots lie in front or above, and the blue picots lie behind throughout the ring.
These colours can be switched. So how about a bit of homework before we proceed further ?

homework : 
For practice, make another ring, but this time have blue SH1 picots lie above & the yellow SH2 picots lie below. Compare with previous ring. 

And for the sake of interest, let’s turn the previous ring over to see how it looks from the back side ....
The colours are switched ! But the homework is to tat this colour effect so that it lies in front.

Just playing around .... the central ring has only 1DS separating the picots. 
Thinking of an aster, in the right colours, of course ?! So many tatted flowers are possible !!!

And here, all I've done is added a normal picot in the center of each segment. 
Each segment between the overlapping picots is [2DS,p,2DS].


I will continue and conclude this tutorial with the overlapping picots (Method 3) with both over-under & under-over overlapping picots. There will also be a comparison with Daisy Picots.


DISCUSSION
Techniques

how to construct ?

With reference to the wrapping of the ring & chain threads, this paragraph was included on p9 :

"Some experienced tatters have compared Ikuta Picots with Shuttle Brothers’ Alternate Thread tatting or AT Rings technique from their book “Tatting Alternate Threads”. Gina Butler’s video for Alternate Thread Wrap is inspired by this technique & is a practical way of holding both threads in position : 
Mituko Ikuta’s book “Shuttle Lace - Tatting & Bead Tatting 3 was published in the late 1990s & 
Shuttle Brothers’ published their book in 2009.
I do not possess either book, hence am not qualified to determine."

BUT , instructions for this construction have been around for a century and a half !!!   Mlle Riego, in her 1868 book "Raised Tatting Book", details how to use the ring and chain thread to make layered picots, all facing the same side (p10). She has a beautiful star insertion pattern (pp10-12) using picots of differing lengths. 
This is my first practice trial, following her instructions only for the ring. The lower flower is seen from the back side. I will be tatting the entire pattern as a sampler.


is this pearl tatting

Instead of a direct answer to the question asked in Part 1, to which a few answers have been ventured, let me first delineate what I consider the characteristics of Pearl Tatting.

As I understand it, pearl (perle) tatting has 5 main characteristics :
  1. picots or perles or pearls
  2. multiple threads
  3. core thread slides freely
  4. double-sided tatting ("double pearl")
  5. encapsulation (implied in #2) usually with reverse stitch (direct tatting/wrapped/unflipped stitches)
Some of these conditions are essential and basic to pearl tatting, while others are merely a ‘by-lane’ - one of many paths to reach the destination. It is these by-lanes that lead to variations (& confusion !).

Let us examine each characteristic in relation to the layered picots ... 
# 1 - yes, picots are definitely present.
# 2 - In a chain we were clearly using 3 threads. And as the comparison picture (2nd pic from top) shows, the same reasoning can be applied when tatting the ring. So yes, we are tatting over 2 threads.
# 3 - yes, the core thread slides freely.
# 4 - no, all stitches and picots face the same direction - all are on one side. 
# 5 - encapsulation exists, but so far in the tutorial direct tatting or reverse stitch (RS) is not used. However, in the overlapping picots to be tackled in Part 3 (which are the "real" method 3 of Ikuta's Picots), we Can use direct tatting in the chain segments. Refer to Sec II - Using DS-RS & under-over picots on p.4 of my pictorial pdf. 
On the other hand, Mlle Riego also does not use direct tatting in her 1867 "Pearl Tatting Book". She works pearl tatting (or pearl beading) by reversing work for each segment worked with the extra shuttle(s) or worked on the other multiple thread(s).
So this direct tatting feature of pearl tatting can easily be considered as "optional".

Based on the above, is this form of one-sided or "single pearl" not a variation of pearl tatting, with picots & stitches all facing the same direction instead of opposite directions ?
Your verdict ?

For those who do not attend Georgia's Online Tatting Class, I will talk a bit about how the name "Ikuta's Picots" came about. 


Many thanks 
to Eliz Davis for her valuable feedback on the comparison pic ;
to Judith Connors for patiently guiding me, which includes leading me 
to the wonderful world of Mlle Riego's tatting ; 
to Georgia Seitz for introducing me to these beautiful picot effects ;
and to all tatters who have shown an interest in this tutorial.

to be continued


Wednesday, 25 May 2016

a cool warm-up

Pin It now!

The weather has taken a turn for the better, at least for now. We had a storm & rain Monday evening. So I got back to working at my desktop a bit. Lots of piled-up emails to answer still …
I was going to delete the previous post which was a mere notification; but how can I do that now ?! Your support, concern & advice through comments & emails has touched me so very much .

But I did get a lot of tatting done during this sojourn. Besides the Wiosna, I worked a bit on the Spinning Wheel snood, completed Ninetta’s bookmark with a bit of floral flourish, caught up with some more picot effects while learning a couple of new ones too. 

But this post is to get back on track :-)
(words in blue are direct active links)

A doily tat-along by Renulek
Rounds 1-8 of tat-along Wiosna 2016 designed by Renulek


I liked the way Renulek used picots on one side of the rings. Reminded me of a kitten’s face ! The floating rings were pretty tiny, though. Worked clockwise, exactly as inked in her sampler image.
It was easy to guess where the next round would join. Hence I climbed out with a split chain & split ring.
Techniques I used : directional tatting (fs/bs), floating rings, SCh & SR to climb out.
Measures < 8½”  in size 40
I actually forgot to take a pic of Round 7 before starting Round 8. So the doily here is un-blocked & only a wedge pic.

I immediately fell in love with this round ! The overlapping rings, a reflection of the central round, with their chains, looked like a lotus in half-bloom ! The stitch count was very easy to memorize.
Tatted all from the front, but going counterclockwise because I used direct tatting (reverse stitch) for all the chains; rings were all normal.

Unfortunately this round has ruffles. We have had different ideas on Craftree about why it is so or how we can rectify it. My own feeling is that the joining picot in round 7 should’ve been a normal picot which would increase the circumference & allow the chains to lie flat, without tweaking the stitchcount. On close inspection, even Renulek’s model seems to have a bit of ruffle. She does seem to suggest in one of the comments that the next round(s) will correct that.
I tried to lay the second ring over the 1st & 3rd rings throughout. But I think the opposite might look better. Will try it later & take a pic to compare. 
Midway through the round, I ran out of thread in one bobbin and used Marilee’s Lark’s Head Knot trick as the last stitch of a ring to add new thread. It worked great, especially since single colour is being used !
As seen in pic, the last chain is yet to be tatted. Depending on how the next round is laid/joined, I will either climb out with a split chain, or complete the chain & start round 9 afresh.
Techniques I used : direct tatting, lark’s head knot to add new thread
Measures 9½”  in size 40


Spinning Wheel snood (an adaptation)
Mary Konior

Following Batty Tatter's example, I have doubled the repeats in the original glass mat in order to use it as a snood or hair bun holder. I use simple crocheted ones in black. But how can one hide such a beautiful pattern in black (there’s still some way to go before my hair turns grey ;-P). So I chose the next ‘sober’ colour that would work with any colour dress. There is a very slight difference in shades between this ecru & the Wiosna one, which is a richer cream in reality.

I’m working on this in very very small steps as something to fall back on when no thinking or concentration is required… a snail tatting !
The diameter appears to be about 4” to 4½” in size 40, which should work fine. Let’s see …


happy tatting :-)


Related posts : Wiosna 2016 Rounds 1-3Rnd 4 ; Rnds 5-6
Strawberries & Leaves for bookmark


Friday, 20 May 2016

A short message

Pin It now!

Dear readers and fellow tatters

This is a temporary post ...

We are going through an extended heatwave and I am finding it very uncomfortable to spend time at the desktop (I don't have an air conditioner in the study ;-P ).  While I will try my best, I can't say how soon & how frequently I'll be able to post.
The silver lining, of course, is that we can gorge on ice creams and mangoes ;-P

Thank you for staying with me thru hot and cold :-D

Hugs
muskaan :-)


Wednesday, 18 May 2016

Cracking “Picotgate”

Pin It now!

(all links at the end of this post)
Yes, “Picotgate” is what they’re calling the Ikuta Picots (Method 3) in class now, LOL!
Why? Probably because some tatters are still struggling to crack the effect – those picots seem to be in quite a conspiratorial underhanded deal against us :-)

So, here’s another post on the same topic. I don’t know the specific difficulties faced by tatters, but Deep Throat has learned a bit more since the first information was provided in the pictorial & the post, and is revealing it in a slightly different style – a tat-along exercise for the Woodwards & Bernsteins :-). Hopefully, some associations & connections might emerge from this little exercise in “doing is learning” .


We shall approach the picot effects through the chain route, going from simple to complex, so that beginners may take a shot at it too. I have taken all new photographs for a new perspective. 


IKUTA’S PICOT EFFECTS ON CHAINS
A tat-along exercise


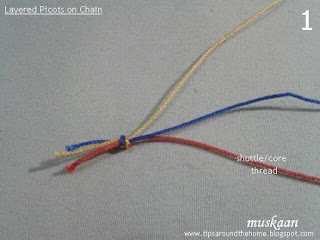
For this tat-along exercise, we need only 1 shuttle, and 2 scrap threads, preferably in different colours. 
In my samples, red is the core/shuttle thread & blue & yellow are the ‘chain’ or scrap threads.
To start each part, I tied the 3 threads together & tatted a 3DS blue chain.

I. Layered Picots-1
Knot the 3 threads together & make 3 DS with blue thread.
After the chain segment is tatted, simply leave/drop the thread to the left.
3DS with yellow thread, leaving picot space at beginning.
I have only just noticed that 1 half stitch of yellow segment is missing – an inadvertent mistake; please ignore. 
Continue these segments. Notice how the yellow thread remains behind ....
... and the blue thread remains in front.
Notice the placement/layering of picots : each picot is separate, but one colour lies in front & the other behind throughout the chain. Also notice that the core thread remains the same throughout.


We can switch the colours if so desired (Part II of the exercise is optional) ...
II. Layered Picots-2 
Follow the same procedure as in I. But this time, keep the blue thread behind, to the left, after completing 3DS.
Compare with pics 7 & 8 with 4 & 5 above.
The final result is same as above, except that now the yellow picots lie in front & blue behind.

Pic 10 shows both the above effects together for easy comparison.

This style of layered picots was incidental ; not part of Ikuta’s Picots. But it helped me figure out how to overlap the picots to recreate Method 3. 
The 2 ways of overlapping are as follows - over-under overlap & under-over overlap , giving a sense of intertwined picots.

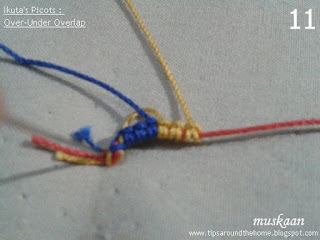
III. Over-Under Picots (Method 3)
In this overlap, the picot lies Over the arch of previous picot, but Under the arch of next picot. See inset in pic 15
Tie the 3 threads together & tat 3DS with blue , picot, 3DS yellow. 
Bring blue Behind yellow , leave picot space ...
& tat 3DS .
Repeat the same with yellow : bring yellow from Behind blue, leave picot space, & tat 3DS.
Continue in similar fashion for required length. (pic 15) 
Examine how the picots lie in relation to each other. They have an over-under overlap as explained earlier.

Now let's do the other overlap ...

IV. Under-Over Picots (Method 3)
As the name suggests, the left side of picot lies Under the previous picot & right end lies Over/above the next picot.
Make 3DS with blue ;
Bring yellow in front of the blue thread, leave picot space & tat 3DS. 
Bring blue in front of yellow, leave picot space & tat 3DS 
Repeat to required length. 
Examine how the picots lie in relation to each other. The woven appearance has an under-over overlap. 
The two overlaps shown together for easy comparison.


To refresh our memory & compare , all 4 chains are photographed together. 


Have you completed this exercise successfully ? Do the happy dance :-D
Do you feel confident of making the picots on a ring ? If yes, then we will continue our exercise on rings in the next post, along with a bit of conceptual input.

Before I sign out, here's something to ponder over :

IS THIS PEARL TATTING ? 
Can you give reason(s) for your answer ?


In case of Any difficulty or doubt please feel free to leave a comment or email me. Your input & feedback is also very valuable. I hope to get some answers to this question before I post the next part :-)

happy tatting :-)
(to be continued)

Related Links & Resources 
class material & logs for May 9, & May 16, 2016 (many thanks to Georgia Seitz)