Monday, 30 January 2017

beady-eyed but dim

Pin It now!
playing with beads and lace
I’m getting better at stringing beads ! So playing is much more fun now. OTC homework for Jan 2017.
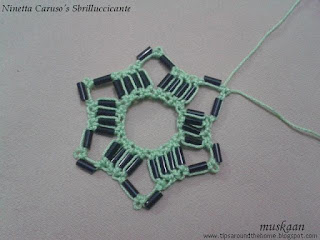
Sbrilluccicante
(or Bugle Bead Star)
Ninetta Caruso
Ninetta’s brilliance has always been apparent in her tatting, lacework, designing, and innovation ! Little surprise to see another winner from her.

Materials : 2 shuttles, size 20 Anchor 4054-0241 ; 72 glass bugle beads 5mm from Itsy-Bitsy
Techniques : working with beads, block tatting, reverse stitch (for block tatting and for split rings), split chain.
Dimensions : Rnd 1 – 1⅜” ; Rnd 2 – 2¼” ; Rnd 3 – 3½”  all tatted in one pass.

The video is excellent and really helps. The written pattern could’ve been better, though the images help.
Unfortunately, these are the only bugle beads I have on hand – not as shimmering, but good quality with hardly any jagged edged or broken ones.
TIP : My quick way of choosing similar sized beads – arrange along the edge of a flat-bottomed lid as seen in collage above!
After the first block, I followed my own way, using 2 same half stitches as a riser. The difference is noticeable (see below).

So you think the beads and thread are dull and dim? Wait till you see how dim I am ....
In this inverted V arrangement (Ù) of Round 1, notice how the thread goes under the bugle bead on the left and over the bead on the right arm ? I liked the shadowy effect and deliberately went with it, thinking I will do the same for the split rings in next round. BUT the thread Has to remain Above the bead for following reasons :
Ø      Bead count in shuttles goes awry
Ø      Joining to it in next round is slightly tricky because the picot can turn downwards.
Ø      More importantly, in split rings, the thread just bunches together when trying to close the ring !!!
I fell in love with the pattern at first glance and the tatting was equally fun !

{{{{{{{{{
3D Beaded Flower Earrings
Jane Eborall
Now this was undoubtedly an interesting piece when I saw it on Jane’s blog
But at the time I skirted around beads. With Georgia taking it up for the Online Tatting Class this week, I had a go at it. These are listed as Palmetto 3D Earrings here and are sewn up as a brooch here .
Pretty quick and easy. I loved the green calyx shape (sorry, no pic)! One can start the calyx as a mock ring with thrown center ring, too, but it is not required. I like it just as it is. 
I did not, however, add a bead between 2 petals, preferring to join to plain picot, and keeping the petals inside the hollow calyx. I like layered effect in tatting.

Materials : size 20 Anchor 4054-0241 green and 4054-020 maroon ;
Bead Craft emerald green seed beads – 5 ;
Bead Craft golden yellow seed beads – 36 ;
Gold beads size 9 – 5
Pearl bead cream size 3 (10mm) – 1 for inner center
Pearl bead size 6 – 1 for outside.

The finished flower measures just about ½” !
A clever design that makes the beads look like another round of petals, adding interest & texture ! Bead placement can be customized to create different looks. Hence beads in diagrams and tatted models may vary slightly.

This was a fun project and a good one to clear shuttles. I like the look of it as a little tree ornament.

{{{{{{{{{

{ Many thanks to Ninetta & Jane for sharing their brilliance with us  {

{{Happy tatting and come join us in The Online Tatting Class{{

Sunday, 29 January 2017

I laced it !

Pin It now!
Beginner’s Armenian lace on Romanian Cord 

We’ve all been admiring Totus Mel’s gorgeous Armenian lace doilies and when she put up her first video, it looked pretty simple. Have wanted to try Romanian lacing for a long time, too – ever since I came across it on pinterest.
This is my very first attempt at both ….

The videos and instructions are excellent and easy to follow.

I used size 20 Anchor Mercer Crochet Cotton 4054-0241 for the cord and an unbranded crochet perle cotton for lace – perhaps a size 30.

I'm very pleased with my point lace cord - unfortunately no separate pic of it.
The thread seemed to get stuck when pulling the needle. Till I started to pull the needle towards my left and sort of guiding the double thread over my left thumb. Then knotting went smoothly.
UPDATE (later in the day) : I cut off the lace and started again with size 40 Anchor Mercer and knotting is so much easier. It was the perle cotton that was 'knotty' !

I need a lot of practice, especially climbing up/down. At present I’m happy that the main lace seems to be evenly spaced out.

For first triangle, I spaced each arch further apart. For second, there is only one ‘picot’ space.

What I like about both techniques?
-         no special tools required
-         no strain on eyes
-         easily portable
-         no need to remember a pattern (at least as yet)
-         there seems to be tremendous scope for freeform
Can't say how, when, where I'll use these techniques, but I’m sure thrilled to learn something new!

This was lesson #1 – a basic knot. Eager to see what the future holds …

Z Many many thanks to Totus & Wendy  Z

happy knotting J   


Saturday, 28 January 2017

Days of my life

Pin It now!

Day 12 snowflake and Day 6 TIAS (and Day 7 to come) ... it's all about tatting !

Twelfth Day of December Snowflake
Lene Björn

When the chains, and colour for last round, didn’t work out, I left the piece and started a new one, experimenting with a different route this time.

What I wanted :

  • Ring spokes highlighted in a different colour
  • Rings in the spokes facing outwards
  • No colour blips in the chain.
Mock rings to the rescue. Picot space held in place by paper clips, to be joined on the way down.
Mock rings are simply chains joined back on themselves or at points to create a ring-like effect.
The mock rings are quite longish. Later, while blocking, a tug at each ring brought it back to a better shape.

I started with single shuttle, making the copper ring medallion, then joined yellow thread for chains in the next round.
This chain round would have mock rings thrown off. So, following my discovery in the poinsettia flake, I left a short length of yellow (seen going down near the blue clip in the previous pic) as CTM to use as core thread, on which the chain stitches would be worked, encapsulating the shuttle 1 copper thread within. When the 'thrown off' mock rings were needed, I pulled out the SH2 yellow to act as core and copper for the stitches. Partially successful.

The rest went quickly – long chains joined at base with lock join, and across mock rings with a crossover/ over-under / alligator join.
I used a picot gauge for the last round.

The partial one (in size 40 Anchor white & Lizbeth) measured 2¾” and this one is 2½ upto the same round !
So, I’ve been working with size 50 and didn’t know it ! No wonder, I couldn’t see the threads easily.
Techniques : mock rings, picot on core thread, encapsulation, alligator join, lock join, picot gauge
Measurement : 3¾” in size 50 Anchor Mercer (0302 – yellow  ; 0896 – copper) 


Tat It And See 2017 - DAY 6
Jane Eborall

Day 6 and awaiting Day 7 later in the day.
It could still be a butterfly, a wagon, a horse, and of course a gown. Clueless as ever :-D
Whatever it is, though, I like the look so far - nice shape and effect.


Oh, Great news !!! Remember when I bought the 3 Lizbeth balls at that exorbitant cost? Well, yesterday, they refunded about 10% - export duty overcharged ! Yippeee, now I can buy some more - restores one's faith and happy days ;-P 

 so it’s happy tatting … what better way to spend our days


Tuesday, 24 January 2017

bitter glitter pill

Pin It now!

Nineteenth Day of December Snowflake
Lene Björn


It was the last day of 2016 and  I was working against the clock to complete as much of the 24 snowflake challenge as possible. To save time choosinging colours and winding shuttles,  I used two half-loaded shuttles from my previous snowflake - white size 40. Remembered in time that Eliz had shared some notes on this snowflake. Thanks to her notes, I left a tiny picot (with paper clip) at the base of first ring. This is where the last ring would be attached before climbing out.
Notice that I did not start with 3 rings as per diagram; there is no need to. As Eliz pointed out, it changes the direction of the rings. So I started with SCMR with a single thrown ring throughout this round, ensuring symmetrical orientation of rings.
TIP : After closing each mock ring/SCMR, 1ushs (unflipped 2nd half stitch) was made. This is almost invisible, but secures and anchors the ring.
Like Eliz, I wasn’t successful in making the last split ring teardrop shaped as the rest of rings. I had wee bit more success later.

TWoT note : Round 1 is worked in clockwise direction using SH1. So the 5 SCMRs are made with SH1. But when we climb out using split rings, SH2 becomes the main shuttle for the new round. Thus, knowing which elements will require which shuttle, broadly helps us estimate the thread required in each shuttle, and also the colour play if 2 colours are used.
Techniques : 2 shuttles, starting with picot, mock ring (SCMR), split rings (SR), thrown rings (TR).
Measurements : worked in size 40 Anchor, white
Rnd 1 - 1" inner medallion of 6 outward-facing-rings & 2" for SCMR with TR.
Rnd 2 - 4½"  (3½" without TR)

Seeing others use it effectively, I've wanted to add glitter to one of the flakes, may be in multiple colours. What a disaster with the dense red in center ! Used only a sprinkling of silver for the rest. I used dry 'powder' over fabric glue (my self-adhesive glitter has all dried out !).

How do you apply glitter ?

happy tatting always :-)


logically speaking

Pin It now!

logically speaking, the TIAS clues should reveal the identity.

Tat It And See 2017 - DAY 5
Jane Eborall

Now here are some clues that I could spot, based on Jane's introduction and the 5 links released so far ...

'" Variegated thread would work well " .
Narrows down the field to critters such as butterfly, bird, moth, sea creatures ;
Garments – gowns for a lady, dancer, dandy ;
Dolls, toys, action figures (is that a cape?), kites, hot air balloon (I love that guess), cage, carriage/cart, sail of a ship (but a sail boat has been done!) could be some possibilities.
On the outside, it could probably work for a decorated horse, elephant or a uniform.

'Pattern calls for a single size 11 bead !
Okay, it could be an eye for some being in profile.
It could be a brooch for a gown.
It could be a nut/screw for some appliance (remember the button in her 2015 scissor TIAS?).

'Alligator join .
Clearly there's a crossover entailed sometime, somewhere ! But when, where ?!

'In one of our convos,  Jane mentioned how only the zigzag chain fulfilled the desired effect she was after.
Hmmm, doesn’t lead me anywhere still.

'After Day 5, a beautiful butterfly does seem to emerge. But it reminds me of a butterfly from one of the workshops that used various decorative chains. So, I think this is simply a ‘day guess’.
At this stage I do see a butterfly in profile, with one beaded eye, and 2 overlapping wings (that’s where the alligator join comes in – to cross over the head).

'The picots show where future elements will be attached, and could give some clue to the pathway. All the more confusing now !

To date, my guesswork includes
A lady in a gown attending a ball
A bullock cart or carriage  may be an old style carnival cart with those canvas covers
A butterfly in profile, which might even have 2 overlapping wings.

Logically speaking, I’m still clueless ;-P  "


But I am thoroughly enjoying the creative guesswork accompanying some gorgeous pictures by other participants. So let’s just tat along, leaving all logic behind to have fun !


Friday, 20 January 2017

flaky flowers or flaky me ?!

Pin It now!

a 3D tatted flower and another from a snowflake perhaps

3D Carnation (a prototype)


My whimsical tatting which started out as a chrysanthemum (perhaps a marigold in different colours) and turned into a carnation !
Flower is worked in size 40 thread & foliage in size 20

The stem should’ve been longer of course – and it isn’t actually a stem – it was a trial of my pine needles idea turned and sewn around to act as a stem ;-P 
Techniques used : How to work a ring on the picot of another ring ; Pearl tatting with snipped picots


Twelfth Day of December Snowflake (partial)
Lene Björn

Here, I wanted to highlight the radiating rings. Started with single shuttle (white) leaving a long white tail to climb out .

TIP : For outward facing rings with bare thread space(BTS) : to keep the symmetry of the medallion, I do not hide the tail in the first ring. Instead, when the last ring is tatted and closed, I thread this tail and sew it inside the last ring. This gives an appearance of continuity in the center.
In this case, since split ring was used to climb out, the tail was already long and used for 2nd side of SR stitches, thus completing the inner bare thread circle.

Ball with variegated thread was joined in round 2.
Instead of thrown rings, I opted to make the rings in the next round and attach to tiny picots on the previous round chains.

And going by previous false memory, I increased the chain stitch count by 1 on either side. Turns out it wasn’t needed, ughh.
I continued.
However, the last round caused me further grief because I couldn’t get the 2 white ‘8’ rings to stay in a line. Maybe SLT would’ve helped. Moreover this variegation didn’t work out as well as I’d imagined, especially on the last round, with lots of picots – it looked to ‘heavy’. A subtler tint, perhaps ? Cut off the last round midways. Decided to leave it and tat a new one. It looks more like a flower, though, with those chains arching like petals.

In size 40 Anchor (white), & Lizbeth (purple splendour)
Rnd 1 - 1¼” ;  Rnd 2 - > 1½” ; Rnd 3 - 2¼”  ; Rnd 4 - ~ 3" ; Rnd 5 – not tatted
Techniques : SR to climb out, outward facing rings, shuttle and ball.

Future idea -- make All 4 or 5 radiating rings as mock rings, with inward picot on core.
I also see a 3D flower - morning glory in these colours ! 

As it turns out, I actually used my future idea, but you’ll have to wait a bit to see it, while I write out the post :-)

 ® Are the flowers flaky or is it just me ?!
 happy tatting ®

Thursday, 19 January 2017

skirting the issue

Pin It now!

Tat It And See 2017
Jane Eborall

Days 2 to 4 of Jane’s fun guessTATting game - TIAS!

Tweedle dum or tweedle dee 
whichever will it be ??? 
A lady's skirt or a cart wheeled,
Jane, our brain is a-twiddle !!! 

Jane’s pdf urls are as interesting as her pattern bits. Day 2 was “twiddle your brain” ! It got well and truly twiddled . The top looks like the start of a skirt or gown but turn it over and it could be a wheel !
Day 3 – no guess. Totally stumped. I know she intends to return to the horizontal rings, attaching to the small picots there. But ….

Day 4 – I’m back to my skirt/gown guess ! Yes, we need to attend the TIAS ball that Jane will throw for her followers ;-P And it’s going to be gorgeous dress with those flowing Z chains !

Z Chain :  From what I understood,
the 8 stitches in Z chain pattern represent (1ds,1rs)x8 
where ds is the normal stitch, and rs is the unflipped stitch
Double stitch : 1ds = (1fhs,1shs)

Reverse stitch : 1rs = (1ushs,1ufhs)

Also, I had to make a lock join at the band ring (on the way 'up') , but a normal picot join on the solitary ring at base. Hope it is fine.
btw, Day 4 url has this 'up the khyber' ! It is a dark tunnel through this guesswork mountain !

!happy tatting "
slowly she weaves her enchanting web 

Related Post :

Tuesday, 17 January 2017

patchwork tatting

Pin It now!
A tatting SOUP bookmark from snowflakes.

What do you do with practice pieces or tatting leftovers ?

You may remember my tatting SOUP (Sewing On / Using Pieces) where I try to put my tatting to functional or decorative use – be it as appliqués or on ribbon bookmarks, envelopes, cards, and so on. It was time for these vintage snowflake motifs to get working!

I’m calling it the ...
Patchwork Bookmark
 using 6-Pointed Motifs by Louise Hauck

update Jan 18,2017 in order to change the blogfeed photo, I am adding this single pic ...

... because it is made by piecing together not just the snowflakes, but also filler bits, tails, tassels, all using short lengths of leftover thread .

I chose to place them one tip into another trough – it looked better than attaching each at 2 tips. This results in an alternating symmetry, being 6-pointed. I sewed the adjoining edges, weaving through stitches to reach the next joining point/picot.

Filler motifs : Yet, there was something missing – they didn’t form a cohesive unit. (refer to the center image in collage). That’s when the idea of fillers hit me, using a motif from the pattern itself ! 4 bits were added, shown by arrows in pic.
With so many options for hiding ends, I didn’t mind weaving in the tails in the filler bits (each started CTM).

Overcoming woes of 2 colours : The coloured snowflake at the end stood out like a sore thumb (it would’ve worked better as a charm). But I liked the tapering effect.
The tails, too, taper with decrease in ring stitches. But it is very subtle.
Tried to bring it all together by making 2 tails and intermixing the 2 colours. Not too happy with it, but ….

My first time trying to fray tassels !
Frayed tassels : Aqua tassel : I tried with toothbrush and also pin . Hardly made any dent.
Then I held the pin horizontal and 'scraped' over the threads - it worked like a charm (pun intended ;-p) !
White tassel : this time I untwisted each thread between fingers. Then used the pin horizontally. Much better and quicker.
I then brushed both tassels with the toothbrush. Beware - don't overdo it ‘coz fibers accumulate in the brush. This is visible in the whitened tips of the aqua tassel.
I was fearful of spoiling the tassel while blocking. But it actually helped!
I’m much more confident now, and may fray picots in a pattern, too. 

This book arrived just last week and I won’t be able to start it till I finish reading my current book …may take a month at least. But this bookmark goes perfectly with both the colours and the title of the book ! A bookmark made with snowflakes for ‘Winter Garden’ by Kristin Hannah

˜l˜happy tatting come snow or shine !  ˜l˜

Saturday, 14 January 2017

Ice drops into the sea .....

Pin It now!

... gets entrapped in an an oyster to turn into a pearl !!!!
Ice Drop made with shell and curled rings

This time I delved right into the depths of the TATemptation sea ;-P
As commented in my previous workings, I had intended to use curled rings for my next Ice Drop, and during a sunny spell I managed to find my collection of shells and other blings. In another lifetime I used them in flower arrangements and for land/sea-scaping in a tray. All my shells are handpicked from various beaches we’ve been to.
I hope Diane won’t mind my naming this composition a Sea Pearl. Why ? Coz there’s a pearl in the oyster !

Sea Pearl Pendant
From Diane’s Ice Drops

I like this shell – it reminds me of a world map. (see in collaged pic below
Blue represents the water (Anchor 00131, size 20) . 
Variegated colourway represents various seaweeds which have ‘embedded’ the oyster. (Lizbeth Vineyard Harvest size 20).

I had sketched the shell outline on paper, but was not comfortable with it. Instead, I kept placing the tatting over the shell to confirm that the contours were fine.
Pearl is on a large picot on first ring.
            Rings range from 18DS to 9DS, with 3 or 2 picots.
            Chains are mostly 4-2--2-4.
Worked this round in counterclockwise direction. Rings frontside, reverse work (RW), chains frontside, RW.

As I tatted the curled rings, the 'seaweeds' looked more like a lotus. My initial plan kept getting modified and in the end I chose this simple, narrow edge in order to showcase the shell markings.
This round is tried all from the front in clockwise direction. I found this easier.
Rings tatted backside (reverse order DS) and chains frontside, with No RW.
After chain, simply start ring at same point. (I used backside tatting for ring); attach to previous ring; complete and close. 
Then pull a loop of ball thread through round 1 as well as through the center picot of ring. Pass shuttle through this loop ans snug. This ensures curling of ring as well as attaching to round 1 in one movement.
            All curled rings : 6-4--4-6.
            Chains : 8 or 9 as required.

Both back and front were tatted with single shuttle attached to ball thread. 

After completion, the short blue chains didn't give a good outline to the pendant. hence, using short lengths of thread, I added another layer of chains - kind of like waves? 3 such chains were sufficient to give a better outline, as well as add some more layer, as seen in the pic below

The pendant is totally reversible, and can be worn to match the dress ! 


That's all from me for now. It was a nice break from blogging only about snowflakes :-)

I had tremendous fun again, though round 1 took longer with the continuous adjustments. Thank you so much, Diane, for such a superb enticement :-))))

happy tatting always J


Related Posts :

Thursday, 12 January 2017

snowflake and TIAS

Pin It now!
blocks in snowflake and first block of TIAS !

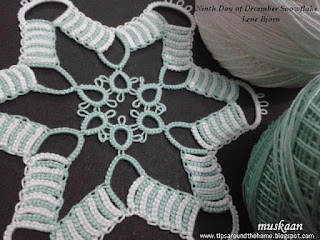
Ninth Day of December Snowflake
Lene Björn

I was inspired by the same 2-colour working of this flake on Craftree as credited and also worked by Eliz here. And so, one of the threads had to be white.

I raided my size 20 stash looking for a colour to go with the white (which is a bit thicker than it’s counterparts), checking each by sight and feel despite my catalogue . I found only one that came closest in thickness – this aqua blue-green 4054-0185 !
For block tatting, equal thickness is critical.

I followed the same block tatting method as described in this snowflake. It works for me. The switching shuttles is too cumbersome. I prefer the flipped/unflipped (DS/RS) with a half stitch riser.

TWoT (This Way or tat?) note : For directional tatting or fs/bs tatting, start the chain backside with reverse order of half stitches. The thrown ring will also be tatted backside.
The snowflake is tatted in one continuous pass in clockwise direction overall.
But can it be tatted all from the front ?

Experiment with all frontside tatting : I tried a little experiment here. Since it is tatted in one pass, I wondered whether I could avoid reversing the work (RW) by using direct/reverse stitch chains and a reverse ring in the centre and tat the whole snowflake from frontside only.
Yes, reverse ring can be applied to thrown ring in this situation.
But I did not like the effect. As you can see, the chain arch is not as smoothly curved, and the base picot space is of 2 colours since core thread is white and ring stitches are green !
Better to avoid the reverse ring and stick to reverse work and normal thrown rings !
BUT, I now realise that I made a mistake in making the ring. If done correctly,  it would work except for 2-coloured base 'picot'.

Future Idea : Using a largish picot at both the inner and outer turns, tat the entire medallion in block tatting. An undulating braid of block tatting !

Techniques : block tatting, thrown rings, fs/bs tatting
Finished Size : 3½”

I Love the negative space in this flake. I'm pretty happy with this snowflake working – blocks and all. Do you share my feeling?

 YYYYYYYYYY

Tat It And See 
2017
Jane Eborall

And now for Day 1 of Jane’s TIAS that has TatLand excited … Yes, the fun has begun !


This little worm creeps out to see
the world in all it’s glory
What will it grow to be
we’ll have to wait, won’t we ?!

Her diagram seemed to indicate spaces between the rings. I hope it is so.
Lizbeth size 20, Vineyard Harvest..


happy tatting always Y