Friday, 31 August 2018

leaning towers

Pin It now!
err, leaning trebles to be accurate!


Here’s the story –

Ninetta is starting a tat-along for her latest piece with those swirls and butterflies. I chose my colour palate and started the round with spiral rings in blue.

Then it hit me and I went to check on my earlier trial. Remember this pink one where the spiral rings are in tds (treble tatting), supposedly?
Well, turns out I made an error causing the stitch to slant! Compare it with the correct formation (blue). In both versions, the rings have identical stitch count.

In the pink, I inadvertently skipped steps 4 & 5, passing the shuttle directly through the first loop itself as in step #6. Refer to pictorial here. 
Wishing to continue with the “crochet saga” (tongue-firmly-in-cheek), 
Ninetta has christened it the half treble.

No wonder it tatted up so much quicker ;-P And no wonder I was having a tough time getting the stitch to lie stand straight (which it still didn't!).
It is visually distinct (reminds me even more of her vapor picot), appears denser, with the stitch slanting and a wavy outline.


Back to the tat-along... the shuttle was running out of blue thread on the 13th ring. This method worked splendidly again – using a scmr. With no bare thread between rings, it was easy to tat over the tails on opposite side as I went along – nothing to sew later. So far it is still a braid and needs to be joined back to first ring. With pearls/beads, it would make a gorgeous bracelet or choker!  Waiting for the next rounds to show up on Ninetta’s blog, shuttles on the go :-)


Tuesday, 28 August 2018

needle tips

Pin It now!
When I was tatting back in the mid-80s till about a few years back, my Anchor tatting book & a few other patterns said “tie and oversew” at the end. Despite asking/searching, nobody seemed to know what it really meant. Similar questions are often faced by beginners who start on their own. Which is why I was recently requested to write a post about the tools used to hide ends and the tips I shared privately. When somebody shares, we all learn.
So, at your request, Jean ....

Which needle to use?
I remember Grace Tan telling me about tapestry needles for sewing in ends. These have a long/large eye and a blunt tip which prevents snagging & fraying the tatting thread. They are also called darning needles or long- or large-eyed needles.
This is the Pony tapestry needle set with coloured ends. 
I also slipped in a few larger wool needles for the extra thick threads.

This image shows the comparative size of needle and thread...
from top -
Large eye blunt needle – size 3 or 5 crochet cotton
Size 22 – size 10 Anchor knitting cotton
Size 24 – size 20 Anchor crochet cotton (about as thick as a Lizbeth size 10)
Size 26 – size 40 crochet cotton
Size 28 – size 50 and finer. Here it carries simple sewing thread which is knotted. I use this for stringing small beads.

A needle-threader is essential.
A couple of tips, that work for me, on how to use it effectively.
Hold the threader horizontally through the eye
In other words, let the needle stand erect/vertical and the wire loop open when seen from top. Then insert the thread through loop, pull loop and the thread is smoothly pulled through.
I find that holding the threader as in the bottom left, is not always effective, despite what the instructions on the threader show.

Secondly, keep the tail end short while threading. 
By doing so, we can go down a needle size! It may fray a bit at the tip, though, as seen in the collage. But the advantage is that we get a finer needle to sew through the stitches.

Whip stitching
Sewing in the end tails is the most common and secure method of finishing off. The various ways of sewing in the tail pertain to where the needle is inserted in the tatting stitch – weaving under the caps from top (whip stitch) or through the legs. You can find some of the how-tos here
Ever since madtatter80 posted her video, I’ve been hooked to whip stitching. It is almost invisible, easy to do, and does not add bulk.

I’ve used my earlier diagram to indicate where to insert needle. 
I prefer weaving the needle under the crests, but one may choose to do it under the troughs. 

Note that I have not drawn the woven tail in the diagram but can be seen in the tatted model and collages below.
Here I have used a different colour to show whip stitch 
and am piercing needle through the crests. 
Weaving progresses from right to left here.

Once the thread is pulled, it almost disappears!
Here the cream thread is hidden under the ring stitches,
woven from left to right under the crests. 

And of course, one can hide ends without sewing, whichever may be the last element(s)! As I said before, this post is in response to a specific situation and question.

happy tatting always :-)

Friday, 24 August 2018

one fifth cornered

Pin It now!
Alibaba has cornered 8 of the 40 thieves! In tatting lexicon, that’s 8 motifs and one corner ;-P

All together. 
The corner in center later sprouted more leaves (scroll down for pic)

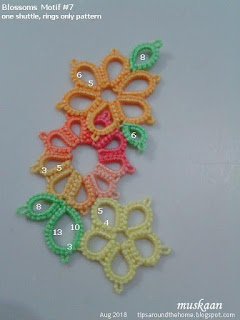
Blossoms Motif #7
 
Notice the number of petals in each flower is different – 9, 5 and 6. 
2¼” x 1¾” in Lizbeth 20

Blossoms Motif #8
Here the 2 end flowers are the same, except for colour.
2¼” x 1¼” in Lizbeth 20

Blossoms Square Motif ?
When placed together, motifs 7 & 8 can form a square with a wee bit of tweaking....

Blossoms Corner Motif
This corner is not part of the 40. It is for a handkerchief, to be gifted soon. The sewing is all done, but I still need to iron it before taking final pics. I’ll share it, along with pattern, in a future post.
In Lizbeth 20, the sides are 2¼” each, and diagonal is 2¾”

How to store?
Here’s how I’ve been storing the motifs till now....
A transparent envelope with a handmade paper envelope inside, giving an opaque background. But the envelope is full and I need a better storage solution. Obviously I want them to lie flat and separate. I have a few half-baked ideas, but would love to hear your suggestions. How would you store them for easy visibility and access?


happy tatting J

Thursday, 23 August 2018

spiraling into distraction

Pin It now!
Sometimes one just Has to! No excuses.


My first trials of Lenka’s Spiral Rings (her blog has some exquisite tatting and jewellery). Based on the tutorial by Ninetta. And also an attempt to try it on treble tatting as seen here.

For the braid, after first 2 rings, instead of a lock join I used the Ring on Picot method, without any join. It like it – subsequent rings remain flush, no gaps.
Notice that my failure to post the shuttle before closing the 3rd ring caused a twist.

TIP : I think the ring should be not be closed too tight as we often do in regular tatting. However, unlike my initial belief, leaving some bare thread (as in half-closed rings) is not necessary either. There is, however a design element there. If we do not close completely, we get a larger spiral compared to a completely closed ring.


Tried the counter-spiral as per instructions for the first one (3rd last from top). Works nicely, but since the ring is twisted or turned, the back comes to the front. I wanted the stitches frontside. 
There are 2 ways to do it –
  1. tat the ring backside (RODS), then pull into a spiral as instructed, or
  2. turn work, tat the ring backside (RODS), then turn back to the front and pull into a spiral. (2nd last ring from top).
I was running out the scrap thread, so managed only one spiral ring with treble tatting. It was enough to give me the confidence to proceed. I’ve been ogling at that gorgeous happy piece!

So, here is the medallion of off-side spiral rings using the treble stitch (tds). Peering into Ninetta’s model, I counted off 8tds and the exit was from the 3rd tds.
Work progresses in counterclockwise direction ie. each new ring is to the left of the previous one.
Now here again I used Patty’s ring on picot after the 1st ring. But see how close the 2 rings come? (the 2 dark pink spirals at the bottom). It looks like an overlapping spiral chain. A good design that can be used in future. But for the original effect, for the rings to curve gracefully and the spirals to show distinctly, a lock join is preferable.

No more dead end or single shuttle split chain (SSSCh) to create curlicues! These rings are so much easier!!!


So much for my distraction and fun in learning something new. Back to my other projects …. Although I haven’t cut off the thread – hoping to continue with another round(s).

Many many thanks to Lenka for this spectacular effect
and to Ninetta for sharing how to do it.

Tuesday, 21 August 2018

The picot stands tall

Pin It now!
Many of us ‘eye-ball’ the picot. When precision is needed as in case of graduated, double/triple, interlocking/interwoven, central and tuft picots or in tatted hairpin lace, a gauge is required. Some ink/tattoo dots on their finger! I merely measure and cut some cardstock to use as a homemade gauge. To me, vertical meant looping the picot thread around the gauge, while horizontal meant laying the picot thread flat along the measuring side. 

But Robin pointed out that there are different interpretations (see comments) and it led to a lot of research ending in this article : Measuring the Picot.
I will use 2 images sent by her to illustrate how some tutorials/resources differ in their approach & terminology. One set speaks of how to hold the rectangular gauge, while the other talks about how the picot thread lies (in relation to core thread or the gauge) when measuring. 

 
            In A, the picot gauge is held horizontally, but the picot thread is vertical.
In B, the gauge is held vertically, but picot thread is horizontal.
But notice that the core thread remains the same throughout – horizontal!
Core thread is the only constant during measurement.
It lies flat (horizontal or on the X-axis)
irrespective of the picot thread or the picot gauge.
In A, we measure the height of the picot (5mm in this case) and the finished picot is of the same measure viz 5mm.
In B, we measure the length of the picot (10mm in this case) but when finished, the picot will measure 5mm.
Length of thread in any picot is twice the height of that picot.
Conversely, height of picot is half its length. 
In A, multiple picots can me made before slipping them off the gauge.
In B, only 1 picot at a time is possible.

Thus the seeming dichotomy is resolved. But this is not all. There are ways to use the gauge unconventionally; and ways to measure a picot without using any separate tool (see collage below) !!! These are all covered in the article, along with pictures – some stepwise. 

Part of the article was published in Bellaonline on July 12, 2018. More sections were added later, and refined further, to make it quite a comprehensive document.

Click to download the pdf of the complete article -

This article is a compilation of the many ways – old & new - to measure a picot. Each method has it’s advantages and it is entirely up to the tatter to choose the method(s) they prefer. The article makes no claim of superiority of one method or of one gauge over the other.

The contents of the article :
I.  Orientation of Picot Gauge – horizontal and vertical
II. Orientation of Picot Thread in Relation to the Core Thread – height (vertical) and length (horizontal)
III. Non-conventional  Applications/Uses
A.                  Direct Tatting (unflipped stitches)
B.                  Decorative Effects
C.                  Graduated Picots 
D.                  Multiplier Effect of Gauge 
E.                  BEADS as Picot Gauge
IV. Stitches as Picot Gauge – length and height
Recap / conclusion
References
¯¯¯¯¯

During the course of my research, many good friends helped with their own insights, though not everything was included in the final article. This post is to share this new information rather than repeat what’s in the article.

Historically, a pin was used to measure the picot loops. “Tatting. Edgings and Insertions”, Mlle Riego de la Branchardiere, 1861.
‘A Pearl Loop – After the number of double stitches are worked as directed, the thread which forms the loop round the hand is passed over the pin, invented for the purpose, facilitates the work.’
Since a pin has a circular cross-section, there is no vertical/horizontal dilemma here. The number of times one wraps the picot thread around it can alter the size of a finished picot.
This same technique is used by Jon Yusoff on modern gauges for extra long picotsThe collage above shows how to measure a 10cm picot using a 2cm gauge.

¯¯¯¯¯

Bonnie Swank (through Anita Barry) sent me her description derived from “The Art of Tatting”, Lady Hoare, 1910, page 20
“Pinching the ring and shuttle threads together then tatting the double stitch and sliding the new double stitch next to the previous double stitch.
This is a horizontal method of making the picot without a gauge.”
Lady Hoare suggests ‘leaving about the eighth of an inch of thread on both loop and shuttle threads….’ This is what we refer to as eyeballing.
¯¯¯¯¯

An elementary and universal method is to employ
the stitches themselves as a picot gauge.
If a gauge is not available, the stitches themselves can act as a gauge. Even beads can be used for measurement if size is known. The advantage of using one’s own tatted stitches as a gauge is that it accommodates all types & sizes of threads as well as individual difference in tension.
I used the height of a picot-in-the-making to estimate the size of central picot and arrived at the following thumb rule. Jane McLellan stepped in with trials, experiments and feedback to confirm the rule.
A thumb rule for measuring the central picot
around which rings will be linked :
1ds width for each ring.
(± half stitch to account for individual differences)
¯¯¯¯¯

While technically not a picot, it is a different way of using a picot gauge. Jeanie Schekel, in her unpublished book, calls it a folded picot gauge ideal for bare thread tatting and mignonette. She shared her images and also these video links –  Double picot gauge by needledreams and this video by mytattingplace which also shows how to get uniform half-closed rings.
¯¯¯¯¯

Coretta Loughmiller sent me many pics of the BTS and Picot Tool being used. Now this stepped tool, at first glance, defies the vertical/horizontal position. However the detailed markings of length and directional arrows helps us understand how to hold and use the gauge to measure either the height or the length of the picot thread and also bare thread. Gloria Nelson, the designer & manufacturer of this compact efficient tool, has been most gracious in our communication, even offering to send in more pics.
Such markings are a good way to avoid any confusion and communicate clearly - whichever gauge a designer uses.
¯¯¯¯¯

Martha Ess’ sliding gauge is ideal for graduated picots. She graciously gave me permission to use any of the photos and instructions!
¯¯¯¯¯

I’d like to sincerely thank each and everyone mentioned 
for prompt and enthusiastic help – over and above my expectations !  
And I cannot thank Robin & Georgia enough! 
Robin Perfetti has helped proof the multiple drafts carefully and offered valuable feedback/suggestions. Some of the words, thoughts & of course images, are hers. 
Georgia Seitz has provided us with a wonderful platform and opportunity to reach a wide audience through Bellaonline and her Online Tatting Class.

Friday, 17 August 2018

an easier split

Pin It now!
2nd split/scmr pattern - bracelet

This braid which I turned into a bracelet is a simpler version of Houtz brothers' split/scmr technique since no reverse (or unflipped) stitches are required. All tatting is worked as normal stitches, except that the second side/half has a double core thread. You see, we lengthen the scmr loop and use it to finger tat this half with double stitches. Hence, I still consider it a s/scmr – perhaps a variation or an adaptation?

Sunrise Sunset Bracelet
braid/bracelet pattern
No unflipped stitches ; no ends to hide !!!

I visualized this as a sun rising above the blue horizon or skies and & then setting on the ocean horizon. Colours were chosen accordingly. 
And if you notice, the blue bead in the sky is a different shade to the one used for the water … there is a tinge of green in the latter, flanked by green seed beads.


Measurements :
In Anchor size 20 (close to Lizbeth 10), the bracelet measures 6¾” X 1”.
There are 10 motif repeats.

Materials :
3 colours in Anchor size 20 (similar to Lizbeth size 10).
Shuttle 1 – red
Shuttle 2 –yellow
Ball or shuttle 3 – blue
Findings – jump rings and bracelet clasp
Seed beads – size 16/0 - 60 transparent yellow ; 60 transparent green
Crystals – size 8/0 – 10 red ; 10 yellow ; 10 sky blue ; 10 blue-green
Loose beads for danglers (optional) - 2 red, 2 sky blue, & 2 yellow crystals

Abbreviations :
Sh – shuttle
s/scmr – split/self-closing mock ring
rw – reverse work
ss – switch shuttle
b – seed bead
B – crystal

Preparation :
Prestring beads in each of the threads as follows :
SH1 Red : 10 crystals 
SH2 Yellow : [3 yellow seed beads, one yellow crystal, 3 yellow seed beads]x10
Blue : [3 green seed beads, 1 blue-green crystal, 3 green seed beads, one sky blue crystal]x10

Pattern proceeds from left to right.

Part 1 : Dangler to start
In order not to hide ends, I used dangling crystals on each thread tail on both ends.
Tie 1 crystal of same colour to each of the 3 threads. Gather the threads at different lengths and make a larkshead knot or luggage tag loop through jump ring, using all 3 threads.

Part 2 : Main body

** Start with Shuttle 1 (red) as core thread. Make a starting loop for scmr and use yellow for stitches.
s/scmr1 : 2 b 2 b 2 b 2 B 2 b 2 b 2 b 2 / lengthen the loop to use as core and finger tat with blue stitches 3 B 3. Close scmr.  rw. ss 
Keep red thread at back of work.

With shuttle 2 (yellow) as core thread ….
s/scmr2 : 2 b 2 b 2 b 2 B 2 b 2 b 2 b 2 / lengthen the loop to use as core and finger tat with red stitches 3 B 3. Close scmr.  rw. ss **
Keep red thread at back of work.

** to ** forms 1 motif. Repeat till there are 10 motifs.

Part 3 : Dangler to end
Leave about 10-12 cms thread tails and cut. Using all 3 threads make a larkshead knot or luggage tag loop through jump ring/bracelet clasp. Tie 1 crystal of same colour to each of the 3 threads, at different lengths.
To ensure the crystal knots in the 6 tails remain secure, dab a dot of fabric glue and press/twist.

This pattern can be shortened for earrings, or lengthened for necklace.

Trials that led up to this 2nd s/scmr bracelet -

As shown in the previous post, I wanted floating/thrown rings on both halves of the s/scmr for the next braid.
I started the trials in size 40 thread. I kept messing up the onion rings!!! I’m not a novice, so I don’t know what was happening. Not very happy with the visual effect either.
But I do think this picoted version has some potential. Of course, there is a lot of switching shuttles to throw rings off.
Since the above trials were not giving me any zing, I took the plunge directly for a beaded bracelet version and I like how it turned out! Once the beads are strung, tatting it is pretty quick.
I was aiming for a more curved 2nd half (like the half moon split rings), but soon realised that it is difficult to achieve because of the double core thread. But this adaptation of the s/scmr is easier than the hmsr.
ßßßßß

Trials for the 3rd braid –


From the 2 tiny rings inside a large s/scmr, it gradually evolved into a heart shape with flower within. I still need a few more motifs to confirm and finalise.
What should I name this 3rd braid/bracelet ? All suggestions are welcome …


I thoroughly enjoyed working the Sunrise Sunset bracelet.
Hope you enjoy it too.