Showing posts with label Jane McLellan. Show all posts

Monday, 27 July 2026

calling them done

Pin It now!

 Several pieces of my tatted lace over the past months are 'incomplete' if one considers the respective pattern. Yet, I am calling them done. And interestingly, most patterns here were gifted to me by kind and friendly tatters. In no particular order .....

Dora Young's Round Pinwheel doily - from All New Knotless Tatting Designs (1974).

Back in April I had wondered how to continue since I had run out of thread. And Jane McLellan commented 'to leave it as it is'. Sound advice 'coz I really like these arches better than the final circle it turns into. 
Against a different background where the grey shows up. 
In Anchor perle size 8. the diameter is 17.5cm. 
There is a slight overlap at the dips in the arches but that's fine - hardly even visible. And hubby is quite happy with this on his table!
Related Posts - 

💜💜💜

Centri Rotondo - from Il Lavaro Chiacchierino 7, Mani di Fata (1994)

A while back there was a post in a FB group which mentioned Cyprus tatting where continuous tatting involved simply leaving bare thread right up to the point in the next round where the next element starts. This is visible unlike Mlle Riego who kept the bare thread at the back of work. 
I used this doily pattern, leaving off all decorative picots, to show this spiralling climbing out.

Only 5 rounds tatted in Anchor size 40 measuring 10cm in diameter. Yet I had to snip off two rounds because there was cupping, but I re-tatted only one adding 2ds to the chains. I have come to the conclusion that my chains are more snug than normal.
The pattern was gifted to me, along with her hand-drawn sketch, by Anna Bertini.
Related Posts -

💜💜💜

April Fool's Rose Circle (2016) -

This is merely the center motif which gets repeated in a later round of the doily pattern. This single round in Red Rose perle size 8. measures 9cm in diameter. The full pattern was gifted to me by Erika Tashiro. Hopefully I will complete it some day, but with different threads. Not happy with this perle cotton as seen in the stitches and imagine my surprise when the dye ran!!!

This angle highlights the raised/3D effect where the rings of a running scroll are interlaced one over the other and joined to create Celtic Interlacing and a realistic-looking rose motif. The pattern has very clear colour-coded diagrams, yet I found it easier to refer to my own sketches to confirm how the rings were inserted into each other. 

And remember Lauretta Tondelli's Interlaced Onion Rings earring (2024)?
Notice how it uses the same technique to interlace the three rings in an onion ring. In this case, however, the rings get kind of squished resulting in different shapes. This is the only piece I tatted, but single earring is not a new phenomenon for me ;-P
Related Posts - 
💜💜💜

Its been a while since I crossed out another box in Natalie's PICOT Bingo 2026 Level 2. This time I am offering the above two models for Celtic Tatting box. (Details: https://www.patreon.com/posts/happy-new-year-147124370 )

💜💜💜

My heartiest thanks to all named in this post (and some who wish to remain anonymous)

Friday, 23 January 2026

something new

Pin It now!

 For the last several weeks, starting around mid-December, I've been mainly focused on completing the Glossary for the book 'Six T's of Shuttle Tatting' by Net Best. Long back I had divided the glossary into separate letter files for ease of work and have gone through anywhere between 5 to 10 drafts of each over the years. Angela has been a patient and efficient support. This time it is 'final' ... my humble request to the tatting community is "Please stop bringing out new effects and techniques for this year so that I won't need to include it in the glossary ;-P Take a pause, my talented community!" 😁

So anyway, I've been tatting samplers for the glossary which were missing or for new entries. This, and the fact that I need a refresher on a few 'rarely' used techniques, I took up Natalie Rogers' Picot Bingo 2026 challenge again this year after skipping it last year. But instead of a completed project I might only make small samplers - to keep it short and quick. Some of these will actually dovetail with the glossary samplers, thus reducing any distraction or time constraint.

Learnt something 'new' - Stacked Dimpled Split Rings by Sandra Eichelberger (Crazy Mom Tats). It is a very clever application of techniques towards continuous tatting which she shared here - https://psychotatter.blogspot.com/2012/07/how-to-tat-stacked-dimpled-split-ring.html

NOTE: 'Stacked' is used for tatted elements that overlap and/or lay one above the other as a 3D formation. Hence in the present technique, 'stacked' is a bit of a misnomer and is probably used to indicate continuous tatting in a line or row of rings. (Thanks, Mary Arnold)

I used her stitch count. It is like working a split ring backwards where the 1st side is worked after working the 2nd side and the 1st side lies on the right instead of the left. Reminds me of Teri Dusenbury's SQDR (where she started with 1ds and then the entire ring was worked with reverse stitches) or a Reverse Ring, applied here to a dimpled yorkie split down the center.

It was a bit of a challenge to figure out the process but once I got it, it went smoothly. I think a pictorial or a video would help a great deal.
TIP: The main thing to keep in mind is to make the mock picot long enough. Notice how the dimple in the 2nd heart from top is less pronounced? The fault lies in a short mock or false picot.

Tied in a quick tassel made from the first scrap threads I could get my hands on. So one more tatted bookmark in my stash, though the body could've been longer.
The boxes crossed out in the Picot Bingo 2026 game (Level 2) -
  • Dimpled Ring - I'm sure these count even if they are split.
  • Tat a Rings Only Pattern - why do we limit ourselves to vintage rings only style patterns, LOL?
  • Tat a Heart - five hearts here.
  • Mock Picots - gravely important in this pattern/technique!
Two different levels of cards are shared by Natalie although I believe the above project falls in a bit of a higher category than even Level 2 (wink, wink). Check out the details and downloads here - https://www.patreon.com/posts/happy-new-year-147124370, 

UPDATE: (31 Jan 2026) Jane McLellan had worked on this technique to create a bookmark and a beaded bracelet here - https://janemactats.blogspot.com/search?q=stacked+dimple+rings
Many thanks to Sandra and Natalie !!! Keep it interesting and challenging! Great opportunities for new learning and consolidation of past learning.

Monday, 8 December 2025

more E15 leafy stars

Pin It now!

 Stars started shining almost immediately after I had posted about Manju Talekar's E15 Leafy Star here - https://tipsaroundthehome.blogspot.com/2025/10/leaf-to-star-spinoff.html. It is my fault that I couldn't blog about the new entrants sooner. So let's go chronologically (all from Nov 2025) ....

Stephanie Wilson 

It was such a pleasant surprise to find this beauty waiting for me in my email inbox! Here's what she said -
I couldn't resist. This is size 40 Lizbeth thread, yellow ombre to suggest 'twinkling,' although that's probably a very BIG stretch of the imagination. I left out the decorative picots for a smoother look....more like a star, to me, at least.
For a Christmas ornament, it would probably be better to tat in size 20 thread.

Pop Maria Lenuta
And this one twinkled in my blog feed! Read what Maria writes in her blogpost -
https://maryshandmade.blogspot.com/2025/11/fulde-de-zapada-leafy-star-by-manju.html

Jane McLellan

You can imagine my excitement when these emerged in my blog feed! Read what Jane has to say in her blog - https://janemactats.blogspot.com/2025/11/seeing-stars.html

And they only multiplied!!! Here's what Jane posted - https://janemactats.blogspot.com/2025/11/still-tatting.html

And the stars are finally settled in their very own milky way! 
https://janemactats.blogspot.com/2025/11/one-done.html

Katie Verna
Are you wondering whether the star is partially hidden behind some clouds? Here's what Katie writes - 
My little version of the Leafy Star--ran out of the red thread, so thought to add green at the bottom to make it like a flower, but it looks more like a demon or fierce animal with a beard! Fun little piece to tat!

I suggested adding a few whiskers to bring out the animal better :-D 

 Padma Mandayam

Padma was so inspired by Katie's version that she worked her own star, too, in variegated thread. Clearly the pattern lends itself to variegated shades as well.

Elzusia
Elzusia did not exactly tat the star but she showed us her collection of fall leaves one of which is the E15 Leaf Doodle that inspired the star. Check out her blog post here -https://mojeroznerobotki.blogspot.com/2025/11/jesienne-liscie.html
UPDATE (8th Dec2025): Somehow I missed Elzusia's post where she actually tatted this star in metallic thread! I am so glad she left a comment with her link - https://czasnafrywolitke2.blogspot.com/2025/11/srebrzysta-gwiazdka.html

Is it any wonder I am seeing stars (of the brilliant, optimistic, happy kind) everywhere?! 

Thank you all so very much for your wonderful 'gift' of Endrucksian tatting

ps: I want to apologise for not responding to every comment left in my blog over the past several weeks and for not leaving a comment in other blogs. I do read all comments and blog posts, but due to a large amount of time already spent in front of the screen deep in other commitments, I am taking a bit of break where and when possible. It is also the reason why I am not blogging as frequently as I'd like or want to.  Thank you for your patience and support - always treasured 💕💕💕

Thursday, 16 October 2025

leaf me roundup 1

Pin It now!

This roundup should've been posted a year back! In the Endrucks FB group, our game of the month for September 2024 was Leaf Me Endrucks (#leafmeendrucks) which I posted in my blog as well - https://tipsaroundthehome.blogspot.com/2024/09/leafy-game.html where we had 3 E15 Leaf Doodle patterns to choose from. 

Better late than never and you are in for quite a scroll since this is merely part 1. Ninetta and I were extremely satisfied with the enthusiastic participation and almost every member tatted more than one leaf, several with tweaks to suit their imagination! And the way the motifs were applied is also inspiring! Many shared their experience and some details, some of which are included here. Nearly all of the participants were very happy with the pattern(s) and the game. All the pics are listed in alphabetical order of participant's name here and not chronologically merely because the former makes it easier to organise them in our folders ;-P

Leaf Me Endrucks Sep2024 (#LeafMeEndrucks) 
in Endrucks 1920 Project FB group

NOTE: If you wish to play along, please use the #leafmeendrucks hashtag when you post along with the hashtag #Endrucks1920Project and tag Ninetta or me or send us a pic.
For other games we've played, checkout the EP EVENTS doc - https://docs.google.com/document/d/1ZiNdE53cvqj2cLlxVP-wlga8aocPtzs5/view

1. Adriana Tomanin

For the choker and earring parure she used the #1 leaf pattern. 
And she added pearls for this pair of green earrings which used the #2 pattern!

2. Anna Bonelli
What a wonderful autumn collage! And the inscription reads (Google translate)-
AS IN AUTUMN THE LEAVES RISE ONE AFTER ANOTHER,
UNTIL THE BRANCH SEE ALL ITS SPOILS ON THE EARTH...

3. Annamaria O'Brien
This lovely overlapping application on napkin rings in fall colours was meant for a wedding a few weeks back. She calls it the Autumn Leaf Swirl and used Lizbeth 20, 40, & 80 and her own bead mix Frosted Autumn. These are the #2 leaves again.

4. Brookie Heightsmen
This time Brookie made a little gnome with two leaves tatted together and a few embellishments!!!

5. Cindy Dunham
"My sunflower is complete."

6. Cynthia Mullinax
Isn't this tiny! Cynthia said this was the first though pics of any that followed were not shared. 

7. Debbie Arnold
"Progression of leaf design, loosely based on E25." 
Her pics clearly show how the design process/development! 

8. Debra Fitchen Cox
"I decided to use the leaves for my journal cover."
"Having a play with embossing powder and my "creative" tatting elements."
These are glued to the cover of her journal! Such pride of place.

9. Frauke Klumpp
 
Frauke absolutely enjoyed tatting and playing with the leaves! She thought the first one resembled a pear or gourd! 
"The other one I want to make earrings, it’s one part of the leave pattern but made mistakes so started new."
I think it could well be a pea pod, right?

 
In this red version, she can imagine some grapes there!
She wanted to make a mask for her costume joining two #1 leaves, but it was small. So she tried a larger version below ...
"Had so much fun with these that I had to try again this time with liz metallic thread size 20, col 322."

10. Jane McLellan
Jane shared the details here - https://janemactats.blogspot.com/2024/10/daisy-doodle-and-more.html
These were sewed on to a food cover which can be seen here - https://janemactats.blogspot.com/2024/10/daisy-daisy.html.

11. Jessica Hansen
Nice colour combination!

12. Jiamrat Supapol
All three versions individually.
And joined together in a common stem with a flower in the center! As usual, Jiamrat's models are always pleasant and she has quick fingers!

We hope you enjoyed Part 1 and look forward to the next part? We are only counting the number of participants, not the number of leaves they tatted since it became really difficult to keep count as you will soon see.

Please use the hashtag #Endrucks1920Project, and cite the name of the designer and pattern when you post your version on any social media platform. And the hashtag for this game is #LeafMeEndrucks.

Thanks to all our participants - some are new while most are repeat offenders, LOL

to be continued (part 2)...

Saturday, 3 May 2025

comfort tatting

Pin It now!

 Wonder why I find this my go-to for comfort?! Is it because it increases in girth so fast, the knitting cotton being a size 10? Perhaps, because it is easy on my eyes when working late into the night and secondly I have been so involved with sample tatting that I couldn't take time out to tat larger doilies. And since my resolution is to keep the design simple, each round tats up real quick.

This is how I started Round 5, but noticed that the previous round started to cup. Tried tugging on the new round, but realised it wouldn't work and the stitch count needed to be modified.

Snipped off the core thread in each chain but left the rings there. Two advantages - 
1. I saved the knotting thread (maroon) [Jane McLellan's tip - https://janemactats.blogspot.com/2015/03/snip-rings-not-chains.html ]
 and more importantly
2. when flattened, it was easier to work out the increase in stitches to avoid cupping.

And here's the pattern inked on the pic! Another scroll round.
Round 5 of the Just So Coaster
There are enough picots in this round to add a 6th round when I need some comfort tatting ;-D I have no idea how it will progress though. I only know that the cream will be back! 

It measures 12.5 cms across BUT remember I am tatting with thick thread (Anchor knitting cotton, size 10). Your model might be much smaller in tatting cotton. Nevertheless, feel free to design your own next round and share.

Pattern for the previous 4 rounds is shared here - https://tipsaroundthehome.blogspot.com/2025/04/just-so-tatting.html

TIP: If you wish to work the coaster in one pass, ensure the last chain in Round 4 is worked as a split chain, followed by a mock or false picot and then a split ring.

Monday, 15 July 2024

so many

Pin It now!

 Quite by chance I noticed that this is my 912th post since starting in Dec 2013. So many posts, hmmm, and yet not enough coz there are so many more that haven't yet seen this space. Hopefully in time. Today's post also shows the many potential forms the simple E43 petal from my last post can take. Many of these shapes were suggested by keen observers (listed at the end)! So many eyes :-)))

It is difficult to photograph a 3D model and I truly wish I could've done a better job or taken a video. Nevertheless, ... 

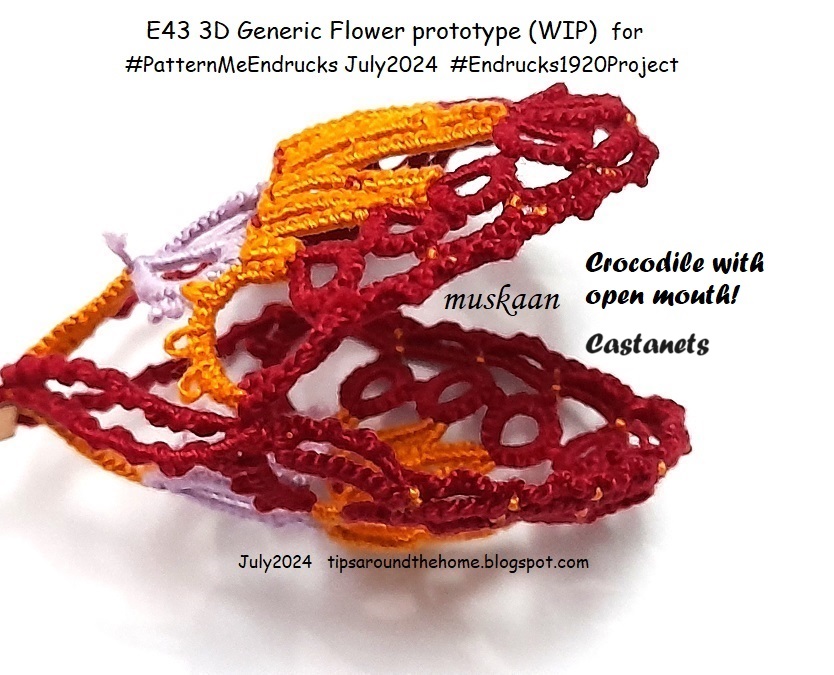
Please Note that in the right colours, with the right number of petals, and if and where the petals are joined, a range of flower impressions can be achieved, besides other shapes. Hence I am calling this a E43 3D Generic Flower. I still need to tat in the stem, pistil, sepals, etc. For pattern details - https://tipsaroundthehome.blogspot.com/2024/07/what-heart-wants.html . I will share the specific petal/flower pattern soon.

In the following, the join is made at the side of petal and at the base.

1. Three petals joined, curved inwards. In the right colours, it could be a spiderwort, a buttercup, a tulip (with unattached petals). And how about a butterfly (2 or 4 petal wings)?!
TIP: When joined, the petals (and flower) hold their shape though each one can be pushed in or out. If left unattached, stiffening or some wire would be needed to hold the petals in place.
2. Two petals facing each other. Could be a flower bud, pendant, fairy light bulbs, or even a strawberry!

3. Two petals could also become a clam shell, oyster with pearl, or a tulip bud. Perhaps even a little gift pouch.

4. Two petals. Now this reminds me of an open-mouthed crocodile. Or castanets? Perhaps even a pair of oven mitts.

5. Two petals, another angle. These pics were taken at night when I was too lazy to get some pearls to insert inside. 

6. This is the 3rd petal. Now the entire flower with any number of petals and joined only at the sides and base, can be tatted in one pass, provided the outermost row is worked in one go at the very end. I had to tat this separately since there wasn't any forethought, LOL.

7. Single petal (#3) without the outermost additional trim around the rings. With beads and gems it would make a lovely pendant or earring.
TIP: For a more rounded tip, remove the middle ring of the trefoil.

8. Three petals joined. Don't you see a butterfly?

9. Three petals joined, facing inward. Same flower, but upended. Could be any number of decorative embellishment or jewellery. Perhaps even a candle decoration at the base.

10. Three petals joined and curved outwards. With the right number and colour of petals, and additional pistils, etc., this really would make a nice hibiscus or petunia.
 
11. And I have to share the lead pic again coz Anita saw this ... 
"This looks like a frightened lady. Can you see her? Her lavender eyes are wide open & picots look like eye lashes, and her orange mouth is open wide, with her orange hair standing straight up.
Or, an Alien. Hmmmm. What’s in my coffee today? Hahaha.
The lady in the petals.
Spell-bound flower, maybe?"

And what do You see? 
Giving credit to my friendly eyes ... what each one saw ...
  • Pendant - Maria Burgo & Vani Kattoju
  • Shell - Jane McLellan
  • Tulip - Ninetta Caruso, Anita Barry
  • Petunia, Hibiscus - Anita Barry
  • Open umbrella for a clown - Anita Barry
  • Spiderwort - Ninetta Caruso
Further, Ninetta has this to say -
"The E43 is like a festoon imho, you had a great idea to extract petals! This pattern has that last double chain over the rings, it "close" the drawing, something that is not present in the E14 even it is similar. So E43 makes a better petal than E14 (or E10)."

Related Posts -

 Thanks for all the friendly suggestions and nudges, ladies! There can never be too many!