Showing posts with label TWoT. Show all posts

Thursday, 27 January 2022

bridging gaps

Pin It now! I have some great news! Our Endrucks 1920 Project will be featured in the February issue of ‘Talking Tatting’ issue 50! Along with a short bio of Frau Endrucks and the doily E28 pattern (modernised version), all by Judith Connors. This is a quarterly newsletter of Queensland Tatters, Australia.
 
[E28 pattern PDF: https://drive.google.com/file/d/1vG2g0JCVsy8cy2DfGKHEhxleq_7Rveba/view]

While this doily has already been tatted by several others, they referred to the diagram rather than the text. Hence it was left to Judith to point out a couple of errors, which are now corrected in an updated pdf.
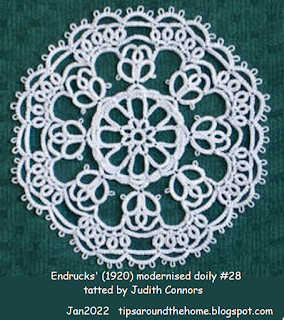
Impeccable tatting from the inspiring teacher, researcher, and historian who was honoured with the Order of Australia Medal last year! And as you can see, she has managed to retain the octagonal shape of the doily after blocking.

We discovered that my tatting tension is way too tight! Worked in Coats No 40 cotton, Judith’s doily is 9cms in diameter to my 7cms in Anchor No 40 (which is also a Coats subsidiary).

“My tension varied from yours in places. I managed the fluting, and when I blocked the mat it turned out to be quite octagonal.” – Judith

Alternate Path: “I worked it completely from the front side, not as you have suggested for Rounds 5 and 6. This means that the small rings of Round 5 were tatted in RODS (with a posting of the shuttle before closure).” – Judith

While enlarging the pic for posting, I noticed another thing about Round 5 in Judith’s doily. It appears the chains on either side of the ring are 8ds each instead of 5ds, creating a graceful arch instead of a flattish line.

Bridging/Mock Chain and Split Chain: Several ways to climb out of rounds for continuous tatting are indicated in this pattern pdf. However, Judith pointed out that what I termed split chain to climb out of round 4 is actually a bridging chain (b-Ch) and I should use this as a “teachable moment”. Got me thinking and this is how I see it:

The technique was invented by Dora Young for rings and then applied to chains – the knotless method (km or KM). Decades later, the term split chain caught on and became more popular. But the stitch and movements are the same in both – mock stitches or tied/manoeuvred stitches.

A Bridging or Mock Chain is functionally and structurally the same as a Split Chain. Each chain spans a space and emerges at a point to the left instead of the far right, and is made over a bridging or foundation thread. 

The difference lies in the Where the threads emerge/exit or where the point of climbing out is. A bridging chain is made completely of mock stitches and threads emerge at the ‘beginning’ of the chain. A split chain, as the name suggests, is split - partially made of double stitches and partially of mock stitches. Thus, the threads in this ‘hybrid’ chain exit somewhere along the length of the chain, not at the start.
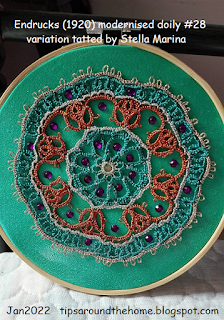
Among the several beautiful versions of this doily tatted by enthusiastic lacers, I would like to show Stella Marina’s version in lovely metallic threads because it is yet another example of how we can alter our path. In a moment of distraction, Stella forgot to tat the 2 large twin thrown rings in Round 3. Instead of cutting back, she continued. She then tatted them as normal rings, facing inward, in Round 4! This happened by accident, but could easily have been a deliberate choice to make the rings red instead of silver. Planning ahead gives us so many bridges to cross smoothly!

Now I want to tat the doily again and bridge all my gaps!

UPDATE (Nov2025): In Mar2022, Daniela Galli mistakenly tatted only 5 repeats of the E28 doily leading to a lot of cupping, which she converted into a cute little gift box. More pics and details - https://tipsaroundthehome.blogspot.com/2025/11/ep-medley-2.html


Many many thanks to Judith and Stella & Daniela - keep inspiring!

Related Posts/Resources –
For more tutorials and details scroll down to Techniques & Effects » CHAINS » Split Chain/Dora Young Knotless/Bridging https://tipsaroundthehome.blogspot.com/p/tatting-resources.html
Knotless Method in split SCMR - https://tipsaroundthehome.blogspot.com/2018/10/scrappy-doily-and-scmr.html
https://tipsaroundthehome.blogspot.com/2021/07/continuous-paths.html

Monday, 29 November 2021

the foster child

Pin It now!

Reworked patterns from Frau Eleonore Endrucks-Leichtenstern’s ‘Die Schiffchen-Spitzen’, 1920, for Endrucks 1920 Project.

Don’t these look like folk dancers with frilly skirts and knocking elbows! Now add a head to each to complete the ladies…. A single motif, with a bit of addition, could become an angel or Crinoline lady.

Endrucks' pattern #7 pdf (click to download): https://drive.google.com/file/d/1UDNg-1W6LJ3pyrn_Umz5f33BF01_92-E/view

This little pattern has interested many tatters and each ‘foster family’ loved and groomed it to their best ability. But each home wanted something even better for the foster child that they could not provide, hence the child travelled, leaving behind a virtual trail of trials and learning, until the final adoption.

adopting, not foisting, the foster child...
House #1 (Ayşe Özgür): An enthusiastic & immediate start but life halted for 10-11 months.
        Starts with chain and work moves form right to left. Good use of 3 colours.
House #2 (Douglas Hill): Enthusiastic choice in the 2nd volunteer list, and mutual collaboration, # 2 conceded that #3 (adaptation & tatting) was better.
        Starts with chain, with inward picots for bilateral symmetry, and work moves from right to left.
House #3 (Julie Santos Villegas): An immediate & willing response but later needed help which #4 provided, but health forced another shift.
        Starts with a ring and work moves from left to right..
House #4 (muskaan): Formally adopted and continued to maturity.
        Starts with a ring and work moves from left to right. With options shared.


TWoT (This Way or Tat?) and Diagram Notes :
original model
Considering Frau Endrucks did not like decorative picots, all her edgings have a line of free picots along the top side (as seen in her tatted model pics) ostensibly to sew down the lace along that side while the other dangled.
original diagram
However her diagrams are ‘upside-down’ and this line of picots lies along the bottom.

But there is a 3rd aspect. Her diagrams are read from left to right. Most of the patterns start with a chain, and when we actually tat a chain normally (not direct tatting) and continue, the working progresses from right to left (as in Houses 1 & 2).
I find myself doing mental & physical callisthenics in order to sync her diagram with the work in my hand. I like to know where/how my very first element faces, and where the threads emerge to continue – this orients me correctly till the very end. This is especially true for her patterns which involve frequent changes in direction.

Hence there are 2 solutions I have employed –
original diagram flipped
1. Try to start the pattern with a ring. It has obvious advantages, including CTM and hiding tails. It is how I presented this pattern, shifting the start from a chain to a side ring. (Julie had first started her adaptation sampler with the central ring and diagrammed it accordingly, moving from right to left). Now the work progresses from left to right as in the diagram. 
2. Draw a working diagram where we follow the pattern exactly as Endrucks has written starting with a chain, but the diagram shows this first element on the right instead of left. And the diagram then moves leftward (as in the flipped diagram above). No need for any brain callisthenics – simply lay the work against the diagram and you are facing the ‘right’ way.

One more common feature of several patterns is that the central ring at the base (from which chains radiate) is tatted at the end of the motif. The only reason I can think of is to make it easy for a designer to estimate how large the ring should be and avoid multiple prototypes. Anyways, several of our pdfs show this ring as per the original. I have always shifted it towards the start of the motif joining chains to it, rather than joining the ring to chains.

TIP:  Potential Pitfall : Joining to the wrong picot!
 
This is one area where I frequently made a mistake and had to retrace my steps! This final one I noticed too late but fixed it by carefully snipping the joined picot (and glued the cut ends), and sewed the correct picot in place. 
This is the 1st motif I tatted in early October to understand and explain the pattern to House#3. By November, I had to tat one more (no pic) to refresh my short memory and then went on to the sampler below ...
Each motif, especially with decorative picots, has the shape of a petal. 
Gather up a row of motifs to create a 3D flower! Alter the length and width 
and you get more layers and visual variety!
Of the 4 motifs in the sampler, the first 2 follow the pattern, each colour giving a clear idea of which shuttle forms the core thread, in other words, which shuttle is in the hand.

In the 3rd & 4th motifs, I added decorative picots along the top edge of the rings, and Catherine Wheel Joins in some chains for a smoother look. Remember to count the CWJ as 1 stitch (as in 4th); notice how smooth and symmetrical the inner negative space is? I also played with colour placement, using Reverse Join, Twist Work, etc. (see Lock Join Plus for more options).

This is one more idea I had – tat the entire motif with bilateral symmetry. The best part? No need for paper clips and inward picots - no BBT (block below tatting)! Notice the central ring is worked as a split ring and the innermost left chain is tatted first. 
But some tweaking is required especially on the right side ... when I get my bearings back ;-P

Before signing out, let me quote my partner Ninetta -
“I would say one more time that this project taught us a lot also in terms of collaboration. The n.7 changed family but each time "we" added a new piece in the puzzle, that is always an improvement, for both understanding the pattern and learning how to present the modernized version.”

Remember, you can find all of Endrucks' patterns (& derivations) in English here - 

Friday, 9 July 2021

a pernickety question

Pin It now!

 When I focused on bilateral symmetry in this pattern, I forgot about the blocks (see 3rd pic below). Thus, while most rings on left and right halves face the same way, the chains in the left and right blocks are incongruous -- instead of being mirror images, they all face the same direction.

Block Tatting is made up of rows/tiers of chains. These rows/tiers can be worked one above the other, or one below the other.

1. Block tiers moving up ie. tatted ABOVE the previous, are simple to make, joining below with a lock join to the picot(s) on previous chain. Like the blocks in pic #1 below -

The block on the right is tatted the same way starting from the shortest chain on top, and moving 'above' to the next row/tier (though it looks upside down).
Now compare the left and right blocks with respect to 2 variables - the colour of each chain/block, and where the chains face. Not symmetrical, right?!

2. When the next tier is tatted BELOW the previous one, it means we need a picot on the core thread to which the new chain level can join. We need down/downward/inward facing/intruding picots! Of the many methods, holding the picot space with a paper clip is most common. This is how the right block was tatted ....

In above model, the left block is tatted 'normally' with chains stacked above. But for a mirror image, the block on the right is tatted with the next chain worked Below the previous one, with a regular picot join instead of lock join. The penultimate chain (beige) in the right block held 4 paper clips till each join was made! (sorry about the shoddy tatting)
Again, compare the 2 blocks in terms of colour placement and chain direction.
Mirror images!!! 
This is the way Pina Pinto has worked her sampler for the Endrucks Project - I will be sharing the pattern when it is diagrammed.

In the above model, all the blocks (in cream and in purple) face towards the right. (The cream rings along the 'belt' are not mirror images since I did not think ahead). Since the row moves from left to right, it is easier to tat in this manner.
Frau Endrucks tats all her blocks with the next chain above the previous one, although she states clearly in her tips that it is not necessary to have picots. Simply move the stitches a bit, clearing space to make the join.

Now here's my pernickety question - Would you be Mr Meticulous with perfect mirroring of blocks despite the invasion & interference of all those paper clips or would you rather be Dr Downplay, just going with the flow without bothering overly much about the left and right sides?
 
Which factors would influence your choice -  whether working with 1 or 2 colours; mood; time constraints; competition submission; etc. 

Please enlighten and entertain ....


And hopefully you will join the global lace community on International Lace Day (July 11th) ....choose your form of lace-making and celebrate the day. I have already registered (free, but only a few hours left, so hurry) with this ILD group on Facebook and intend to tat a new earring/pendant - the motif can actually be repeated to create a lovely edging! I am hoping it will work .... let's see. Off to load my shuttles. Maybe I can upload a diagram on or before 11th, in case you wish to tat and experiment with the same pattern? Stay tuned .....

Thursday, 6 May 2021

has tatting made you cry

Pin It now!

 Oh, I've had plenty of frustrating moments over the years - be it figuring out a technique, perfecting my work, designing and subsequent trials, even creating pattern pdfs. But this one takes the cake! For numerous days now, I've been working on presenting a pattern and it has left me on the verge of tears almost every night, sigh. Each time I felt I had it all figured out, I would discover yet another issue and so much of my day's work would go to nought. Ninetta has been a solid and helpful shoulder to cry on, though, preventing me from actually shedding tears which would've agitated hubby dear 😉. 

Finally, I took up my shuttles (which I had avoided for so many weeks in order to stay focused) and have begun tatting it myself. Now I am happy with hands that are tatting instead of typing every evening and eyes that are gazing at cheerful colours.

Quick Tip: Notice the starting tail at the bottom? I leave it there till the end of project for many reasons, one of which is that is helps me identify the frontside from the backside at a glance.

The straw that killed the camel's back was when, after days and hours of intense drafting, I finally noticed this -

the original model
the original diagram

Notice the difference? Add to this the fact that this pattern can be worked entirely in one pass as a combination of 2 standalone laces 18/a and 18/b, with a few tweaks to climb around/over. And each of the 2 parts was beautifully tatted and presented by 2 talented tatters with hugely different styles of working and presenting. Using those to present the combo lace meant frequent references back and forth - confusing and demotivating to any tatter attempting it. Reconciling pics, patterns, diagrams, styles, and synchronising them all took up way more of my energy and power not counting a new issue cropping up daily. 

Perhaps it is just my own shortcomings that led to all this turmoil or perhaps I have this sense of TWoT that makes me want to present a pattern that is the easiest possible I can think of.

Whatever the case, I am grateful for all my friendly tatters, their sincere efforts and enthusiasm. And a huge hug to Ninetta!
    1. So has tatting ever made you cry? Why?
    2. Which way do you think the lace should face - like the model or the diagram? Your response will help us decide.
    3. What shapes and designs can you see in this lace that may lead to future patterns?
Eager and curious about your answers ....
All relevant links can be found in the Endrucks 1920 Project document here. 

Monday, 12 April 2021

meet the lady

Pin It now!

...and the designer/author from a century back! 

‘Die Schiffchen-Spitzen’,1920, by Frau Eleonore Endrucks-Leichtenstern
- German to English Translation -
original book: http://www.georgiaseitz.com/public/endrucks/eleonoreendrucks-leichtensternschiffchenspitzenbook1920.pdf

banner/bracelet for #Endrucks1920Project

When tatters get together, magic happens!

It was Ninetta’s brainwave and initiative to have the 3 non-pattern pages from the book translated into English. She attempted it herself first, then sought help from the facebook community and soon we had volunteers willing to do it! And I am still amazed at what emerged!

While volunteers were busy reworking Endrucks’ patterns to modern music, Simone Beyer hummed away at the transcript and translation.

It wasn’t a simple translation from German to English since the book is in Fraktur font which had to be transcribed into regular font (this German transcription is included at the end of the doc). Simone went further, seeking and adding biographical notes with help from the historical society in the town where the designer last lived and died! Unfortunately we do not know if she had any descendants and there is no portrait of Eleonore even in the gravestone. Hopefully we'll be able to glean more in future.

Simone’s excellent English translation reveals Frau Endrucks’ tatting style, thoughts, and expertise within a contextualized framework. 

‘My book shows you the way out of the eternal monotony of all tatted lace so far’ -Endrucks,1920

Frivolousness is not in this designer’s nature! This comes through in the brevity of her instructions (Foreword). She dives right into a key to decipher her patterns, leaving the basic tatting tutorials to others books. Her focus is on 2-shuttle tatting and which of the 2 shuttles is in the right hand determines how to proceed with the pattern. Hence no reverse or turn work is indicated, picots are minimal, and multiples used when segments are repeated in a pattern.

She is no fan of decorative picots and read her Pieces of Advice to know why! We may scoff at a couple of her practices, for instance she asks us to resolutely snip off mistakes...opening a closed ring to fix a mistake appears to be a later development. However she advocates what we now know as 'false CTM' and tatting over tails! It also appears that the lock join was fairly uncommon in her time and she demonstrates it - 

We have tried to list the more popular ‘modern’ terms, wherever possible, against Endrucks’ instructions in an attempt to bridge the tatting language of the past with the present. This is where my meagre contribution comes in. One sentence that warmed my heart – ‘Be clear that one always, even when working rings, works from left to right’. This is the basis of my incomplete TWoT (This Way or Tat?) series! However I hesitated adding this to the pdf – it seemed too much like self-promotion ;-D


Whether you like her patterns or not, whether you will tat any of her patterns or not, I urge you to read the few pages of English translation when you can. It is very interesting. I feel as if Frau Endrucks is talking directly to me and thank Simone for bringing her to life through the translation! I’d also like to thank Jane Potts and Jacquelin Roth for participating and proofreading. And thanks to Ninetta for thinking of this and pursuing it! In fact, if Ninetta wasn’t bilingual, she & I would not have been able to collaborate so freely for so many years.

The image at the beginning is our banner/bracelet for the Endrucks 1920 Project. Ninetta tweaked the fun alphabet designed by Edda Guastella to tat this cuteness. We chose this because it is worked continuously and the letters have long block chains - both features of Endrucks' style. The fun letters can be bought from Edda's etsy shop.


As a token of gratitude we sent the pdf to Martha Ess and Georgia Seitz and this is what Martha wrote back –
Dear Muskaan and Ninetta,
Thank you for sharing this with me. I had groped my way through the introduction and afterword with an online translator and a German dictionary, but it is wonderful to have such a coherent clear translation. I think it is wonderful you found some biographical information for Fr. Endrucks as well. Good job, everyone.

Ninetta joins me in extending our heartfelt gratitude to Simone, Jane, Edda, and Jacqueline.

muskaan & Ninetta 

We'd love to hear your thoughts after reading what Endrucks has to say! Join the project if you wish - contact us through our blogs or through Facebook....
https://m.facebook.com/muskaan.mooskaan ; https://www.facebook.com/ninetta.caruso
https://tipsaroundthehome.blogspot.com/ ; https://ninettacaruso.blogspot.com/
https://www.facebook.com/hashtag/endrucks1920project - #Endrucks1920Project

Friday, 4 December 2020

picot join to right part 4

Pin It now!

I haven’t picked up my shuttles in a long time despite spending all my free time in tatting-related activities and interaction. And I’ve been neglecting my blog, too – can’t let that happen!

Well over a week back, this is what I made quickly for an experienced friend.  She, too, like I, avoids the folded join when making a picot join to the right. I prefer to rotate the work slightly on my hand, repositioning the picot on the right such that it now comes to the left, and then execute the join normally. These are my detailed pictorials and article on the topic -

http://www.tipsaroundthehome.blogspot.com2016/03/demystifying-joins.html - about picot join
https://tipsaroundthehome.blogspot.com/2018/09/picot-join-to-right-part1.html - outward facing rigs
https://tipsaroundthehome.blogspot.com/2018/09/picot-join-to-right-part-2.html - chains and down join
https://tipsaroundthehome.blogspot.com/2018/10/picot-join-to-right-part-3.html - where we need this join.

What I did not explicitly show in Part 2 was what happens when all rings face inwards. She was under the impression that 'with inward facing rings no such rotation is required to execute the final join  since we are working counterclockwise'. Visuals are better than words, hence …

Picot Join to the Right – Part 4 

(joining last inward facing ring to the first using Rotate Work)

The following motif comprises single inward facing rings (4-4-4) separated by bare thread and joined to each in the round. 
 
1. 6 rings have been worked and the last, 7th ring is started. It needs to be joined to Ring. 6, so pull up a loop through the picot of previous ring. This picot is to the left of current work and we perform the action almost on autopilot, without any extra movement.

2. The same as #1, but laid flat to see clearly, The knotting thread is pulled through picot. Note- this can be pulled down for frontside tatting.

3. Now comes the point at which Ring7 is to be joined to Ring1. 
Where is this joining picot in relation to this last ring? It is to the Right. Try making the join without shifting the motif. 
4. Hence some form of picot join to the right is needed - be it a folded join, or a simple rotation, or whatever you are comfortable with.

5. Since we are avoiding the folded join, notice the slight counterclockwise rotation of motif while still in hand, to reach the picot. The movement is so subtle, that it goes unnoticed, unlike in a rosette with outward facing rings (Part 1) 
My own theory is that we need to rotate more when rings face outward, hence it is immediately noticed.

6. Loop pulled up through picot and shuttle being passed through it.

7. Join made and ring closed.

8. Motif complete. Tail ends hidden.

The principle to remember is this (TWoT Notes): Whether overall work (motif or lace) progresses clockwise or counterclockwise, whether we are working on the front or the back, the current element - Ring - is Always worked clockwise*, and Chain is Always worked from left to right. Hence when joining in a circle (last to first), whether the rings or chains face inward or outward, the joining picot on the first element will be to the right of current element, and a Picot Join to the Right will be needed.

*The only exception that comes to mind is a Reverse Ring where stitches are being added counterclockwise. 

UPDATE: A tatter graciously shared her feedback after trying it - this method works well in needle tatting as well!

Practice Patterns : 
For further practice, try this R1:4-2-4-2-4. bare thread. R2:4+2+4-2-4. and so on ... where each ring is joined to the previous ring through Two picots on each side. The last ring will need to be joined to the first 2 picots on Ring1.

Also consider inward facing trefoils or clovers instead of single rings. 
eg. this Clover Wreath Poinsettia is good practice for the picot join to right. It has both inward facing clovers as well as outward facing thrown rings that need to be joined in a circle.

Saturday, 22 February 2020

not one ring

Pin It now!
Snowflake #10 in Land of Laces’ 25 Snowflake Project

And you thought out of 2019, out of mind! No, I haven't about posting the left out patterns! When Anetta invited me to share a snowflake pattern and something about myself for her Meeting with Tatting series, I took the longer path instead of giving her an already published pattern. On the 1st of every month, she intends to share a design and designer, and everybody can participate.

Rosette Enchained Snowflake & Ice Drop
free pattern pdf (click to download)

This pattern was first created in 2016 and I have since posted several models. It is made of Chains Only, for what was to be Set 2 of the This Way or Tat series of diagrams. I don’t know when that series will resume, but at least the pattern is here.


The entire motif is worked from the front, in clockwise direction.

Whether you choose 1 or 2 colours; shuttle and ball or 2 shuttles; the join used to switch colours/shuttles; the technique used to change curve of outermost chain; etc., can result in a change of direction.

Hence it was to be one of the practice patterns for the TWoT Set 2 – Chains Only. A fun way to study how our choices affect direction, and may differ from what the designer/pattern says.
The entire snowflake motif is worked in one pass. In the 2 outer rounds, there is a short 2ds chain which can be worked as a split chain by advanced tatters. But if you are not in the mood, why not try the vintage style of leaving some bare thread at the back, lock join, and continue with next round. For all practical purposes, it is not discernible! Don’t do it for a competition, though ;-D

Continuous tatting, vintage style -
In this collage, from top right –
  1. last chain in 4th round with a picot join to the right. Remember to keep both threads to back of work before making join.
  2. Complete 2ds, and lock join to 3rd round (pic shows back of work)
  3. From front, pull up a loop of shuttle thread, and make a lock join leaving sufficient bare thread.
  4. Continue with next round. Voilà, no split chain required.

I have already posted the choices one can adopt for the concave chain segment in last round. It is also part of this pdf. 

Ice Drop
The ice drop is probably a novelty, being made only with chains. There are 2 separate motifs – one larger (yellow), and the other smaller (green). 
 The pattern remains almost exactly the same as the snowflake, except for more repeats. 


When working the 3rd round of smaller motif, the join is made simultaneously through Both previous round as well as the respective round of larger one. With a crochet hook, pull a loop of ball/chain thread through both picots, pass shuttle through loop, and snug tight. Hence simple picot join, not a lock join. The cabochon is inserted before the last 2 joins are made.

Click to download Rosette Enchained Snowflake & Ice Drop pattern

I hope you enjoy this pattern and play with colours, embellishments, etc.
     

Related Posts


Sunday, 7 July 2019

dream castles

Pin It now!

Happy International Lace Day !

Snowflake #4 in Land of Laces’ 25 Snowflake Project on facebook & instagram

Minarets in the Sky Snowflake
November 2016 was when I first uploaded a collaged image of a snowflake I was working on.

I had worked a sample that September as part of the This Way of Tat? (TWoT) series – in fact it was meant as the final practice pattern since there can be a lot of directional changes depending on various factors. Well, that series is still in limbo, but I’m gradually sharing the patterns.
What I like best about this design is the dome shape created by changing the direction of chains. However, this is also the biggest ‘flaw’ in the design. It causes ruffling when tatting, and has to be blocked for flatness.
(In Lizbeth 20, this measures 2½” as a hexagon side) 
It is something I tried very hard to rectify, through numerous small tweaks in many trials but was unsuccessful. I will be extremely pleased if you wish to try your hand or leave suggestions.

There is hardly any ruffling in the beaded version where the small base rings are removed. However, the domes tend to overlap slightly.
The beaded version is quicker to tat as well and can be worked with one shuttle and ball if short chain lengths are done with unflipped (reverse) stitches.
UPDATE TIP : Instead of direct tatting, one can make a SLT and reverse work to tat the tapering chain segment, making requisite adjustments to bead, etc.
For the large gold bead on top, I tried using my Floating Beads method, but it does not give a snug and stable finish. After trying a couple of the usual methods, I finally settled on threading the beads as and when required and using the transparent seed bead as an anchoring bead.
I later added this Swarovski crystal in the center, although it can be worked in during tatting by holding it on a long picot in the first ring and joining across later.

While the white one reminds me of marble domes as in the Taj Mahal, the yellow & gold is for the Golden Temple in Amritsar. It is surrounded by water, though here the central blue is for sky with little stars.
Again, patterns for both versions are included in the pdf.
download Minarets in the Sky Snowflake pattern here

UPDATE : An adapted version is shared by Grace Atkinson where the overlap is removed and the flake lays fairly flat. Find the pattern and models in her facebook timeline or here  - https://tipsaroundthehome.blogspot.com/2021/03/minarets-take-time.html 

Sunday, 23 June 2019

an aspiring flake

Pin It now!

While hunting for something, I came across many snowflakes in various stages – from sketches to trials to completed-but-not-presented. So, despite having sketched 2 new designs after the Paisley snowflake, I’m taking this opportunity to reduce my backlog.

My Snowflake #2 for the 25 Snowflake Project started by Land of Laces on facebook....

Aspiration Snowflake

This is the snowflake that arose from my Aspiration doily trials in 2017. with an additional final round of spiky dendrites! I prefer curve to points, but this is a deliberate experiment. The reason is evident in the yellow trial piece below.

The size 40 white is pretty stiff and starchy and not enjoyable. It is also slightly thicker than coloured size 40s as can be seen between the original yellow trial piece and this white one.
I don't even like my stitches! Hence I’ve decided to change to another bold colour in 40 for trials, and may also play with Pearl 8 colours for flower flake versions.

This 4-round snowflake can be worked as separate rounds or in one pass. 
The written pattern is given for individual rounds, but the very same instructions can be applied to continuous tatting by working the last element of each round as split ring or split chain, with mock picots to climb out. Except for the central rosette, the white model is worked continuously.
In Anchor Pearl cotton size 8, it measures 3¼” tip to tip and just under 3” as a hexagon side. This is equivalent to Lizbeth 20.

I intended to make some picots longer in the coloured version, but didn’t quite get it right. Pearl cotton tends to mask a clean picot due to the fibrous nature of the thread.

There are numerous ways to tat this flake and is a prime practice piece for a study of This Way or Tat ? (TWoT) when different methods/techniques are used - such as SLT, reverse join, direct tatting (reverse or unflipped stitch), and so on.