Saturday, 30 May 2020

puffy clouds

Pin It now!
So here’s the next pattern in the same Interlacing technique (tutorial links at end of post). It reminds me of floating cumulus clouds, especially if one uses the right colours. The pattern changed and emerged as I tatted, with the familiar ‘what if I do this?’ dictating my hands. Hence again there is a lot of scope to adapt and change.

Interlaced Cumulus
pattern for braid / bracelet / earrings

4 shuttles. In the model, shuttles 1 & 2 have purple thread, ctm ; shuttles 3 & 4 have yellow thread, ctm.

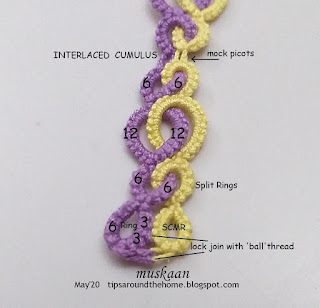
TO START AND FINISH :  (see notated image below)
Sh1: Ring : 3 – 3 -– 6.
Sh3: SCMR: 6 + 3 + 3.
Please Note : In order to maintain colour symmetry, I used the ball thread join (or lock join with 2nd shuttle - https://tipsaroundthehome.blogspot.com/2016/04/shuttle-2-to-rescue.html). This is also the reason why the 2nd ring is worked as a mock ring, so that the ‘ball’ shuttle is free to make a lock join.
This is optional, and one can start any way you wish.


PATTERN :
Sh1: Split Ring1: 6 / 6 , Interlace Sh3 through open ring.
Sh3: Split Ring2: 6 / 6. Close both split rings.
Sh1: Split Ring3: 12 / 12 , Interlace Sh3 through open ring.
Sh3: Split Ring4: 12 / 12. Close both split rings.
Sh1: Split Ring5: 6 / 6 , Interlace Sh3 through open ring.
Sh3: Split Ring6: 6 / 6. Close both split rings.

This completes one motif. Leave bare thread for mock picot and repeat for desired length.

For Interlacing, you can choose the movement (back to front or front to back) and corresponding effect (under/over or over/under). In the model, the movement is alternated between motifs.
TIP: In the center, where colours are switched, the mock picots are ‘interwoven’, though not very clear in the image.

A single motif can work great as an earring, with proper embellishment and findings! The braid can be turned into a bracelet, lanyard, choker, etc.

I like this design and hope you enjoy tatting it, too. Create your own versions and please share images!  happy tatting :-))))

updatehttps://tipsaroundthehome.blogspot.com/2020/06/whimsical-interlacing.html - an experimental application, with pictorial.


Friday, 29 May 2020

intermixing

Pin It now!
As indicated in my previous post, I will be sharing ideas as patterns since there is no way I can make everything that comes to mind even as I tat. 

There is immense scope for intermixing - be it
  • the way we start or finish,
  • the number and placement of colour(s),
  • technique,
  • function,
  • decorative elements &/or embellishments used, ....
  • and for those who dislike too many shuttles, using SSSR &/or Dora Young rings! Yes, slash the number of shuttles to Half!!!

But first let me get one pattern out of the way with a promise of more to come (I am especially excited about the next one which uses 4-shuttles) …
My earlier dissatisfaction ended up with snipping off the side braid and finishing off in this manner –
Lock-Laced Bracelet / Choker
pattern
I’m calling it Lock-Laced because the central braid is actually interlocked and only the side braids, with a free edge, are interlaced. But this is mere semantics; the method remains same.

PATTERN  
6 shuttles with desired colours, worked in pairs with 3 split rings in each row, worked from left to right.
Sh1: Split Ring1: 6 --- 6 / 12. Interlace Sh3 through open ring.
Sh3: Split Ring2:12 / 12. Close 1st SR; interlace Sh5 through open ring.
Sh5: Split Ring3: 12 / 6 --- 6. Close 2nd and 3rd SRs.
Repeat. 

You can choose the movement and effect (back to front or front to back). For more details refer to my post here, and the pictorials listed below.


Since I wasn’t sure how it would take shape, and I wanted to try options, long tails (around 6-8") from each of the 6 shuttles were left dangling. Thus one need not start CTM; one can use leftover lengths. The tails can be braided into decorative chains such as S-chains, Josephine chains, pearl tatted chains, etc.

BEADED TRIM –
Pre-string beads on a shuttle.
With a crochet hook load 3 beads on 2 adjacent long picots.
Make a lock join through 1st picot, pass 1 bead from shuttle, make a lock join on 2nd picot, pass 9 beads from the shuttle. 

Continue along the length, ending with a string of 10 beads.
Tie to the bundle of tails, and snip off leaving the same length.
Repeat this on the other side.

If you want symmetry, ensure you have an even number of long picots. I like the slight off-set taper.

I inserted a spacer bead, knotted the tails together, added another spacer bead. On one of the tails extra beads were strung
I was fixed on seeing it as a bracelet, but when I showed it to my hubby he immediately thought of a necklace/choker or an ornamental armband (bajuband) traditionally worn by brides and the rich.


Worked in Anchor size 20 ( Lizbeth 10), with size 11/0 bicone crystals (28 maroon and 78 yellow) and 14 gold 10/0 bicones for trim. Some more beads were added to the tails on either end.


Interlaced SSSR Trial !
4 or 6 shuttles too much to handle? Try interlacing using single shuttle split rings (SSSR) – Mathew Takeda style.
This is my first attempt. Look, only 2 shuttles instead of 4!
It can be done. However, it is not necessarily easier since there are open loops; but tangling of 4 threads can definitely be avoided.
I’m not happy with the final look here – will practice make it better, or should I stick with normal SRs?

My next experiment will be with Dora Young’s Knotless Rings which are also split rings using one shuttle. In theory, they should work. Want to give it a go? Join me....


Interlaced SR pictorials -  


Tuesday, 26 May 2020

not for the faint-hearted

Pin It now!

It’s been years since I first posted the technique for interlaced split rings, and despite being among the all-time visited posts, I did not get around to creating any patterns. So when Lilas asked for a pattern, it got me thinking.

I started with one of my sketches and, gulp, I couldn’t get the looping right despite going through my own pictorials! A bit of perseverance, and now I’m happy with my rhythm.

I’ll be posting my trials, experiments, tips, and samplers. I have no intention of creating complete projects at this stage. But for those interested, I will share the count and instructions and you can play and adapt as you wish.

This is the very first of the present attempts. 4 shuttles.
Large rings are 10/10, alternating with small 5/5 rings. I tried both movements for practice.
Worked in Anchor size 20. I think the small rings should be 6/6 to avoid this cramped look. And the large rings can then be made 12/12.

Tried with 6 shuttles.
All rings are basically 12/12 – and the ones along the edge have a long picot for beads.
Here, I deliberately experimented with
back/front, front back movements on each row, alternating with front/back, back/front movements on next row. Look carefully and you can see the over/under and under/over effects.

I wanted a broad bracelet, hence the long picots on both sides, to be joined to interlaced braids. This is how far I have reached on the first side, and will snip it off... it is too broad! I have an idea on how to finish the bracelet, though.

This is just the start …. Lots of ideas and I welcome more - please share your thoughts :-)


Friday, 22 May 2020

peacock in the snow

Pin It now!

Whoever heard of a tropical bird prancing and showing off it’s plumage in snow? A bird that dances in the rain! It can only happen in lace where creativity knows no geographical bounds.
Yet, I stuck with cool colours for a seamless transition.

2 flakes stacked, creating a lovely effect and design!

Peacock in the Snow flake
Pattern is finally ready and converted to pdf which includes details, along with a close-up pic. Contact me in case of any problem. Hope you enjoy this layered flake. 

The story in pics ....
Round 1
Round 2
Round 3
2 together as motifs for a larger fabric.
Round 4
It measures 10 cms in Anchor Pearl cotton, size 8 (similar to Lizbeth size 20)
An extreme close-up to show details.

2 together as motifs for a larger fabric. Each side is 5 cms.

Hope you enjoy it as much as I did creating and playing with it!

Download pdf here


Wednesday, 20 May 2020

lace to fabric QnA

Pin It now!
For several years, tatters have been emailing for some help or other on their current tatting project, term, technique, pattern, etc. It is usually an eye-opener for me, when I have to delve deeper into a method, or come up with a solution. Some of these have been posted as tutorials/pictorials already, several are in the works with pics taken, but not yet presented.

I put in a lot of thought, research, and detail into my response, and have decided to share some Q&A for anybody facing a similar situation. In any case, it makes my life easier when I have a simple link to share instead of re-typing. I may edit/paraphrase/add/organise.

Here’s one such, from one of my dear followers, Emily H, who often comments with a unique perspective. I was pleasantly surprised, and grateful, when she gave me her feedback, along with pics of her final project. Read on ....

  
Question : I want to edge a handkerchief for a friend, but I want it to be usable and washable. I know cotton shrinks, so what would be the best prep for that? I had the thought to tat my lace and then wash it so it would shrink and then cut the handkerchief to the size it ends up.  Attaching together after everything is preshrunk. I am thinking like a seamstress though and don't know how these same principles apply to cotton thread. 

Answer :
Sharon Briggs has some sound advice – scroll down to Washing. Personally, I am a bit scared of her boiling water part.  

Suggestions based on my experience - 

1. Thread size and brand. 
Anchor size 20 definitely shrinks. Not sure about Lizbeth 20, though MIL says her Blossoms remained fine.
But size 40 and 80 should not shrink.
This is evident in the stretch of a thread (my observation).
Hence decide according to thread size you are using. 

2. Definitely wash and shrink the cotton fabric. It will also remove sizing, if any.

3. Is it possible to give washing/care instructions to your friend, and will she follow them? If yes, then despite which size you use, ask her to block the lace (simple rolling pin method works fine, without hassle) after wash, while still damp. Or iron on wrong side while still damp.

4. Try to avoid too many decorative picots. Fewer the picots, easier to care and maintain.

5. If there is a corner in tatted lace - In such cases, I sew on each side (to pre-shrunk fabric) as I finish tatting it, so that placement is precise. 

6. In case of a simple braid, I tat a shorter length than that required, and start sewing it to fabric. The short span can then be tatted and sewn to precision without fear of overlap of any extra bit.

Some links on how to attach lace to fabric : Tatters frequently post their tips and favourite methods but I haven’t collated them all. Here are a mere handful -

Feedback : Thank you! That was all so helpful. I found in my stash a ball of DMC size 30. This was my first time using anything other than ordinary crochet thread (20?) at first I had several breakages, but they got less and less as I went on. I forgot your 5. tip and tatted the lace in a complete square, then measured it for fabric size. 
I did brave the boiling water trick from the link and pressed with a hot iron after wards and it shrunk in 1/2 inch. I also forgot to look at the video on how to attach lace and managed as best I could. I finished it just in time to mail to my friend before her wedding. 


Isn't it a beautiful piece of tatting and a wonderful gift to a friend?!

So what is Your favourite method? Please do share any tips or links and I will add it to my post or the tatting Resources page

UPDATE : Kathleen Minniti and Ninetta Caruso have graciously shared their expertise and tutorials/tips on this topic ! Don't miss their pdfs and post detailed here - https://tipsaroundthehome.blogspot.com/2020/06/why-tatting-is-thriving.html 

Monday, 18 May 2020

dual-faced

Pin It now!
The very night I blogged about this first poker attempt, I completed tatting it. I decided to make it an earring or a pendant. My earlier idea was to create a kind of garden of blooms for a greeting card. Making a whole bunch in size 80 was no joke – I was working blind! One can only bluff to an extent ;-P
Added a pearl bead with spiral ring to hold the appropriate findings.

Mulberry Earrings / Pendant pattern
Here’s the pattern, if interested.

2 shuttles with different colours. Tie threads.
CATKIN :
All are picot flowers, meaning each ring is made of picots separated by 1ds. There are 3 sizes :
  1. large, with 7 picots : 2±1-1-1-1-1-1-2
  2. medium, with 5 picots : 1±1-1-1-1-2 or 2±1-1-1-1-1
  3. small, with 3 picots : 1±1-1-1.
Tat 3 large rings, 2 medium, 3 small, 2 medium, and 3 large rings.
Leave bare thread between rings, and join to previous ring.

TIP: If you wish to have some green thread show up like I did, here’s how –
After the first 6 rings, tat the 7th (small ring) But before closing the ring, pass green thread through it, then close.
From 8th ring onwards, make a lock join to corresponding bare thread, trapping the doubled green thread within.

STEM & LEAF :
Josephine chain : 15 long picot 15.
Chain : Insert paper clip on core thread to hold inward picot. 3-3-3-2 fold 2-3-3-3, join to inward picot.
Josephine chain : 15 long picot 15.

This is one sprig. One can tat a ring for findings and continue for the 2nd sprig.
TIP: In order to change the direction of Josephine chain, switch to the other half stitch. So, if 1st stem is tatted with 1st half-stitches, tat the 2nd stem with 2nd half-stitches. It creates a sharp turn.
For 2nd sprig, repeat the first or alter the number of picot flowers.

So how’d the cards stack up?
Card #1 for stem
Card #2 for large picot flowers
Card #3 for leaves
Card #4 for small flowers
Card #5 for medium flowers

Natalie thought the first part looked like a hyacinth, while hubby thought it looked like yummy mulberries! Your deal ;-D


I can’t even remember all the little ideas and off-shoots that came to my head while playing this game! A few I sketched out for later, but most have since evaporated.
Here’s my trial of one of them. It has fancy onion rings, thrown rings, and picot flowers. Could be an edging or return back for a bookmark or insertion. But I’m done playing for the present ….

I fold.
Many many thanks to Natalie Rogers 
for sharing & organising this creatively fun  game!
It is a semi-structured designing process. It is a great way to start a design and tweak for perfection. Add more types of cards such as techniques or effects or perhaps colour combos, etc. and we can spread our imagination further.
To see what was on other players’ cards, check out this facebook page and do visit Natalie’s blog for her previous games and details.


Saturday, 16 May 2020

tracking both sides

Pin It now!
So, Life got majorly in the way! You indulged me, but ALL my plans to utilise my time on blogging and ticking off my check-list, while keeping my personal correspondence staggered, got way-laid. Where did this entire week go?! I literally lost track of everything beyond the very personal.

But life's train runs on 2 tracks - there are 2 sides to everything. So there was some good mixed in and everything is back on track, fresh ‘n’ fine.

And look what I discovered on the other side of the picoted S-Chain


Isn't it pretty? In my previous cords, this intricate weave did not reveal itself so clearly. Obviously, there needs to be greater contrast in colour or tone between threads. It may also be lost in finer threads.
The above cord uses Anchor size 20.
We can now choose which side we want to show up front and which to hide!


Friday, 8 May 2020

captured onion rings

Pin It now!
Ninetta has been posting a comprehensive study of Onion Rings – their construction and variations – along with pictorials and tutorial links. A must-read for anybody wishing to learn, explore, or improve. A sumptuous dish!
My guess is that Marilyn followed one of those links to my blog and left a comment for help with captured onion ring
Ever since I tried it here for the first time, I have been hooked to this method and have used it consistently with good effect. I think this is a good excuse, and opportunity, to present a stepwise tutorial.

Captured Onion Rings
Kathleen Minniti's method

BACKGROUND :
Captured Onion Rings are a pair of concentrically placed True rings. These true rings can be tatted with the same shuttle, or with different shuttles for a 2-colour version.

Aurora Lozada first shared her Perfect Onion Ring method (pdf) in 2014 with the Online Tatting Class. She captures the inner ring between the core and working thread After making 1ds. Thus the inner ring is captured Between adjacent stitches of the outer ring. After closing the outer ring, the emerging thread is offset by the 1st ds. 

Kathleen Minniti improvised Aurora’s method to capture the inner ring Within the 1st half-stitch of outer ring. After completing the outer ring, the thread emerges from the center.

I can now understand Aurora’s method, but am still unsuccessful at executing it! Kathleen’s method is like tatting over tails, substituting the inner ring for the tail. I can do that - and if I can, You certainly can!  

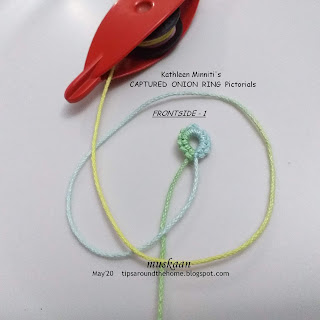
Captured Onion Ring Pictorial - FRONTSIDE

I have used a single shuttle for the pictorial. 
Inner ring : 6 – 6.
Outer ring : 10 + 10.
1. Tat inner ring. Close ring and loop the thread around to start outer ring.

2. Hold in pinch.

3. Start 1st half stitch – under ….

4. …..over

5. 1st half-stitch seen clearly after the flip, but do not snug.

6. Pass the inner ring through the open leg of this 1st half-stitch. Follow the core thread (just as in tatting over tail).

7. Bring the leg to the base of the inner ring by wiggling your left index finger, and

8. snug tight. Make sure the stitch is as close to the base as possible, and that the core thread slides freely.
9. Make the 2nd half-stitch (over-under) and

 10. snug normally. 1st ds complete.

11. Tat around the inner ring, joining to the picot. I used the ball thread or onion ring join

12. Close the outer ring normally. A pair of concentric or onion rings is ready.


In the above ConcentriCITY snowflake, there are 3 concentric rings where the outermost is a chain or mock ring. To bring the shuttles in position, the middle ring is worked backside. This is what Marilyn was referring to. Hence here are a few pics showing the backside working of the captured onion ring.

Note: In directional or frontside/backside tatting, the sequence of half-stitches in a ds is reversed (hence called RODS – reverse order of double stitch) working 2nd half before 1st half-stitch. 

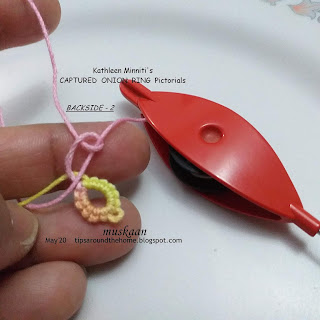
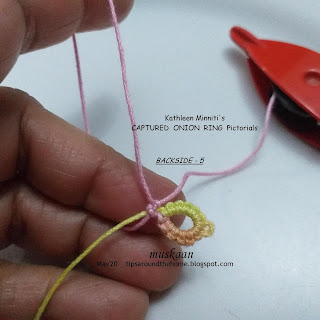
Captured Onion Ring Pictorial - Backside

In this pictorial, both rings are worked backside, but this is not compulsory.

1. Inner ring worked backside. Loop the thread around to start outer ring, and pass shuttle over-under to make the 2nd half-stitch.

2. 2nd half-stitch made, but do not snug.

3. pass the inner ring through the open leg of the half-stitch, following the core thread.

4. Snug the stitch as close to the base of inner ring as possible.

5. Make 1st half-stitch. 1RODS complete.

6. Continue around, joining to the picot, and close the outer ring normally.

7. This is how it looks from the front. (There is some inadvertent space left at the base - the ring should've been pulled close more tightly to avoid that pink line).

Note : This method is so basic that it can be used even for chains/ mock rings, etc. , either in onion rings or in other situations. 


Hope this answers your question, Marilyn?


Many many thanks to Aurora & Kathleen :-) 
My onion rings have certainly improved!  

UPDATE : Comparison of Captured Onion Rings - original and variations!