Showing posts with label Aurora. Show all posts

Wednesday, 1 July 2020

never say die

Pin It now!
Serious readers of my blog may recall my inexplicable difficulty in working Aurora's onion rings, despite the fact that I understood the concept and she had laid out a stepwise pictorial with instructions here. Yet based off that method, I easily accomplished Kathleen's variation as seen in this pictorial.  Judith left a couple of comments there today and I decided to give it one more try.

This time I did not follow Aurora's pdf. I went with her concept in my mind and Voila, I got it!!! Yup, never say never! So here is my take ... a quick comparison of 3 methods which includes Judith's suggestion that lies in between.

Specs :


From left to right :
  1. Kathleen's captured onion rings (Variation #1 of Aurora's onion rings method). The inner ring is captured within the base of the 1st half stitch of outer ring - within the leg of the half stitch.
  2. Judith's half-hitch capture (Variation #2 of Aurora's onion rings method). The inner ring is trapped between the 1st and 2nd half stitches - between core and working thread. 
  3. Aurora's onion rings (original method). The inner ring is trapped after making 1ds. Thus it is trapped between 2 stitches - between core and working threads.
  4. Kathleen's method repeated for sake of consistency.

My first thoughts :
  • I found it easier to maneuver and position the inner ring using Kathleen's method.
  • In Aurora's method (#3 OR) I worked only 5ds in the last segment since 1ds had been worked while trapping the inner ring at the start.
  • This also causes a slight offset or perhaps I need to practice more.
  • I can barely detect any difference in the bulk in either of the 3 methods, although I understand that technically Judith's comment is right. 
  • They are all fairly flat.
  • I think Judith's variation is visually best, though Kathleen's is easier to implement. 
  • Judith also mentioned posting the shuttle. I tried it, but didn't like the result, and pulled the thread back to 'normal'. To be sure, I post shuttle Only for backside rings - works for me.
  • More practice and application required, along with experimenting with 2 colours.

UPDATE : I forgot to add a slightly different type of "captured rings" - Floating Beads method used to capture the inner ring with the flexibility that it can lie flush against the outer ring, or can float at a slight distance. Here are a couple of pictures showing the diversity -
 
It is not as elegant as the above methods, obviously.
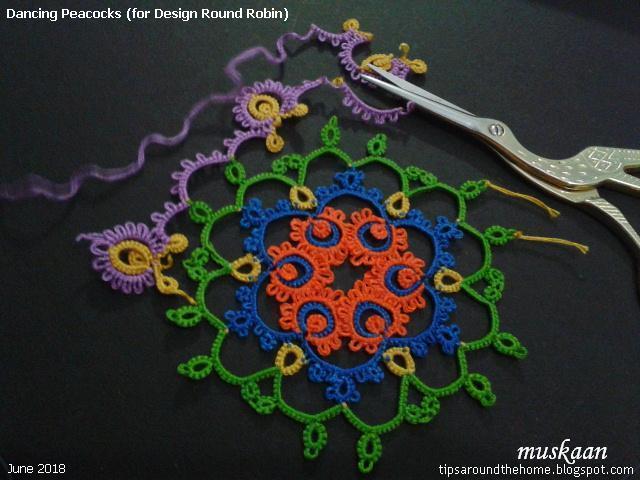
Dancing Peacocks medallion was adapted to become the center of my Design Round Robin doily. This is the center where Kathleen tatted the floating inner ring using her captured OR method instead of the FB method and I learned it from her.


Many thanks to all three tatter-designers ; 
love to have options and multiple paths toward improvement!

Friday, 8 May 2020

captured onion rings

Pin It now!
Ninetta has been posting a comprehensive study of Onion Rings – their construction and variations – along with pictorials and tutorial links. A must-read for anybody wishing to learn, explore, or improve. A sumptuous dish!
My guess is that Marilyn followed one of those links to my blog and left a comment for help with captured onion ring
Ever since I tried it here for the first time, I have been hooked to this method and have used it consistently with good effect. I think this is a good excuse, and opportunity, to present a stepwise tutorial.

Captured Onion Rings
Kathleen Minniti's method

BACKGROUND :
Captured Onion Rings are a pair of concentrically placed True rings. These true rings can be tatted with the same shuttle, or with different shuttles for a 2-colour version.

Aurora Lozada first shared her Perfect Onion Ring method (pdf) in 2014 with the Online Tatting Class. She captures the inner ring between the core and working thread After making 1ds. Thus the inner ring is captured Between adjacent stitches of the outer ring. After closing the outer ring, the emerging thread is offset by the 1st ds. 

Kathleen Minniti improvised Aurora’s method to capture the inner ring Within the 1st half-stitch of outer ring. After completing the outer ring, the thread emerges from the center.

I can now understand Aurora’s method, but am still unsuccessful at executing it! Kathleen’s method is like tatting over tails, substituting the inner ring for the tail. I can do that - and if I can, You certainly can!  

Captured Onion Ring Pictorial - FRONTSIDE

I have used a single shuttle for the pictorial. 
Inner ring : 6 – 6.
Outer ring : 10 + 10.
1. Tat inner ring. Close ring and loop the thread around to start outer ring.

2. Hold in pinch.

3. Start 1st half stitch – under ….

4. …..over

5. 1st half-stitch seen clearly after the flip, but do not snug.

6. Pass the inner ring through the open leg of this 1st half-stitch. Follow the core thread (just as in tatting over tail).

7. Bring the leg to the base of the inner ring by wiggling your left index finger, and

8. snug tight. Make sure the stitch is as close to the base as possible, and that the core thread slides freely.
9. Make the 2nd half-stitch (over-under) and

 10. snug normally. 1st ds complete.

11. Tat around the inner ring, joining to the picot. I used the ball thread or onion ring join

12. Close the outer ring normally. A pair of concentric or onion rings is ready.


In the above ConcentriCITY snowflake, there are 3 concentric rings where the outermost is a chain or mock ring. To bring the shuttles in position, the middle ring is worked backside. This is what Marilyn was referring to. Hence here are a few pics showing the backside working of the captured onion ring.

Note: In directional or frontside/backside tatting, the sequence of half-stitches in a ds is reversed (hence called RODS – reverse order of double stitch) working 2nd half before 1st half-stitch. 

Captured Onion Ring Pictorial - Backside

In this pictorial, both rings are worked backside, but this is not compulsory.

1. Inner ring worked backside. Loop the thread around to start outer ring, and pass shuttle over-under to make the 2nd half-stitch.

2. 2nd half-stitch made, but do not snug.

3. pass the inner ring through the open leg of the half-stitch, following the core thread.

4. Snug the stitch as close to the base of inner ring as possible.

5. Make 1st half-stitch. 1RODS complete.

6. Continue around, joining to the picot, and close the outer ring normally.

7. This is how it looks from the front. (There is some inadvertent space left at the base - the ring should've been pulled close more tightly to avoid that pink line).

Note : This method is so basic that it can be used even for chains/ mock rings, etc. , either in onion rings or in other situations. 


Hope this answers your question, Marilyn?


Many many thanks to Aurora & Kathleen :-) 
My onion rings have certainly improved!  

UPDATE : Comparison of Captured Onion Rings - original and variations!

Monday, 9 December 2019

ConcentriCITY pattern

Pin It now!

Snowflake #21 in Land of Laces’ 25 Snowflake Project

This time I decided to go simple. Trouble with ‘simple’ is the constant fear that it’s already been done! Which is perhaps one of the reasons I did a 2nd round. A quick search did not throw up anything like this, and if there is, I haven’t seen or copied it.

I’ve used Kathleen Minniti’s captured adaptation of Aurora Lozada’s Onion Rings method. I find it ‘simpler’ and easier to remember, with great results. Kathleen captures the 1st/innermost ring in the first half stitch (within the loop after flipping the stitch) and proceeds with the 2nd half stitch. The rings stay snug.
In the 2nd round, where I worked the 2nd ring backside (RODS), I captured the inner ring in the 2nd half stitch (see pictorial below).

Both rounds are worked from front, clockwise....

ConcentriCITY snowflake
Small / Round 1 pattern
Worked in both Anchor Pearl (size 8, white) and Lizbeth (size 20), it is <4½ cms. As a hexagon, the side is 2cms.
Ball and shuttle, continuous thread. Start with the innermost ring (A) of onion ring. 
Choose your favourite method to make the onion rings.
I used Georgia Seitz’s Onion Ring or ball thread join.
Then work the chain. Note that the chain picots are NOT linked to each other. They remain free, and are slightly longer.

ConcentriCITY snowflake
Medium / Round 2 pattern
Worked in Anchor Pearl (size 8, white), it is 8 cms. As a hexagon, the side is 4cms.
2 shuttles, continuous thread.
Join to the 2 free picots on adjacent chains. I used a normal lock join, pulling up a loop simultaneously through both.
Check out this explorative study by Eliz Davis of how different ways of joining 2 picots together can be visually different. She tried Consecutive vs Simultaneous Joins. 

Start with the chain, going clockwise.
Lock join to the center picot. Make the 2 inner onion rings. Outer one is a chain, with a thrown ring. Join chain to middle ring, leave some picot space and make thrown ring. Leave equal space after closing ring, and continue chain. Lock join to same picot and continue chain, again making a join to the double picots simultaneously.

Repeat all around.

NOTE: I often have to tweak the stitches - adding half or full stitch in onion rings. Hence, depending on your tension, make the necessary adjustments.

PICTORIAL (with FRONTSIDE/BACKSIDE TATTING) 

The following pictorial shows how I worked one repeat, in directional or frontside/backside tatting. Red is shuttle1 & yellow is shuttle2.
1. After making the chain, make innermost ring with Sh1.

 2. Turn work and start next ring backside. Capturing the inner ring in 2nd half stitch.

 3. Close ring. Both shuttles are now in position to start chain.

 4. Make chain around the onion rings. Make onion ring join or lock join. Switch shuttle to tat a thrown ring, leaving mock picot space. Switch shuttle, and continue chain back on other side. Lock join to base. [see inset].   
 5. Make chain. Put hook through both picots of previous round to pull up a loop and make a lock join.
 6. Continue chain
 7. Make lock join and repeat from 1.
8. Snowflake complete.

 Round 3 TRIALS
I tried a 3rd round. These are the 3 repeats with tweaks in each (from 1 to 3). I couldn’t decide whether to go through with it or not, but feedback on facebook seems to be in favour of making a 3rd round.
I have a couple of questions, though –
  • Should there be a small ring (as in 1 & 2) or 2 picots (as in 2 & 3) between chains?
  • Should the outermost onion ring round be normal (1 & 2) or Victorian Set (as in 3)?
  • Anything else?
This will require making the entire snowflake afresh to make the picots the right size and avoid stretching. Hence it will be counted as a new snowflake for the project – I have 4 more to design/tat before the 25th, so I’m taking this lifeline ;-P


Thursday, 24 October 2019

a friendly neighbourhood

Pin It now!
I count my blessings to have such talented and generous friends in my global/digital neighbourhood. Here are a few ‘gifts’ I gratefully received recently….
In the order they were worked....

Elizabeth’s doily Round Robin 15.
Jenni Clark (Liyarra) posted her beautiful pink version on facebook & I liked it for a snood. She shared the pattern with me. It is from an old blog ‘tattingroundrobin’. Does anybody have a link?

More rounds to go.
Not happy with my chains - some overlap. Not a problem as it will not show up when worn.  I used 2 colours to showcase the flower shape, the green showing up as foliage.
Does the center look familiar?  Yes, it's what started the whole False CTM exploration. And to think I started this as a slow side project to disengage my mind and focus on downsizing my UFOs ;-P

Spool Pin Doily 
Who else but Anita Barry can come up with a butterfly to place under the spool pin?! How cute to have a butterfly sitting pretty on the sewing machine, keeping an eye on our sewing (or current lack of it, in my case)?! She is making these to sell at fairs, etc. yet shared the pattern with me!
Again playing with colour placement and had to include some lavender! It is worked continuously using 2 shuttles.
Now this is an example where we can continue into next rounds using the same core thread (in this case the mustard) but adding new colours for each round since they are chains with thrown rings : false ctm! If only I had remembered ;-P
This time I simply twisted the long antennae picots when it was wet. One picot is missing on one of the purple chains - can you identify it?

Walla-Walla Sweet Onion Motif 
Kathleen J. Minniti is not only talented but also explains so well! I understood Aurora’s onion ring technique when Kathleen used it for my dancing peacocks doily! But she uses only a half stitch instead of a full ds to capture the inner ring. I do like this method!
She PM-ed this pattern a couple of months back, with 3 versions for the center leaf. The left motif has a dot picot tip, and right one has a bullion knot (which got pulled out when I closed the ring).
A clever feature of this motif is the captured picots! Multiple alligator joins across the same picot. The left one has smaller picots than the right one. I like it, but need more practice.

Both these patterns (butterfly & onions) can be worked in one pass using 2 shuttles.
We mostly get pink/red onions here, but I've eaten similar onions in Australia.

Bobble stacked rings
And finally below is my trial of Rhoda Auld’s bobble technique posted by Ninetta Caruso which she shared with everybody ;-D  
Here again, one captures the previous thread in the current ring. It reminded me of how Ninetta curled her small rings.
I wanted to see if a circle could be formed with the stacked rings and then to see how it works with different ring sizes. I want to use this in one of my snowflake centers. Many textured effects are possible with this technique! 

Captured together...the butterfly & onion motifs are worked with Anchor Pearl cotton size 8, and the bobble trial is in Anchor size 20. Elizabeth's doily measures 4½" so far in Anchor size 40.

You generous ladies have captured my awe and gratitude J


Sunday, 24 June 2018

rotten core

Pin It now!
… or rotten pulp ?!


I've been spending the last couple of weeks bringing my four Design Round Robin doilies up to date. They had been neglected for the last couple of months, but now I am finally at par. I will share them in more detail gradually.
This post is merely about one rotten evening.

I was tatting the 3rd round on my Dancing Peacocks doily. Half way through I realised I’d been attaching it on the wrong side ! Much as I love fs/bs tatting, herein lies the disadvantage.
Not only can you see the colour blips in previous rounds (in pic below), but also how the stitches in the last round look more like rolled tatting with misplaced picots (purple in above pic) – a visual reminder that there is a distinct front and back side to tatted lace in directional and colour tatting.

About to snip off both threads, I remembered Jane McLellan's excellent pictorial directing us to snip rings and not chains.  I had stopped doing this ever since Carollyn's whip stitch method entered my tatting life, taking away all fear of hiding ends.

Fortunately, this round is mostly chains with stitches coming from the purple; tailor-made for the above technique. So off went the scissors on the mustard core thread and in no time I had rescued all the purple. Instead of cutting across the rings, I snipped through the core at the base of the ring.
For some of the stubborn points, especially near the lock joins, I inserted a fine crochet hook to make enough space for the scissor tip.

The unravelled thread is still wavy and vulnerable as seen above (these are 3 strands of Anchor embroidery thread). So I added another step -
I started winding this unraveled end on a new bobbin, giving it time to rest and recover. With the unused part of purple thread now at the free end, I started the round again with this ‘fresh’ thread. 
Turns out, I didn’t even reach the unravelled part in the corrected round - in a future post.

I lost my tatting and time, but did learn Aurora's method of capturing the inner ring in onion rings. Kathleen, who designed this round, used it and I followed accordingly. Aurora had shared it in the online class but I hadn't tried it out.
So not all was lost - new method learned, and pulp saved !!!  

Ahem..... the rotten core and pulp have twisted my arm to include their comment :
"Stop blaming the threads -- the fault lies in this tatter's scattered attention !"

happy tatting always ...
let's make sure our fruit and lace stay healthy :-)))