Snowflake
#22 in Land of Laces’ 25
Snowflake Project

pattern

Rounds
1 & 2 remain the same as shared here.
The
only difference is the small ring at the tips is (3-3) instead of 5ds.
Since
one tatter preferred written instructions, here is the entire written pattern.
Choose your favourite method for making onion rings, pointed or angular chains,
& joining 2 picots together. If required, adjust the stitch count so that
the concentric rings & chains lay niched.
Abbreviation/Notation :
OR = onion ring ; -/p = picot ; + = join ; RW = reverse work ; Ch = chain ; -- = long picot ;
SS = switch shuttle ; rs = reverse (unflipped) stitch - optional ; ^ = dot picot with Only 1 first half stitch (not 1ds) - optional ; 1SSCMR = self closing mock ring made of 1 stitch.
Round
1 : ball
and shuttle, continuous thread


OR1: 6 – 6.
OR2: 7 – 3 +, p 3 – 7. RW
Ch : 2 –– 8 – 8 –– 2. RW
This forms motif#1. Repeat 5 more
times, joining each new OR2 to that of previous motif, and also the last to the
first.
Note : None of the chain picots is
joined. They all remain free.
Round
2 : 2
shuttles, continuous thread. Refer pictorial here .
Attach
thread to BOTH picots on adjacent chains of previous round. I joined them
simultaneously, but you can choose your own method, keeping it consistent
throughout. See Eliz Davis’ study.

Ch : 2 –– 6 lock join
OR1: 6 – 6.
OR2: 9 + p 9.
Ch : 12 + SS mock picot R: 3 – 3.
mock picot SS, 12, lock join
Ch : 6 – 2, lock join through Both
picots.
This forms motif #1. Repeat 5 more
times.
Round
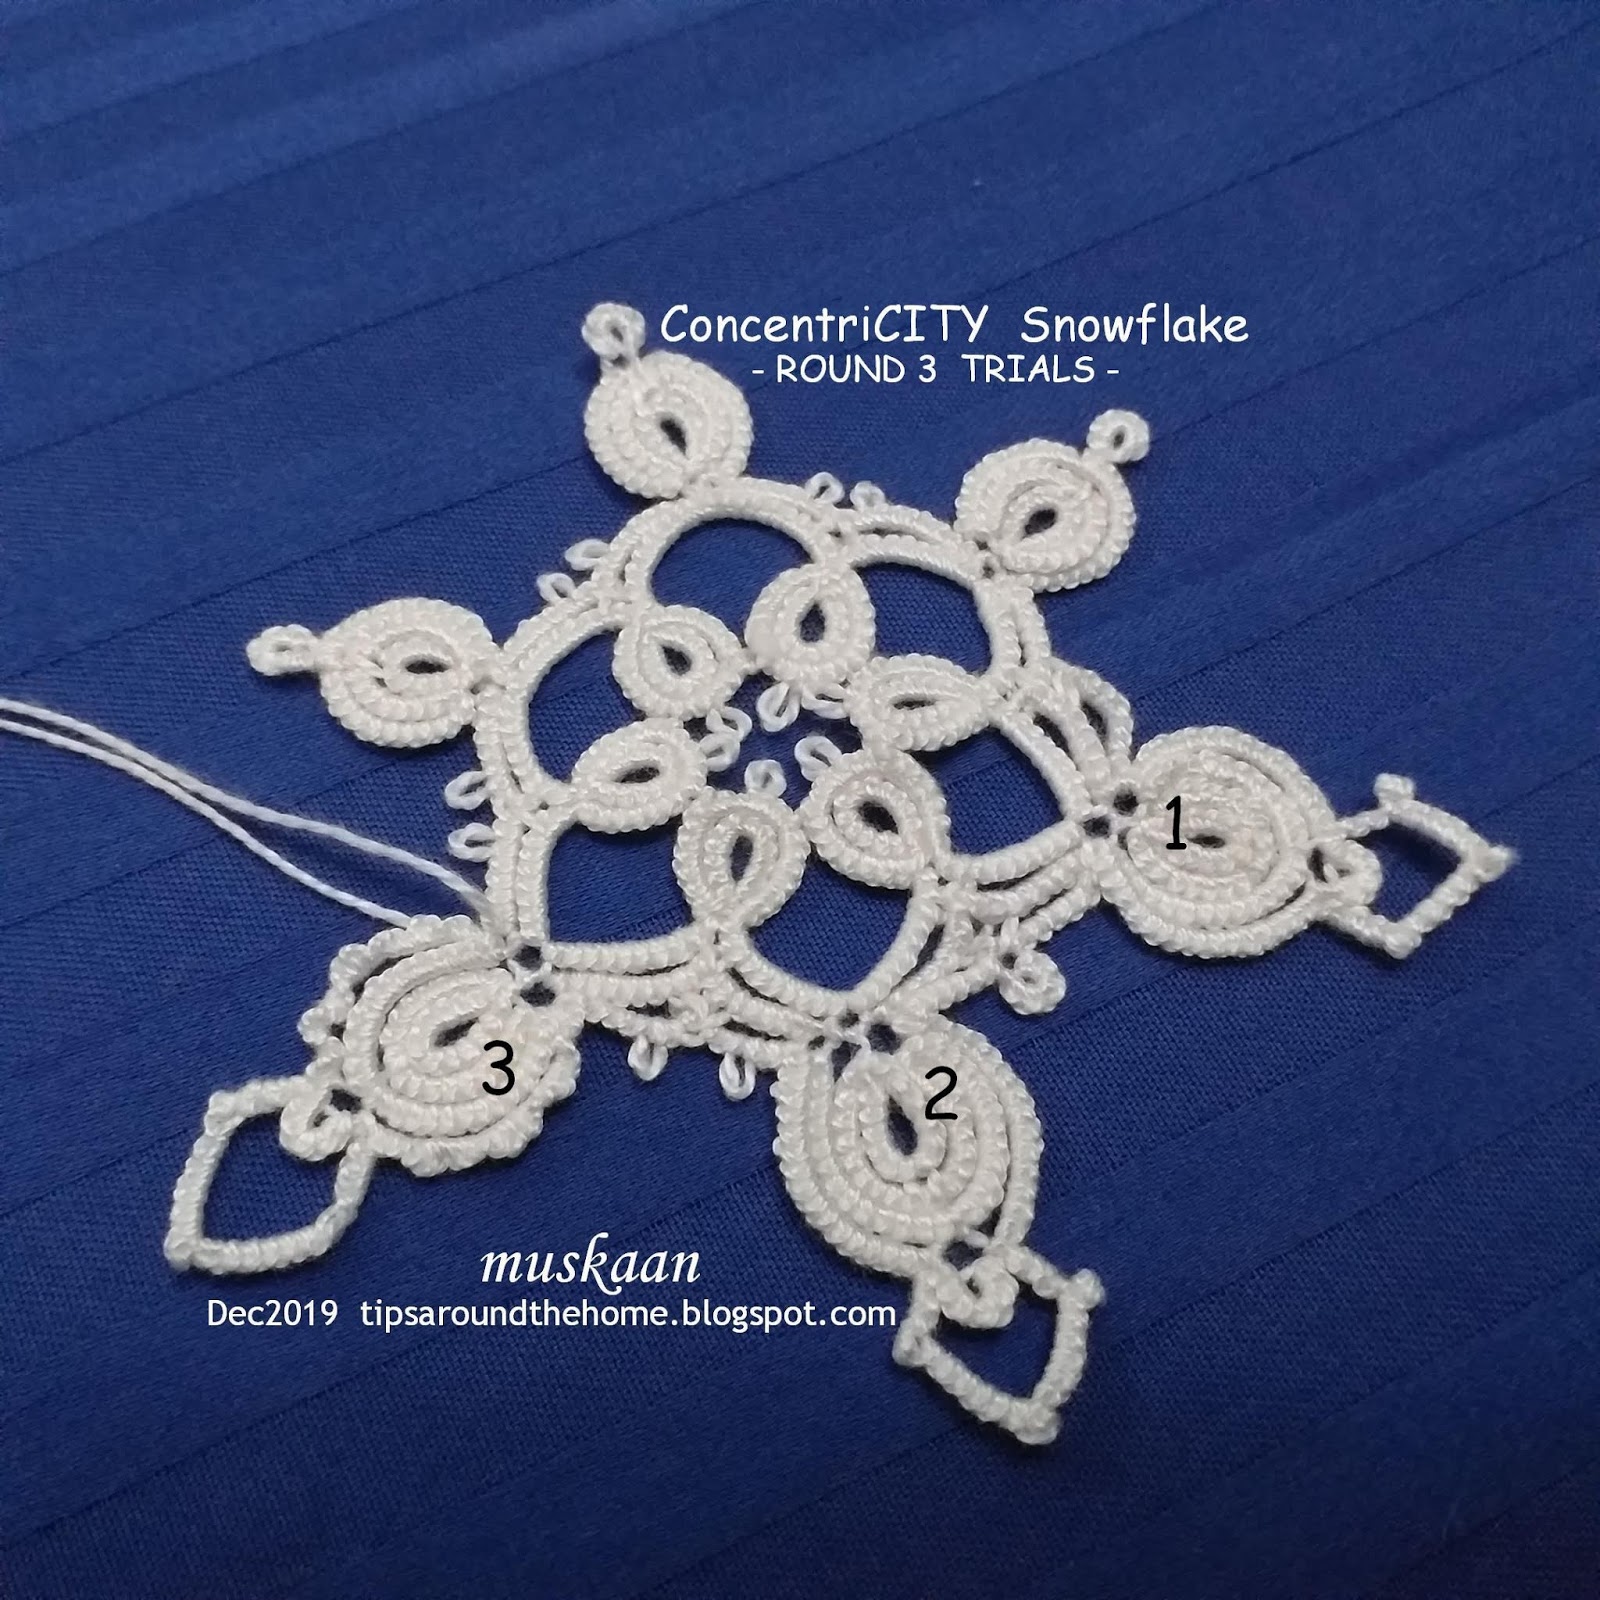
3 - TOWERS :
2 shuttles, continuous thread.
Attach
thread to the outside of any onion ring formation, and continue around the triple
onion ring.
The
‘towers’ are made of curved chains where I used reverse or unflipped stitches.
To avoid this, you can RW, and switch shuttle.
You
can choose your favourite method to make the points. There are numerous
options, including a seed bead, which I have listed at the end of the post.
To
create the point at the top, I made 1ds SCMR, and the points at the side are made with 1 first half stitch dot picot.
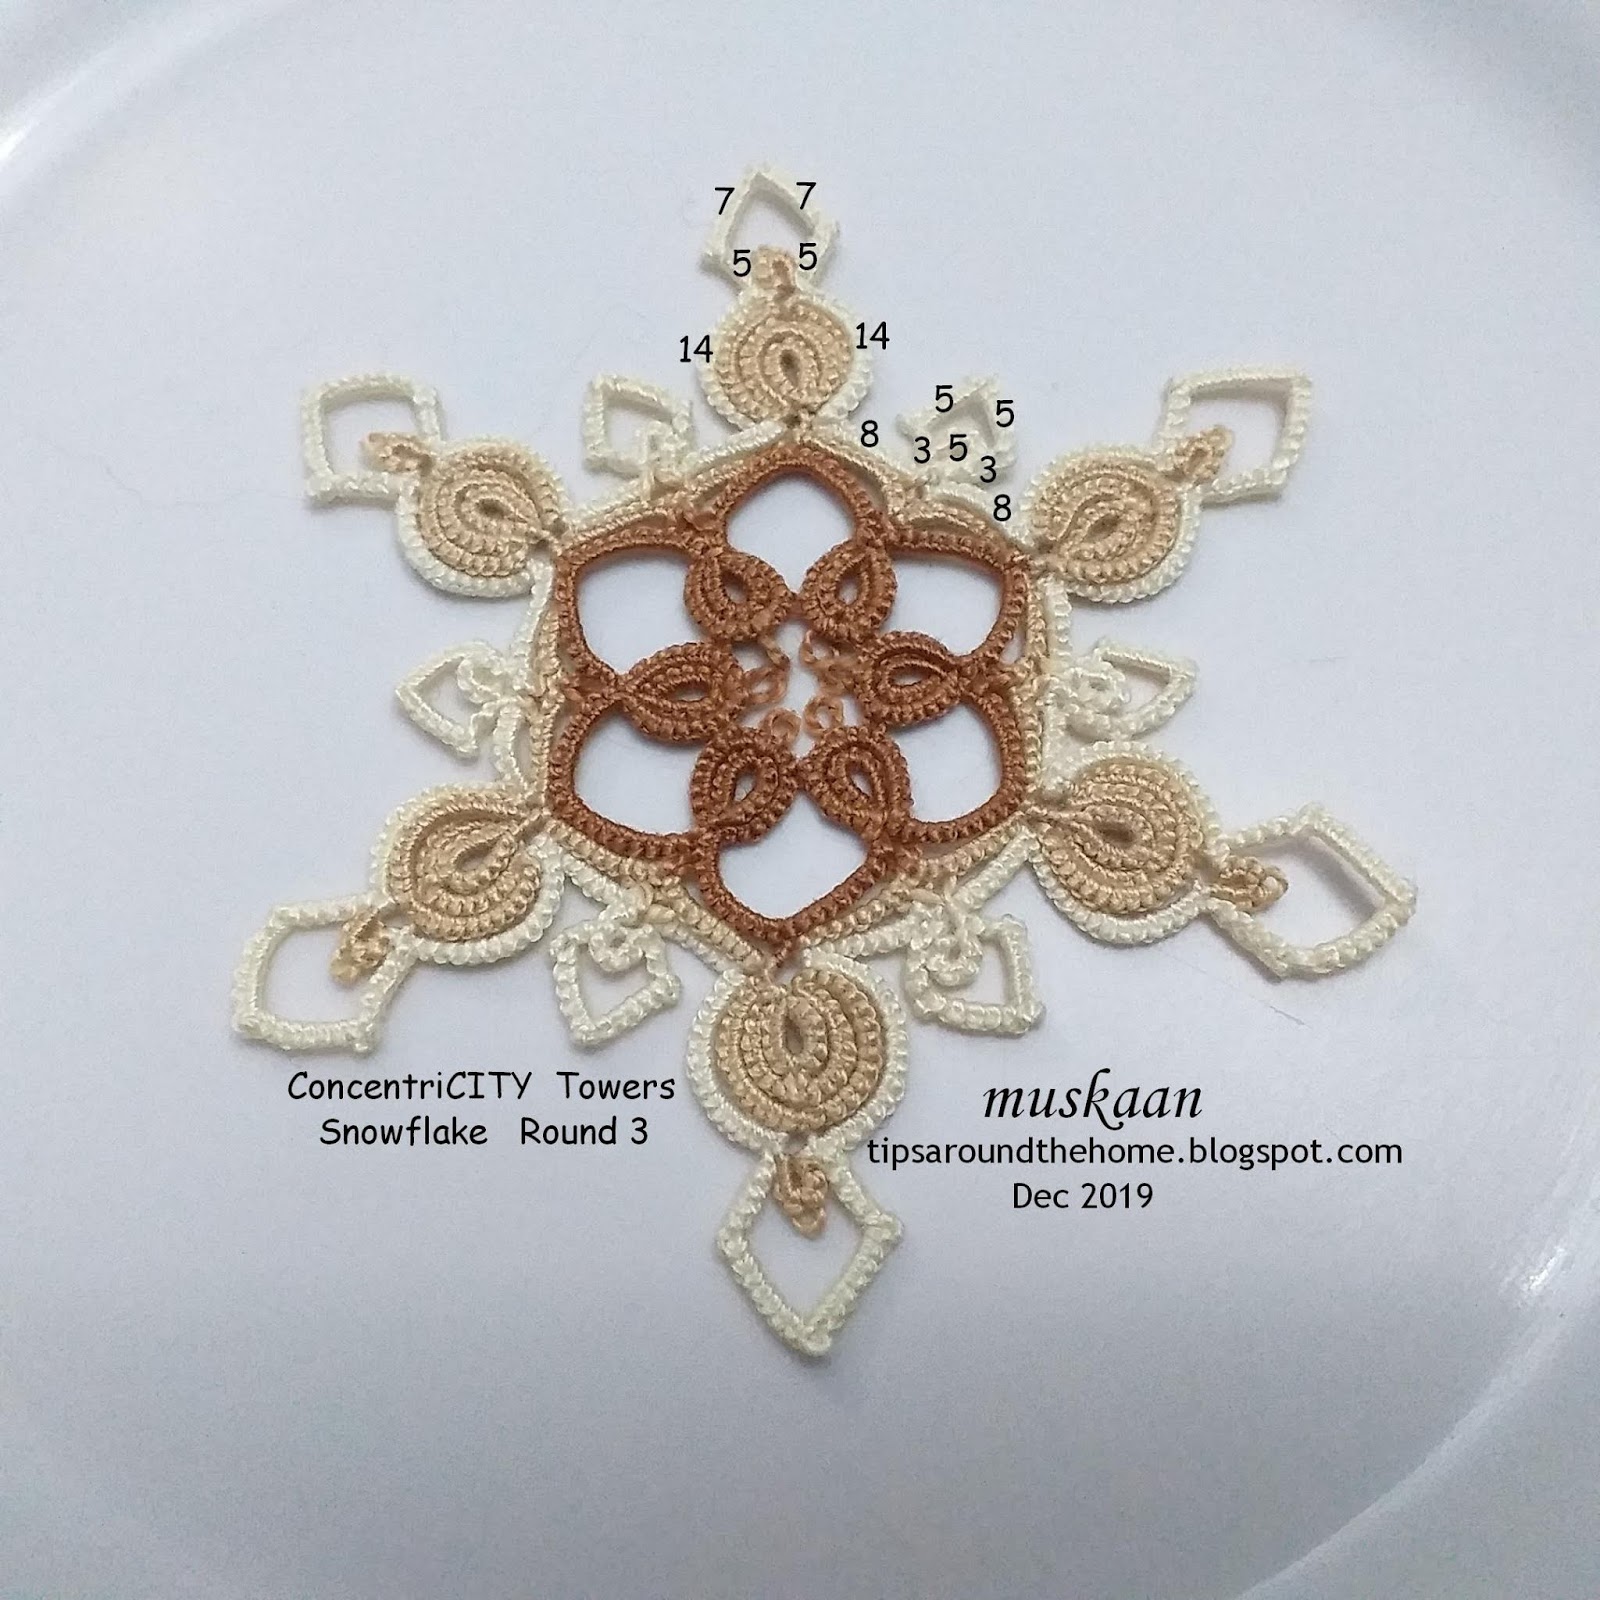
Ch : 14, lock join, 5rs, SS, ^ , SS, 7, 1SSCMR, 7, SS, ^ , RW 5, SS, lock join on other side
of OR ,
Ch : 8, lock join through Both
picots,
Ring: 5.
Ch : 3rs, SS ^ , SS, 5, 1SSCMR, 5, SS, ^ ,
RW 3, SS, lock join on other side ring, and again through both picots.
Ch : 8, lock join
This forms motif #1. Repeat 5 more
times.
Block into shape.

I
really should’ve used another method to change the curves of the chain, and I
did try a couple, but somehow settled for this finally. Not happy with my work.
In
Anchor Pearl cotton size 8, this measures 4”. Side of hexagon is 2”.
FUTURE
IDEAS

-
use Victorian set for alternate onion rings.
-
change the tower curve from ‘spear’ to ‘trident’ (as in above trial pic)
-
padded double stitch (balanced ds) for sturdier spear chains
- concentric chains for the towers (as in trial pic)
- beads-
- Lee Buchanan gave me another idea to explore at leisure, to grow the tips as in real snowflakes.
- concentric chains for the towers (as in trial pic)
- beads-
- Lee Buchanan gave me another idea to explore at leisure, to grow the tips as in real snowflakes.
POINTED CHAINS
A
few options to make pointed chains : Scroll through for tutorial links (many are listed under different headings/sub-headings)
-
Shoelace trick (SLT), switch shuttle or reverse work
-
Frivole’s one-stitch SCMR
-
Jon Yusoff’s pointed chain
- Martha Ess’ folded chain (2 half-stitches) [node stitch - Elgiva Nicholls]
-
Usha Shah’s dot picot (or a half stitch dot picot as in pattern, to reduce 'bulk')
-
Ninetta Caruso’s right angle
-
Daniela Mendola’s mimosa knot