Showing posts with label mock picot. Show all posts

Tuesday, 22 April 2025

just so tatting

Pin It now!

Over the past few weeks I had been receiving versions of the DAL 2025 challenge and I was feeling very inspired and motivated, itching to design/tat. While I couldn't focus on adding another round for my own DAL version, I picked up a motif I had worked for the glossary and decided to tat around it. My aim was to keep it simple.

For many samples I have been using Anchor knitting cotton size 10. This is very thick but smooth and a bit loosely twisted. Sometimes it is necessary to be attentive while tensioning the stitches to keep them uniform. Nevertheless, I do enjoy tatting with it. The disadvantage is that it is difficult to use such thick pieces in SOUP tatting. So I am happy that this has now become a good size for a coaster (9cms across).

Sharing the pattern for the Just So Coaster if anybody is interested. I was simply winging it but it lays flat.

  • It can be worked continuously in one pass by climbing out with mock picots, split chains and split ring. Trace the path before you start. Otherwise, enjoy working as individual rounds and play with colours. 2 shuttles are required only if you wish to tat it in one pass. 
  • Count for each round is marked in a different colour.
  • It starts with a central ring with long picots, followed by two rounds of chains lock joined below.
  • The 3rd round is a scroll with rings and chains. I wanted the smaller rings to overlap a wee bit but they ended up only squished together. Both small rings are joined to the same picot of previous round while the large ring is joined to the hidden picot above the lock join.
  • Again a chains-only round with medium sized picots. 
There are pics for individual rounds - WIP and/or completed. However, I doubt they are needed and would take too much time to notate. Hence I hope the inked count along with my notes will suffice. 
  • And if working as separate rounds, it is a beginner pattern with only rings, chains, picots, picot joins and lock joins and each round can be worked with a ball and one shuttle, CTM.
I deliberately have picots on the last round in the event I feel like adding one or more rounds. 
Feel free to extend the design to more rounds, if you wish, but do share it with me. All my contact details are on the top right panel of my blog.

****
UPDATE (3rd May, 2025): Round 5 is shared here https://tipsaroundthehome.blogspot.com/2025/05/comfort-tatting.html and end Round 4 with a split chain for continuous tatting. 
****

I hadn't intended for the scroll round to be so overwhelmingly ecru. So it lay around for some inspiration. It was a happy coincidence that I bought new threads from a 'new to me' online store. I needed more contrasting colours in this knitting cotton to work on the samplers and as soon as the package was delivered my mind was made up with this maroon shade! 
Since it was my first time with this store, I bought single balls/sets of different types of threads/brands so that I know what to expect in future, except for the six knitting cotton shades. And I am very happy with the quality and service and will definitely be going back for encores ;-D It was nice to see they stocked size 40 threads too, albeit in Red Heart, since Anchor has stopped manufacturing it. The other balls are all Anchor - size 20, perle, etc. More about the 'cone' threads later.
So this is my knitting cotton palette for now. Bottom row are the 4 shades I have had for a very long time (there are at least 6 more balls of ecru, bought from my local shop at least 10+ years back). I have already used all shades in my recent samplers, giving new life, energy, and colours!

Happy Tatting! Thank you for inspiring me!

Tuesday, 3 January 2023

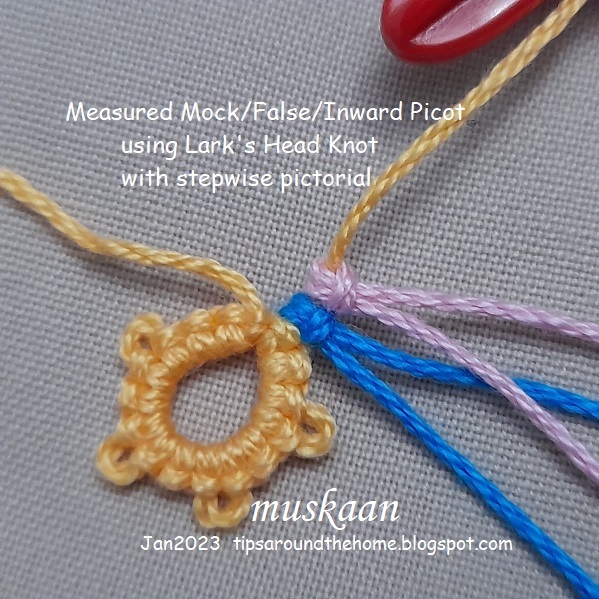
measured picot on core thread

Pin It now!

 It is difficult to get an accurate measure of an inward picot on the core thread which is held by a paperclip or coil-less pin, etc., till the time of joining. 

Then we have a mock picot where the norm is to make an overhand tie and then work the stitches. This is something I have never been comfortable with. 

And it is these that led me to use scrap thread to hold the space, by making a lark's head knot (LHK), which is exactly the size and form of a double stitch. Now this gives me an accurate measure of a picot even when it is on the core thread.

Measured Mock/Inward Picot with LHK pdf  (click to download) - https://drive.google.com/file/d/1GciBBglABtYVt3Jew5zn6chqhMjLQuqG/view 


1 Lark's Head Knot = 1 Double Stitch

The best part is that we can alter the size as desired! 
For a very small picot, make 1LHK with a smaller size scrap thread;
for a regular picot, use the same tatting thread and make 1LHK;
for a longer picot, use thicker thread for 1LHK, or several scraps for 2 or more LHK. 
The possibilities are endless. The mock or inward picot needn't even be regular. You can easily have an irregular picot with a longer core thread side and barely any space on the ball thread side, if a future join is to be made only on the lower end. 
The marker/scrap thread can be removed once the element is joined and the core thread is locked either with a lock join or with a ring.
Notice how all the picots above are of the same size and all the stitches are the same with not a single thread or bar out of place.

I put together some pics in a one-page pdf to show the steps involved.  Measured Mock/Inward Picot with LHK pdf  (click to download) - https://drive.google.com/file/d/1GciBBglABtYVt3Jew5zn6chqhMjLQuqG/view 

If you remember, I've used the LHK to join at the beginning - it was called luggage tag loop (Georgia Seitz). eg. Radiant Sun paper clip tatting, Blossoms motifs, etc. (click for search results and patterns). The LHK is also used to add new thread since it gives the appearance of a double stitch. 

Related articles/resources -
Measuring the Picot - https://drive.google.com/file/d/1Kk6rtyIUvo5JFA5u3vE3ruU2Z7zQ9fuq/view

Saturday, 30 May 2020

puffy clouds

Pin It now!
So here’s the next pattern in the same Interlacing technique (tutorial links at end of post). It reminds me of floating cumulus clouds, especially if one uses the right colours. The pattern changed and emerged as I tatted, with the familiar ‘what if I do this?’ dictating my hands. Hence again there is a lot of scope to adapt and change.

Interlaced Cumulus
pattern for braid / bracelet / earrings

4 shuttles. In the model, shuttles 1 & 2 have purple thread, ctm ; shuttles 3 & 4 have yellow thread, ctm.

TO START AND FINISH :  (see notated image below)
Sh1: Ring : 3 – 3 -– 6.
Sh3: SCMR: 6 + 3 + 3.
Please Note : In order to maintain colour symmetry, I used the ball thread join (or lock join with 2nd shuttle - https://tipsaroundthehome.blogspot.com/2016/04/shuttle-2-to-rescue.html). This is also the reason why the 2nd ring is worked as a mock ring, so that the ‘ball’ shuttle is free to make a lock join.
This is optional, and one can start any way you wish.


PATTERN :
Sh1: Split Ring1: 6 / 6 , Interlace Sh3 through open ring.
Sh3: Split Ring2: 6 / 6. Close both split rings.
Sh1: Split Ring3: 12 / 12 , Interlace Sh3 through open ring.
Sh3: Split Ring4: 12 / 12. Close both split rings.
Sh1: Split Ring5: 6 / 6 , Interlace Sh3 through open ring.
Sh3: Split Ring6: 6 / 6. Close both split rings.

This completes one motif. Leave bare thread for mock picot and repeat for desired length.

For Interlacing, you can choose the movement (back to front or front to back) and corresponding effect (under/over or over/under). In the model, the movement is alternated between motifs.
TIP: In the center, where colours are switched, the mock picots are ‘interwoven’, though not very clear in the image.

A single motif can work great as an earring, with proper embellishment and findings! The braid can be turned into a bracelet, lanyard, choker, etc.

I like this design and hope you enjoy tatting it, too. Create your own versions and please share images!  happy tatting :-))))

update - https://tipsaroundthehome.blogspot.com/2020/06/whimsical-interlacing.html - an experimental application, with pictorial.


Wednesday, 4 March 2020

climbing out with mock picot

Pin It now!
A question was posed in a facebook group and my first answer was incorrect. Got my shuttle, thread and beads out, and gave it a few whirls. Wahoo, got it! (I'm getting good with bead solutions ;-P) Later, Lee Buchanan posted another option.

Climbing Out with a Mock Picot …
with a bead at the base!
What’s special or new about climbing out with a mock picot, you ask? Well, this time there was a bead at the base of the ring and a long picot over it. Looking back it seems, huh, what’s the big deal. Try it with a normal ring, and you’ll discover the issue.
This may have been done before but I’d like to keep a record on hand for future. Sharing both methods here.

For this pictorial, only 1 shuttle is used, with a long thread left attached (ctm).

Method 1 : Mock Ring
1. String beads on the shuttle thread and start a mock ring. I find the self-closing mock ring (SCMR) is neatest and the closure almost ‘invisible’.
Leave a loop and slide a bead after each double stitch (or as per pattern). I have 6 beads here. 
2. After sliding last bead, do not make any more ds, pass shuttle through loop ...
3. ...and close the mock ring. 
4. Leave bare space for the mock picot and make a lock stitch or overhand tie (SLT). Continue with pattern.


Method 2 : Reverse Ring
Lee Buchanan got into the swing of things and offered this RR solution!
1. Start a reverse ring (tutorial links here). A reverse ring or wrong-way tatting starts on the opposite side of a normal ring, and has reverse or unflipped stitches. Make sure the beads are within the loop of the ring, and slide a bead after each reverse stitch. 
2. After sliding the last bead, close the ring. 
3. Threads emerge on either side of bead. 
4. Make a mock picot by securing the bare threads with a lock stitch or SLT and continue with next element in pattern.

As you can see, the end result is the same. Of course, getting that last picot to look unbroken is unavoidable, Unless the next element is a split ring in which case no lock stitch or shoe lace trick is required.

TIP : If beads are on the picot (up beads), one can climb out with a mock picot as in this beautiful Sitka Rose motif here.

Thank you Sheetal. Each time a question is asked, 
there is an opportunity for mutual learning and improvement!
Thank you Lee, for being such an enthusiastic and adventurous tatting sport! 

PLEASE NOTE: If you wish for a pdf of any of my posts, let me know. I now have a mail app thatnallows me to convert any post into a pdf easily.