Monday, 30 April 2018

I’ve got you covered!

Pin It now!
And just in time, phew!!! What an exciting range of projects to start off this month’s task of covering a cabone ring. I want to make each and every one of them someday. It was Renata’s turn to choose this time – Summer in Circle.
This is my April submission for 'I Love Tatting'

Royal Wave Bangle
 with free pattern directions

I didn’t have any hollow ring except for my loads of now neglected bangles which are unfortunately all circular. And I wasn’t confident with a glass bangle, so went with this metallic one despite the golden knobs projecting along the circumference. They made covering it more difficult and despite my diligence, the green peeps out at places.

Turns out I’d forgotten and had to consult tutorials on cabone tatting. This was a good refresher after my first bangle
But this time I wanted to use 2 colours alternately as a personal challenge. I chose thread colours to complement the lovely beads Usha sent me. These are vintage threads and closer to a size 50 or finer than the Anchor size 40 they claim to be ;-P

TIP : The thread not in use is encapsulated/hidden within the visible colour. The trick is simple. Keep the ‘not-in-use’ shuttle dangling and encapsulation becomes easy. The thread tends to stay alongside the bangle. Merely ensure that you pull the thread taut before switching colours.

I used scraps of the purple thread and had to join new thread at least 3 times, using a simple weaver’s knot and then encapsulating all tails within the next few stitches. This tiny knot is not visible.

Basic Pattern is simple and can be adjusted to any bangle size. I didn't have any specific pattern in mind - just let my shuttles take the lead.

Round 1 - covering the bangle (cabone tatting)
ROUND 1 : 2 shuttles each with different colour
2 vsp 4 vsp 2, switch colour and repeat, till end.
Carry the previous colour along the bangle, encapsulated within the stitches.
I ended up with 18 repeats of each colour.

Round 2A - Rollicking Waves - overlapping/interlaced chains 
ROUND 2ARollicking Waves
Next I strung beads to the 2 balls and joined these to the 2 shuttles to continue the next round. This round is all chains with beads on picots. Chains are interlaced/overlapping, so before making a lock join, ensure the threads are in the right position.
Chain1 : 2 B 2 B 2 B 2 B 2 B 2. switch shuttle.
Start next chain behind.
Chain2 : 2 B 2 B 2 B 2 B 2 B 2. SS
Lock join Chain1 to nearest picot, and Chain2 to next picot, ensuring the under/over overlap.
Repeat to end.
Round 2B - Frolicking Waves- undulating, overlapping chains 
ROUND 2BFrolicking Waves
I tried something different ¾th of the way around to change the shape of the 'waves'. Made the chains longer and twirled them around the bangle, joining to a picot above. The overlap continued as before.
There are between 6-8 beads in each chain before joining. And both shuttle & ball need to be passed through the bangle.

Finished off with 2 strings of beads and a teardrop at the end.

Hubby was rolling his eyes when I was choosing a bangle, wondering what I’m going to do with them after so many years - I stopped wearing them ages ago but still have a huge stash. Gradually, as the tatting started taking shape (including the simple covering without beads), he was all excited and ideated… how I could make earrings, and so on. Yeah, he’s finally ‘getting’ tatting – I’ve got him covered ;-P

I can’t thank Usha enough for her lovely seed beads. They are a delight to work with!

Do check out the beautiful projects (and tutorial links) lined up for
Thank you Renata, for another inspiring challenge :-)


tatting brings in joyful waves of creativity and togetherness

Saturday, 28 April 2018

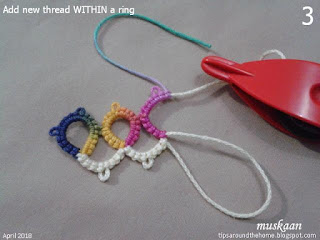
Add new thread WITHIN a ring

Pin It now!
When we run out of thread while working on a lace, it is easy to add new thread to a ring or even a chain. What if the next element is a largish ring and we have just enough thread to make a part of it, but not the whole ring?

1. Snip it off anyways - We could let that thread go waste, snip and hide it and start the ring with new thread. But if the thread is vintage, HDT, or not easily available we like to make use of the last possible length.

2. Extender - Tie a scrap thread as extender and work the ring normally.

3. Mock Ring – Switch shuttle and work that last ring as a mock ring or SCMR.

4. Switch the Core Thread – In case of split ring patterns, simply switch shuttles.

What if we know that the remaining thread can make only part of the ring stitches and we will run out of thread midways?
What if we could add new thread anywhere along the ring with least wastage of good thread? How ? Simple.
If you haven’t already done it before, here’s how to

Add New Thread WITHIN a Ring
how-to pictorial
UPDATE - Now in pdf (published in IOLI Bulletin Spring 2020) - https://drive.google.com/file/d/1g5GJz1rdzdKqpfw51Cm8lGptsY5S73ca/view?usp=sharing

Shuttle 1 – variegated ; shuttle 2 – cream ; 
shuttle 1 refilled with new variegated thread to show difference.
All threads are about a size 3 or 5.

1. Pink is the tail end of thread – not enough to make a complete ring.

2. Switch shuttle and start the ring as a mock ring. In this case I am using a SCMR 
(self closing mock ring), leaving a loop at the beginning.

3. I may not have enough thread to complete the ring. I have just enough to hide the tail.

4. At this stage new thread is added to the core. Notice that the ring is still open.
I like to tat over tails and hide tails in separate elements. But any method can be used.

5. First half stitch made over new tail.

6. Second half stitch made while hiding tail.

7. New tail encapsulated within the first stitch. Continue hiding for a few more stitches, 
leaving off after a first half stitch (the middle path mantra)

8. Ring is worked. Pass shuttle through loop .... 

9. .... and snug tight. We can now switch back to the original shuttle.

10. Continue. Notice the old and new tails in the same ring.

11. I prefer to whip stitch the old tail under stitches.

12. Now snip off all extra tail ends and continue working the lace.

Voilà.  New thread added to a working ring !!! No more untatting, no more wastage of good thread.
It is the first time I used this method. But it had been in my head for a long time and I recently encountered a situation where I recalled it, put it to the test and it worked!! A mock ring is after all just a chain.

You can’t really tell where the new thread is added. My ring shows it because the thread is too thick and it isn’t easy putting down your tatting and taking a pic at every step. I’m still pretty backward using images when the world is moving to videos! This is my comfort zone, though ;-P

Anyways, hope you like this and use it, if you aren’t already using it.

Related Resources and Tutorials to cover all situations–

p.s. During the finishing stage of this post, another idea has crept into my head. It works in my head, but I need to let the shuttles decide if they want to follow or not. I’ll let you know ….

tatting solutions can be easy & fun !

Wednesday, 25 April 2018

butterfly invasion !

Pin It now!
Remember my 2nd round design for the round robin where I discovered butterflies? Well, it got me thinking of edging possibilities which further led to a veritable butterfly invasion - of the happy kind :-) I used that same motif for the "make me pretty" challenge. Sharing some more of that happiness with you.

Butterfly Edging/Insertion
and off-shoots ! 
I will convert this into a composite pdf once I have tatted all models.
This card is not complete. Will share more eventually ...

A versatile pattern. Single butterfly motifs can be tatted separately to empty shuttles. The straight edging with alternating butterfly and flower motifs can also work as an insertion. It can turn the corner on either side with butterflies facing inward or outward. 2 Square motifs can be derived from these.


Techniques : 2 shuttle tatting, split ring, decorative picots.
Dimensions :Tatted model (maroon) is worked in Anchor size 40. Width – 1.5cms; 4 motif repeats are 9cms long. Each corner is 1cm long.


2 shuttles wound CTM.
Butterfly :
A-Ring : 6 vsp 10. rw
B-Chain: 6 - 8 – 3. rw
C-Ring : 4 + (to vsp) 8 – 10 – 2. dnrw
D-Ring : 2 + (to C) 10 – 8 vsp 4. rw
E-Chain: 3 + (to B) 8 – 6. rw
F-Ring : 10 + (to vsp) 6.
Flower :
G- Split ring : 1 – 1 –- 1 – 1 / 1 – 1 -– 1 – 1. (6 picots)

This completes one motif. Repeat from A to G for desired length.

End with a butterfly motif and work the corner with 3 flower motifs as follows -


To turn corner (to the left/upward):
SR1: 1 (– 1 –- 1)x2 - 1 / 1 (– 1 –- 1)x2 - 1. rw, Switch shuttle. (10 picots).
Ring2 : 1 (– 1 -- 1)x4 – 1. (9 picots). rw. SS
SR3 : same as SR1.
Join the next butterfly to the previous one (ie. Join C of new butterfly to D of previous one). This stabilises the corner.

Continue to follow pattern till end, joining back to the beginning.
Tie and cut. Hide ends.
Sew the edging to fabric or glue to cardstock for a framed greeting card.

It is the first time I’ve tried to block in this manner, with a grid paper below 
that thin plastic sheet. It really helped to keep the corners sharp and edges straight.

Notes :
  • All rings are tatted frontside, except for the corner-most ring (R2).
  • All picots are normal or decorative except where vsp (very small picot) is mentioned.
  • Overall, the edging moves from left to right.
  • In order to keep the edging/sides straight (and avoid twisting in case of long edgings), do not leave any space between butterfly and flower. Avoid gapsosis.
Since it was not to scale, I found it very difficult to diagram the corner. 
Hence I tatted a model in light colour and thick thread and notated instructions on it.

Suggested Variations :
Substitutions -
substitute floral picots for flowers for a layered effect ;
add seed beads instead of picots ;
add a pearl bead in center of each flower ring ;
substitute flower with large bead.
I hope to try some of these in my butterfly decorations.

Conversion
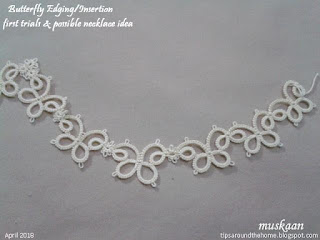
This straight edging can easily be converted into a gently curved necklace by leaving a tiny bit of space between the butterflies and flowers. This will allow the edging to curve slightly.
This pic is of my trial and practice piece and you can see that it can easily be 
arranged in a curve without changing the pattern.
This is definitely on my to-tat list and I've already chosen the colour.

Direction

Turn the corner in the other direction – to the right/downward. Instead of 3 rings after the butterfly, we only work 1 single split ring as follows :
SR : 1 – 1 –- 1 – 1 -– 1 – 1 -– 1 – 1 / 1 . (7 picots)
Then continue with next butterfly, joining to the nearest free picot of previous butterfly.


Here’s a collage of more ideas clockwise from top left -
Doesn’t this give a sense of a possible crown? An outer round to bring it together and give proper shape?
Turn it over and is can be a pendant with beads and a teardrop !

2 square motifs (blue is a trial piece) when the corner is turned to the right. These can be joined together either at their tips or along their sides for a larger fabric.

In case you detect any errors or if there is any confusion, do let me know so that I can make the changes in the pdf.


make me pretty butterflies are slowly starting to fly in. What wondrous joy !!! So if you haven't, get right down to it and send me the pics or your posted link. I would love to share them in a future post. 
I still want to keep my own butterfly samples a secret for now so as not to corrupt any ideas ;-P


happy tatting always J

Friday, 20 April 2018

retreading the path

Pin It now!
magic squares, doilies and magic/infinite pathways - common threads VI.

This post is an exploration to satisfy the researcher in me. There is no absolute right or wrong – it is my perspective or thought experiment. Fair warning - walk away while you have the chance; or stay to humour me? ;-P A new thread in Craftree inspired me to retread the path.


So yes, the pathways in this earlier post were all just that – pathways – a sequence of working and joining motifs continuously without having to tie and cut after every motif. And for this we can use bridging elements or tweak the design to allow us access to next motif.
The magic pathways moved straight along column/row or moved in a concentric spiral. Therein lies one of the major difference with the magic square.

Ia.  Magic Square

I explained the magic square concept in my 2014 post hereAll the magic squares till then had been based on the original Ann Orr triangular corner design. Someone found that one could work continuously from one triangle to the next to create an ever-increasing square – hence the term ‘magic square’.

Last year new interest was generated with the incredible series of new magic square patterns that Robin has spawned, including the reverse/inverted squares. She adapted an existing square into a magic square by ‘breaking’ the square into triangles for a workable continuum. 
She shared her deconstruction of the concept and process in detail, inspiring others to join in with their own magic squares (eg., Jane McLellan and Ninetta Caruso). These also followed the original style of working and the original triangular pathway.

Thus the magic square, characteristically, is made of repeatable square motifs that work as “…building blocks… (Robin) and follow a diagonal path (triangulation) resulting in as large a square as one desires. The square will get “…opened out just by turning the direction of tatting (Grace Tan), not by the application of bridging elements.


Ib.  Open-ended Motif or Transitioning Elements in Magic Square

There is one aspect that needs to be highlighted before I begin the next segment – the slight ‘asymmetry’ of each motif within the fabric. While working, one corner remains ‘open-ended’/different in order to change direction and continue to next segment. 

For instance, in the old magic square motifs, while 3 corners have chains, the 4th corner is made with rings in order to continue to the next section. Only the final fabric will have all 4 corners completed/identical (chains, in this case).  
Similarly the new squares needed some slight adaptation to transition into a continuous working path as in Konior's original square motif, and the Onion Ring magic squares.  

The reason this happens is clarified in Robin’s own words : You start with a formula (triangular pathway for magic square, or up and down columns for the table runner) and make the design work for that path. A one round square can be redesigned into a magic square, and now I’ve found a bookmark can be redesigned into a table runner.
(Notice that the bookmark is essentially a rectangle. It doesn't strictly adhere to the magic square definition since it follows the straight column/row magic pathway, and well, it is not a square to begin with). 

These transitioning elements are not merely functional, but visually appealing and create lovely patterns to break the monotony.

TIP : Incidentally, Jane’s magic square can be worked as a magic pathway, with each motif intact. Robin’s 2nd Onion Ring magic square can also work along a magic pathway with complete & symmetrical motifs because of the single outward ring which can be worked as a split ring. Clearly, a ring in the corner is an asset!


IIa.  Magic or Infinite Pathways 

During my Quatrefoil polygons, I discovered other pathways which would allow the tessellation to continue uninterrupted and create large fabrics in the same shape as the original motif. Thus I could trace paths for a triangle, square, pentagon, hexagon; and recently the Fortuna Square, by climbing out/in using split rings.

With so many shapes, Magic ‘Square’ seemed like a limiting term to me, hence I used the term Magic Pathways - there is magic in figuring out an infinite route :-)
At the end of the day, though, it is just continuous or one-pass tatting which can go on forever (hence Robin uses the term ‘Infinite Pathways’). During the writing/researching of this post and some recent discoveries, perhaps ‘Infinite Pathways’ is a better term than Magic Pathways. Yet I’d like to spell it out …

IIb.  Rationale for the term Magic Pathways : 

When we have shapes other than a square as a building block; use bridging techniques (climbing out/climbing in); and follow paths other than along the diagonal, then I like to call this one-pass or continuous tatting a “Magic” Pathway, because ….

1. it creates an immediate association to the essence of a magic square – that a large fabric can be worked continuously from the same repeatable pattern

2. it is magical that a simple substitution (eg. 2nd shuttle instead of ball, split ring/chain instead of regular ring/chain, perhaps simply switching shuttles, etc.) can allow us to tat infinitely

3. the straight/zigzag and/or spiral pathway is not limited to a square – depending on the pattern of the motif any geometrical shape/polygon can be tessellated into a large lace fabric. eg. the quatrefoil triangle, pentagon, hexagon and Robin’s mat and hexagon from Dillmont’s triangle. 
  
4. it is magic to puzzle over and trace out a continuous sequence keeping the original motif intact - without changing, tweaking, or redesigning an original motif or creating any transitioning motif.

Future idea : 2 different motifs tessellated alternately/side-by-side through a magic pathway. Note that the transitioning part of the magic Squares tend to automatically create a different motif in the center of 4 motifs.

I hear you ask - If a magic pathway is simply one-pass tatting then wouldn’t a doily worked in one pass also qualify? Hmmm….

IIIa.  Is the magic pathway different from a One-pass doily?

We frequently use climbing out techniques (split rings, split chains) when working on a doily, even if not specifically designed. So if we can complete a multi-round doily in one pass, does it become a magic pathway? After all we are moving in a spiral pathway whether the doily is circular or angular.

I don’t have a clear-cut answer for this. But my guess is ‘not exactly’?

To me, part of the difference lies in tessellation : motif v/s medallion. Each row of a doily comprises of repeatable motifs while the magic pathway is for medallions that we use as motifs. Medallions are standalone complete designs, and the magic pathway allows us to join them continuously and repeatedly to create a large fabric in the same shape as the original medallion and the same pattern as the constituent.

Further, even if we use the same motif in All rounds, we may have to change the stitchcount to prevent cupping or ruffling especially in a round/oval doily. In magic pathways, there is absolutely no change in stitches.

Future idea : It will be interesting to convert a circular medallion into a magic pathway.

IIIb.  What about more elaborate one-pass doilies?

Remember these doilies that are specifically designed to be worked in one pass such as Iris Niebach's TIAS doily and tattingweed's Crinoline Doily?
These take a long serpentine and circuitous route through multiple ‘tiers’ with each repeat, to complete the tatting in one pass. German tatters such as Endrucks designed elaborate one-pass doilies. These do appear magical to even design, let alone tat! 

But these are logistically and practically limiting. Inevitably, there comes a full stop. It cannot go on or be tessellated infinitely. So while magical in itself, it does not conform to the above concept. Or perhaps it is a 'magic' pathway, but not an 'infinite' pathway !!!  


To conclude :

  • Magic Squares and Magic/Infinite Pathways allow us to tessellate infinitely to form larger and larger lace fabric working continuously without snipping off.
  • Almost any square medallion can be modified/redesigned into a magic square, but not all medallions will allow a magic/infinite pathway.
  • In the magic square, one first selects the formulaic diagonal path and ‘fits’ a square medallion to tessellate infinitely; in magic pathway, one selects a polygonal medallion and then figures out a continuous pathway. 

I was amused to read Robin’s comment here. How far she's travelled, now leading the way :-) And only a few days back I rediscovered her Dillmont inspired mat & hexagon where she has already outlined the pathways that I spoke of during the Quatrefoil series and diagrammed in the Fortuna Square!

If you have, thanks for reading. It validates my effort ;-)
I invite you to share your views.


All paths lead to Tatting !

Monday, 16 April 2018

make me pretty please

Pin It now!
Still waiting patiently but the butterfly has not shown up yet. Instead of losing hope, I decided to have some collective fun while we wait.

Ready for a bit of fun to empty your shuttles and use up scrap threads ?

Here's a little pattern - with only 4 rings and a couple of chains. I wasn't going to show a diagram or tatted model, but then succumbed in the fear that you might start throwing your shuttles at me... wouldn't want you to lose or break them now ;-P Hmmm, but I could possibly start my own shuttle collection then - now there's a thought! Bring it on, then ...

The working order and stitchcount is diagrammed on the right (above). 

And below is the written pattern for the ‘skeleton’ -
For directional or fs/bs tatting, rings are worked frontside and chains backside.

“make me pretty” butterfly fun pattern
          
        One shuttle and ball, CTM.
A-Ring : 6 vsp 10 rw
B-Chain: 14 – 3 rw
C-Ring : 4 + (to vsp) 18 – 2. dnrw
D-Ring : 2 + (to C) 18 vsp 4 rw
E-Chain: 3 + (to B) 14 rw
F-Ring : 10 + (to vsp) 6.
         Tie and cut.

I would love for you to decorate this ‘skeleton’ as your heart desires - with picots, beads, or what have you. Be a designer and choose your style & placement of picots, beads, accessories, and colours.

For a list of options, inspiration, and tutorials/resources, please check out Eliz Davis' incredible compilation - An Element-al Approach to Tatting Techniques.

You can post a pic on your blog, social media site, etc., but please do send me a link so that I can share it with everyone.  Or you can email (on my profile page) a pic and I will upload it here.

Do you feel inspired to join? I hope so …
Let’s fly together !