Showing posts with label deconstructing tatting. Show all posts

Monday, 1 April 2019

happy tatting with old and new

Pin It now!
A very happy International Tatting Day!

I’ve had a fruitful day – I’ve tatted a cross from a vintage edging, tried a new technique, gorged on black forest pastry (it has chocolate ;-P), and am now going public with this blog post. 

Georgia Seitz has a puzzle - can we work this vintage edging continuously? Hmm, I couldn’t, but I did convert it into a cross that can be tatted in one pass. And if the puzzle intrigues you, attend class today to see if our talented participants have answers. They always have tons of ideas !

The dark purple one was made first but felt too long, then 'improved' upon in the brown one. But I think the chains in the long arm should be shorter, leaner. That arm looks like it’s grown biceps !!!
In Red Rose pearl cotton (size 8) the brown cross measures 8½ cms x 6½ cms & the first one is longer at 9½ cms.
Techniques I used : 2 shuttles, directional (fs/bs) tatting, central picot, SCMR with mock picot and thrown ring, ring made with 2nd shuttle (like thrown rings), lock join.

I need your help in naming the cross. What should I call it?
It is edging #436 from Coats and Clark #138 Priscilla Edgings. And if you have any design improvement ideas, please do advise.


Now to the lovely new effect, Mimosa Knot, shared by Daniela Mendola to create pointed rings and chains. I tried them on rings only including half-closed rings.
My understanding of the Mimosa Knot on ring, based on movements in video :
  1. It starts off as a self-closing mock ring or SCMR (holding core thread loop at base) ;
  2. Make the 1st half stitch, but before snugging, pass shuttle front to back through open loop and adjust tension – this creates a twist in the thread just like in the treble tat stitch. Except that in treble, there are 3 twists, whereas here there is a single twist.
  3. Next make the 2nd half stitch, and pass shuttle back to front to twist, and snug.
  4. Close loop in 2 stages as we do for any regular SCMR. But my core thread did not slide freely after closing SCMR. I had to do this 5th step to ensure free movement & it worked every time ...
  5. Hold the mimosa knot in pinch and tug/pull the core thread such that the knot transfers and core thread becomes free.
Doesn’t this remind you of Frivolé’s one-stitch SCMR (for pointed chain) combined with Ninetta’s treble tat stitch (2nd half)? The SCMR lifts up the stitch to create a point (see 1 wrap tds here). 
Usha’s dot picot also creates a pointed effect and I remember doing a comparative study on pointed rings (perhaps privately?). Jon Yusoff also created pointed chains. Now I’ll have to add the mimosa knot to the compilation :-D

All links can be found in the tabs above (My Tutorials & Tatting Resources) or type in search box.

Can’t thank global tatters enough for sharing generously ! 

Tuesday, 29 May 2018

Mock Rings 1 U-O Join continued

Pin It now!
In my haste to upload, I missed adding some details to the pics in previous post. These have now been notated and updated.

Continuing from previous post ….


The following are again mock rings made using the Under and Over Join. But we now have a tiny picot at the start of the chain. When the chain is joined back to this picot, it creates a mock or false ring.


1C. Under and Over Join: With joining picot; Unattached rings

 
 Make a small picot at the base of the chain before tatting the ‘ring’ portion.
Since the mock ring is unattached, it is easy to place 
one thread above and other below the chain.

 
Pull up a loop of ball thread through the picot, pass shuttle, and snug. 
A simple picot join converts this chain into a mock ring. Continue tatting.
Note: Although we have made a picot join, this arrangement of joining an overlapping chain is included in under-over join. 

 
This time the shuttle thread is below and ball thread above.
Pull a loop of ball thread down through the picot, pass shuttle and tension the join.
Two unattached mock rings made with under-over join 

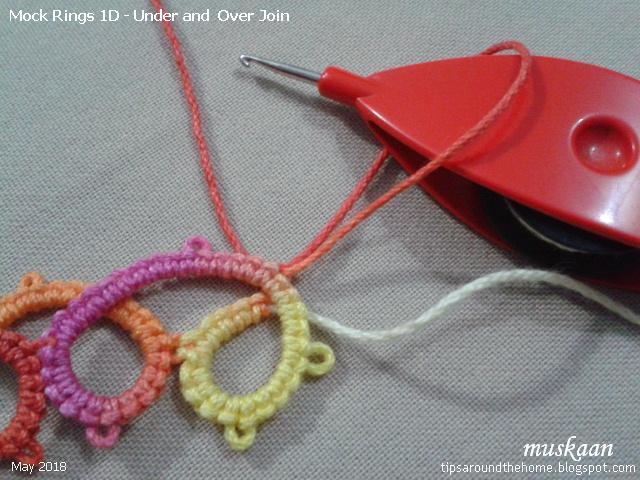
1D. Under and Over Join: With joining picot; Attached rings

 
Here the ‘ring’-chain is linked to previous ring and both threads are above the chain.
Pull ball loop down through picot, pass shuttle and make the join.
This is reminiscent of the down join.
 Continue tatting.

 
For mock ring #8 both threads are below the chain. 
Pull up a loop of ball thread through picot, pass shuttle and snug the join.
Notice the change in overlap between mr7 & mr8! Continue tatting.


as seen from the back.
This above sampler, with joining picots and overlapping chains that form loops is also known as the Running Scroll, for it’s flowing cursive style.


This join can also be used to create a line of back to back rings – called a Cord of Loops. We now prefer to work this as a split ring braid or mock rings with a flatter closure. The latter will be discussed in future posts.

Observations
  1. In all these mock ring instances, the core thread remains free to slide.
  2. They can all be worked with a ball and shuttle.
  3. All mock rings face the same side as the normal first and last rings when we reverse work after first ring.
  4. The under and over join creates a slight overlap/layer when crossing over, giving the mock ring a dimensional effect rather than lying absolutely flat.
  5. The overlap changes depending on which type of crossover we choose.

This completes the first category of mock/false rings using a join across a chain.
But there are so many more ways of joining or closing a chain to create a faux ring. While I work on that presentation, I invite you to sit back and recall all the different ways in which you may have made mock rings. It is quite an eye-opener. Please share your list in the comment box in case I have missed some.


Main references:
Tatting Technique & History – Elgiva Nicholls, 1962. (running scroll & cord of loops explanation  on p94, models on p96)
An Illustrated Dictionary of Tatting – Judith Connors, 2007.

…. to be continued 
See also -
https://tipsaroundthehome.blogspot.com/2018/05/mock-rings-1-under-and-over-join.html
https://tipsaroundthehome.blogspot.com/2018/06/mock-rings-2-lock-join.html
https://tipsaroundthehome.blogspot.com/2018/06/mock-rings-2-lj-mock-onion-rings.html

Monday, 28 May 2018

Mock Rings 1 Under and Over Join

Pin It now!
SCMR is a mock ring, but not every mock ring is a SCMR (self-closing mock ring).
While trying to explain this to someone who used SCMR as a default term, I started to remember so many different ways a mock ring can be shaped.

Mock Rings have been around for centuries. A mock ring is essentially a chain that is joined back on itself to create the impression of a ring. The difference lies only in the way the chain is closed.
In order to avoid overload I will break up the presentation into segments. This post covers mock rings made using the Under and Over Join.

Mock Rings 1: Under and Over Join


Once the tatted chain was invented, it was a simple step to convert it into a mock ring using an Under and Over Join - with or without a picot. Under and Over Join is a type of ‘across’ join, allowing us to move threads to the other side across an existing element.

A single shuttle filled with cream thread and a ball with variegated colour are used for clear distinction in this pictorial.
There are 5 stitches between every picot; each ring is 5-5-5-5 & chain 5-5.

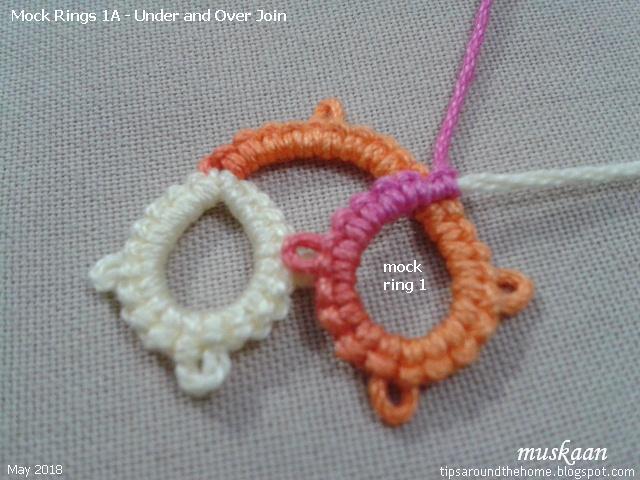
1-A. Under and Over Join: Without joining picot; Unattached rings

After a normal ring (cream), RW and 5-5 chain (above pic), we start working on a long chain (5-5-5-5) that will form the mock ring. 
 

Place shuttle thread above and ball thread under the chain. Continue tatting the chain normally, enduring that the first half stitch after the crossover is nicely snug.
A mock ring is made, with the chain (running scroll) moving across from above.

Note: Because of RW, the mock rings face the same side as the first normal ring.
We know this popularly as Alligator or Capture Join.


Let’s see what happens if we switch thread positions (ball above and shuttle under). 
It is difficult to control the shuttle enough to get a continuous chain above. 
But it can be useful in directional (fs/bs) tatting when working from the back side.

This method is useful when the elements (in this case mock rings) are free/unlinked and the threads can be positioned on either side.
But if the ring is attached to previous element, here’s how the join can be made.


1-B. Under and Over Join: Without joining picot; Attached rings

After linking the chain to previous ring, both threads are in front of/above the chain.
Pull a loop of ball thread down from under the chain, pass shuttle through loop, and snug tightly. Continue tatting chain.

In this case, after linking the chain, both threads are below/under the chain.
Pull a loop of ball thread up, pass shuttle through it, and snug tightly. Continue tatting chain.

This pulled loop is very handy when crossing over any previous element as in faux Celtic tatting. I used it in Teri Dusenbury’s Flurry snowflake. The pattern instructed slipping the long ball thread through the spaces and tatting the chain (as in #1A or alligator join). It was cumbersome and prone to tangling. Pulling a loop through the joining point is a quicker, more efficient method.
I made this in 2015, but am unhappy with my work.

This is a view from the back.

Without a joining picot at the start, there is greater flexibility in shaping the mock ring, but one also has to be extra careful to see that the ‘join’ is snug and secure. Adding a small picot at the start of the chain ensures accuracy and stability. I will show this in next post, along with some observations.


…. to be continued
Till then, enjoy tatting all over :-)))
See also -
https://tipsaroundthehome.blogspot.com/2018/05/mock-rings-1-u-o-join-continued.html
https://tipsaroundthehome.blogspot.com/2018/06/mock-rings-2-lock-join.html
https://tipsaroundthehome.blogspot.com/2018/06/mock-rings-2-lj-mock-onion-rings.html

Friday, 20 April 2018

retreading the path

Pin It now!
magic squares, doilies and magic/infinite pathways - common threads VI.

This post is an exploration to satisfy the researcher in me. There is no absolute right or wrong – it is my perspective or thought experiment. Fair warning - walk away while you have the chance; or stay to humour me? ;-P A new thread in Craftree inspired me to retread the path.


So yes, the pathways in this earlier post were all just that – pathways – a sequence of working and joining motifs continuously without having to tie and cut after every motif. And for this we can use bridging elements or tweak the design to allow us access to next motif.
The magic pathways moved straight along column/row or moved in a concentric spiral. Therein lies one of the major difference with the magic square.

Ia.  Magic Square

I explained the magic square concept in my 2014 post here. All the magic squares till then had been based on the original Ann Orr triangular corner design. Someone found that one could work continuously from one triangle to the next to create an ever-increasing square – hence the term ‘magic square’.

Last year new interest was generated with the incredible series of new magic square patterns that Robin has spawned, including the reverse/inverted squares. She adapted an existing square into a magic square by ‘breaking’ the square into triangles for a workable continuum. 
She shared her deconstruction of the concept and process in detail, inspiring others to join in with their own magic squares (eg., Jane McLellan and Ninetta Caruso). These also followed the original style of working and the original triangular pathway.

Thus the magic square, characteristically, is made of repeatable square motifs that work as “…building blocks…” (Robin) and follow a diagonal path (triangulation) resulting in as large a square as one desires. The square will get “…opened out just by turning the direction of tatting” (Grace Tan), not by the application of bridging elements.


Ib.  Open-ended Motif or Transitioning Elements in Magic Square

There is one aspect that needs to be highlighted before I begin the next segment – the slight ‘asymmetry’ of each motif within the fabric. While working, one corner remains ‘open-ended’/different in order to change direction and continue to next segment. 

For instance, in the old magic square motifs, while 3 corners have chains, the 4th corner is made with rings in order to continue to the next section. Only the final fabric will have all 4 corners completed/identical (chains, in this case).  
Similarly the new squares needed some slight adaptation to transition into a continuous working path as in Konior's original square motif, and the Onion Ring magic squares.  

The reason this happens is clarified in Robin’s own words : You start with a formula (triangular pathway for magic square, or up and down columns for the table runner) and make the design work for that path. A one round square can be redesigned into a magic square, and now I’ve found a bookmark can be redesigned into a table runner.
(Notice that the bookmark is essentially a rectangle. It doesn't strictly adhere to the magic square definition since it follows the straight column/row magic pathway, and well, it is not a square to begin with). 

These transitioning elements are not merely functional, but visually appealing and create lovely patterns to break the monotony.

TIP : Incidentally, Jane’s magic square can be worked as a magic pathway, with each motif intact. Robin’s 2nd Onion Ring magic square can also work along a magic pathway with complete & symmetrical motifs because of the single outward ring which can be worked as a split ring. Clearly, a ring in the corner is an asset!


IIa.  Magic or Infinite Pathways 

During my Quatrefoil polygons, I discovered other pathways which would allow the tessellation to continue uninterrupted and create large fabrics in the same shape as the original motif. Thus I could trace paths for a triangle, square, pentagon, hexagon; and recently the Fortuna Square, by climbing out/in using split rings.

With so many shapes, Magic ‘Square’ seemed like a limiting term to me, hence I used the term Magic Pathways - there is magic in figuring out an infinite route :-)
At the end of the day, though, it is just continuous or one-pass tatting which can go on forever (hence Robin uses the term ‘Infinite Pathways’). During the writing/researching of this post and some recent discoveries, perhaps ‘Infinite Pathways’ is a better term than Magic Pathways. Yet I’d like to spell it out …

IIb.  Rationale for the term Magic Pathways : 

When we have shapes other than a square as a building block; use bridging techniques (climbing out/climbing in); and follow paths other than along the diagonal, then I like to call this one-pass or continuous tatting a “Magic” Pathway, because ….

1. it creates an immediate association to the essence of a magic square – that a large fabric can be worked continuously from the same repeatable pattern

2. it is magical that a simple substitution (eg. 2nd shuttle instead of ball, split ring/chain instead of regular ring/chain, perhaps simply switching shuttles, etc.) can allow us to tat infinitely

3. the straight/zigzag and/or spiral pathway is not limited to a square – depending on the pattern of the motif any geometrical shape/polygon can be tessellated into a large lace fabric. eg. the quatrefoil triangle, pentagon, hexagon and Robin’s mat and hexagon from Dillmont’s triangle. 
  
4. it is magic to puzzle over and trace out a continuous sequence keeping the original motif intact - without changing, tweaking, or redesigning an original motif or creating any transitioning motif.

Future idea : 2 different motifs tessellated alternately/side-by-side through a magic pathway. Note that the transitioning part of the magic Squares tend to automatically create a different motif in the center of 4 motifs.

I hear you ask - If a magic pathway is simply one-pass tatting then wouldn’t a doily worked in one pass also qualify? Hmmm….

IIIa.  Is the magic pathway different from a One-pass doily?

We frequently use climbing out techniques (split rings, split chains) when working on a doily, even if not specifically designed. So if we can complete a multi-round doily in one pass, does it become a magic pathway? After all we are moving in a spiral pathway whether the doily is circular or angular.

I don’t have a clear-cut answer for this. But my guess is ‘not exactly’?

To me, part of the difference lies in tessellation : motif v/s medallion. Each row of a doily comprises of repeatable motifs while the magic pathway is for medallions that we use as motifs. Medallions are standalone complete designs, and the magic pathway allows us to join them continuously and repeatedly to create a large fabric in the same shape as the original medallion and the same pattern as the constituent.

Further, even if we use the same motif in All rounds, we may have to change the stitchcount to prevent cupping or ruffling especially in a round/oval doily. In magic pathways, there is absolutely no change in stitches.

Future idea : It will be interesting to convert a circular medallion into a magic pathway.

IIIb.  What about more elaborate one-pass doilies?

Remember these doilies that are specifically designed to be worked in one pass such as Iris Niebach's TIAS doily and tattingweed's Crinoline Doily?
These take a long serpentine and circuitous route through multiple ‘tiers’ with each repeat, to complete the tatting in one pass. German tatters such as Endrucks designed elaborate one-pass doilies. These do appear magical to even design, let alone tat! 

But these are logistically and practically limiting. Inevitably, there comes a full stop. It cannot go on or be tessellated infinitely. So while magical in itself, it does not conform to the above concept. Or perhaps it is a 'magic' pathway, but not an 'infinite' pathway !!!  


To conclude :

  • Magic Squares and Magic/Infinite Pathways allow us to tessellate infinitely to form larger and larger lace fabric working continuously without snipping off.
  • Almost any square medallion can be modified/redesigned into a magic square, but not all medallions will allow a magic/infinite pathway.
  • In the magic square, one first selects the formulaic diagonal path and ‘fits’ a square medallion to tessellate infinitely; in magic pathway, one selects a polygonal medallion and then figures out a continuous pathway. 

I was amused to read Robin’s comment here. How far she's travelled, now leading the way :-) And only a few days back I rediscovered her Dillmont inspired mat & hexagon where she has already outlined the pathways that I spoke of during the Quatrefoil series and diagrammed in the Fortuna Square!

If you have, thanks for reading. It validates my effort ;-)
I invite you to share your views.


All paths lead to Tatting !

Friday, 16 December 2016

a new look or ...

Pin It now!
… turning over a new leaf ? mocking or reversing ? Fancy a tatted troll !

For Georgia’s Online Class one of the patterns shared was a troll pattern! Reverse rings again – caught my fancy, as well as it’s potential to turn into an angel (but that for another day). Time for yet another refresher.
Small, cute, beckoning. Found a shuttle with some size 20 white thread left. Perfect. Completed within minutes.

Troll with an Afro !
Slight adaptation of 


First off, this rings-only pattern has 2 central rings (head & body) with thrown/floating rings for limbs and ears. There are multiple ways to work this, as annotated and compared here. 
Further, the Reverse Ring can easily be substituted with a mock ring – the SCMR (self closing mock ring) !

Body and Head
I followed the pattern instructions, using a single shuttle & reverse rings.
But I pulled out a long tail from the shuttle – enough to wrap around your hand for the 2 central rings plus the bit that is used up as core thread inside these 2 rings. 10-15 inches is more than sufficient, in size 20.
For eyes, string 2 beads on this long tail (not in original pattern).
This tail is used to wrap around hand as core thread, over which Reverse stitches (unflipped) are made/wrapped as in second half of split ring.

TIP : Loop the long tail. This can be done in 2 ways.
  1. as we do for a split ring (SR) – over and around finger to hold in pinch ; or
  2. as for left handed tatting – under and around finger to hold in pinch.
In both cases, the loop is made with tail and the unflipped stitches with the shuttle.
Yes, you guessed right – reverse ring is a split ring without the first half – it is all second half !  ...

UPDATE (Dec 27, 2016) :  A short explanation of how to work a Reverse Ring... Wrap the ring thread exactly as you would for a SR, with hand in the SR position ('dead spider'). Pretend you are about to start a SR, BUT, tat Only the unflipped stitch or 2nd half side throughout. Unlike a SR, where we usually begin with 1st half (normal double stitches), then work the 2nd half with 2nd shuttle in Reverse/unflipped stitches, in RR, we do Only the 2nd half for entire ring using 2nd shuttle.

Appendages
Hands, legs and ears are all thrown rings around a central ring. I tatted them as backside rings using the reverse order half stitches (RODS), and posting the shuttle before closing each ring. Posting shuttle keeps the ring from curling when closed.   
Eyes
Bead for eyes was brought forth 1ds away from the ear, without changing the overall stitchcount.

Afro cut
Long picots, snipped across at end. Each cut tail was rolled between fingers to untwist – this is super fast! Leave as is, after trimming. Original pattern calls for fraying and lovely fluorescent threads are used!
Okay, this is an aging troll with thinning hair ;-P Should we give him a wig?
I skimped on the hiding ends procedure by tying a bow around it’s neck with the tail ends.

Georgia shared a cute idea in class – fold the limbs & stiffen the troll into a sitting position !!! I would love to do that – if only my thrown rings weren’t so firmly in place with no wiggle room.

many thanks to Ruth & Georgia for sharing this enjoyable pattern

SCMR and Reverse Rings  

This revisiting of reverse rings and the SCMR option got me thinking of their characteristics and the outcome is this tabulation. It is based on my present comprehension, and if there are any errors, Please let me know before the mistake(s) spread.


Sufficient conditions are listed; there can be exceptions and situational tweaks. 
Mock it, Reverse it - nothing is written in stone ! 

For Reverse Ring tutorials/videos, synonyms, options, scroll down to Thrown/Floating Rings here. 
Please note that reverse rings can also be worked if one is using 2 shuttles. But a single shuttle suffices if there is thread from the ball to loop for the ring.

An understanding of the characteristics of each, can help us choose one technique over the other, play with colour placement. eg., tatting a 2-coloured onion ring might be more convenient if tatting the inner ring as a reverse ring. 

Download pdf here : SCMR vs RR Table


Download pdf here : SCMR vs RR Table

see also Central Ring with Thrown Rings

happy tatting with a :-)


Thursday, 22 October 2015

Graphic Deconstruction of FS/BS (revised)

Pin It now!


Deconstructing FS/BS (RODS) Tatting

Many of us are visual learners. And a picture is worth a 1000 words anyway !
This got me to thinking of a universal graphic that could deconstruct & represent Stitches/Techniques.
This simple right-angle symbol seems to be easy & perfect to showcase Many different stitches, including some advanced ones. It is still a work in progress. But here is the 1st 'unveiling' .... It is meant to understand & compare a normal double stitch (DS) with a Reverse Order DS (RODS) commonly called FS/BS tatting.

I am uploading a picture, but for better visual, it is also presented as a pdf file which can be downloaded here.


A ring and chain pattern usually calls for RW (Reverse Work). The element we start tatting with (let's say a ring), can be considered to be the front of the project. Now, when we RW (to make a chain, suppose), we go from the front to the back side of the project. If we continue with the normal DS, they will look like RODS when viewed from front. The pattern may next ask for RW again, to make 2nd ring. So, we've switched to the front again, and normal DS will appear complete. Thus, in 'traditional' tatting, in terms of stitches,  there is no Distinct front or back .... some elements have complete ds, some seem to have incomplete DS, despite the fact that the Number or Count of stitches is a complete numeral according to pattern.

Left motif is the back of project, with RODS ;
 right motif is as seen from the front .

Now, since DS viewed from Back looks like a RODS, and conversely, RODS is nothing but a normal DS when viewed from the other side, we started to use RODS when tatting from the back. Hence in the description above, the ring is tatted in DS, RW, chain is tatted in RODS, RW, ring again in DS, and so on.

What has happened ?
ALL the stitches, when viewed from the Front of project, look like complete DS. And ALL the stitches, when viewed from the Back of project,  look like RODS !
Thus we have a project with a DISTINCT frontside & backside. Hence the name FS/BS tatting which employs DS & RODS.

There are many tutorials that explain & demonstrate it much better (I didn't have time to take pictures of actual tatting). This post is meant more for the symbolic representation of stitches.

Hope it helps, though.


Download Free pdf of Deconstructing FS/BS or RODS Tatting


I would truly appreciate any feedback, criticism, constructive suggestions for improvement. I do intend to add actual tatting pics in subsequent posts in this series.

Thanks & happy tatting :-)