Showing posts with label under and over join. Show all posts

Friday, 26 December 2025

full of options tatting

Pin It now!

 In our endeavour since July 2025 to update patterns in our Endrucks 1920 Project collection, some PDFs posed a dilemma. For instance whether to leave the E1 shamrock and it's butterfly offshoot in the same PDF or to separate them. A survey in our FB group voted overwhelmingly in favour of the former. We took the opportunity to include a stepwise pictorial, add some missing portions, as well as options to work certain parts through some mini-pictorials.

E1 Happy Hands Shamrock and Butterfly by Diana Howe and Muskaan : 
https://drive.google.com/file/d/1_D5xY68NyfsKMB4LDr0GUv-WYC0VCba6/view (updated pattern link)

Following are some notable features -

This Way or Tat? (TWoT Notes): This is one of those patterns where many paths and options are possible.  Diana had diagrammed both clockwise and counterclockwise pathways (my E1 Happy Hands Heart from which it was derived could also be worked either way), and my working of the shamrock followed a third. Since it is a two shuttle pattern, just follow the shuttle which is in the right position, but adjust the instructions accordingly.  

I used contrasting colours in size 10 knitting cotton for the pictorial to clearly indicate which shuttle is in use.
Dimpled Yorkie: Since the heart ring is fairly large, it is a good idea to apply the two-step closure option as in the dimpled yorkie. Notice the bare thread on the left, just before the ring starts? It is part of the false picot ....

False Picot: Since there will be two back and forth chains at the base of the heart, a false picot is needed to prevent overcrowding. And the bare threads need to be long enough to accommodate them.

False Picot v/s Mock Picot): I distinguish between a false picot and a mock picot. The former is just bare thread left before and/or after an element to simulate a picot. The latter usually uses an overhand tie, a lock stitch, or a paperclip/spacer to make the picot. False picot is a much more vintage term than a mock picot, often used interchangeably, and the construction is left to the discretion of the tatter. However one should be aware of this since it may affect which of the two shuttles you will be using to continue. Does it coincide with what the designer intended? If not, the tatter will need to adapt accordingly.

Lock Join and Under-Over Join (U-OJ) aka Alligator Join: During my early trials with the original E1 pattern, I finally settled on making a lock join through the false picot in order to keep the chain in place. This was followed by ensuring that the two threads/shuttles were on either side of the picot (one above and one under).  
However the lock join can be eliminated completely and only the U-OJ can be used if so desired. And which thread you wish to keep above and which under is entirely up to the tatter. Just make sure to adjust instructions accordingly.

The first heart motif is complete in the above image. 

Armadillo join: While in the above model we went with the original consecutive joins (picot join on top and lock join below), this can be substituted with the armadillo join as explained in my previous post. https://tipsaroundthehome.blogspot.com/2025/12/armadillo-join.html . 

Over The Top Join (OTT): This is an adaptation of the U-O join when the space is too small for a shuttle to pass under (or one forgets to position the shuttles ahead of the final chain segment in the pattern). Above image shows Ninetta working it in the 2nd or 3rd repeat.

 
Ninetta's E1 shamrock and butterfly versions! Can't thank her enough for all her enthusiastic and prompt support in so many unexpected ways!

Stem : Diana recommended the BDS or padded chain for a stem. However, any decorative chain or cord can be applied such as the lock chain in above model, a pearl tatted chain, etc. 

Never let it be said that tatting is just rings and chains and picots, LOL.

We will soon be releasing the EP Tutorials document which endeavours to list all tatting techniques, effects, and terms used in the Endrucks patterns - original, reworked, and derived. Until then you can find tutorial links in the Tatting Resources tab above (https://tipsaroundthehome.blogspot.com/p/tatting-resources.html).

Please give credit to the designer and pattern, and use the tag #Endrucks1920Project when you post your version of the pattern.

Thursday, 26 June 2025

quick tatting

Pin It now!

 I first shared a pic of my Fan Palm motif or pendant here - https://tipsaroundthehome.blogspot.com/2025/05/bead-tatting.html . Now I have the pattern ready --- 

Fan Palm Motif/Pendant by Muskaan (March2025) pattern PDF: https://drive.google.com/file/d/16amEUnVT7ERSySRJqbMsj0af0Xu_MFsP/view

It is a simple motif that can be worked with a ball and shuttle and the beads are not pre-strung. 

It is a prototype I made to show beads over/on a picot. These beads are slipped over the long measured picots at the time of joining. Or they can be slipped over the picot while it is being formed, and held with a paper clip or marker. I prefer the former to avoid beads and clips getting in the way of smooth tatting. 

Measuring the Picot (including using beads as a picot gauge) - https://drive.google.com/file/d/1Kk6rtyIUvo5JFA5u3vE3ruU2Z7zQ9fuq/view


I deliberately chose to do a mock ring since I did not know how big I wanted it. And then made an under-over or alligator join across the start of the chain. There are several ways to make the under-over join (alligator join is only one of them). Refer to my pictorials here - https://tipsaroundthehome.blogspot.com/2018/05/mock-rings-1-under-and-over-join.html  and https://tipsaroundthehome.blogspot.com/2018/05/mock-rings-1-u-o-join-continued.html

The diagram in the PDF is simply a guide. You can choose to tat with two shuttles if you wish to empty them of leftover threads. You can even work the mock ring as a true ring and without need for an under-over join. 

For a plain, flat leaf, avoid any beads on the picots. 

I used 4mm beads, but you can choose smaller ones and adjust their number accordingly. Oh dear, I've been so flaky lately that I forgot to take a pic of this on a chain. Hmm, not too difficult to imagine, right?

This is such a quick tat, really, and easily adaptable to any thread and bead size. Or go all around for a floral motif! Hope you enjoy the pattern. 

Tuesday, 6 November 2018

it's flying !

Pin It now!
............flying straight to you
butterfly tatting pattern

You’ve already seen these little butterflies in a couple of my recent posts (links at end) where I asked for volunteers to test tat the pattern. They have graciously obliged and with feedback from Jane McLellan , Bonnie Marriott, & Leta Fuller, I now have the final pdf to share with you.

Coloured Cluny Butterfly

early trials/versions, with prototype
I have chosen only 3 models (versions 6,7,9) for the pdf, but each of the 9 that I tatted had a slight modification or variation – be it in colour placement, decorative elements, wing direction, element size, technique…..
The following images will speak for themselves. Arranged in chronological order, it simultaneously provides an insight into the design process. 
version 1
version 2
version 3
version 4
Measuring 2cmsx2cms in Anchor 20, I recommend a thick Lizbeth 10 or it’s equivalent.
version 5
This is designed as a quick practice piece for coloured Cluny Tatting. However, it can just as easily be done with one single colour, with thread wound continuously on 2 shuttles.

version 6
I used directional tatting (frontside/backside), but it is optional. 
version 7
Choose your favourite method of Cluny tatting or follow the pictorials listed in the pdf or in the Tutorials tab above. 
Leta wove her First tallies using this pattern and is happy (as am I) with how well they turned out!
version 8
version 9

As you can see, there are numerous possibilities, many more than are shown above. Bonnie’s friend saw these as cute earrings! Now that’s an idea to be explored further. Ninetta used treble stitches on the decorative chain for large wing.
Let your imagination take flight and soar alongside this little butterfly!

My sincere thanks to Bonnie, Leta, Jane M, Ninetta, And Anita  - 
you helped me fly  this little baby !

Related posts

Thursday, 20 September 2018

Clunied !

Pin It now!
2-Tone Cluny Bracelet
aka 
Ganga-Jamuni bracelet

This bracelet is based on the basic Cluny tatting with colour variation pictorial. I chose these 2 colours in order to complement the beads I had – notice the subtle colour striations? And the name was chosen accordingly, though it’s Indian name could be Ganga-Jamuni bracelet – symbolising a fusion of colours and techniques (taking off from a fusion of Hindu & Muslim cultures symbolised by the rivers Ganga & Yamuna).

One can work it in one colour with no need to think of where the shuttles should be. Working with 2 colours brings a degree of interest and apparent complexity since one has to ensure the colours are switched correctly. I’ve employed various little tricks to smoothen the transition between colours, as seen in the process pics. I make the ‘switch’ within the previous element itself. But it is all optional – you can work at will, using SLT if you like.

Materials :

·         2 shuttles (or needles)
·         Anchor size 20 thread in 2 colours 
(I used the light 00366 in shuttle1 & the dark 00896 in shuttle2).
·       Seed beads : 14 beads size 16/0 per repeat. 
For 8 repeats load 112 beads. String 56 beads in each shuttle.
·        2-tone beads : 1 per repeat (+1 for end) size 5/0. 
For 8 repeats, 9 loose beads required.
·         A Cluny loom of your choice.
·         A crochet hook to load the loose beads.
·         Findings for the bracelet.

Techniques :
  • 2-shuttle tatting ;
  • Add findings ;
  • Lock stitch (1 unflipped half stitch; 1 flipped half stitch)
  • Under-Over or Alligator join ;
  • Slope and roll join
  • Cluny tatting ;
  • Working with beads.
Measurements :
3 repeats (including beads) = 5 cms long
Final bracelet (end to end): 1½cms wide and 7 inches (<19cms) long

Abbreviations :
          Sh – shuttle ;  vsp – very small picot ;  b – seed bead

Pattern
Pre-string 56 seed beads on each shuttle and join both shuttle threads.
All tatting is done from the front, progressing from the left to right end.

With Sh1 -
End Ring1 : 10, with finding.
Join Bead.
With Sh2 - Lock stitch to hold bead in place.
Wind loom with Sh1 and weave tally with Sh2 …
Tally: 12 wraps. Emerge from the right side, hiding the colour blip. This ensures that the shuttles automatically switch positions.

With Sh2 –
Chain: vsp, 2 b 2 b 2 bbb 2 b 2 b 2 rotate , Under-Over join across base of tally ,
2 b 2 b 2 bbb 2 b 2 b 2, join to vsp as shown in pics. This method of joining automatically switches the shuttle positions & hides colour blip.
Join Bead as before.
With Sh1 - Lock stitch to hold bead in place.
Wind loom with Sh2 and weave tally with Sh1 …

Repeat tally and chain motif for desired length, switching colours.

To Finish :
Join Bead as before.
With Sh1 –
End Ring2 : 10, with findings.
Tie and cut and hide threads. 

Process
 1. Start first end ring with finding and continue from pic #2.
I tatted 4 repeats before deciding to take process pics. 

 2. Pull up a Sh1 loop through a loose bead, pass Sh2 through this loop …

3. …pull Sh1 such that both threads are now within the bead. Adjust tension.
I first saw this in Usha Shah's Lanyard #4.

 4. Pick shuttle2 and make 1 lock stitch. 
I made unflipped 1st half stitch, and flipped 2nd half stitch.

5. Wind loom with Sh1 and start weaving with Sh2.

6. Ensure that Sh2 is on the right side before closing the tally.
Hide colour blip as described in A6 & A7 .
Pick up Sh2, move seed beads forward on Sh1 to start chain.

7. Make a very small picot at start of chain.
To cross over to other side, rotate work and make an Under and Over join.

8. Complete the chain and make a slope and roll join to vsp as follows :
Pull a SH1 loop through the vsp and pass Sh2 through it…

 9. Tension the threads such that the SH1 loop is NOT pulled back through the picot.
This method ensures that there is no colour blip And the shuttles switch positions.

All odd numbered motifs are worked in above manner.

 10. Repeat Steps #2 to #9, but with the shuttles switched.
All even numbered motifs are worked accordingly, 
starting with shuttle2 in place of shuttle1. 

Continue for desired length, switching colours/shuttles accordingly.

End with another 10 ds ring with finding attached.

TIP : Continue for a longer length to make a necklace. In the middle, after a chain around a tally, add another beaded chain(s) on one or both sides, to act as a pendant.


Clunied !!!
I am so thoroughly Clunied! Earlier this month I bought a set of bathroom mats – not my style, not my colour, and it took us a few days to get used to that large print and relatively bold colour! But guess what – don’t you see Cluny leaves there? Freudian slip or serendipity?! 

happy tatting J

Tuesday, 29 May 2018

Mock Rings 1 U-O Join continued

Pin It now!
In my haste to upload, I missed adding some details to the pics in previous post. These have now been notated and updated.

Continuing from previous post ….


The following are again mock rings made using the Under and Over Join. But we now have a tiny picot at the start of the chain. When the chain is joined back to this picot, it creates a mock or false ring.


1C. Under and Over Join: With joining picot; Unattached rings

 
 Make a small picot at the base of the chain before tatting the ‘ring’ portion.
Since the mock ring is unattached, it is easy to place 
one thread above and other below the chain.

 
Pull up a loop of ball thread through the picot, pass shuttle, and snug. 
A simple picot join converts this chain into a mock ring. Continue tatting.
Note: Although we have made a picot join, this arrangement of joining an overlapping chain is included in under-over join. 

 
This time the shuttle thread is below and ball thread above.
Pull a loop of ball thread down through the picot, pass shuttle and tension the join.
Two unattached mock rings made with under-over join 

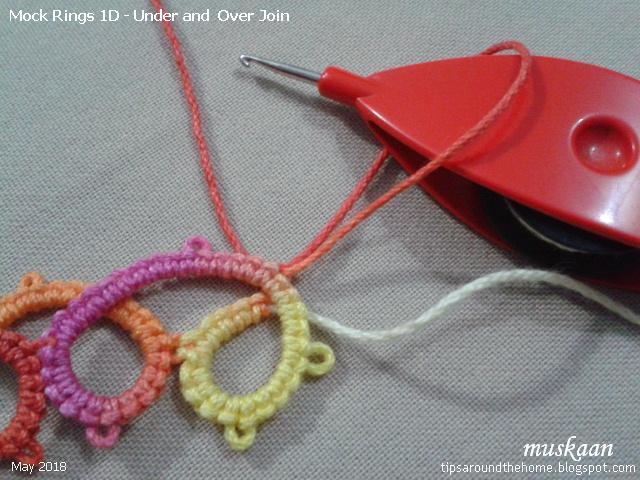
1D. Under and Over Join: With joining picot; Attached rings

 
Here the ‘ring’-chain is linked to previous ring and both threads are above the chain.
Pull ball loop down through picot, pass shuttle and make the join.
This is reminiscent of the down join.
 Continue tatting.

 
For mock ring #8 both threads are below the chain. 
Pull up a loop of ball thread through picot, pass shuttle and snug the join.
Notice the change in overlap between mr7 & mr8! Continue tatting.


as seen from the back.
This above sampler, with joining picots and overlapping chains that form loops is also known as the Running Scroll, for it’s flowing cursive style.


This join can also be used to create a line of back to back rings – called a Cord of Loops. We now prefer to work this as a split ring braid or mock rings with a flatter closure. The latter will be discussed in future posts.

Observations
  1. In all these mock ring instances, the core thread remains free to slide.
  2. They can all be worked with a ball and shuttle.
  3. All mock rings face the same side as the normal first and last rings when we reverse work after first ring.
  4. The under and over join creates a slight overlap/layer when crossing over, giving the mock ring a dimensional effect rather than lying absolutely flat.
  5. The overlap changes depending on which type of crossover we choose.

This completes the first category of mock/false rings using a join across a chain.
But there are so many more ways of joining or closing a chain to create a faux ring. While I work on that presentation, I invite you to sit back and recall all the different ways in which you may have made mock rings. It is quite an eye-opener. Please share your list in the comment box in case I have missed some.


Main references:
Tatting Technique & History – Elgiva Nicholls, 1962. (running scroll & cord of loops explanation  on p94, models on p96)
An Illustrated Dictionary of Tatting – Judith Connors, 2007.

…. to be continued 
See also -
https://tipsaroundthehome.blogspot.com/2018/05/mock-rings-1-under-and-over-join.html
https://tipsaroundthehome.blogspot.com/2018/06/mock-rings-2-lock-join.html
https://tipsaroundthehome.blogspot.com/2018/06/mock-rings-2-lj-mock-onion-rings.html