Showing posts with label fixing mistakes. Show all posts

Monday, 28 July 2025

viral spread

Pin It now! This would've been the first time an entire month would've been devoid of a single blog post here in my 12/13 years of blogging! Couldn't let that happen, now.
 
The reason for this silence and absence has been my own viral flu which came on a bit severely this time. Since we started taking the flu vaccine annually, we only get some very mild symptoms, easily covered with some paracetamol tablets. Despite the antibiotic course, it left me totally devoid of energy - both mental and physical. I am still taking extra measures to overcome the inflammation and this leaves me very little time to do much.  And while I have been visiting blogs to see new posts, I haven't been in a very chatty mood nor mode, hence no comments ... hope to make up for it soon. As it is, the new line of treatment I started some months back hasn't worked, at least clinically, leaving me more exhausted than previously. The book editing has been shelved for probably two months now and I might not be able to get back to it till late September when I see my pulmonologist with blood tests, etc. :-(

All I can manage are kind of mindless activities which is why the  other virus (below) has been detected at an opportune time ...

💦💦💦💦💦

Interestingly, another virus was detected – a simple ‘s’ that spoiled the party! Spellings are so important especially when citing or crediting. 

‘Die Schiffchen-Spitzen’, 1920, by Eleonore Endrucks
NOT  
‘Die Schiffchen-Spitszen’


I profusely apologise for inadvertently introducing an ‘s’ into the book title when we started the Endrucks 1920 Project. Initially my spelling was correct, but when I typed it in my fall-back word doc, the 's' creeped in and I continued to copy and paste this in my blog, PDFs, and articles. :-( 
Except for a miniscule number, this has also been copy-pasted by almost everybody through the years till Manju Talekar’s sharp eyes spotted the error and pointed it out some weeks back. 
Since then, my extremely supportive PIC Ninetta Caruso and I have been on a mission to update all Google docs, blog posts, and pattern PDFs with the correct spelling.

We also created a checklist of other updates we had been mulling over since this has been an evolving and an unbelievably expanding Project. I am taking this opportunity to simultaneously incorporate as many of these updates as possible and Ninetta will be doing the same eventually (she has already completed the spelling-change in her PDFs!). This often requires some reformatting and could easily take up to an hour or more for each PDF. Unfortunately, we cannot do anything about articles written for publications but we can be extra vigilant in future.

PLEASE NOTE that while the original reworked pattern PDFs have her full name, Eleonore Endrucks-Leichtenstern, we have removed her maiden surname in the derivative patterns and now use only Eleonore Endrucks. And all her 44 patterns are listed as E1, E12, etc., where E stands for Endrucks.

We are also adding the links which did not exist before, viz., the EP LINKS and the Directory links.

My sincere apologies once again and please do not hesitate to inform us of ANY discrepancy or problem you might encounter in any of the documents. We wish to remain as error-free as possible.

And many many thanks to Manju and Ninetta!

Saturday, 26 October 2024

done

Pin It now!

 Done for now, to be clear. And not because I've tired of it. Au contraire, it is just too enticing, distracting, and addictive. I want to simply sit and tat this, and ignore all other tasks, including a couple with deadlines. So, done for now, threads unwound from shuttles and back in their respective boxes. And my apologies to my tatting buddy Anita, for leaving it here. I do hope to pick it up again some time next year.

In Anchor Pearl cotton size 8, it measures about 7cms across.
This was completed several days back. It's taken me this long to take pics and prepare a post.

At this stage I am calling it my Sunflower version. Going forward, it might become a dahlia or chrysanthemum with more colours being added.
I followed Patty's diagram again, alternating the 2nd join between the inner scallops. Later realised that the original doily throughout had a single join between the inner scallops, not alternate. By then I had already completed 2 whole repeats (4 scallops each), hence went ahead as before. Not that it shows either way at least in my version. 

How does it Always happen?! The one slice I chose for the close-up is the one where I missed a join in round 1, LOL. I missed a join in round 2, too, and also a 2ds chain segment. However, it was easy to ignore the first and for the second, I inserted a fine hook through the 'hidden picot' (viz, through the stitch) for a join. Can't even locate where this all happened. Dr Downplay zindabad!
  
I wish there was more of the chrome yellow rather than the yellow ochre in this model, but I was going from a light to dark shade using whatever I had in my stash. And the brown could've been a a couple of shades lighter if only I had enough.

My intention is to use two shades of orange then two shades of red for the remaining four rounds. I could repeat the same yellows, but that would become kind of boring ;-P
What do you think of the colour scheme?

Oh and I had updated my previous post with the completed round 1, but here's the pic again in case you missed it - 

Many thanks to Jon Yusoff for hosting the TAL. Don't know when I'll be back to complete this.

This mini-doily or coaster is my October submission to splocik's Small Decorations game. Only two months left and I still have so many ideas/projects I could submit! It's been a fun game for sure and will definitely look forward to joining again if splocik hosts it in 2025.
Check out the range of creativity and crafts for September here -https://splocik2.blogspot.com/2024/10/male-dekoracje-2024-galeria-wrzesniowa.html

Monday, 21 August 2023

sneak peek variation

Pin It now!

 This is my submission for our #TALme2Endrucks Aug2023 game of the month. It is a variation on Ninetta Caruso's Garland pattern derived from Endrucks' pattern #20. The pattern was shared in 3 parts during the 3 weeks, and a 4th part on some surprise variations will be shared in a couple of days. Here's a peek into part of what might be expected, ;-D

Most participants have already finished and shared their beautiful versions. So sharing my variation will not cause any confusion now.

It was meant to have 8 repeats and 5 rounds. I have 7 repeats and a 6th round of rosette motifs.
 
This interesting pattern is worked from the outermost round. It has onion rings with thrown rings.
Onion Ring with Thrown Ring. A few members seemed to find it difficult to understand. Hence I quickly prepared this pictorial using 2 colours to show which shuttle was in action. It is the same process as for the Happy Hands patterns from #1 (https://tipsaroundthehome.blogspot.com/2021/03/balancing-act.html). But each tutorial I referred to, was missing in one feature or other that was need for this particular pattern. Hence it was simpler to follow the steps of this pattern without the need for detailed written explanation.  

The 2nd round is worked on the inner edge of the previous round, made of block tatting 'flowers'. In my first repeats I am sure there are mistakes in the block (the very first one was snipped) - it needed mindful tatting.
I may not have gotten the shape of the flowers very nice, but the construction is very clever, as is to be expected of Ninetta.

The inner space is filled by working 3 rounds, this time in the 'proper' order - ie., from the inside out ;-D
The center rosette is worked and cut off. The thread for Round 4 is attached and worked around. 
The left one has 8 repeats, as per the pattern. This time I had counted and followed correctly, LOL.

Round 5 continues from the previous one without cutting and it is the round that connects to the outer rounds. It was only at the 'final' join that I realized there had been a miscount!!! Nothing to it but to bring out the scissors and snip snip snip.

Tatted Rounds 3,4, and 5 again, this time with 7 repeats, and joined successfully. However I did not wish to change the count which is why you see the slight curve in the linking chains. However I kind of like the organic feel of this imperfection.

TIP: To get a neat point in parallel chains or with chains that turn back, as in the middle round, I always count the lock join as one half of the double stitch. It leaves a much smaller footprint.

I had the pleasure of test-tatting and proof-reading this clever pattern back in June. Well I messed up with the repeats, but it gave us a variation that lay flat. So not much was lost.

For some reason the tinted green felt too overbearing. Hence I wanted to tone it down a bit. So after a long tatting break, I picked my shuttles for 2 nights in August for some 'mindless' tatting .....

This is what I came up with - repeated the inner flower motif around the edge. I measured the distance between the rings and the picots on the chains. It was a good fit!
Design TIP: I had initially tatted a 6-ring rosette. Surprisingly it did not look nice! So the 2nd one was made with 7 rings and these reflected the pattern well. So the first one was snipped off. 
 
I intended to fill in the space between the motifs with purple and white flowers connected with a plain green trellis. However, my tatting buddy Anita Barry, completely forbade it! She called it finished at this stage. To assuage my designing curiosity I might still try out one repeat, but not in the near future since I'm back in the no-tatting zone.

The model is worked in Anchor Pearl Cotton size 8 [green 0128; purple 00087; yellow 00291; white; tinted purple 5393. It measures around 12.5cms without and about 16cms with motifs.

I had a great time tatting it and apologize for the inadvertent error in counting. Must go back to a Maths refresher class! However yet again a mistake led to a slight variation - I should call it 'Mistake Designing', LOL.

Many many thanks to Ninetta for her beautiful pattern and all the work that went into it and into organising the game. 

Tuesday, 23 March 2021

2 quick tips

Pin It now!

Well tips are strewn about my blog - have to stay true to the name of this blog ;-D. Following are 2 quick tips, one of which you may already be doing.

Straightening Unravelled Thread - wind and rest!

  
When we have to unravel/untat stitches, the thread gains kinks (fig1) that are not merely unsightly but often affect future tatting. It happens because the thread balance/twist is disturbed. A quick fix is to simply wind that thread back on to the shuttle or the ball (fig2), allow it to rest for a few minutes (a minimum of 10 minutes), and voila, the thread is almost back to normal (fig3)!

In fig2, I wound the unbalanced thread partly on shuttle and partly on ball to show that either works equally well. To quicken the process, slide the unravelled portion gently between fingers, a few times while winding back.

Simple and quick, right!

Turmeric Powder for Cuts - rub and forget! 
Every Indian household knows the immense benefits of turmeric, one of the basic spices in our cuisine. It has antiseptic and healing properties - internal as well as external. You must've heard of the 'new' rage  'golden milk'? It is simple 'haldi' (turmeric) milk, an almost timeless legacy.  
What is known in Western world as 'alternative system of medicine' is over 3,000 years old based on the more than 5,000 year old Ayurveda (Science of Life) philosophy. 

So anyway, who does not get cuts, including bleeding ones? The quickest way to disinfect the area, stop the blood flow, AND heal the cut almost instantly, is to RUB turmeric powder over the cut. A gentle but deep rub in one direction such that the powder can enter the slit. Rubbing it in hurts obviously, but Do It.
In the above pic, this cut is 3 days old and it is still reddish, sore, hurt every time it came in contact with water and soap. I had Not used turmeric powder - simply used a tissue to stem the flow which took several minutes. 
But I'd finally had enough and rubbed turmeric powder. 
The above pic is taken one day later, AFTER I had spent the entire morning in heavy spring cleaning, with my hands in soapy water, etc.! But I had No problem, no reminder that there was a cut there! 

The trick is to do this deep turmeric rub immediately (I was actually surprised that it worked on a 3-day old cut). It seems to cauterize the tiny blood vessels, thus not merely stemming blood flow, but eliminating all soreness, pain, sensitivity. It kind of closes up the open capillaries and scar tissue starts forming immediately. 
It is like apply, rub, and forget !!!

Remember to try it next time - and rubbing it in is Extremely important, not simply sprinkling/applying it on top. This was my own discovery and my family/friends have become 'converts' ;-D. Turmeric powder is part of my first-aid box, besides the kitchen.

The only drawback is that there is a chance of yellow stains on anything you handle for the next few minutes until you wash it away. And for very deep arterial cuts, it may not work because the flow is much stronger.

Sunday, 21 February 2021

waltzing home

Pin It now!
Carin Jansen’s Angel Choir doily TAL 
tatting completed by ANITA  BARRY

As the final strains of the angelic melody dies down, the waltz comes to an end. It was an exhilarating and learning experience that will be treasured for years to come. We didn't just tat lace, we built memories, which is what tat-alongs are all about.

Ah, but it was not an easy romp home for Anita Barry, but no means! You remember her fixation anecdotes here and here? She wasn't wearing 6 inch heels while tatting, so why did more missteps and stumbling follow, despite having the finishing line in sight?!
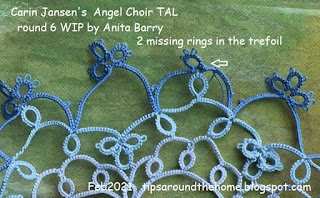
Round 6 struck again, this time with 2 of the 3 rings in a trefoil missing (arrow in pic above).
Some colourful language followed when she noticed the miss! And who can blame her ;-P

Where there's a mistake, there's a fix!

Anita shared her tools of the trade...I like to call it tools of our craft ;-D
The strange looking pick top left is a thorn from the Agave Cactus! Cool, right?!
And on the right is the needle as picot gauge in action.
' The above are "self-threading" sewing needles used for sewing in thread ends. There is a slot above the eye of the needle to slide the thread down into the eye of the needle. '

' And my fabric Ort Bag (scrap bag) for my thread ends. It's a tiny trash bag.'

Round 7 in progress. She followed my example of making the picot at tip longer.
Whoop Whoop waltzing home finally ... 
' The angels are helping me learn more ways to improvise and showing others I Tat like they do with 'do overs'. '

One would think her doily is riddled with fixes. But look what emerged from it - 
We have her husband to thank for this inspiration - he wanted the angel from Carin's doily to have "More Heart"!

I think this quote sums it up nicely since Anita will be sharing this experience in a speech titled "Fear Knot" at the IOLI Convention this year, showcasing the international cooperation this doily embodies, as well as 'bumps and grinds Tatters get themselves into'. 

        Don’t carry your mistakes around with you. 
        Instead, place them under your feet and use them as stepping stones to rise above them. 
                – Anonymous © Source: quotespedia.org

It was Anita's idea early last year, to tat a doily together. We had zeroed in on the Mystery doily whenever we could. On seeing this doily, I just felt we could all use some angels in our lives during these weird times, and Anita graciously accepted. Who knew this doily would come to create so many personal memories for her, besides the ones we made mutually!

And we had the added pleasure of several other tatters tatting along. Use hashtag #AngelChoirTAL to find the doilies on facebook as well as in Just Tatting group. If you type 'Angel Choir' in the Just Tatting search engine, it will throw up more versions by tatters who uploaded their finished doilies. Do take a look at their beautiful work if you are a member there.

Many many thanks to my buddy Anita and all my other tatting friends who joined us in our journey!
Perhaps we can plan another joyful journey next year!
Thanks once again to Carin for sharing her lovely pattern.

All related posts, with joint notes on this doily tat along - 
https://tipsaroundthehome.blogspot.com/2021/01/two-to-tango.html 

Thursday, 4 February 2021

treading lightly

Pin It now!

Yes, even an accomplished Master Tatter can make missteps and need to retrace her step. This post is filled with possible pitfalls and respective remedies as well as alerts and tips from Anita Barry. So, tread lightly as you dance along. The screenshots are straight from the horse's mouth ;-P

Carin Jansen’s Angel Choir doily TAL – Round 6 (continued) 

pattern - http://handwerk-fee.blogspot.com/2020/11/engelenkoor.html 


Notes by Anita Barry -
Threads used for this project - DMC, Lizbeth,
and vintage J&P Coats size 80

1. Number of stitches per centimeter in size 80 -
First, a quick tip, since this doily has a lot of long chains.... This image is from Round 5
I checked mine after receiving this info from Anita, and turns out I had similar tension. This is a good way to maintain uniform tension on chains throughout the project. Design TIP It is also a good measure for a designer to convey in such patterns (along with thread size).

2. Started Round 6 from wrong point and untidy attachment -
The left pic was shared at end of previous post ...


3. Missed a join and the fix -


4. Tools of trade and Marking frontside -

If you remember, Carollyn Brown ties a tiny thread bow to identify front of doily. These 'charms' are really helpful when working with fine thread in single colour, or if we use blipless joins. I generally work in multiple colours so the colour blips help me identify back of work.  

5. Missed a ring in trefoil and the fix - 
 
She almost snipped off the knotty segment, but wisdom prevailed ;-D At least one angel was watching over her shoulder, whispering in her ear!
I would've made a true ring, but Anita's solution goes to show the range of options we have! She also saved a few stitches on the chain.
TIP: Thread comes out in front from a 2nd half stitch and in back from a 1st half-stitch. Follow the opposite movement to untat stitches. Easy-peasy. Loosen the stitch loop, pass shuttle front to back through it to untat shs, and back to front to unravel fhs. These pics might help.

6. Uniformity and symmetry of arches -
Let's all wish a few of the angels from this doily keep Anita's tatting in check so she can dance freely rather than 2 steps front, 1 step back, right?! But as she wisely says, the take away from all these oops is Growth.

I've been receiving these pics and emails for the past several days and I completed my own doily 4 days back. However, some other collaboration has kept me too busy to post. Hopefully I'll be able to do a back-to-back post with my finale. 
I will also try to share pics of how far our tatters have progressed.
Join us and post your doily pics on Facebook or Just Tatting group using the tag #AngelChoirTAL.

Related Posts -