Showing posts with label Patty Dowden. Show all posts

Wednesday, 13 August 2025

lotus tatting

Pin It now!

 Every year I try to tat something for our Independence Day celebrations.... if not a dedicated project, then using the tricolour in whatever I may be working on at the time. This year I felt it was much more vital given the international and more importantly our domestic situation where the parties who are in the opposition at the center keep peddling falsehoods and agenda-driven false narratives in order to show the world that Indian democracy is on shaky ground, the election process is flawed and manipulated, etc. They do not hesitate to bad-mouth the country and its institutions in their hatred towards the democratically elected Prime Minister. They cannot even digest our superiority in our  retaliation (Operation Sindoor) to the terror attack on Indian tourists by nationals from the neighbouring country! 

Lotus is our national flower and this is my prototype. 
Now you may ask where is the third colour?! Good question.
I had started by using this motif as a charm for a bracelet with a white tatted band/braid, sprinkled with some blue. Every colour has its symbolic value which I have explained in previous years.
Now I wonder whether I will have sufficient time.
Another idea is to tat a few more motifs and glue to a greeting card, with tatted blue/white chains representing water. 
Which do you prefer?
I chose ANKARS style stacked rings or ring on ring technique. Though incidental, I like the fact that this technique came from Russia. I've read more Russian literature than American!

LOTUS  MOTIF 
(prototype) Pattern by Muskaan © Aug2025  
Single shuttle. Starting from the left orange ring ....
NOTE - since this is a prototype, there are a few count changes made along the way for the petals. I am happy with the flower count but the green rings can be stacked a bit more. Hence some tweaking of count will be needed. 
Start ring by leaving a small loop and tail over tails. This loop is later used to make a shepherd's crook join at the end. https://tipsaroundthehome.blogspot.com/search?q=shepherd+crook
ringA: 19 - 4 - 15. dnrw
ringB: {lies above A} 15 +(to A) 5 - 5 - 15. dnrw
ringC: {lies above B} 15 +(to B) 6 - 6 - 15. dnrw
ringD: {lies under C} 15 +(to C) 5 - 5 - 15. dnrw
ringE: {lies under D} 15 +(to D) 4 - 19. dnrw
Attach green thread and cut and hide orange tail. [UPDATE: See updated pattern here - https://tipsaroundthehome.blogspot.com/2025/08/independence-day-tatting.html]
ringF: 10 - 4 - 6. dnrw
ringG: {lies above F} 6 +(to F) 6 - 6 - 6. dnrw
ringH: {lies under G} 6 +(to G) 4 - 10. 
Join to starting loop at base of ringA and cut and hide tail.
TIP: I will join rings F & H or make the segments longer than 6ds in order to make the overlap more visible.

I don't know how original this motif is - it seems pretty basic to me. If you have seen anything similar, do please let me know so that we can acknowledge the designer.

In Anchor pearl cotton size 8 (equivalent to Lizbeth size 20) the motif is 3.5cms wide and 3cms high.

I had trouble with closing the large rings with this thread and am thankful it did not break. It did flip the last half-stitch and I had to rectify it each time despite care and precaution while closing. After the first two rings I remembered Patty Dowden's Working with Large Rings tips and closed the ring in two phases (like in the dimpled yorkie) - https://tipsaroundthehome.blogspot.com/2015/03/experimenting-with-colours.html

Let's see what tomorrow brings - hopefully plenty of time to decide, tat, and complete for 15th August to celebrate #HarGharTiranga!

Thursday, 9 January 2025

updates

Pin It now!

I have often updated a post (highlighted as 'UPDATE') without any separate notification. This time I thought a special post would be good for those interested since there are quite a few. Yet as I list them, I find some should be accompanied with a photo. Hence while I rectify that omission, here is part 1 of the updates in no particular order ....

DAL Celtic Snowflake challenge. Pattern (diagram) for Padma Mandayam's adaptation of Mariola Siwek's version is now uploaded to this Google doc - https://docs.google.com/document/d/1pVqM6S5Ng49xk6erSsDyRm3y7SdV2tCIUOCgltze4lM/view for you to enjoy. 
Original post -https://tipsaroundthehome.blogspot.com/2024/12/and-more.html 

🌹🌹🌹🌹🌹


I was very impressed with the way Ninetta had started her ring seamlessly without making any 'join' by using the same joining loop as a ring loop. Well, forgetful brain did not put two and two together especially considering I have used this method before. It is basically the Ring on Picot technique which Patty Dowden demonstrated in this video -https://m.youtube.com/watch?v=LmMxIBrDpRI 

Original post -  https://tipsaroundthehome.blogspot.com/2023/10/awakened.html

🌹🌹🌹🌹🌹 
 

When I wrote about Fringe Tatting and the Tatted Fringe I did not highlight that beads could be used for the fringe, too. Eventually I made a beaded fringe inspired by and following Corina Meyfeldt's directions for Beaded Stem. Nina Libin called it Single File Beaded Picot.  The beads are pre-strung on the shuttle or ball thread depending on the pattern and each fringe or beaded picot is moved in place when needed. 
Original Posts - https://tipsaroundthehome.blogspot.com/2024/08/on-fringes.html
https://tipsaroundthehome.blogspot.com/2024/11/soup-catcher.html

Here's an old model from 2017 - https://tipsaroundthehome.blogspot.com/2017/05/rising-month-late.html
This method is fine for a limited number of fringe elements/picots with a limited number of beads on each or if all the beads are on the ball thread. 
One more method is the Floating Beads method but it has severe limitations -https://tipsaroundthehome.blogspot.com/2017/09/floating-beads-part-4.html

🌹🌹🌹🌹🌹

And finally splocik's Small Decorations 2024 since I won't be participating in her 2025 verion - December gallery (https://splocik2.blogspot.com/2024/12/male-dekoracje-2024-galeria-grudniowa.html ) and collages of entire year's works by some participants (https://splocik2.blogspot.com/2025/01/male-dekoracje-2024-podsumowanie-i-3.html) ... links added to my final post (https://tipsaroundthehome.blogspot.com/2024/12/a-no-glass-ceiling.html). I am happy to have been able to submit 13 decorations.

🌹🌹🌹🌹🌹

I had sent the vapour stitch bouquet pic for PICOT Bingo, but couldn't complete the game in the way I had intended and imagined. 5 boxes still left to cross out. Natalie, too, has uploaded a 2025 bingo card, but I won't be participating. See how disciplined I am being this year?! ;-D 

This is it for now. More updates will follow with some exciting revelations/discoveries!

And I still have to update some of the original posts with new links/details. Tomorrow. It's time for bed now.

Saturday, 26 October 2024

done

Pin It now!

 Done for now, to be clear. And not because I've tired of it. Au contraire, it is just too enticing, distracting, and addictive. I want to simply sit and tat this, and ignore all other tasks, including a couple with deadlines. So, done for now, threads unwound from shuttles and back in their respective boxes. And my apologies to my tatting buddy Anita, for leaving it here. I do hope to pick it up again some time next year.

In Anchor Pearl cotton size 8, it measures about 7cms across.
This was completed several days back. It's taken me this long to take pics and prepare a post.

At this stage I am calling it my Sunflower version. Going forward, it might become a dahlia or chrysanthemum with more colours being added.
I followed Patty's diagram again, alternating the 2nd join between the inner scallops. Later realised that the original doily throughout had a single join between the inner scallops, not alternate. By then I had already completed 2 whole repeats (4 scallops each), hence went ahead as before. Not that it shows either way at least in my version. 

How does it Always happen?! The one slice I chose for the close-up is the one where I missed a join in round 1, LOL. I missed a join in round 2, too, and also a 2ds chain segment. However, it was easy to ignore the first and for the second, I inserted a fine hook through the 'hidden picot' (viz, through the stitch) for a join. Can't even locate where this all happened. Dr Downplay zindabad!
  
I wish there was more of the chrome yellow rather than the yellow ochre in this model, but I was going from a light to dark shade using whatever I had in my stash. And the brown could've been a a couple of shades lighter if only I had enough.

My intention is to use two shades of orange then two shades of red for the remaining four rounds. I could repeat the same yellows, but that would become kind of boring ;-P
What do you think of the colour scheme?

Oh and I had updated my previous post with the completed round 1, but here's the pic again in case you missed it - 

Many thanks to Jon Yusoff for hosting the TAL. Don't know when I'll be back to complete this.

This mini-doily or coaster is my October submission to splocik's Small Decorations game. Only two months left and I still have so many ideas/projects I could submit! It's been a fun game for sure and will definitely look forward to joining again if splocik hosts it in 2025.
Check out the range of creativity and crafts for September here -https://splocik2.blogspot.com/2024/10/male-dekoracje-2024-galeria-wrzesniowa.html

Sunday, 13 October 2024

off the deep end

Pin It now!

 Well, kind of! I'm certainly mad to have succumbed to temptation when there are already so many huge pies baking in my tiny oven. The heat quotient is out of the world! Yet it has been a decade-old wish to tat the beautiful Mystery Doily. I've actually been compiling resources and versions for a decade whenever I came across something .... And so can you blame me if I joined Jon Yusoff's tat-along on FB intending to tat just 2 or 3 rounds for now.

Pattern Links to the Mystery Doily Project first shared by Georgia Seitz -https://www.theonlinetattingclass.com/doilies-mug-rug-etc

I roped in my tatting buddy, Anita Barry, and she readily agreed. To date, she has Never refused me anything!!! We've been exchanging note, thoughts, angst, and progress these last few days. While I was thinking of size 80, she suggested size 40 since she wanted to use up some of her stash. It was absolutely fine by me, or so I thought!

Yes, angst. My story starts with several discards. Don't remember why I cut off the one in orange. Was it a change of colour decision? I think I decided to use it for the next round and start the first with yellow.
The rings are tiny - only 8 stitches. And while closing that last ring the tread snapped! Better to discard since the thread (Gopal) is not mercerized.
 
Wound new shuttle with Anchor size 40. Now the inner scallop of first repeat looks very different since it is unattached. I got all muddled up thinking I had made a mistake and snipped it off. Turns out it was correct, sigh.

4th start with lighter shade of Anchor yellow. While I was struggling with the chain directions (since I was shuttling between diagram and original doily pic) I thought I'd got it right. Till I uploaded the pic to a larger screen and found an error in one segment. Not a huge mistake, but still the dark brown wasn't helping my limited vision. Even managed to snag the thread at one stage and joined again. 
Overall, though, I wasn't enjoying the tat and decided it was time for course correction and snip off the size 40 altogether. 
Finally settles on Anchor Pearl Cotton size 8 (equivalent to Lizbeth size 20) and this is how far I reached after dinner last night. Tatting went smoothly and quickly, I enjoyed the thread (the shade appears darker here), and I have more of a choice of colours, too. Would've preferred a lighter brown, but turns out I am running out of greens and browns in perle cotton! Looks like some buying in on the cards ;-D
What also helped was that I sketched my own diagram and although I wrote my text version, too, I didn't need to consult it.

My visualization is to change the colour of the rings in each subsequent round, using darker shades or even different colours, to resemble a chrysanthemum or a blossoming flower. Brown remains constant throughout.

Okay, so that's the backstory. If it hadn't been for the FB tat-along and especially with my buddy, I might've discontinued the endeavour for the present. Somehow tatting with others felt like a commitment and something I needed to accomplish for myself, too. 

Now for my notes -

  1. Pattern - I referred mainly to Patty Dowden's instructions, starting with an outer ring, and also followed her count.
  2. FS/BS tatting here is in 'blocks' like in Mary Konior's Spinning Wheel Glass Mat where a set of motifs/repeats changes en bloc. So the outer scallop has frontside rings while the inner scallop has backside rings.
  3. I followed the original doily pic and Patty's Row 2 diagram for the 'S-chain' instead of her diagram for Row 1. Ultimately I drew my own sketch instead of shuttling back and forth.
  4. Direct Tatting - In such serpentine patterns (including magic squares), it is very practical to direct tat the chains instead of frequent reverse work. This also keeps the work mostly on the front side. Hence reverse stitch the chains, ensuring that you make adjustments for the sequence of the hitches when tatting backside chains.
  5. Joins - For symmetrical/mirror-image chains, including colour and direction, I used a reverse join on the right S chain and a downward picot (picot on core thread) on the left chains.
  6. Reposition - And before the picot on core thread (I wanted it to be yellow to mirror a ring picot), I used a TwW (a 2nd half-stitch which it turned to face the other way), reversed work, and then placed the paperclip on core (yellow) thread. 
  7. Colour - My first instinct was to follow Jon's variegated and solid combo scheme. However, seeing the tiny rings and my own stash, it just felt that a variegate would make the already dense design too busy. Hence I chose solid colours.
  8. Thread - Remember to use mercerized cotton for easy closure of the tiny rings.

As I mentioned above, here are some additional links - 


Can't say how far this doily will go at present reckoning, but I am committed to at least two rounds to get a good feel of this beauty! Jon has created a dedicated private group for this TAL, called Georgia's Mystery Doily Tat-Along. Join us if you can!
 
UPDATE: 
Reposition Methods (either after a lock join, a picot join, or free) to change the thread, shuttle, direction, or colour --- For convex/concave chains - https://drive.google.com/file/d/1JxcO-ubKP1KXb_CVAAfOMX6uBPkCy_gO/view 

And my completed Round 1 -
It's enticing And it's addictive!!!!!


Sunday, 10 April 2022

EP medley 1

Pin It now!

Activity in the Endrucks 1920 Project continues with tatters chipping in with their versions. Some are shared in respective blogs, others in our Facebook group. A section called ‘Gallery of Possibilities’ in the EP doc features the more clear variants or adaptations. [If any adaptation is accompanied by a dedicated pattern, it is shifted to the main entry of the respective pattern]. But beyond these are several more versions that can inspire us.

Although we can pin an image from a public FB page/group, it will not lead back to the source or provide any information about the tatter, pattern, etc. 

All these factors made me realize that sharing them through blogposts will not only reach a wider audience, but will also help us pin correctly. Under the title ‘EP medley’, I will occasionally share the projects (and blog post links) with due credit, for all to enjoy and pin correctly.

Description will be at a minimum, and images are in no particular sequence. More details and information can be garnered in the Endrucks 1920 Project Facebook group or the respective blogs. The medley is in no particular order. (links at end)

EP Medley #1 

pattern #17 adaptation: 

1. Recently Coretta Loughmiller uploaded 2 versions of ‘Upended Endrucks Snowflakes’, adapted from an adaptation! Check out her beautiful models and other details here- http://corettadeesign.blogspot.com/2022/03/endrucks.html

2. Molly worked a beaded version of the Upended Snowflake and draped it beautifully over a tree ornament. ---


3. Eulalia worked the same snowflake in 3 strands of sewing thread as a trial while incapacitated! ---

I had extracted a motif from #17 and used it in several adaptations, starting with the Lace Day earrings, edgings, snowflake. 
4. Marie of West Pine Creations tatted a beautiful rendition of the earrings here - http://westpinecreations.blogspot.com/2022/04/lacy.html

5. And this is Kathleen's lovely beaded version from last year. ---

pattern #1 + #40 combo:
6. Reiko tatted the central rounds of #40 and edged the circle with #1! Happy Hands know no limits :-) ---

pattern #2 adaptation:
7. Ninetta is still not back to blogging, and has dumped her images on me for the present! My tiny fragile shoulders carry a heavy burden, LOL.
This is her bracelet adaptation extracting and repeating only one motif from #2,  reminding her of fishbone. ---
Notice how cleverly she has attached the tatting to the clasp?! Seamless. The rings look like they are part of the clasp.

pattern #43 adaptation:
8. Agnieszka (Aga) tatted an exquisite Jewelry Set extracting a motif from #43. Her beautifully tatted necklace and earrings are displayed through several pics here - https://agaszowopapierkowo.blogspot.com/2022/03/komplet-bizuterii.html

9. Pop Maria followed suit adapting the motif slightly for a bookmark worked in her own delicious hand=painted thread, here - https://maryshandmade.blogspot.com/2022/03/proiectul-endruks-1970.html 

10. And several years back, Patty Dowden inserted some freeform tatting to create this yummy Strawberry Doodle using almost the entire motif.  ---


This is a small window into the possibilities with so much still to explore and adapt. Hope you enjoyed this display and will leave a comment if you want some changes in the presentation. 


All pattern pdfs can be downloaded from Endrucks 1920 Project document (EPdoc) - https://docs.google.com/document/d/17LEVftXweztBIOWh4sL4BB7bX65ssoOsOn4oXIgCepY/view
Endrucks 1920 Project FB Group - https://www.facebook.com/groups/1235560633606162
#Endrucks1920Project - https://www.facebook.com/hashtag/endrucks1920project
Endrucks 1920 Project Pinterest board - https://pin.it/16AYBmv

Wednesday, 4 November 2020

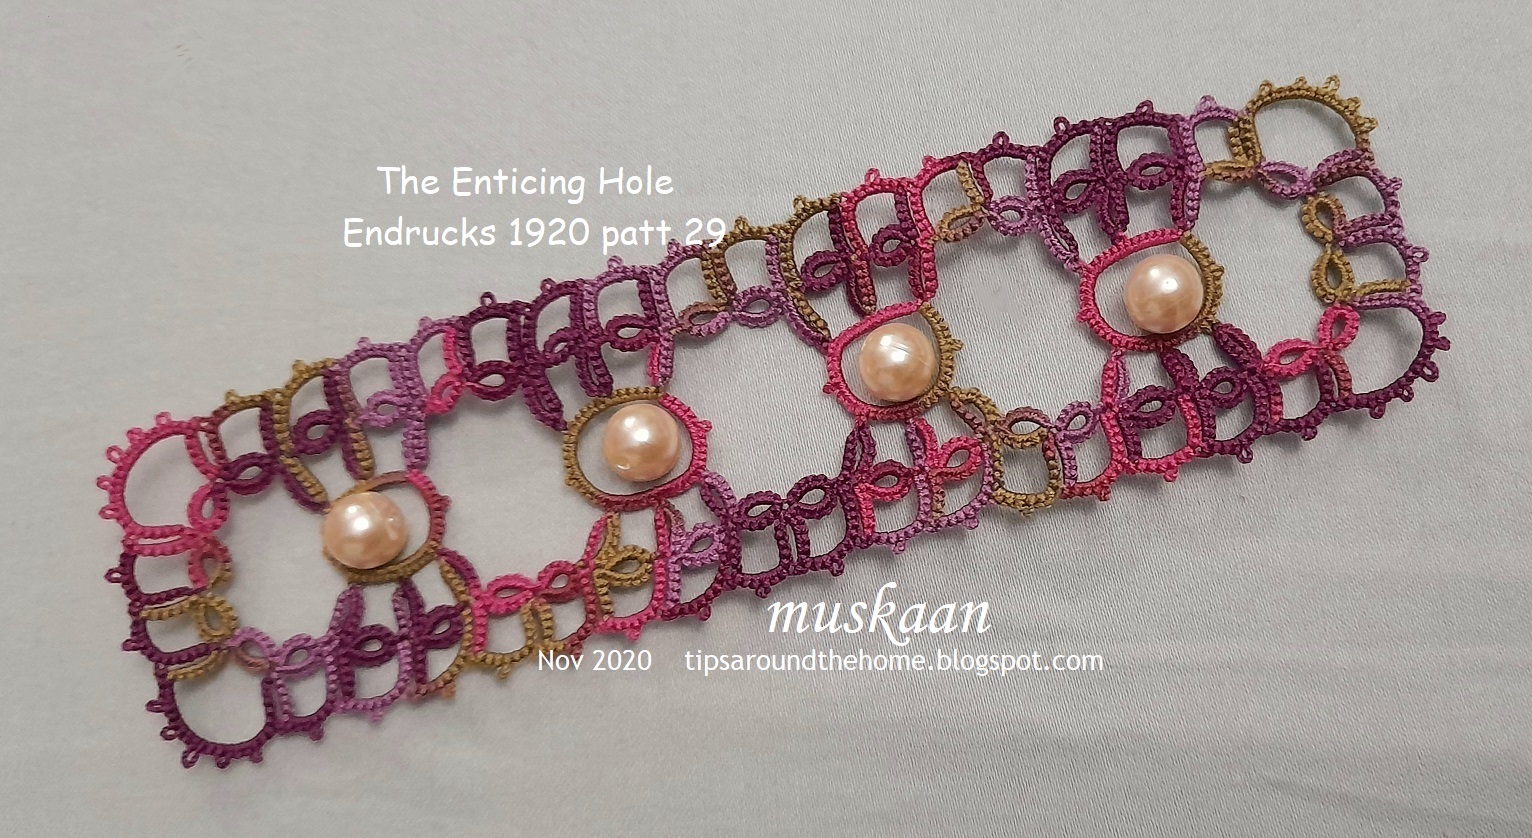
the enticing hole

Pin It now!

.... in an array of denser block tatting patterns in Endrucks' 1920 book ! ('Die Schiffchen-Spitzen' by Frau Eleonore Endrucks Leichtenstern )

If you remember, over 5 years back Georgia Seitz had asked me to work pattern #22 and share in modern format. From that one broad lace, so many different patterns emerged, including little angels and I fell in love with this book and worked in private trying to cover the entire book (including some derivations), calling it my Endrucks Project. All of it is in various stages of incomplete ;-P

At first glance, the images are not enticing. But once I start tatting up a pattern in colour and translate modern notation, ideas blow around and it becomes addictive. Ninetta is feeling that same enchantment & addiction as you can see from her lovely versions over the past several weeks! She has systematically tackled 4 patterns already and has roped in several volunteers in the Chiacchierino facebook group!!! Some have started posting their first trials. We welcome you to join in, or watch the progress in this document - Endrucks 1920 Project which contains all information, links, and updates.


This is my adaptation of pattern #29 into a close-ended, one-pass bookmark/bracelet which I am calling The Enticing Hole  Endrucks pattern #29 vintage to modern

This is the first motif. The joining picots should be very small, unlike those seen in this first trial. Doesn't this look like the top frill of a gown? Or perhaps an angel, even a 3D version. is waiting to emerge?

A few more repeats in Anchor 20. The 2 colours show how easy it is to work with 2 shuttles, covering a large area in one pass. And all segments are basically 6ds!

In the original, the insertion is open-ended. We prefer continuous tatting, and I used one of the small motifs to span the side.

The center ring is fairly large with 48 stitches! I tried SCMR for the 2nd pink ring, but it distorted as is clearly visible. So true rings, using my usual adaptation of Patty Dowden's working large ring tutorial.
It is also Very important to leave a mock picot at the base of the large ring otherwise the later chains tend to pull it out of shape (as is visible in a couple of my rings).

This is in Lizbeth 20 #131. It is fall after all! 4 repeats, including both sides makes this bookmark 15.5cms long and 4.5 cms wide.

Since I hadn't thought of a tail design yet, I tried satin ribbons to reduce all the negative space.

Of course, it hides alternate motifs. I also thought of using this as a surround for a wrist watch, provided the dial fits within the ring diameter.

And it is better to have an odd number of repeats. Oh, I forgot to insert the ribbon Inside the ring, sigh!
One more colour. Of course, one can simply tie the ribbon as a tail at one end. I really don't mind the negative space....in fact the hole in the center is quite enticing ;-D
But Ninetta's 'eyes wanted to see something there'. How about glass gems as in ice drops? These are the smallest I had and they do add a bit of sparkle and lift. One will need to modify the center for these insertions.
Pearls! Gives it a vintage feel doesn't it?

How about leaving the ring alone and covering up the in-between space? 2 large faceted bicone crystals between each.
Bugle beads at a slant! What, are we playing Knots and Crosses now?! 

And finally, faceted tear drops. I still have to add findings, etc. for this bracelet.

Download the pattern here - 

We invite you to join in before all patterns are taken. Let Ninetta or me know which pattern you wish to tat and share in modern style. 

Sunday, 24 November 2019

3 wave patterns

Pin It now!
Snowflake #19 in Land of Laces’ 25 Snowflake Project

I wanted to share more of the process of the large snowflake, but sharing the patterns before I relegate the task to the pending tray.
The square is where it all started, leading to the small and large snowflakes. The small snowflake was easier to do after my failed trial here (top right in collage). It showcases the swirl/wave effect more than the large flake.

All 3 can be worked in one pass, continuously.
  
Abbreviations/Notations, in order of appearance –
ctm = continuous thread ; – = picot ; vsp = very small picot ; SS = switch shutte ;
SR = split ring ; ch = chain ; lj = lock join ; rw = reverse work ;
–– = decorative picot ; rs = reverse/unflipped stitch (optional)

Square Wave motif
muskaan ©Jan, 2018

Worked in Anchor size 20 (equivalent to Lizbeth 10). It is a tiny motif, hence better worked in size 20 or 10.

2 shuttles, ctm
Round1
split ring: 6 – 3 vsp 6. SS
chain :   2 – 2, SS
Repeat 3 more times and join back to A.
Tie and cut, or climb out with a split chain : 2/2, mock picot
Round2
SR : 4 / 4. SS
ch : 6 lj, SS
SR : 4 / 4. SS
ch : picot, 7, lj, 8, lj
Repeat 3 more times around. Tie & cut.


Swirl Wave snowflake - small
muskaan ©Nov, 2019


In Lizbeth size 20, this measures 2”.
It can be repeated and joined as a motif for larger fabric, each side of the hexagon measuring 1”

2 shuttles, ctm

Round1
A-ring: 7 – 8 vsp 6. rw
B-ch: 1 – 4 –– 4 – 1, lj to vsp,
C-ch: 1rs vsp 1rs.
Alternate C-chain : rw after B, SS, chain: 1 – 1 , SS.
Repeat 5 more times, joining last B chain to first. 
Climb out with last C-chain as follows –
To climb out one can make the last C-chain a split chain (1 / 1). However, since it is only 1 stitch, using Patty Dowden’s Ring on Picot method is simpler :
Pull up a loop of Sh1 thread through the picot on C, pass shuttle through from back to front, and leaving just the tiniest bit of bare thread behind, start the split ring. Work the 2nd half of SR with Sh2, again leaving a bit of bare thread on the back (enough to span the 1ds) and complete the SR.
The bare threads are not visible on the back, and the front also looks similar to the rest.

I have taken stepwise pics of this process. If anybody is interested, let me know & I will post the pictorial.

Round2
D-SR : 5 / 5. SS
E-ch : picot, 5, lj to nearest picot on ring, SS
F-SR : 5 / 5. SS
G-ch : 6, lj, 8, lj, SS
Repeat from D 5 more times.
Tie and cut and hide ends.


Swirl Wave snowflake - large
muskaan ©Nov, 2019
In Lizbeth size 20, this measures 3”.

2 shuttles, ctm

Round1
A-ring: 6 – 3 – 5 vsp 6. rw
B-ch: 1 – 4 –– 4 – 1, lj to vsp,
C-ch: 1rs vsp 1rs.
Alternate C-chain : rw after B, SS, chain: 1 – 1 , SS.
Repeat 5 more times, joining last B chain to first and last C-chain to base of first ring with a lock join.
To climb out : split chain (1/1) or the ring on picot option explained above.
Round2
D-SR : 5 / 5. SS
E-ch : picot, 4, lj to nearest picot on ring, SS
F-SR : 8 / 3 + 8. small mock picot
G-SR : 6 / 6. small mock picot
H-ring: 5 –– 5. SS
I-ch : 7, lj, 9, lj, 6, lj. SS
Repeat from D 5 more times.
Tie and cut and hide ends.


In case of any error or doubts, please let me know. Hope you enjoy these patterns :-)

My 20th snowflake has dimpled rings (hearts) and is worked in bits and pieces but no ends to sew in. I’m still tweaking it …. I’m calling it Heartland snowflake!