Showing posts with label shepherd's crook join. Show all posts

Wednesday, 13 August 2025

lotus tatting

Pin It now!

 Every year I try to tat something for our Independence Day celebrations.... if not a dedicated project, then using the tricolour in whatever I may be working on at the time. This year I felt it was much more vital given the international and more importantly our domestic situation where the parties who are in the opposition at the center keep peddling falsehoods and agenda-driven false narratives in order to show the world that Indian democracy is on shaky ground, the election process is flawed and manipulated, etc. They do not hesitate to bad-mouth the country and its institutions in their hatred towards the democratically elected Prime Minister. They cannot even digest our superiority in our  retaliation (Operation Sindoor) to the terror attack on Indian tourists by nationals from the neighbouring country! 

Lotus is our national flower and this is my prototype. 
Now you may ask where is the third colour?! Good question.
I had started by using this motif as a charm for a bracelet with a white tatted band/braid, sprinkled with some blue. Every colour has its symbolic value which I have explained in previous years.
Now I wonder whether I will have sufficient time.
Another idea is to tat a few more motifs and glue to a greeting card, with tatted blue/white chains representing water. 
Which do you prefer?
I chose ANKARS style stacked rings or ring on ring technique. Though incidental, I like the fact that this technique came from Russia. I've read more Russian literature than American!

LOTUS  MOTIF 
(prototype) Pattern by Muskaan © Aug2025  
Single shuttle. Starting from the left orange ring ....
NOTE - since this is a prototype, there are a few count changes made along the way for the petals. I am happy with the flower count but the green rings can be stacked a bit more. Hence some tweaking of count will be needed. 
Start ring by leaving a small loop and tail over tails. This loop is later used to make a shepherd's crook join at the end. https://tipsaroundthehome.blogspot.com/search?q=shepherd+crook
ringA: 19 - 4 - 15. dnrw
ringB: {lies above A} 15 +(to A) 5 - 5 - 15. dnrw
ringC: {lies above B} 15 +(to B) 6 - 6 - 15. dnrw
ringD: {lies under C} 15 +(to C) 5 - 5 - 15. dnrw
ringE: {lies under D} 15 +(to D) 4 - 19. dnrw
Attach green thread and cut and hide orange tail. [UPDATE: See updated pattern here - https://tipsaroundthehome.blogspot.com/2025/08/independence-day-tatting.html]
ringF: 10 - 4 - 6. dnrw
ringG: {lies above F} 6 +(to F) 6 - 6 - 6. dnrw
ringH: {lies under G} 6 +(to G) 4 - 10. 
Join to starting loop at base of ringA and cut and hide tail.
TIP: I will join rings F & H or make the segments longer than 6ds in order to make the overlap more visible.

I don't know how original this motif is - it seems pretty basic to me. If you have seen anything similar, do please let me know so that we can acknowledge the designer.

In Anchor pearl cotton size 8 (equivalent to Lizbeth size 20) the motif is 3.5cms wide and 3cms high.

I had trouble with closing the large rings with this thread and am thankful it did not break. It did flip the last half-stitch and I had to rectify it each time despite care and precaution while closing. After the first two rings I remembered Patty Dowden's Working with Large Rings tips and closed the ring in two phases (like in the dimpled yorkie) - https://tipsaroundthehome.blogspot.com/2015/03/experimenting-with-colours.html

Let's see what tomorrow brings - hopefully plenty of time to decide, tat, and complete for 15th August to celebrate #HarGharTiranga!

Friday, 28 September 2018

picot join to the right part1

Pin It now!

Several weeks back an expert told me that the last to first join is not a beginner technique. I can see why, since there is a tendency for the joining picot to twist when linking to it. We are familiar with different names for this technique - twisted picot join, folded join, avoiding folded join, joining in a circle, rosette join, etc. (scroll down to I.1.b here) and excellent tutorials in various formats show us multiple ways of going about it.

But whichever method one employs it boils down to just 2 facts :
  • the joining picot is on the right side of the current ring or chain being worked; and
  • the join is ultimately a picot join.
Hence we can employ a generic term, Picot Join to the Right, irrespective of which particular movements a tatter uses to achieve it.
I understand and have tried the folded & twisted picot joins, but continue to avoid them. I get a sense of security & comfort in working it as a normal picot join. 
All I have to do is move the last picot to the left of the current tatting! 
And I consider this easy enough for any beginner to grasp and accomplish. Scroll down if this interests you …

The flowers (rosettes) in Blossoms motifs all require this join. Hence Part 1 shows how to do that last join, continue to completion, and also how I finish off the ends.

Picot Join to the Right - Part 1
( joining last ring to first in a rosette )
Only one step – rotate work to bring joining picot from right to left side!

One-shuttle pattern.
Each ring is (7–5–5–7), joined to previous ring. 7 rings total. 
Ring7 is linked to both Ring6 & Ring1, closing the medallion or circle.

 1. This is the common Picot Join where the joining picot is on the left side of the working element  (Ring7). We pull up a loop of ‘ball’ thread, pass shuttle through it, tension and snug, and continue with the second half stitch or a new double stitch.
Note
In fs/bs tatting, we pull a loop down on the frontside and then make the second half stitch.

 2. Here we have reached the point where the last ring (wip) needs to be linked to the first ring.

3. Rotate work on your hand. We do NOT have to take it off our fingers, simply rotate counterclockwise.
Notice how the picot is now on our left! Looks familiar, doesn't it?!

 4. Pull up a loop of ‘ball’ thread, just as in a picot join (as seen in #1).

5. Adjust the tension. Make sure that the core thread slides freely.
Notice how the threads are all on the front of (or above) the motif.
Note : 
If we need the threads to be at the back of the work, use this simple trick by Linda Davies

 6. Continue tatting to finish the last segment of this ring.

7. Close the ring. Picot Join to the Right has successfully completed the rosette!

Permit me to continue, to show how I end the motif. Notice there is a tiny loop (like a vsp) at the base of the first ring. I had tatted over the starting tail, leaving a small loop, but did not pull it tight. I left this tiny space for a reason...(I showed it here in more detail along with a pdf). 
UPDATE: This loop is used for the final join and Dale Pomeroy coined the term Shepherd's Crook Join for it.

8. Snip off the shuttle and thread the new tail.

 9. Insert needle through that space or loop.

10. Tug strongly at the old tail to close that gap. This also traps the new tail within.
(I sometimes use my teeth for a strong grip & pull) 

11. Bring the needle back through the space between the 2 rings 
and whip stitch through the back arcs of the last ring.

12. After whip stitching for a few stitches, tug tight and snip both tails close.

As with all techniques, what I have shown here is a viable alternative, but optional.  
We all have our favourites, and this works well for me.
I used a down loop, hence the joins all look like a complete double stitch.

This pictorial was already photographed when I received a ‘distress’ email last week, asking for help on how to proceed with the last chain after it has been joined to the first chain. I will share it in the next post since this is already pretty long.
.... Part 2 in next post 

Friday, 18 August 2017

hiding ends knot-free

Pin It now!
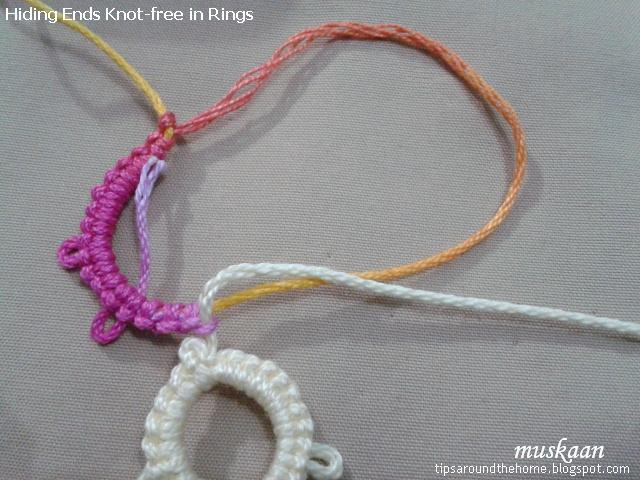
Hiding Ends Knot-free in Rings
aka
How to start and end patterns in the Quatrefoil Series


I’ve been meaning to share how I start and end the quatrefoil patterns. There are 4 tail ends to hide, 2 colours, and 2 types of rings at start and finish.
There are numerous methods to choose from, many listed here. So we are actually spoiled for choice.
My personal preferences are  -
  1. to hide tails in separate segments and avoid bulk
  2. to avoid knots while starting or ending
  3. to tat over the starting tails, ending in the middle’ of a stitch ('the middle path').
  4. to whip stitch the end tails.
All these have been incorporated in how I start and end my quatrefoil patterns. Sharing a few process pictures here using Quatrefoil Square -

Leave a very tiny space at the beginning while tatting over tail in first ring. 
This ring is tatted backside (optional).
UPDATE: This loop is used for the final join and Dale Pomeroy coined the term Shepherd's Crook Join for it.
I follow the middle path when leaving tail
 Reverse work and attach shuttle 1 thread, tatting over tail in the ring.

Leave both tails unclipped for now. 

At completion, cut a long tail and thread needle through shuttle 2 thread. 
Pass needle through the space left on ring 1. 
Tug the old tail to bring the rings closer and to eliminate the space. 
Then whip stitch back through second half of last ring.
This is how the 2 tails look. Give another tug and it is now safe to clip the extra lengths. 
For shuttle 1 thread, pass needle through base of second ring, 
and whip stitch back through the last ring. 
All ends clipped after ensuring they are snugged tightly. 
The starting tails were tatted over ; 
the end tails were whip-stitched back through their respective rings. 

Notice how the space between 4 rings is consistent with the space in other 3 clusters (see lead pic) and there is no visible bulk or tell-tale tail ends.
This is merely my process. What is your preferred method(s) ?

Also, I have figured out a way to hide ends in a split ring without any sewing! I still need to take pics but will hopefully share soon.

happy tatting always :-)