Showing posts with label freeform tatting. Show all posts

Sunday, 29 March 2026

freeform fun

Pin It now!

I've been enjoying some tatting time almost daily for the past several weeks/months. One of the outcomes is this freeform sprig with 4 colours which was tatted on the go using 'branching encapsulation' to pull out the desired colour where required (scroll to end for details).

I'm not fully satisfied with the shape or rather the length of some of the stems. Also I didn't spend time in choosing colours - just picked the first 'flowery' shades that had been used in recent samples. Wound four shuttles with the different colours, some of them using leftover threads. I've always multiple shuttles very freeing despite the risk and discomfort of tangling threads. 
I didn't start with all 4 threads together. Started normally with two colours and then added the 3rd and 4th colours where needed. If you look closely you might notice the difference in the thickness of the stems.
So this is the 2nd piece I am submitting for Natalie Rogers' PICOT Bingo 2026 (Level 2) which you can find here - https://www.patreon.com/posts/happy-new-year-147124370 and the boxes crossed out with this model include ....
  • free-form tatting
  • tat a flower
  • tat nature
Huh, if only I had included a butterfly, I could've had a row bingo!!! Oh well, next time ...


A bit about Branching Encapsulation -

 The term was coined by Sherry Pence (2012) and she published a book dedicated specifically to this technique and you can scroll through her posts and samples here - https://ladyshuttlemaker.blogspot.com/search?q=branching+encapsulation. You can find Karen Cabrera's Lesson #155 - Branching Encapsulation video here - youtube.com/watch?v=2oB08uUYfzo&feature=youtu.be.

Elgiva Nicholls called it multiple dead ends in her 1962 book Tatting: Technique and History. Recently Marilee Rockeley (2024) worked the menorah from Elgiva's book using this technique and she also uploaded a video and free pattern here - https://yarnplayertats.blogspot.com/search?q=branching+encapsulation

I had used branching Josephine chains in a card here - https://tipsaroundthehome.blogspot.com/2018/05/i-love-floating.html but since they were dead end chains without any flower or bead, I used scrap threads to hold the bare thread at the desired length. You can find pictorial with options here - https://tipsaroundthehome.blogspot.com/2015/03/dead-end-start-to-split-chains.html

Wednesday, 12 July 2023

SOUPy vine

Pin It now!
Our game of the month for July was to tat a bookmark from any of Endrucks' patterns. Her book has a lot of edgings making it easy to choose one and adapt into a bookmark. I've done it with a few of her patterns already. However this time I went with a SOUP* (*Sewing On / Using Pieces) bookmark.
Bookmark directory (soon more models will be added): 

I was actually rummaging for another project through my Endrucks' models stash which is now so huge that it is stored in several different truffle boxes! My eyes landed on these hearts (these include trials and prototypes) and it felt like a good opportunity to use them. It would keep them 'in line' and also be of use.

Not wanting to make it 'permanent', I tatted something that can be cut off if required.
This is my SOUPy Vine Bookmark from E37 for the game ....

Tatted with only one shuttle using teal shade, it is made solely of rings. A bit free style. 
The two large 'leaves' are lock joined to both heart motifs and joined somewhere along the edge, too, for stability. However since the heart edges did not have picots, I had to pierce a fine crochet hook into the space and make a join while tatting the ring.

In her book, Frau Endrucks advises: 
Should you have forgotten a picot, poke a needle between the respective double knots. The picot created that way is large enough for joining. 

Wanting to avoid cutting and hiding ends after each pair of rings, I went with a half-closed ring string! 
TIP: Half-closed rings (aka half rings, scallops) act like split rings with thread(s) emerging at a point away from the start. 
Each HCR is 3ds.
The leaf rings range from 20 to 30 ds.

The heart motifs were worked in Anchor size 20 which is like Lizbeth 10. Adding this connecting 'vine' in the same size would make it too bulky for a bookmark. Hence the vine is worked in Anchor size 40.

The tassel is made of short leftover lengths in brighter colours. And another HCR string or vine is inserted to sort of bring it all together.

The entire work took me less than 2 sittings and was a fun task. I now have one more bookmark to use!
In different colours the leaf rings could've been butterflies 🦋 .

PATTERN: Eye Spy Hearts #1 derived from Endrucks' #37 (E37). All hearts derived from Endrucks' book are collected in the Hearts Directory - https://docs.google.com/document/d/1MpYw9XMB8Asz8zusj1ZpHvX8A8Ww424-rEVORtxcL1w/view

Related Posts -

Friday, 30 April 2021

what were the thieves up to?

Pin It now!
(scroll down to see what Alibaba was up against!)

Boy, am I glad about not posting the 31-41 combo ideas in the unmasked post! Guess what, I found more combo ideas from 21-30 that hadn't been published after the 1-20 cornucopia display. Those thieves really like to play together coming out in different formations from nooks and crannies for Alibaba to collect and show the mutants/variants !!!
collage with motifs 31-41
Please note that these are shapes that emerge from playing with motif placement - possibilities that can turn to reality when joined properly and with a bit of cleaning up for greater definition of shape. And if worked in one colour and 2 shuttles, the shapes can be tatted in one pass - trace the path for another layer of fun! The motif number is indicated in each image. Blossoms Motifs patterns can be found under Nature 2D here. For shapes/ideas with motifs 1-20, see this post. Imagine the possibilities if I had played with all 41 motifs together instead of in batches!

Blossoms Heart #2
While the outline is mostly fine, the tip and inner dip should have more of a point.

Blossoms Butterflies #7-#10


Blossoms Wreath/Garland #7
 
This is among the smaller ones. There are medium and larger sized wreaths/garlands in the 1-20 post.

Blossoms Bookmarks #1&#2  
                    
With or without a tassel or tail, these make cheerful bookmarks. Rotate them and we have edgings! How cute would a single floral spray look as a tail for some bookmark?!

Blossoms Edgings #1 to#3
The vertical is now horizontal and becomes a meandering edging!


The above scalloped edging was shared earlier, but not clear enough. This time I have cropped and filtered the image and notated the number beside the respective motif. What a difference a simple enhancement does!

Blossoms Square/Frame #3

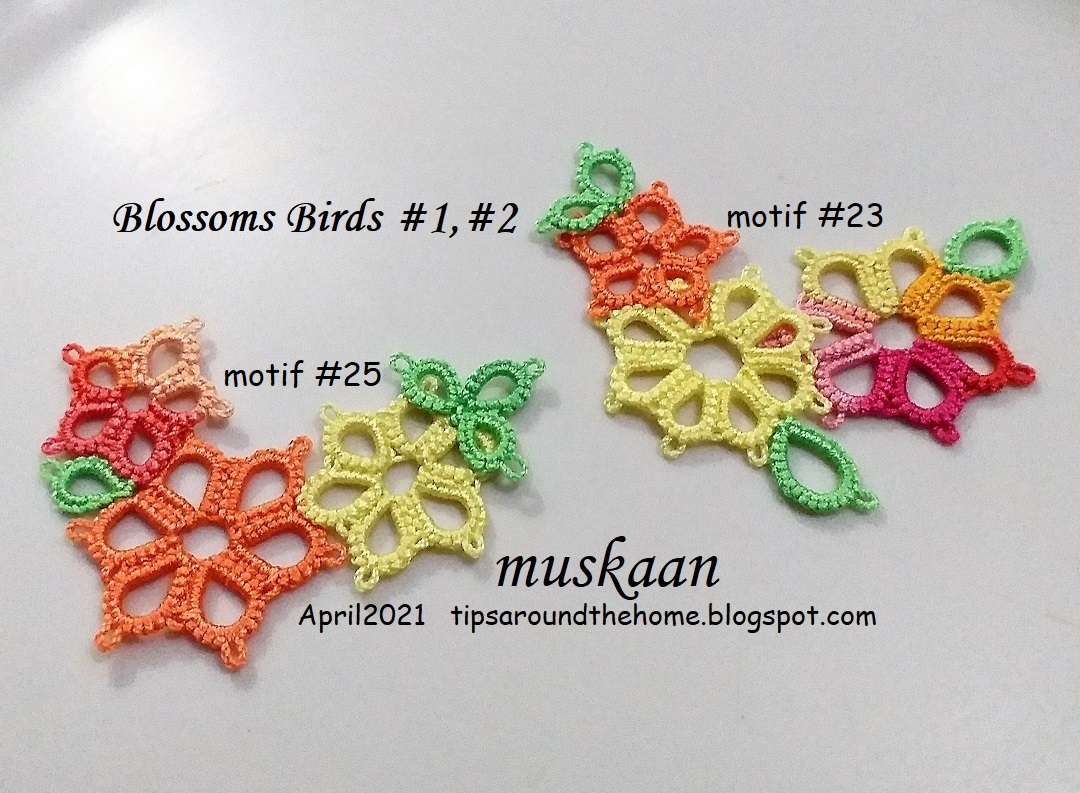
Blossoms Birds - flying or perched!
These might take a bit more imagination and shifty-eye ogling for the shapes to emerge. And of course a bit of tweaking to enhance the shape when actually tatting them. 
To me #25 looks like a a bird swooping down. Could work well as angel wings, too.
#23 could well be a bird in profile, just as the yin-yang combos below, especially #4!

Blossoms  Yin-Yang Bracelet/Pendant #3 to #6

This #4 really should've been under Birds, if I hadn't inked in the name.

A few beads in the right places, findings for attachment, and we have ourselves some beautiful bracelets or necklaces to suit a range of dress colours and seasons!

Blossoms Spinning Wheels
Motifs #21 to #30 arranged in a circle with curves of each motif parallel creates this spinning wheel effect. 
There are several gaps between adjacent motifs that need to be filled in order to make this coaster/doily stable. One reason for the gaps is that many of the motifs have been rotated so that their fronts are facing the camera...narcissistic much!
This is the same as #2 above, but I spot a heart in encasing the center space.

Besides all the above, 4 bouquets and a corner also emerged. And this butterfly and Blossoms Heart.

Phew, that's it for now. It took tons of time to locate and notate each motif but I kept the wind at my back to sail ahead instead of delaying further. Alibaba has to stay on top of his game!

So what was Alibaba up against ??? 
The 40 ingenious thieves (okay we now know there were 41!) had drawn lines in the sand within which Alibaba had to strategise. Following are the broad thematic parameters for Alibaba and 40 Thieves in Lace aka #BlossomsProject (2018).

  • 40 motifs of overall similar size, using Lizbeth size 20
  • single-shuttle motifs with thematic similarity
  • no identical twins allowed!
  • about half the motifs curving to the right and half to the left
  • 5 colours for rosettes juggling each for combo, position, spread, size, number of petals, overlap, etc. 
  • single shade green leaves ranging in number, placement, overlap, etc.

Wednesday, 28 April 2021

all rounded up

Pin It now!

Alibaba took all of 7 months to round up all the 40 thieves but their notoriety knew no bounds! Imagine his surprise to find one more lurking around - their leader no less. And this 41st one was an illusionist - seemingly appearing as his own reflection. Hmmm, what a dilemma - which one was the flesh and blood version?! But our hero managed to crack the mirror and nab him in a trice!

Patterns for these 6 final motifs are below. But they gather together to create a few more larger pieces that will be showcased in the next post before the final reveal. Since I've already inked April on the former, I will have to post them before the start of May. So please don't get bored as the story continues ....

Worked in Lizbeth size 20, single shuttle. My previous posts have more details and I will give an overall round-up in next post. You can find all Blossoms patterns listed under Nature 2D here.

Blossoms Motif #36  
<2½ × 1¼

 
The reason I added a joining picot between a petal segment is because the next flower can have a free picot and also a bit of layered effect. This was not done in earlier motifs.

Blossoms Motif #37  
2½ × 1¼


Blossoms Motif #38  
2¾ × 1¼

 
Why should all leaves remain at a level with the rest of the spray? I joined the leaves above a flower in a few motifs. Here I made a leaf under the spray for a bit of a natural look.
See, I was getting bolder ;-D

Blossoms Motif #39  
2½ × < 1¼


Blossoms Motif #40 
2½ × 1¼


Blossoms Motif #41 
2 × 1¼

 
I found it extremely difficult to decide which way looked better. I finally chose the former and notated the stitch count below. 

So that's it folks as far as actual patterns go for this Blossoms Project. However, as I said above, the ideas continue and I invite you back in a couple of days to see Cornucopia #2 and the constraints under which Alibaba had to work.


Thursday, 18 February 2021

Palentine Day

Pin It now!

Came across this for the first time on the 14th 'Palentine Day'. Well, it doesn't have the same ring as Valentine Day, but it certainly has a far greatly reach!!! And it does not have to be limited to a single day - pals brighten our day anytime and every time. And this year, it was extra special as you can see ...

The very talented Krystyna Mura tagged me on her take of the Budding Heart! Don't you just love her vision and impeccable execution?!
Every time I write 'execution' I think what an odd word to use 'coz it evokes more gory images!
She used much thicker pink threads for the heart outline, encapsulating the finer green threads for the foliage. 
Last year she gifted me with her variation of the Blossoms Heart! A dear pal in deed, indeed 💖

Many of my readers must already have seen the pleasant surprise from another dear friend, Ninetta Caruso, who organised a tatting event on the facebook group Chiachhierino: Filo, Amore e Fantasia. They chose my Block Heart (Spring in my Heart) alongside her own very pretty Heart by the Sea to share and tat along with the participants. This online event called Un cuore per te goes on from 14th through to the 28th of this month. So join in! You can find links to both patterns and more details here - https://ninettacaruso.blogspot.com/2021/02/hearts-friends-and-flower.html. Love the pictorial she created, too.

Lovely models of these hearts are coming in everyday from our enthusiastic tatters and talented Italian tatters! More of Ninetta's than mine, but that's to be expected - she is such an exceptional designer!😁 

Also coming into my inbox are the Happy Hands Heart I shared last time. Denise W is so taken in by the little heart that she has tatted several already, trying to learn new techniques and perfect them. Can't wait to share them with you.
What I Can share, however, is HisKid's (Sue) beautiful model in a happy colourway here. It is her first time at roll tatting, but it already seems perfect!


On the 14th, Anita Barry waltzed in with news that she had completed the TAL doily, yay! We should've known that Cupid was her tatting angel 😄 I have all the material, but need some time to put it together into a post. But for those who can, check out her or my facebook timeline for pics of her completed work - love the colour composition!!!


Find all my heart patterns here (which I will update with these recent additions)
https://docs.google.com/document/u/0/d/1LpHU69wNsQspIHgvt9pihgTNhHFDRBab3I5_MDEYyNw/

Before I sign off, here's a Delightful article by Karen Bovard Sayre who nails our thread addiction through studies! Anitra Stone called it Threadus hoardicus, and sadly we tatters seem to suffer from it, with no cure in sight 🤣😁🤪

Thank you pals, you make my life WonderFull ! 💖

Thursday, 29 October 2020

tree in time

Pin It now!

Digging through my tatting stuff for another project, this tree pattern sprung up! I had sketched the pattern in January, but didn't get around to uploading.  

Wonky  Spunk  Tree   

free pattern pdf

This was the final motif of the 25 Snowflake Project from last year. All patterns are listed in my patterns page, as well as in the Snowflakes' Google-Docs file (which needs a bit of updating).

This is tatted in 3 parts, though one can climb out with split chains to avoid cutting and joining. It is based on a sketch I showed here.

Worked with one shuttle and a Red Heart size 20 ball, ctm. 
Final measurements : 6 cms wide and approx 8.5 cms tall.
This is a prototype, but worked quite well the first time round! It is very wobbly since most rings are unattached. It was deliberate, so that I could insert a string of beads later, as desired.

Under fairy lights, shadow play gives it a 3-D appearance. Despite being floppy, it is good to glue down on a card or to sew as an applique.

Here it is with a string of assorted size 10 to 12 beads. Notice that there are 2 strings. I used a sewing needle with firm thread, joining to each free ring, as well as at other points.

Finally, these larger size 4 beads in assorted colours were sewn in. I thought they would work as baubles :-) With a bit of pre-planning, some of these 'baubles' could be left to dangle. However, in this case I needed them to join the free elements between layers.
It can be used as a tree ornament, but will require stiffening.

This time I simply inserted a couple of the model pictures to my pattern image and converted it into a pdf. Each of the 3 parts (A, B, C) is in a different colour. Here's the pdf link again.
This is kind of freeform - easy to change size and shape. making each model exclusive and unique, as in Nature! Hope you enjoy tatting and gifting.