Showing posts with label sewing away. Show all posts

Tuesday, 3 April 2018

thread a needle using chalk

Pin It now!
I’ve been neck deep in sewing after neglecting it for well over a year. Mostly utilitarian, nothing exciting. And I remembered a tip I wanted to share. I had taken photos back in 2013, months before I even thought of blogging, but never got around to posting.

It’s a simple tip and perhaps common; but I haven’t come across it yet.


A weak eyesight or the thread end dancing to the tune of the fan breeze can aggravate a simple task. My Singer Futura sewing machine has the needle eye facing the front. It was very efficient till I had to start using a needle threader! A very difficult/inconvenient position; see how the threader has bent in the pic below.

So here’s my 3-step solution to threading a needle (dip, snip, swipe) – it works for any kind of needle, though demonstrated for a machine one here.

All we need is a tailor’s chalk and a sharp scissors.
 There is a mix of old (2013) & new (2018) pics, hence the chalk pieces differ.  

1. Dampen about 1 cm of thread end (yeah, I use my tongue – gross but fairly universal).

2. Snip the tip with a sharp scissors to remove any frayed ends.

3. Hold the chalk in right (dominant) hand & thread in left. 
Keeping left thumb over the thread, run or swipe the chalk over the tip from left to right – 
in one direction only. Do this 4-5 times.
The lines made by the thread are clearly visible on the chalk

Voila! Your needle is ready to be threaded very easily, even with the left hand !!!
Once threaded, the chalked end can be snipped off.

Chalk powder stiffens the damp thread, weighs it down a bit, and makes it more visible too!
I use coloured chalks for better contrast.

Other materials : In a pinch, raid your kitchen for some cornflour or rice flour. 
Or, beeswax, candle wax, or a crayon, instead of chalk can be effective.

I still prefer the chalk and have used it to thread handheld needles just as effectively. There are always pieces of chalk (3 different colours) in my sewing organizer and emergency box.


What is your go-to method to thread a needle?

Tuesday, 31 May 2016

coming together for a cover-up !

Pin It now!


I didn't want to enter the kitchen so soon ! But a tummy needs what a tummy needs, no matter sun or rain, muggy or cold. There's no grumbling with rumbling. Leftovers, you say ? Yes, of course, but one still has to make something in order for there to be leftovers, right ?
And one doesn't want to get one's pretty dress dirty in the process !
So off I crawled to the kitchen, .... taking a little detour through time and the sewing room. 

'Make something' first !
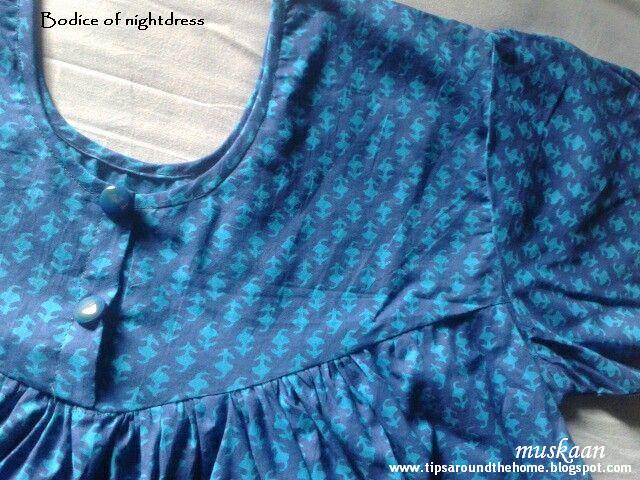
Stepping back a couple of years.... My MIL needed nightwear ASAP due to an emergency hospitalization leading to a long recovery/rehabilitation thereafter. Luckily I had recently bought a lot of cotton fabric for both of us and could sew them out quickly. Here is one such, a hand-block printed Bagru cotton :
 
There was no time for anything fancy ...
But still too simple, so I rummaged through my frugal button stash and found some matching buttons to put along the front … (these buttons were left over from a 2nd birthday dress I had sewn for my niece).
And the sleeve, though not clearly visible, has an open box-pleat at the base and a minimal puff at shoulder.

One of the advantages of sewing oneself, is you get to keep all the leftover fabric pieces :-D  
There was a decent-sized rectangular piece that could be used for an apron, since it was pure cotton.


Apron from 'leftovers' ! 
My pinterest challenge for May 2016


What pattern to use ?
Tropical weather can be quite hot & humid as we approach monsoons, and add to that the heat in the kitchen. Even the thin apron strap round the neck can cause discomfort & perspiration ! I have been looking for apron patterns that circumvent the neck strap/string & saved a few on my DIY-Sewing board.
Despite the lovely ideas, they all had a kind of skirt around the waist, and wider straps behind needing much more fabric than I had or wished to use. These projects gave me a very good idea but customization was called for. 

Firstly, I had only about 35”x 22” (plus enough seam allowances all around) of this material. Plenty for a straight-cut apron; not enough for pleats and skirts.
Secondly, the fabric suddenly seemed a bit thin for a durable apron; not enough body.
Rummaged through my fabric stash & found this plain blue fabric.

A double-sided/reversible apron ?
Yes ! Keeps the boredom away ;-D

How to adorn ?
Tatting …
Another rummage, this time through my tatting stash.
I had 30 blue & white motifs in 3 sizes which had been sewn on to a blue silk sari & gifted to my MIL in 2000. Unfortunately, the sari colour ran & the white turned pale, spotted blue :-(  Eventually she removed & returned the motifs, knowing I would put them to some sort of use, & wore the sari plain.
Perfect for this fabric print & colour ! Picked the ones where the white thread was more evenly ‘dyed’. 
3 small motifs & 2 medium motifs were arranged & sewn only through the printed fabric.
The pattern is from the only tatting book I had for decades (gift from a dear friend) “Tatting Favourites” from Anchor Design Center

…. and Painting !
My idea was to do some freestyle monotone fabric painting on the plain blue side. That was the reason I used dark blue sewing thread on the light blue fabric. But practicality ruled. See, once the front is ironed, it will leave an ‘imprint’ on the back; so it would not really be a reversible apron. The blue would just have to settle for being a lining.

How to strap it on ?
Still strapped with the neck 'strap' problem….
I couldn’t decide whether the strings should go straight down the back or make a cross. This led to difficulty in estimating their length and position (one should have a mannequin or a live model!). Hmm, as I write this, it occurs to me that I could've used crocodile clips to estimate !!!
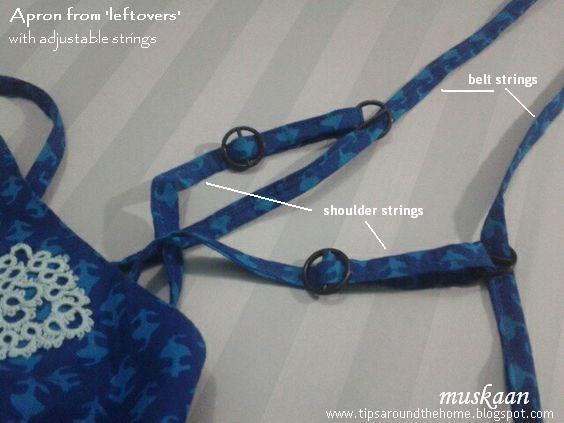
So the decision was postponed – 4 strips were sewn – 2 on top & 2 for the belt.
Meanwhile the remaining sewing, including hand-hemming the bottom seam was completed.
I was still lost, and the last day of May to post the pinterest challenge was fast approaching… take a deep breath and Think girl !!! 
Rummaged through my meagre leftover neural stash .... and  Eureka ! 
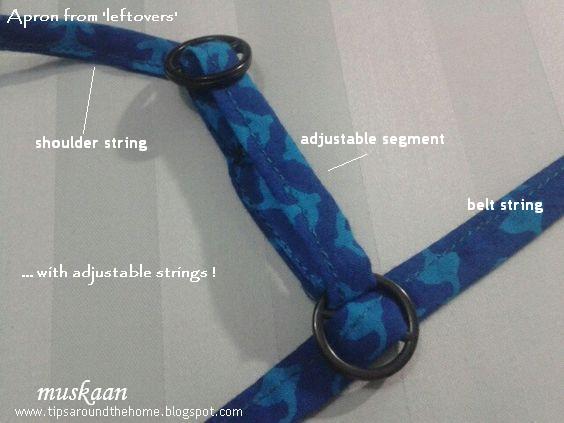
Adjustable strings !!!
Rummaged through my closet & cut out an old beige bra & removed the ahem “bra strap adjustment slide rings” – quite a mouthful (hmmm, didn’t know the term, but Google always obliges).
 Once I saw that it would work, I cut out another black one for black rings.
One ring went into each belt, and the rings for adjustment went on each shoulder strip.
The adjustable segment was hand-sewn.
The belt rings are free-sliding at present, leaving me the option of wearing the strings straight or across my back. The final tacking down of the rings on the belt will have to wait till I wear the apron for a bit & adjust to comfort.

The belt strings are left long enough to be tied in front .

That’s my challenge completed & solved to my liking, literally using leftovers – quite a cover-up!


Aren’t you just curious to see what the other pin chicks are up to? I am.
Let's visit them and check out their immense creativity at
& our newest member


Related Posts : pin chick in the bed room ,
the kitchen,
the bathroom,
the dining room


Saturday, 30 April 2016

pin pricks for this pin chick !

Pin It now!

A bit dramatic, but fairly true.
This month’s choice for our pinterest challenge was an idea I derived 5-6 years back & have shared it many times on Yahoo!Answers back in the day. It remained a want-to-make idea till this challenge challenged me to get on and make it ! I really want to thank the pin chicks for starting this challenge – so many of my old pins are now coming to life.

After the bedroom, kitchen, & bathroom, this time it’s the turn of the dining room! This pin has been a longtime resident at my DIY Crafts board.

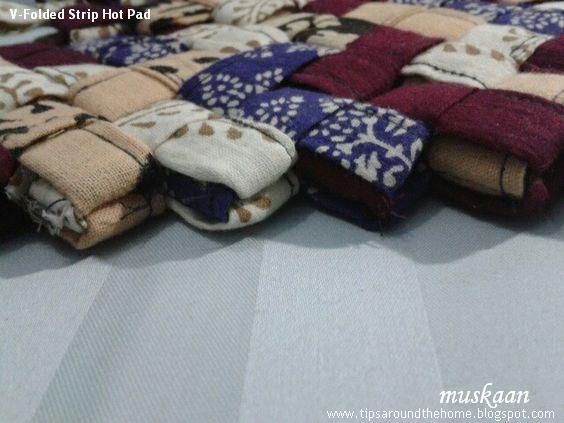
A V-FOLD STRIP HOT PAD
For the dining table

The intention had been to use up my plain rubia 2x2 cotton scraps, but those went into deep storage last year after a bout of rigorous housecleaning. Instead of pulling out the carton, I choose what scraps I had on hand. They are all cotton though of differing thickness & texture. I also got to use my new rotary cutter !
I first checked whether the dimensions in the video would work on cloth. Yes, they did! After sewing the folded strip lengthwise, 3 more folds are required. Paper holds it's folds, but had to use pins to keep the interlinked fabric pieces in place, resulting in a free-for-all pin prick contest !
Some modification & adaptation was called for….

Scraps were collected & cut & folded while machine-sewing the edge in long strings (too lazy to change threads, black/dark grey was used throughout). Forgot to take a pic of this stage.  This is fold #1 in above pic : the lengthwise fold is sewn down with machine. 

Keeping breadth same, I increased the length of each strip by ½cm, and machine-sewed the centre of the folded strip. Now all that was needed was to insert the folded strips to each other to create rows. And this time it worked splendidly; the pieces stayed in place and the short sewing line was not visible in the V-folds.
This is fold #4 in earlier pic, where the extra 1/2 cm is overlapped & sewn all through.

Strong blunt-edged Tweezers helped to pull the strips through the slots.

I chose to align the rows in a zig zag fashion rather than all rectangles facing same direction. 
Thus each alternate row faces opposite to the adjacent rows.

7 rows ; 15 strips for each row ; 105 strips in all.
2 strips create 1 slanting rectangle; the last rectangle is a single strip.
Final measurement of hot pad : approx 6” x 6½” x ¼” . Thickness depends on material used.

To Join The Rows, I chose to hand sew the thick mat. Here was another Major needle prick, with quite some bleeding. Decided to switch to the long sturdy sharp-pointed Sail needle, which worked great with due care. I’d had a vague idea of inserting wooden beads at the intersection points to both sew in the rows, as well as add interest. But it was a non-starter.
I used a combo of hem, whip, and running stitches, passing the needle through the middle folds/layers. 
After every 4-5 stitches, pull the thread (double thread used) taut to tension & hide the stitches; 
then make a kind of back stitch to secure them in place.
All this hand sewing was done from the back side.
I left the end strips to be sewn in last, since the single strips required sewing the flaps together too. For this, a normal needle was used (both needles shown in pic for comparison) and some sewing had to be done from front side as well.
My initial idea of basting a linen cloth base was not required. This pic is  the front view.
This mat is thick & sturdy enough and can be used from both sides. Above is the back view.
One corner of the single strip (top or bottom corner in above pic) can be left open to be 
used as a slot for hanging.
The pics are taken fresh off the needles, with no time to iron. 
However, it lays flat and compact.

This is a fun & playful stash-buster project (except for the hand-sewing)! Remember making these V fold garlands, buntings, bracelets at school ? Here’s another pictorial I found on how to make paper bracelets. 

There are many steps where I wanted to or could’ve made it prettier.
Eg. use matching thread for sewing (which meant straining my vision & time-guzzler) ;
hide the black sewing line (which meant trips to the ironing board) ;
make parallel sewing lines (meaning more work) ;
hiding the raw edges of the fold more neatly while sewing (too fidgety on the machine) ;

In the toss-up, practical reasoning won in this first attempt. It looks pretty enough & very functional in reality, & my DH liked it ! Each time he’d ask whether I was done sewing (the sewing room becomes a mess when I take up a sewing project & therefore try to combine multiple sewing projects adding to the mess) & what was I sewing … for all that 3rd degree, he could only extract an impish smile from me ;-D . I didn’t want him to prejudge (he is Not a labour-intensive person!). But the hot pad has been passed with flying colours – soon I will hunt out my old scrap stash & change all the store-bought hot pads - I want a woven one too ! 
Unless you insist on distracting me ;-P

Speaking of distractions, check out what the other talented pin chicks have hatched !!!
Margaret , Suzanne & Carollyn have already posted their challenges; Imoshen’s is an ongoing process this month, with 2 posts already uploaded. But I’m not telling – you’ll have to click on the respective names for an eye-candy tour :-)
I’m the last to post this month - you gals keep me on pins & needles ;-P


Happy pinning & join us anytime you wish
(all you need is to contact Suzanne)


Sunday, 15 November 2015

Sewing lace

Pin It now!
The Forgotten Lace
I simply Cannot rely on my memory ! 
So many items that I’ve made & gifted down the years have just vanished from my memory box :-(

Last week, when my MIL sent in some sewing/refitting of petticoats, I asked her to send along a fit sample to refer to. She loves crochet laces along the hemline, and has always had hand-crocheted laces sewn on – mostly her own !

Turned out one of the laces was made by her DIL ! Moi? Quand?
It does have my preference of working the lace from side to side (width-wise) till the required length. Imagine having to crochet an almost 2 meter long chain & then working each row lengthwise ! Messy. (I’ve done it for a couple of my Grandma’s petticoat laces, though, when I did not have too many books/patterns to choose from).
I need to rummage through my books to find the pattern … will update when I do. If I can rely on my memory to remind me later ;-P
I like the fact that this pattern can be made as broad or narrow as desired/required !!!
Above are a few very quick pics I took, before sending it back to her. Didn’t have time to iron ….

But time to crochet a New broad lace for her !!!

*****************

What this post is really about is the way my MIL sewed on the lace to the fabric edge.
Note : These are not new edgings – many have been in use for decades, switching to new fabric …. 

Sewing Lace
in 2 easy steps

I like the way the edging is machine-sewn, in 2 simple steps. Here are a couple of process pics …
Place right sides touching & sew along the edge.

STEP 1  
Place lace along hemline : Right side of lace touching the Right side of fabric/hem.
Sew over, along the edges. 

STEP 2  
Turn the lace over (‘open’ towards the right), 
so that both lace & fabric are right side up. 
Top-stitch as close to edge of fabric, as possible. 
 TADA !

TIP : There is only one thing I would do differently. In the above pics, the fabric hem is completely sewn, before the lace is being attached ; thus it has 3 layers already. Add to that the lace, & then the turned down lace & fabric … and you have many layers to sew over.
To reduce the bulk, fold of fabric just once (simply tacked in place), then follow the 2 steps above. This would eliminate a couple of fabric layers, as well as the sewing lines.


But I do like the result ! Quick, too, and very durable !
Of course, if one does not want any part of sewing to be seen, then this process will not work, especially the 2nd top-stitch step. In the end, one needs to consider where & for what purpose the edging/lace is to be attached & how it is to be used.


I’m certain most of you already know & do this. But you can understand why I have to post, right ? This is my memory deposit for a future ‘cloudy’ day ;-P

*****************
My Mom-in-Law’s Crochet Laces

My MIL has done tons of crochetwork – making multiple sets for gifting, or personal use, etc. – ranging from doilies (in all shapes & sizes), edgings, laces, to entire patchwork bedsheets !!! I will share some of her work over time …
Here are a couple of her other petticoat laces (the ones she sent me to sew on) : 

As you can see, I’ve completed only step 1 in this case.

Both steps completed in this case.

The one pictured in the 'tutorial' above

*****************

In Conversation

A bit of ‘news’ … I’ve added a new page to the blog, titled ‘My Tutorials’. It is still under collation, though.

I added some explanation to my previous post ‘Kitty with an Auxiliary Tale’ 
I realized that for many who haven’t seen the pattern, my working of the face may seem confusing. And I had not explained my rationale, anyways !

So please click on links to check out both :-)


Wednesday, 10 December 2014

Sewing Away II

Pin It now!
Green Kaftan
with black laces 


 It was difficult to capture the entire kaftan on camera ; hence the folds, etc.

When I first stitched this kaftan & sewed on the store-bought lace along the sides, the neck looked quite barren & needed something. (as seen in the penultimate image).
Hence, tatted up a single-shuttle, rings-only edging that I like. It does not exactly go with the triangular peaks of the side lace, but I did not want to take away focus from the side laces. The final result didn’t turn out that bad.

I used size 20 Anchor Mercer Black thread for tatting.
I don’t have the exact source of this edging pattern (it is one from my old collection), but in an earlier post I called it “Dancing Clovers”.


Sewing
For this kaftan, I deliberately cut off some inches from the side of the fabric, in order to shorten the width. Despite a beautiful drape of entire width, the long ‘sleeves’ snag at door knobs !
Secondly, I sewed on the lace at the sides some distance from the fabric edge for 2 reasons :
The lace lost some of its appeal if nichéd along the very edge. The short green strip gave a much better appreciation of this beautiful lace.
And, the extra fabric was folded & seamed in After sewing on the lace, such that the sewing line of the latter was completely hidden within.

Another alteration I made was to inner stitching line. Instead of keeping it straight throughout, I gradually went in towards the waist & back out. Unexpectedly, this has created such a lovely shape, that even though a backing was added at the waist for string/belt (the parallel sewing lines are visible in pic above, shown by white arrow), it is No Longer required ! The kaftan drapes so well Without any gathering at the waist ! And since the neck is broad enough, it is easy to slip on.

Ending with a pic of how I sewed on the "Dancing Clovers" edging to the already-sewn neck line, using an embroidery hoop.


Motif #23 for 25 Motif Challenge

Tuesday, 4 November 2014

Sewing Away I

Pin It now!
The Classic Pincushion


Inspiration : Jane McLellan


This is a ‘welcome back’ post for Jane McLellan – I’ve been waiting for your return, Jane, to post this :-) I would never have garnered the courage to make it, if it wasn’t for you !
And the tutorial is just Great ! (click on names above, for respective posts)

It is a compromise, utility-first pincushion, made in a hurry. I’m happy as it is my first attempt, but not satisfied as I did not follow on what I had in mind. That will have to be for a later date.
I was surrounded by a lot of sewing projects & desperately needed a pincushion. Hence, I simply used some leftover fabric strips from a WIP & made it. Very quick, Very easy ! Great way to use up some scrap fabric! DH loved it & I'm using it ;-)


Happy Sewing :-)