Showing posts with label mat. Show all posts

Wednesday, 29 April 2026

clover mat

Pin It now!

Question - Is there a specialised tatting term for a fabric made by repeatedly joining multiple tatted motifs? Or were they simply called doilies and mats, and the like? Tessellation and/or tiling are terms that could be applied but I'd like to know what this arrangement was called historically ....

This is a portion of Jon Yusoff's Clover Mat/Doily/Runner. This free pattern can be found here - https://tatsaway.blogspot.com/2008/11/clover-matdoilyrunner.html It is made up of 3 different motifs, attached in a regular pattern. It is a diagram-only presentation, which I prefer!
Worked in Anchor Pearl Cotton size 8 (equi to Lizbeth size 20).

Motif A worked in blue shade - 00131 
Made a few wrong joins between the trefoils in the beginning and even untatted back to rectify the error.
Future - I had decided to use two colours - one for rings and other for chains, but totally forgot when I wound my shuttle CTM with the ball. Hopefully somebody will give it a go since they would outline some nice shapes when joined.

You might notice that the picots are not perfect. Dr Downplay was dancing on my shoulder and urging me to just let go and have fun and that's what I did - no picot gauge - sheer unadulterated pleasure of the shuttle moving back and forth!

Didn't realise the amount of thread this was consuming, LOL. For fear of running out of this shade I switched to a lighter blue - 00130.

12 Motif A joined.

Next I chose to add Motif C because the outer unattached motifs made the piece floppy. Also, being a single shuttle motif, I took it to my doc's appointment where I could finish 5 motifs. 
The florets that are joined to 3 motifs should actually have been filled with Motif B. However this small motif not only fit the space perfectly; it also left me the option of enlarging the fabric at a later date by snipping them off.

Motif C is a much darker shade of blue - 00133
When working with multiple colours or shades in frontside/backside tatting, one has to be mindful of colour blips at the joins. This time I used Lark's Head Join (the 2nd method) throughout and it is truly quite easy and quick! It has become my go-to. Watch Karen Cabrera's Lesson #101.

Motif B fills in the negative spaces. After some deliberation I chose two shades of purple - dark 00106 and light in the center 00104.

The final mat measures 20.5 cms or 8 inches length and breadth. It is already in use!

Background Options -
Being of different values, it was very difficult for all shades to show up. The best was against this wooden board. I usually brighten the image and increase the contrast. Which is when I noticed the options in the top bar of Photos .... Is it a new AI option put in by Windows 11 or was I just blind all this time?! Anyways, here is what I did ....
Open pic in Photos and click on Edit.
Next click on the last icon. (The last two icons are AI features, I think)
This is the window that opens on the side with 3 options. I chose to remove the background, hence clicked on the center option. Then Save your image.
TIP - The image might save as .png which is heavier. Choose 'Save as' and select .jpg or the format of your choice from the drop down menu.
Before and After versions of the same pic. All colours and values are better visible against the white background.
 
NOTE - I used the other two options (blur and remove background) in a pic each of 2 other projects. While I haven't played with it much, I believe some distortion can occur especially in close-up pics. Hence use judiciously.

Many many thanks to Jon for sharing this lovely pattern and to Karen for her clear demo of the LHJ!

Monday, 9 May 2022

single motif bonanza

Pin It now!
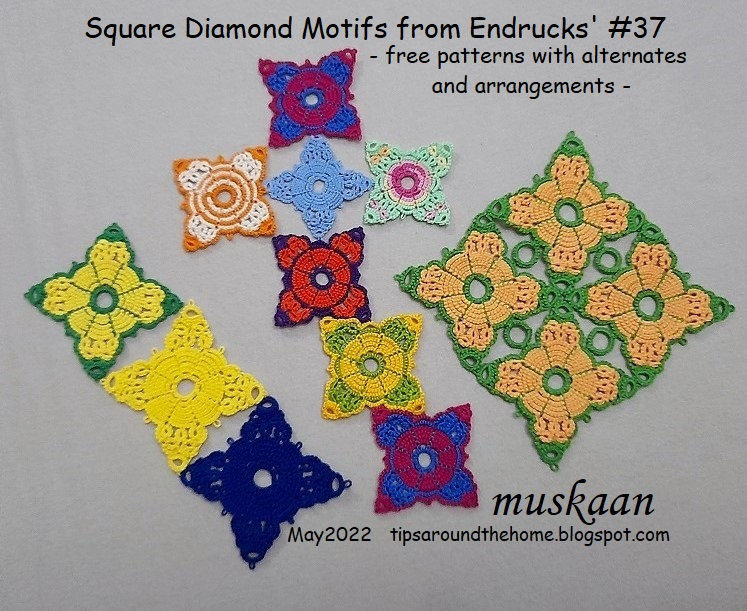
Square diamond motifs and mat with pattern 
from endrucks (1920) doily #37

pattern pdf (click to download) : 

My love affair with this motif started a long time back and the tatting started in November 2020. It is the central motif of a doily - pattern #37 from Endrucks' 1920 book. What caught my interest as I tatted, was the versatility in terms of sequence/paths resulting in diverse colour and directional effects.
For the most part I kept the inner Rosette unchanged, focusing on the arms.

1. Original: This is the original unaltered pathway from Endrucks. The 2 small middle rings (lateral) face the same direction - to the right. The asymmetry is not too visible since the rings are tiny. However it intrigued me, and as a study in design, I decided to go ahead with my variations....

alternate pathways and variations ---
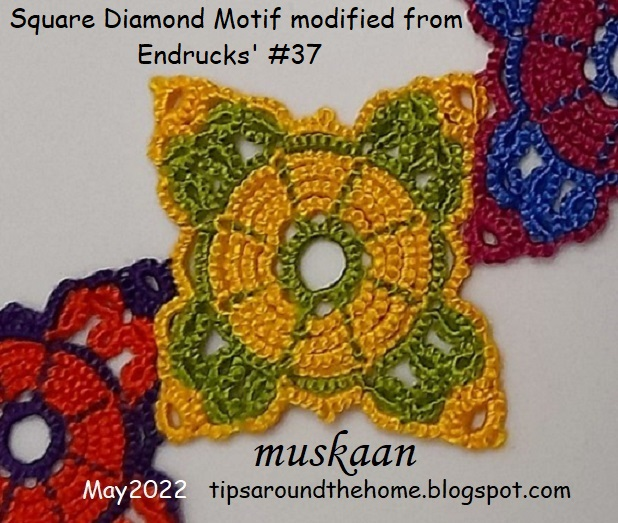
2. Modified: My modified pathway where the 2 small lateral rings face each other for symmetry. This is used to present the stepwise pattern, loading 2 shuttles with contrasting colours.
In Anchor size 20 (~ Lizbeth 10), it measures 5cms sides and 6.5cms diagonally.

3. Trefoil Version: This entire motif can be worked with one shuttle and ball, except for the single thrown ring at the tips, provided we decide before working the penultimate round. 

4. Flipped Ring version: While following Endrucks' original pathway, I merely swapped the direction of the thrown ring at the tips, working it on the way up rather than on the way down. Look closely to see that I alternated the flip.

5. Colour medley 1: Using Lock Join Plus aka Repositioning methods, I alternated the colours/shuttles within the rosette. (https://drive.google.com/file/d/17zsM3JaLO7r0ajg8VOnv5IcJ-kLNqEiU/view). You can choose any method you like, including changing colours between segments rather than rounds.
6. colour medley 2: I started with ball and shuttle for the rosette and added the green thread later, using False CTM, and snipping off the ball thread. (false ctm tutorials Part1 ; Part 2).
In Lizbeth 20 (with one less rosette round), it works to 3.5cms sides and 5 cms diagonally.

7. Reduced Round: If you remember my travails with cupping, this motif was my solution by removing the final rosette round and increasing the size of the 4 joining picots.
In Anchor Pearl cotton size 8 (~ Lizbeth 20), this works out to 4cms sides & 5,5cms diagonally.

8. New Motif for Doily: While the doily worked fine with the above modifications (in #7), I needed to make sure it will hold up in crochet cotton thread. Hence started this new motif (but forgot to reduce the round!). I'm still a bit apprehensive about continuing .... let's see.
In Anchor size 40, this works out to 3.75cms sides and 4,5cms diagonally.

arrangements and tessellations ---
The motif can be used as a square or a diamond and joined for various arrangements. Several arrangements and ideas have already been showcased here - https://tipsaroundthehome.blogspot.com/2020/11/arranging-motifs.html

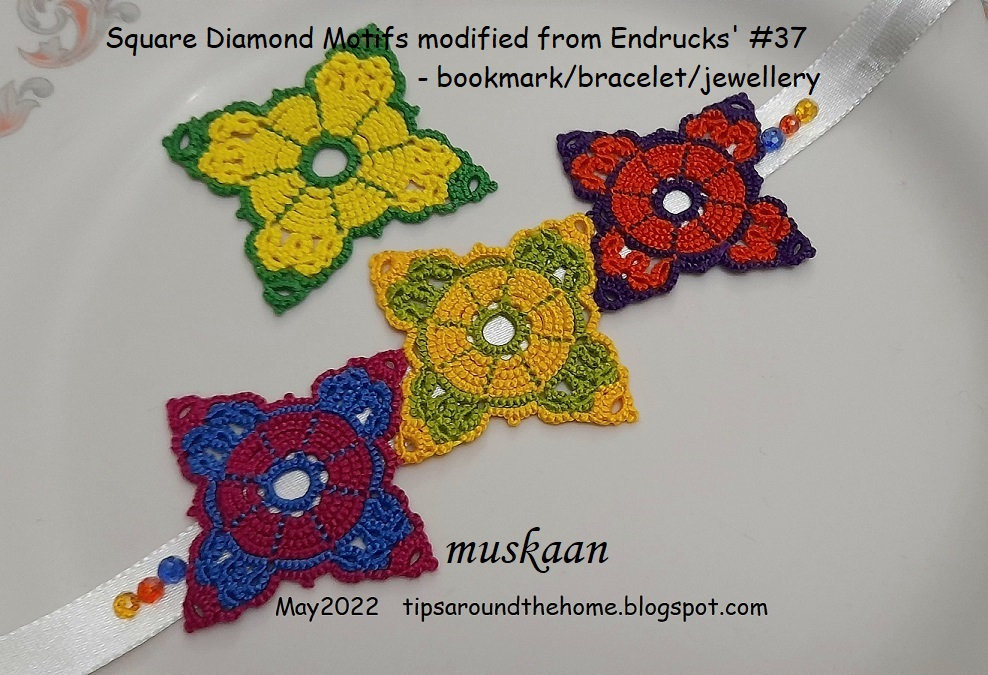
bracelet, bookmark, jewellery, charm, ....: Above is the bracelet idea. I really like this offset arrangement! Bookmark with a single motif as charm at the end of a tail is another practical idea. 
Single motifs with beads and findings can become jewellery pieces,...in fact an entire parure can be tatted.
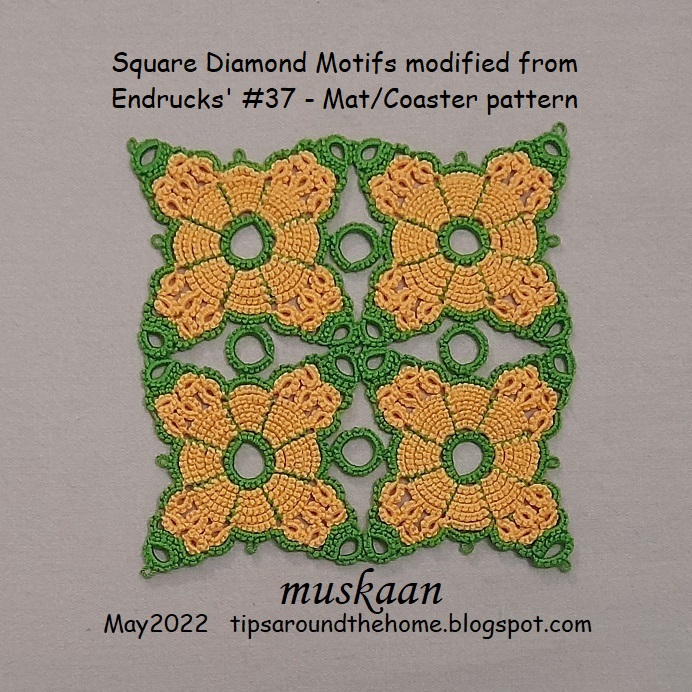
9. Modified for Mat: The single lateral ring at the tips are larger here (7+4-4), and used for the Mat (below). 
Hubby had chosen this yellow and blue combination for the mat/coaster I wanted to make him. But the solid colours didn't work out (the 2 joined motifs can be seen in the topmost group pic). However, after seeing the cute 3D Flower Cube by Lillian Yeung, I hope to convert it into one, too!

mat/coaster/table runner/table cloth ..:  I was tired of working with yellow, hence chose this peach colour and the green went nicely with it. One can increase the tatted fabric to deserved size by joining as many motifs as required.
In Anchor size 20 it measures 10cmsx10cms.

Wondering whether we needed to cover up the blank space a bit, the sequins were hubby's idea and he got the blue he'd had in mind! One can use buttons in place of sequins.

For the purpose of sharing the pattern, I decided to see how large a ring would be required and worked these 4 rings in later. However, they can be worked as thrown rings. I was prepared to snip off the rings, but hubby liked it just fine and is using it!

alternate tessellation or cross: If a size 40 motif is joined like a diamond to the 4-motif open arrangement (worked in perle size 8 or Lizbeth size 20), we get another variation for a mat or fabric with alternating squares and diamonds!
In the above, if we join a couple of motifs to the orange one for a longer arm, we get a cross!

So there it is - a bonanza of choices and effects from one single motif!!!
All pattern notes and/or diagrams are included in the pdf (click to download): https://drive.google.com/file/d/1wqAPnOUZwLJ9tEUk55wDZhAMw2qCNFSj/view

All pattern pdfs and more, in modern style as well as links to the original book can be found in the Endrucks 1920 Project doc here -

Thursday, 14 October 2021

spirited seventeen

Pin It now!

When posting the pattern recently, I said I'd share some possible ideas from pattern #17 in a separate post. Well, this will be like a static slide show, without much text except for the idea. I hope you put on your coloured glasses to figure/pick out the possible images from this spirited #17!

Endrucks pattern #17 - possible ideas, adaptations, extraction, derivations 

By simply folding, removing 'unwanted' areas, and/or joining at appropriate points, a plethora of patterns are possible ...

1 - kimono
 
2 - Eskimo or gingerbread man

3 - wheelbarrow with flowers or prams with babies in between
Or Marilyn Monroe in her iconic flying dress image
The wheelbarrow and pram are what Ninetta saw! Took me a few minutes to extract those images.
This is the 2-repeat sampler I had tatted and have folded to create most of these other ideas .....
Click here to download the pattern and get into the spirit -  https://drive.google.com/file/d/1sStHg5IQmuwizC7QcKRaX951CvVoURbn/view
4 - yet another possible corner for a triangular motif or a square mat.

5 - is it a bird? is it a plane? is it a boomerang?!

6 - folded into a bow - good around the neck or waist,
to hold up long hair or decorate a gift!

7 - cat ears for Catwoman!

8 - a 3D crown or headgear

9 - mojaris (Rajasthani footwear) for men

10 - 2 grasshoppers munching their way through leaves! 
So what if they are the wrong colour?!

11 - 2 swans facing each other

12 - Reiko Akamatsu's rearrangement for a square frame

13 to17 - These have moved from the realm of ideas to patterns ....
Superimposed Square frame  - https://drive.google.com/file/d/1sStHg5IQmuwizC7QcKRaX951CvVoURbn/view
Reflections motif and snowflake - https://tipsaroundthehome.blogspot.com/2021/08/more-reflections.html

So, is it just me or could you spot the possibilities as well? Did you come up with something else? Do share.


Saturday, 20 March 2021

happy sunflowers

Pin It now!

Adaptation of Endrucks' pattern #1 edging into a circular coaster/doily.

HAPPY HANDS SUNFLOWER
by Meenakshi (muskaan) Jain
adaptation of Endrucks-Leichtenstern's pattern #1 
from her book ‘Die Schiffchen-Spitzen’,1920
UPDATE (Nov 2021): pattern now in pdf... click to download -
The large one on the right is a prototype from 2015. The upper WIP is halted due to cupping. The lower left one is the final version, with pattern below.

6 years in the making! In 2015, it was tempting to convert Endrucks' #1 edging into a circular coaster. Every other year I would pick it up, sketch or tat a center and fail. For a long time I thought of it as a sun/corona. I also wanted some block tatting inside. 
Till that aging process resulted in my own maturation and this center materialised from yet another failed attempt at tatting a reflection of the happy hands, large ring facing inward (like our reflection in water). That proved too large, but led to this idea which worked! 
Design Tip: Notice the cupping in above WIP model? I believe it happened because in my 2015 model there was space at base of large ring and arms on either side. In new model there is no such space.
The lower center was tweaked with shorter chains.

ROUND 1 - center medallion pattern


Ball and shuttle, continuous thread. Joining picots are small. Start with a large ring (starred in pic). Tatting moves counterclockwise.  
    R1: 4-4-4—4-4-4. rw
    C1: 5-5. rw
    R2: 4+(R1) 4-4. rw
    C2: 5-5. rw
    R3: 4+(R2) 4 +(R1) 4—4-4-4. rw
Continue around (total of 10 rings). 
NOTE: Remember to join last 2 rings to the first ring. The red lines in
 the top right pic show the last large ring is joined to 2 previous rings on the left, and one join on the right to the 1st large ring. The final small ring is also joined to rings on either side.

ROUND 2 - circular edging/petals pattern
For stepwise edging pictorial, with sequence, legend, links, etc. refer https://tipsaroundthehome.blogspot.com/2021/03/balancing-act.html and the notes below

    2 shuttles, ctm.
    A ring: 4-4-2—2—2—2-4-4. rw
    Bchain: p 4•4•4-4. rw
    C ring: 8-2
—6. dnrw, SS
    Dchain: 4CWJ 4• SS
    E ring: 2
—2-4. SS
    Fchain: 4CWJ 5+
    Gchain: p 4•4•4-4. rw
    H ring: 8+2--6. dnrw, SS
    Ichain: 4CWJ 4• SS
    J ring: 2
—2-4. SS
    Kchain: 4CWJ 5+ . rw
    Lchain: 5+(Rnd1) 5. dnrw, SS
First Motif Complete.
    **Leave space
    Aring: 4-4-2—2—2—2-4-4. Rw, SS
    Make B,C,D as before
    Join to E above and lock join to A below. Keep Both threads on same side ( I prefer to keep them above). 
    Continue chainF
    Make picot join and continue to other side, as in 1st motif, and complete the 2nd motif.
** Repeat ** to ** till all 10 motifs are made and joined back to the first motif. Tie & cut.

Model worked in Anchor size 40 (00269 & 00302) measures 7.5 cms. Round1 medallion is 3cms. 
In Anchor size 20 (the prototype model), it measures 4cms inside and 11.5 cms final.

I sought the advice of my Endrucks 1920 Project partner Ninetta (thank you!) when there was cupping and her tips along with my own ideas helped me arrive at a model that lies flat. A very close inspection will reveal discrepancies as I implemented changes on-the-go. But I am fairly confident this is good.

NOTES / THOUGHTS
  • To work petals in 2 colours, see pictorial for colour placement options and methods.
  • All joining picots are very small.
  • CWJ is optional but gives a smoother outline.  
  • For fs/bs tatting, I did a bit of cheating with the CWJ – I made 1 less half stitch on the backside chains, and formed a normal CWJ. Thus when seen from the front, they appear as a complete stitches.
  • I did not count the CWJ as a stitch.
  • There are chain segments with 1 more or less half-stitch-a judgment call. 
  • Simple blocking on completion will give it a neat finished look. 
  • All decorative picots are deliberately kept long. Picot gauge is optional.
In my 2015 prototype I had used double and triple picots which are now changed to regular long picots. I think it gives a way better look!
If you look closely you will see the tweaks I made in the light yellow center, trying to settle on the right count.

FUTURE IDEAS :
  • For a more natural look, vary the length of the petals by adding or reducing chain segments by 2, 3, or 4ds.
  • We could try to do away with the 2 rings at the periphery, replacing them with chain segments and picot for joining.
  • Add more layers of petals for a beautiful 3D flower.
  • Add more colours. Hubby insisted on just these 2 and I obeyed (sometimes I behave ;-P).
  • I am working on a 3D 3-petal earring/pendant/brooch adaptation that I think should work - simple tatting and a beaded version.
So, keeping my fingers crossed that you remain sunny and cheerful for future posts, without ennui setting in ;-D
And I welcome somebody to test tat this and send in their feedback. I hope there is no mistake. I will convert the pattern into pdf format at a later date.
happy tatting and adapting !