Showing posts with label rosette. Show all posts

Sunday, 2 August 2026

time to play again

Pin It now!

I wasn't going to, honestly, I had no intention of doing a design-along challenge this year! But then I made this simple motif to show the common picot and it looks cute, quick, and easy enough to work as the starting motif for a DAL, right? 

Disclaimer - The design is so basic that I did a quick image search for a similar pattern done before, but couldn't find any. I used my own count without referring to any previous pattern. Yet, if you know of any, please do let me know.

So what is a DAL, you ask? 

  • Design-Along (DAL) is a little game I 'invented' where I give you a starting pattern. You tat the motif and then you have to continue by designing and tatting your own round or rounds to it. 
  • In this 2-round motif no special techniques, no special effects are used, hence it can be a good stepping stone for relative beginners to design another round.  
  • The motif can be tatted as separate rounds (like in my model) or you can climb out with a split ring.
  • Feel free to add more picots to these two rounds if you need your 3rd round to have more attachments.
  • You might even think of repeating this motif to create a larger piece, BUT you still have to design a round around them for it to be considered a DAL.
  • Send me a pic of your tatted-designed piece and as before, I will include it in a Google doc for everybody to see. You can upload to Facebook (tag me - MuskaanM), or in your own blog (leave a comment here to let me know), or send it to me privately through email.
  • Tatters are always looking for new patterns. Hence we would all appreciate if you shared your pattern as well in whatever way you can. All participants in my previous DALs have done so.

So here's the pattern. I hope you can find the time and enthusiasm to participate and display your budding or experienced talents! It is always such a huge inspiration to see the wonderful designs you come up with! In case of any doubts, feel free to ask.

Muskaan's DAL 2026 Motif pattern - 


Round 1 - (pink in diagram) Rosette, single shuttle. 
  NOTE: Common picot (△) - height is about 3 stitches across when folded.
  NOTE: For continuous tatting, use two shuttles and make the last ring a split ring followed by a mock picot, the same size as the common picots.
ringA: 2 - 7 △ 7 - 2. close ring, Do Not Reverse Work (DNRW).
ringB: 2 join to last picot of A, 7 △ 7 - 2. close ring, DNRW.
ringC: 2 join to last picot of B, 7 △ 7 - 2. close ring, DNRW.
ringD: 2 join to last picot of C, 7 △ 7 join to first picot of A), 2. close ring. Tie, cut, hide ends.  NOTE: This last join is a picot join to the right or a folded join.

Round 2 - (black in diagram) Scroll, ball and shuttle.
ringA: 6 join to any △, 6. close ring. Reverse Work (RW)
chainB: 6 - 6. RW
ringC: 6 join to same △, 6. close ring. RW,
chainD: 6 - 6. RW.
Repeat from A to D all around. Join back to base of A, Tie, cut, hide ends.

Round 3 - Your Design!!! You can design and add more rounds, too.

You can find links to tutorials here - http://tipsaroundthehome.blogspot.com/p/my-tut.html and here https://tipsaroundthehome.blogspot.com/p/tatting-resources.html

Feel free to scroll through my previous DAL challenges and see what emerged from the shuttles/needles of participants.
Past DALs - https://tipsaroundthehome.blogspot.com/search/label/DAL
DAL 2023 - https://docs.google.com/document/d/1pVqM6S5Ng49xk6erSsDyRm3y7SdV2tCIUOCgltze4lM/view
DAL 2025 - https://docs.google.com/document/d/1mQmdXWXQmcbXQ48nRz9FBeTJf_DoJqKz/view

Hope you join!

Friday, 18 April 2025

hospital tatting

Pin It now!

 Its been over 10 years that I took any tatting along with me. This time I felt like taking my shuttles along to my doctor's appointment. In our minds it was supposed to be a routine visit after 6 months and since everything was stable, we thought the regimen would just continue. We spend anywhere between 3 to 5 hours there, mostly just sitting around. 

A question that has constantly plagued me .... Which came first - patient or patience?!

So anyways, turns out we started a new line of treatment (basically injections at stated intervals) in order to get rid of the oral steroids. I only have a 50/50 chance but any little decrease is better. So off we tromped to the hospital again the next day which required a few hours of hospitalisation for observational purposes, and along came my shuttles again. Following are the motifs I tatted as a patient patient. All in Anchor size 20.


I gave away a couple of butterflies. One lady noticed the hook on my shuttle and asked whether this is how crochet hooks are made nowadays! I explained to her that it was a shuttle used to make tatted lace. She bemoaned the fact that nobody wants to wear or use handmade stuff any longer.


I kept each motif different. Couldn't bring myself to repeat the same counts, LOL.
All tatted with single shuttle or one thread aka single tatting.
These are all very generic patterns hence feel free to copy-tat ;-P

These came home with me. I have decided that it is better to glue them on cards or bookmarks and then gift randomly. Easier than explaining what one can do with the motifs, how to wash and block, etc. So, whenever I'm in the mood, I'll be gluing them to card stock and adding a bit of background. 

And while I had no side-effects from the injected biologicals, I did come home with viral flu which later shifted to my stomach and I lost about 10 days doing hardly anything due to the fever. Back on track now and tatting up samplers, etc., writing an article, creating PDFs, and catching up with blogs.

Friday, 28 February 2025

DAL 2025 challenge

Pin It now!

 Well, I wanted to show some techniques/effects for glossary entries and decided to create a motif to incorporate them. It resulted in a very simple motif, nothing fancy. It may not even be original though I did not refer to or look for any patterns. and it's still a work in progress. 

I kind of like how it looks so far and it could very well be the starting center for a larger motif, if you wish to participate in yet another Design Along (DAL). Tat this two-round motif and then design as many rounds as you wish around it. Sharing your stitch count/pattern is highly appreciated. All will be shared in my blog.

NOTE: I started with a single-shuttle rosette with the intention to cut away later rounds and reuse it for other samples, hence I cut off the thread and hid tails. However, you are free to climb out by making the 6th ring a split ring. Remember to use two shuttles for continuous tatting.

Muskaan's DAL 2025 Challenge


Round 1 - Rosette - one shuttle or two shuttles, continuous thread
ringA: 5-6-6-5. do not reverse work
ringB: 5+6-6-5. do not reverse work
Repeat ringB till you have a total of 6 rings, joining the 6th ring to the first ring.
Cut and hide ends OR climb out with the last ring as a split ring.

Round 2 - Curled Rings  (CR)- one shuttle and ball or continue with two shuttles.
CR: 10-10. Curl around any rosette ring. 
Chain: 2 (-2)×9. Repeat all around. 
NOTE: Picots are 3.5mm high or open picot is 7mm long. [My motif is worked in Anchor size 20, which is similar to Lizbeth size 10).

Hope you like the motif and would be interested in designing and tatting more rounds. Leave a comment or contact/tag me on Facebook or Instagram.

Take it away, friends!

My next round is already decided which is why I have all those picots in the 2nd round. Will share when it is finished. 

Some of my previous DALs can be found here -  https://tipsaroundthehome.blogspot.com/search/label/DAL

And tutorials/videos for all techniques can be found here - https://tipsaroundthehome.blogspot.com/p/tatting-resources.html


UPDATE (12th March 2025) - the first batch of lovelies! -- https://tipsaroundthehome.blogspot.com/2025/03/colour-me-happy.html

Monday, 26 August 2024

starburst fringe

Pin It now!

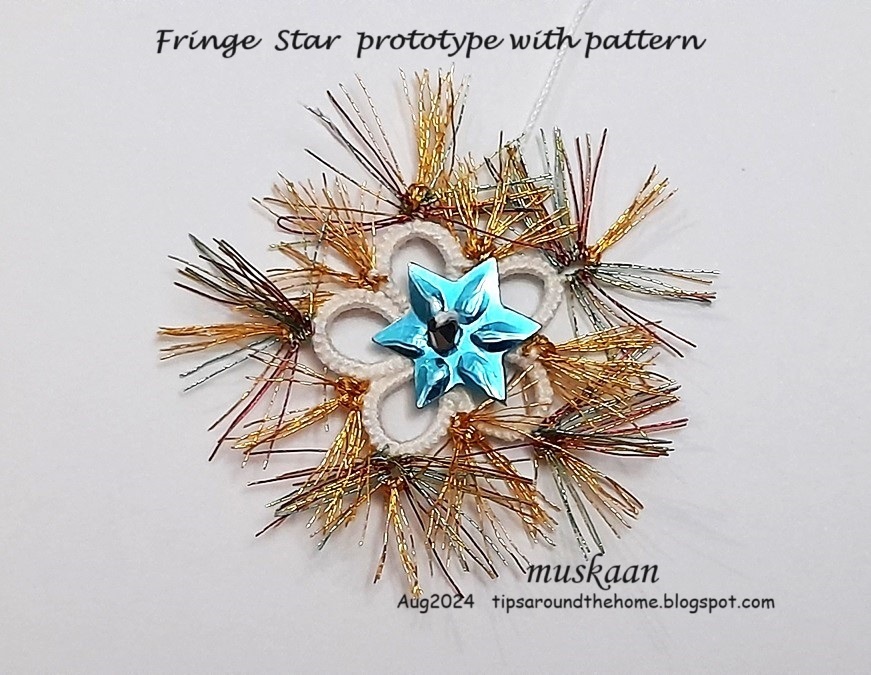
In my last post I had shared several adaptations of Corina Meyfeldt's Tatted Fringe. Lots of ideas swirled in my head to try out a quick practice pattern, applying all three adaptations viz., tatted fringe, spot/luggage tag fringe, and tatted fringe picot. While I am not fully satisfied with the outcome (it looks especially messy in photographs), there is a lot of scope to play and try something better and different.

This is the Fringe Star - a kind of practice pattern with a lot of possibilities. 
I got so involved that I forgot to take some process pics.

I started by tying the white (Anchor size 40) shuttle thread with metallic Madeira (Astro 2, No.40) and tatting a chain with measured adjoining picots. This took longer than I bargained for coz the metallic thread is really really fine. However the colourway is beautiful with a range of shades.

Now since the thread was so thin, I feared the picot might turn out to be too small. Hence, after snipping off the tips and dividing them into 5 clusters (eyeballed, not counted!) I divided each further and added a luggage tag in the center of each using Sanbest #34. 
And I wanted a small cluster in the joining picot as well. So, I direct tatted 3 adjoining long picots at the start and between the 5 clusters. 
Future Idea 1 - My original idea was to make layered rings with graduated fringe picots. But somewhere along the way, I decided to simply add the fringe between rings for now.
  
With all the prep work finished, I pushed the clusters further into the shuttle and started tatting. The star body is a simple rosette of 5 rings (6 - 8 - 8 - 6)x5 joining to adjoining ring(s).

However, before starting the ring, bring forth the fringes (Fr) into the loop for the ring.
    For first ring tat 6ds, Fr, 8ds, FrPicot, 8ds, Fr, 6ds. 
    For next 4 rings, tat 6ds +(join to ring: push the Fr towards the top of the picot and join below it), 8ds, FrPicot, 8ds, Fr, 6ds.
    Join last ring to first.

Insert sequin and bead and sew down with the tail and hide the tail end or use it to suspend the star. Trim the fringes.
I wanted a starburst kind of shining aura, hence the long fringe. It is very sparkly when seen in person.
I repeat, it looks especially messy in pics, but there is always room for improvement. 
Future Idea 2 - Use a circle of tatted fringe for the base of a rakhi!!! Or how about fireworks?!

OBSERVATIONS - I'd like to point out that each adaptation has its advantages and this little pattern will help you realize this. 
  • For a fringe picot it is advisable to tat the chain as in Corina's original. 
  • But for spot treatment or to sprinkle a different colour randomly, luggage tags are preferable. 
  • Now if you need fringes on both rings and chains in FS/BS tatting, then you will have to decide and plan beforehand. Decide the number of fringes needed. Then tat the chain in segments of DS and RODS (reverse order DS). 

Future Idea 3 - Tat a motif with spot fringes in rainbow colours! 

Saturday, 7 October 2023

rosettes

Pin It now!

 In tatting, we often come across different names for the same technique/effect and the same name for different techniques! (jot it down to various reasons - historical, linguistic, ignorance, non-standardization, ....).  One example of the latter is Rosette. This historical term refers to at least three different styles as evident in the collage below!

Our newest game in the Endrucks 1920 Project FB group involves the third motif and it seemed a good opportunity to address this situation and refresh my knowledge.


They are arranged along evolutionary lines -

1. Single ring with picots aka central ring. Tatted with a single thread. This was a common starting medallion in numerous antique patterns, and the thread was tied and cut after each! Now, we climb out with a mock picot or if possible, we work it as a thrown ring for continuous tatting.

2. Outward facing rings, often called a daisy or flower. Again, tatted with a single thread and the rings are joined to each other to create beautiful medallions. It helps that joining on the go was discovered. The number of rings can determine the shape and size.

Rosace is a term used by several non-English speaking tatters, to address this formation. eg. Maria Papia's earrings (https://www.youtube.com/watch?v=wbqLn8xTaGU) and Lilas Lace's pictorial of Edwige Renaudin's Double Rosace (https://lilas-lace.fr/blog/2014/02/28/diy-a-double-rosace-diy-une-rosade-a-double-rangee-danneaux/)

3. Concentric chains around a central ring. Each chain segment is joined to the picot below from the previous round. The entire medallion is worked continuously, but requires two threads. Obviously this came into existence after the discovery of tatted chains.

In the sample above, the consecutive chain rounds are niched closely into a compact circle - like a dartboard. However, if the chains are made slightly longer, with more of an arch on each chain, it gives the appearance of a flower - a Rose or wild rose as Sharon Briggs calls it (https://sharonstattedlace.blogspot.com/2008/05/tatting-wild-rose.html).


This is all I have. Have you encountered the term for another formation? Please do share.

My main references for the above, besides online resources already listed (including Craftree), are - Elgiva Nicholls' 'Tatting: Technique & History' 1984, and Judith Connors' 'An Illustrated Dictionary of Tatting'. And all three tatted samples above are from derivatives of Endrucks' (1920) patterns 42, 20, and 37.

UPDATE: (9th Oct 2023) - Perhaps I should've spoken about the origin of the word rosette, etc. But here's a comment by Stéphanie Mc (Tattimic) on my FB post and quoted here ---

I'm pretty sure it comes from French.
In French, the word "rosette" can take about 10 different meanings. It usually refers to something circular with a circle in the middle, but not necessarily.
Also, when the suffix "-ette" is added to a noun - let's say "rose", haha-, it refers to a smaller version of that noun. So a "rosette" is supposed to mean "a small rose", at least in some interpretation of the word, of course.

 Well, she is absolutely right! 

My sincerest thanks to all mentioned!

Monday, 9 May 2022

single motif bonanza

Pin It now!
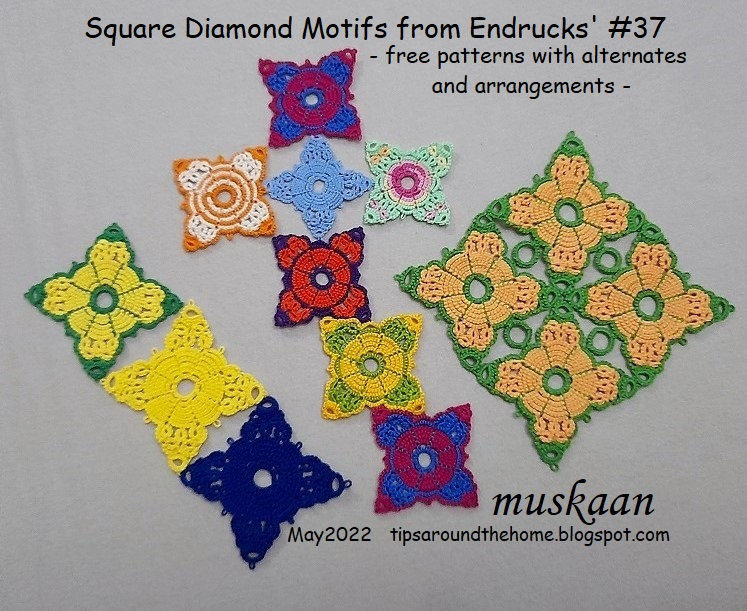
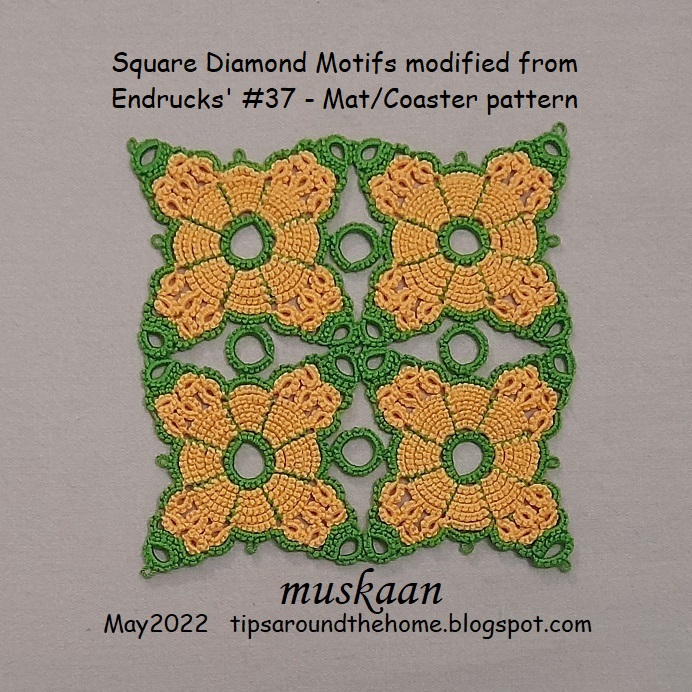
Square diamond motifs and mat with pattern 
from endrucks (1920) doily #37

pattern pdf (click to download) : 

My love affair with this motif started a long time back and the tatting started in November 2020. It is the central motif of a doily - pattern #37 from Endrucks' 1920 book. What caught my interest as I tatted, was the versatility in terms of sequence/paths resulting in diverse colour and directional effects.
For the most part I kept the inner Rosette unchanged, focusing on the arms.

1. Original: This is the original unaltered pathway from Endrucks. The 2 small middle rings (lateral) face the same direction - to the right. The asymmetry is not too visible since the rings are tiny. However it intrigued me, and as a study in design, I decided to go ahead with my variations....

alternate pathways and variations ---
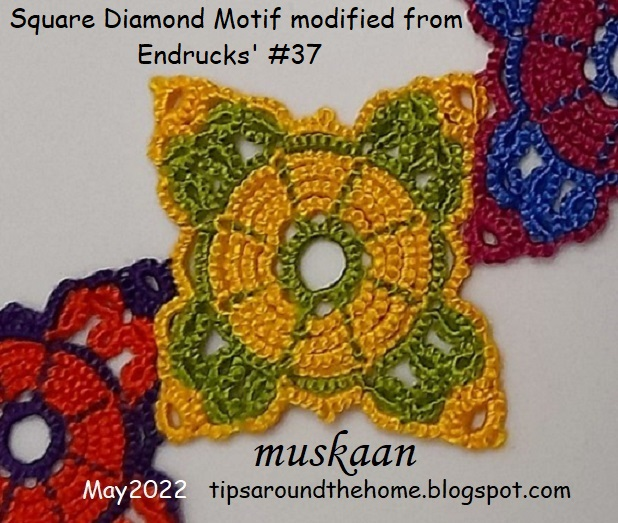
2. Modified: My modified pathway where the 2 small lateral rings face each other for symmetry. This is used to present the stepwise pattern, loading 2 shuttles with contrasting colours.
In Anchor size 20 (~ Lizbeth 10), it measures 5cms sides and 6.5cms diagonally.

3. Trefoil Version: This entire motif can be worked with one shuttle and ball, except for the single thrown ring at the tips, provided we decide before working the penultimate round. 

4. Flipped Ring version: While following Endrucks' original pathway, I merely swapped the direction of the thrown ring at the tips, working it on the way up rather than on the way down. Look closely to see that I alternated the flip.

5. Colour medley 1: Using Lock Join Plus aka Repositioning methods, I alternated the colours/shuttles within the rosette. (https://drive.google.com/file/d/17zsM3JaLO7r0ajg8VOnv5IcJ-kLNqEiU/view). You can choose any method you like, including changing colours between segments rather than rounds.
6. colour medley 2: I started with ball and shuttle for the rosette and added the green thread later, using False CTM, and snipping off the ball thread. (false ctm tutorials Part1 ; Part 2).
In Lizbeth 20 (with one less rosette round), it works to 3.5cms sides and 5 cms diagonally.

7. Reduced Round: If you remember my travails with cupping, this motif was my solution by removing the final rosette round and increasing the size of the 4 joining picots.
In Anchor Pearl cotton size 8 (~ Lizbeth 20), this works out to 4cms sides & 5,5cms diagonally.

8. New Motif for Doily: While the doily worked fine with the above modifications (in #7), I needed to make sure it will hold up in crochet cotton thread. Hence started this new motif (but forgot to reduce the round!). I'm still a bit apprehensive about continuing .... let's see.
In Anchor size 40, this works out to 3.75cms sides and 4,5cms diagonally.

arrangements and tessellations ---
The motif can be used as a square or a diamond and joined for various arrangements. Several arrangements and ideas have already been showcased here - https://tipsaroundthehome.blogspot.com/2020/11/arranging-motifs.html

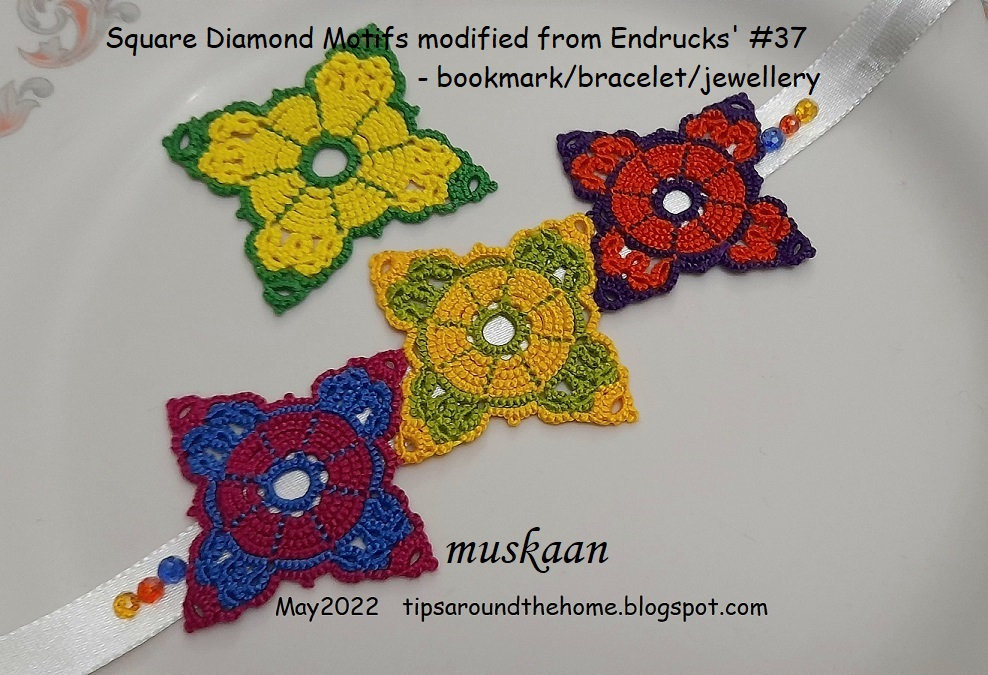
bracelet, bookmark, jewellery, charm, ....: Above is the bracelet idea. I really like this offset arrangement! Bookmark with a single motif as charm at the end of a tail is another practical idea. 
Single motifs with beads and findings can become jewellery pieces,...in fact an entire parure can be tatted.
9. Modified for Mat: The single lateral ring at the tips are larger here (7+4-4), and used for the Mat (below). 
Hubby had chosen this yellow and blue combination for the mat/coaster I wanted to make him. But the solid colours didn't work out (the 2 joined motifs can be seen in the topmost group pic). However, after seeing the cute 3D Flower Cube by Lillian Yeung, I hope to convert it into one, too!

mat/coaster/table runner/table cloth ..:  I was tired of working with yellow, hence chose this peach colour and the green went nicely with it. One can increase the tatted fabric to deserved size by joining as many motifs as required.
In Anchor size 20 it measures 10cmsx10cms.

Wondering whether we needed to cover up the blank space a bit, the sequins were hubby's idea and he got the blue he'd had in mind! One can use buttons in place of sequins.

For the purpose of sharing the pattern, I decided to see how large a ring would be required and worked these 4 rings in later. However, they can be worked as thrown rings. I was prepared to snip off the rings, but hubby liked it just fine and is using it!

alternate tessellation or cross: If a size 40 motif is joined like a diamond to the 4-motif open arrangement (worked in perle size 8 or Lizbeth size 20), we get another variation for a mat or fabric with alternating squares and diamonds!
In the above, if we join a couple of motifs to the orange one for a longer arm, we get a cross!

So there it is - a bonanza of choices and effects from one single motif!!!
All pattern notes and/or diagrams are included in the pdf (click to download): https://drive.google.com/file/d/1wqAPnOUZwLJ9tEUk55wDZhAMw2qCNFSj/view

All pattern pdfs and more, in modern style as well as links to the original book can be found in the Endrucks 1920 Project doc here -

Tuesday, 20 April 2021

unmasked

Pin It now!

 Finally, after 3 years, when masking is almost a given globally, Alibaba has decided to unmask 5 of the 40 thieves. Dare he expose them to the pandemic without they being vaccinated? Is he cruel or is he testing their bravado? Only time will tell.

For now, whichever hemisphere you are in, let's enjoy the all-weather blooms, with these quick single shuttle sprays that can be used for appliqué, cards, tags, decorations, and so much more. 

Techniques : rosette ; picot join to the right ; luggage tag loop or larks head knot ; lock join.
All worked in Lizbeth size 20 threads (Sunkist mix) with a single shuttle.

Blossoms Motif #31  
2½ x 1½" 
  

Blossoms Motif #32 
<2½ × <1½"
 
Some joins are made between a ring segment. It helps to control the curvature of the spray besides being more stable.
 
Blossoms Motif #33 
2½ × 1¼"
 

Blossoms Motif #34 
> 2 × > 1½”

Blossoms Motif #35 
> 1¼ ×  1"

As with previous motifs, these can be arranged together in various formations to create new shapes and larger designs. I will share these after the last of the thieves are nabbed! So keep an eye out....who knows there might even be more than 40?

stay masked even if Alibaba comes calling! 😁

All Blossoms Motifs patterns are being listed under Nature 2D.


Wednesday, 12 August 2020

what is, will be

Pin It now!


Our Independence Day is just round the corner and these flag colour rosettes are up to something! They will only show their full bloom on the 15th ;-D   I still have more to tat. I would've thought the Blossoms project would make me tire of these, but no, I still enjoy the quick motifs.
These were tatted yesterday, only one today.

TIP :  I leave short tails till after blocking so that it is easy to identify front from back, and also to preempt any mishap!

For the last several days I was one of the test tatters for Grace's lovely braid pattern. It is made of hearts and she uses a larger heart to turn the corner. But, oops, can't show you just yet ;-P

In the midst of this exercise, I was asked for help with Teri's bookmark pattern (Dandelion Chain Link) and I have skimmed through her pattern and brushed up on my notes (in this post). My 2-colour version of the dandelions has inspired a couple of tatters on fb and they did a beautiful job of colouring the flowers. 
But guess what, it can be done in a simpler manner! But wait, I still have to tat one to test my idea before I reveal that!

Haven't been able to continue with the hanky edging. Should resume in a couple of days.

Then there's the next pictorial in the lock join plus series. All laid out, but I need fresh eyes to cleanit up before sharing. 

So, the seeds are all sown, most have taken root and grown shoots, but we'll have to wait for full bloom.
In this rainy season, with it's vast lush serene greenery, I chose Pradip Krishen's 'Trees of Delhi - A Field Guide' as backdrop. It is such a labour of love! So meticulously documented with colour photographs of 252 species of trees in my city state! He gives many details about each, including where exactly they can be seen and enjoyed locally. It feels like strolling down avenues and lanes lined with popular, common, as well as exotic species. 
The pages are all glossy and a pleasure to scroll through.

So not much to show at present .... patience, the trees will bear fruit ;-P

♧♧♧♧♧♧♧♧

If you wish to tat along, in your flag or school or team colours, here's the count - 
[Ring: 5-15-5. ]×5, joining to picot on previous ring, and last to 1st ring.
In Anchor Pearl Cotton size 8, I will be making 12 florets in all for a 7" bracelet.
 

Friday, 17 July 2020

lock join plus

Pin It now!
Many months back, in response to some curiosity and confusion among several tatters, I decided to illustrate the simple progression and functional similarity between a few techniques. Here the underlying common factor is the ubiquitous Lock Join. Add one extra step to the LJ, and it opens up the canvas to change colours, shuttles, and even direction of chains.
I took stepwise pics for each of the combinations back then, but preparing a proper stream-lined article has taken way more time than intended. I am immensely grateful to Anita Barry, Master Tatter, for her proofing and editing.


In order to make the document manageable, it is uploaded as a series of 5 pdfs, each a stand-alone (click on each title to download) –
PLEASE NOTE - Most of these are also Reposition Methods which can be used even without a lock join to change direction, create points or curves, etc.

  1. Lock Join Plus – Executive Summary and practice Patterns for further exploration. (3 pages)
 
How one extra movement after a lock join can open up the canvas to change colours, shuttles, and even direction of chains. 

For starters, a simple 2-colour motif is used where all chains face the same direction. But for further exploration, more patterns are listed. 

  1. LJ Plus - Lock Join (LJ) pictorial (1 page)
 
How to make the lock join using both up and down loops. 

Notice how the colour blips in the 2 right joins are larger than the remaining 3. If the down loop LJ is followed by a 2nd half-stitch, the blip is almost hidden completely.
Links to undo a LJ and variations that include making a LJ with 2nd shuttle.
See also Lock Join in Mock Rings - 


  1. LJ Plus – Reposition pictorial (1 page)
 
A laissez-faire crossing of threads. Simple, quick, vintage. Compare how chain segments change colour and the slight overlap at the start of each chain.

  1. LJ Plus - Shoe Lace Trick (SLT) pictorial (1 page)
 
Tying a half knot outside the LJ – overhand tie or SLT. Again chain colours get switched. SLT also allows us to switch the core thread in instances when the shuttle is running low on thread.

  1. LJ Plus – Reverse Join (RJ) pictorial (2 pages)
 
Encapsulating or entrapping the other thread within the LJ. Created by Elaine P Gan (tattingbox). 

Pics showing an up loop and a down loop. The latter 
minimises the colour blip in a RJ as well.

Functionally the same as crossing and SLT after LJ, but more elegant and efficient – a smooth transition.


After each or either of these, if we turn work, reverse work, switch shuttle, and/or direct tat (unflipped stitches) the next chain, we add another dimension – changing the direction of the chain! Along with colour. Our choices multiply! And we might even be able to work throughout with just one shuttle and ball. To explore these choices, some practice patterns are listed in the main pdf. Besides block tatting, think also of filet tatting, especially in 2 colours, where these can be used effectively. I forgot to mention the role of lock join plus in mock rings and mock onion rings, but you get the idea, right? Wherever you have 1 or more chains joined below, play with LJ Plus!
I used all the above 4 in this vintage edging from Priscilla Tatting Book3 Fig 29 where the chains move to and fro. We can turn work after each chain or we can work every alternate chain directly (reverse stitch - unflipped). I started with LJ, then tried reposition, SLT, and RJ after every 3rd chain. Shuttle in hand changes depending on our choices.

So I'm sure there is no need to spell out why I presented this article/pdfs in the way I did? There is lot of scope to play and design because each method has it's own pluses and minuses!
Do you see a butterfly in the above arrangement? Time to pick up my shuttles again and work out a pattern ;-D
Before that you might get fed one more lesson, so stay locked in ;-P

UPDATE 1: (2021) When working with only one shuttle and ball, changing the direction of chain using direct tatting - https://tipsaroundthehome.blogspot.com/2021/06/2nd-shuttle-or-ball.html 
UPDATE 2: (2021) Carrying on with functional movements, see pictorial Twist Work (TwW) -
UPDATE 3: (2026) The Catherine Wheel Join pictorial accompanied by diagrams by Ninetta Caruso- https://drive.google.com/file/d/1UmmjBqNwwQYIb9Ms9_-T5K6dPnZENCwl/view  
UPDATE 4: (2026) Beaded Lock Join (based on Vicki Clarke's suggestion) - https://drive.google.com/file/d/1rL7ZLsSUwKqmkZy210yqP03RgVAsUOxN/view