Monday, 30 March 2020

magical patterns

Pin It now!
A few eager tatters had requested the diagram-only pdf which I sent privately and Usha Shah’s lovely rendition in metallic thread has already reached my inbox.

Finally, after a lot of self-editing over several evenings, the pattern is ready to be published.
Magic Square Cross pattern. Click to download the pdf.

I had started it in Anchor size 20, in single colour above. But it was turning out so large, hence stopped and switched to Anchor Pearl cotton size 8 in 2 colours and reduced the count as well.

Instead of the pattern in my deconstruction series, I used the concept shared by Halibut04. It eliminates the central picot and rings are linked on either side.
And using only 2 decorative picots for the inner chains – this idea is taken from this exquisite Japanese Tatting Square Doily.

Huguenot Cross Pendant

The square in the center kept looking like a emblem or insignia, except I didn’t know where to start my search without a term. Fortunately when I accepted someone’s fb request, there it was in bobbin lace – Huguenot CrossWhat a huge coincidence.

My intention was to have 2-coloured split rings all around. At the last moment I switched to a black chain edge so that the blue ring clusters look complete. This, unfortunately, decreased the indent. I do want to try the SR one later to highlight the Maltese Cross.

There are a lot of symbols within this cross (heart, fleur-de-lis, Maltese cross, 8 Beatitudes, dove), some of which are recreated in a stylised form. Since I don’t have any dove charm or sequin, a butterfly sequin is used at the base, and converted into a pendant. Hope there is no religious sentiment being hurt. 

The Josephines are 8 half-stitches and extra chains are 5 or 6ds.


A Tiger Face? Perhaps a butterfly!

Wondering how only chains would look, for a deeper notch, I started another in green/black. Midways, it started looking like a butterfly, and then like the face of a tiger (focus on the negative space enclosed by the black chains above - they look like eyes and the rest of the facial features magically emerge)! 

There were 2 green rings where the top picots are. I had to untat one, and snip off the other and reattach black thread to make it symmetrical. Want to see how it looks after I complete a long black chain outlining the top of the head.

So many possibilities! If you wish to play, check out the ideas in this series - Part 1, Part 2, Part 3! Derivative patterns that have already been shared include heart, bracelet, and bookmark.

Magic Square Cross pattern. Click to download the pdf.

Best wishes ....

Thursday, 26 March 2020

whats in a size

Pin It now!
A spring bonanza! A generous lady from South India I ‘met’ on facebook sent me these gorgeous balls of Lizbeth threads in size 80! Although I tried to dissuade her, and also offered remittance, she would have none of it and asked only for a piece of my tatting (which will unfortunately only get mailed once this pandemic chaos is over). Luckily the threads arrived just before lockdown was declared, phew! 
Can’t thank her enough, despite hubby rolling his eyes at more stash ;-D (whispering - He's the one who bought the 36-piece Ferrero-Rocher boxes to store my threads ... though at the time I didn't realise only size 80 fit in them)

One of the balls had a single ring (the pink petal) with thread still attached. I immediately used up the thread to tat 4 more rings for a complete rosette. Not bad, eh?! I thought it would be difficult to work in size 80. I did tat a bit looser, having heard that the thread breaks when closing. Notice the difference between the pink petal and the rest. 
Hiding the tails could’ve been neater, though.

Heeding Vicki’s call for a fundraiser project, I started the rosettes in size 20. I am taking this as an opportunity to compare the different brands and intra-brand sizes in my stash. Details are tagged on to each.
I suggested this idea to the organisers, but they haven’t worked on it so far. It would’ve been such a great opportunity to create a sort of comparison chart and build on our tatting resources. There are charts, but none that have Anchor listed in them. (UPDATE : I did not include decorative picots in the measurements )

The 2 variegated rosettes on the left are Lizbeth (size 20, and size 80). The rest are from Anchor Mercerised Crochet Cotton and Red Heart so far.

Meanwhile I'm working on extracting a Huguenot Cross from the cross center here. Progress on the written instructions for the MS Cross is slow, though many have requested and received the diagram pdf.


Saturday, 21 March 2020

a new old cross

Pin It now!

UPDATE : Pattern posted - https://tipsaroundthehome.blogspot.com/2020/03/magical-patterns.html


A few days back this post emerged as top 5 of the week. On rare occasions I know why, such as currently this pictorial is trending due to a Sweedish group. It has been translated and pdf distributed among students, with permission). I have no idea why the magic square became 'popular', but it sparked my shuttles to finally tat the cross from it.
This is the sketch from 2014.
I decided to call it Magic Square Cross, not only because of the source from which it is derived, but also because there is a clearly demarcated square in the centre area in my tatted model.

The basic principle and body is the same, but I altered the stitch count and added a few decorative Josephine knots.
I would say this pattern calls for mindfulness and concentration. I will write/draw the pattern only if there is sufficient interest.

In Anchor Pearl cotton size 8 (= size 20 Lizbeth), it measures a bit more than 11.5 cms x 8.5 cms.

I am posting this from my tablet,  since computer is not connecting to the net - social isolation?! We think the operating system is the culprit, but no techie is available due to a 3-day moratorium on non-essential businesses, etc. My washing machine also blinked and is taking a spring break,  LOL. Right in the middle of my spring cleaning, no less! But I already have enough lemons in my refrigerator to make lemonade!!! ;-P


Wednesday, 18 March 2020

edged doily

Pin It now!

I took a digital break for a couple of days and found my inbox swamped with emails. Will get to them tomorrow. Thank you for your concern and wish you good health and lots of creativity.

Clover Wreath Doily
Ever since I was reminded of this, I was keen on designing and finishing off the edging. 
  
This is where I’d left off in 2017. A round of 6 medallions around the central one.

I love this shape and would’ve stopped there if it weren’t for the asymmetry of swirl joins.
Quilters are well aware of the versatility of hexagons - create any outline you want by tessellation!
In Anchor size 40, it measures 17 cms x 15 cms 
While I like the swirl join (there is a mistake in mine), I thought it made the focus shift to the filler rings. Hence added another complete round without the swirl join.
If you see light and darks shades in this round, it is not your eyes playing tricks! I had bought 2 balls of this shade years back and stored the 2nd ball nicely. But when I started working off it, it was darker :-( 
In Anchor size 40 -
4 motifs, straight - 14.5 cms
1 motif - less than 4cms

Edging Trials
Refreshed my memory with the opinions and suggestions here.

Clockwise: The top 2 pics in the collage are from 2017. I’ve come some way in designing confidence since then ;-P
3 ideas tried in the bottom right pic (tatting moves counterclockwise). Happened to show this to Ninetta and she offered valuable suggestions. No, the tuft picot didn’t work (left center pic), but the clover and chain curve change did as seen in 3 more repeats (bottom left pic)!
What I forgot, though, was that the trials were worked in the 7 motif piece which had only 6 motifs in the round. When I tried to duplicate this in the larger piece, I realized my error! There was a motif Between the ones at each corner! Back to the sketch board, but it was very easy this time.

What do you think of this?
I got my wish of all filler motifs having 6 rings wherever they may be.
This is only the first of 3 edgings.... After completing all 3, I will upload the pattern.


All Clover Wreath posts, pics, & notes 

Wednesday, 11 March 2020

hidden directions

Pin It now!
Hidden Rose Snowflake worked Clockwise 
Click to download pdf

Months back I received feedback that a group had difficulty working the snowflake because the sequence of tatting went counter-clockwise. At the time, I was working against a deadline of sorts, but finally in January, I tatted another snowflake in clockwise direction. It has taken me several more weeks to present the pattern. If there is any error, please let me know. Otherwise, simply choose the shuttle that seems to be in the right position, to tat the next element, especially if both shuttles have the same thread colour.


Tatters now have a choice, but clockwise is certainly easier. And yet, this is still not the complete picture. As with many patterns, the method you choose can alter which is the working shuttle (held in the hand). You can choose to start at a different point/element. If you use 2 colours, depending on their placement, you may need to do an shoelace trick (SLT). We are spoiled for choices!


TWoT Notes : Notice how the inner and outer ‘horizontal’ rings go round clockwise in the yellow flake, and counter-clockwise in the pink flake, reflecting the sequence of work.
The above pic gives an idea of how they would look as tessellated motifs.

And when placed one above the other. Doesn’t this look cute when layered? And those pink outer chains bridging the yellow ones form a nice design element. Something for the future again ;-D
Click to download the clockwise Hidden Rose Snowflake pdf.


Tuesday, 10 March 2020

primordial soup

Pin It now!

Over-dramatic, I know ;-D This post is about uncooked, errr unfinished, razzmatazz morsels in minestrone soup. Instead of waiting for life-forms (tatting patterns!) to evolve from the primordial soup, I am ladling out servings to see but not consume :-D 

Last year I bought a stash of beads directly from an online shop most of which can be seen in this image. These include Miyuki, bicone crystals, drop & tube glass beads, drop resin beads, and so on.
In person, I wouldn’t have bought the bulkier ones. But it also got me thinking about how to use them. 
Playing around with some leftover metallic thread, these 2 little earrings came about. 
Single thread, picot flowers, free-style. I’m calling them Spring Drop earrings for obvious reasons. I intend to use each type of bead in similar fashion....
Recently, when test tatting Anita Barry’s Laura & Itsy-Bitsy Angels, I went on a tangent and this emerged. Played with some bead arrangements. Which one of 3 do you prefer? Do you see a Victorian era lady/gown? Made with single thread/shuttle, and the 2 rings on the side are regular rings folded over and linked. This can have no other name than Laura Angel Earrings.

Anita has this uncanny ability to spy/create heart motifs from vintage doilies, etc. She’s done it before - Daisy heart here and Hidden Rose heart here - to show a few that are in public domain. 
She calls it Eye Spy, and I got to playing as well. These are 2 hearts that I spied in the Elizabeth Round Robin Doily. There’s still a lot of work needed to get into desirable shape, whenever that happens.

Can you spy them in the images below?.
This is Elizabeth Heart #1 from Round 4 designed by Kathy Lowe 
I started tatting from the right side clover, going counter-clockwise, to finish with a split ring at the tip. Why split ring?
TIP : Split Ring creates a distinct point at the tip (rather than base, as in normal ring). And using my whimsical method to finish on a split ring without sewing, (Mathew Takeda's method cannot be used due to the joins) enhances that point.

Elizabeth Heart #2 is from Round 3 designed by Bettina Lauth. I've taken a real liking to these picot flowers! 

In both motifs, worked with 2 shuttles, elements were added or removed without changing the original stitch count. The shape that seemed fine in the doily, does not appeal as an independent motif. Tweaking is needed.

Now why is it that hearts in any bookmark are always identical in shape and design? Can’t we put together different designs and sizes? I’ve done it with sizes in this Patchwork Bookmark, and the Italian Connection bookmark, but the design was the same. Elizabeth Hearts Bookmark could be an idea to work on.

Friday, 6 March 2020

meet me and continue

Pin It now!

Meeting with Tatting
Skip over to Anetta's blog to get to know me a bit. If you are interested, that is! 

As I mentioned earlier, Anetta has started a monthly series where readers get to meet a different designer each month. Said designer shares her/his tatting journey along with a free snowflake pattern. At the end of the year, at least 12 snowflakes will be ready compounded by the joy of tatting along with friends, and learning new techniques. It is also her endeavour to educate about copyright and giving credit even when a pattern is free.

Everybody is invited to play along. Before the end of the month, send a pic and link of your snowflake by clicking the 'blue frog' button. Anetta will further summarise all entries in a separate post the following month.
Renulek opened the year with a beautiful snowflake, followed by a couple from Anne Orr (due to unavoidable circumstances), and I was invited to share in March for which I chose the Rosette Enchained Snowflake & Ice Drop
Check out Anetta's beautiful 2-colour version. She even prepared a lovely pictorial for split chain, leading up to the pattern. 
And don't forget to visit the post again at the end of this month to check out what the talented tatters send in.
Seeing the patterns shared so far, I am tempted to tat and send in entries, too. May be I’ll catch up later in the year.

{{{
Continuing with the topic of continuous tatting ….

Mock Picot to climb out and Changing chain curve
In my previous post, I spoke about Sheetal’s question on facebook, which led to 2 methods of climbing out with a mock picot when there is a bead at the base (down bead or bead on core thread). {If the beads are on the picot (up beads) and we need to climb out with a mock picot, then I described it for the Sitka Rose}.
Sheetal uploaded a pic of her 2nd round – a flower motif {! The petals are very similar to the rosette enchained ones where the chain changes it’s curve. But her brilliant stroke was adding beads on picots to the concave segment! Thus the beads face inside. Love it!!! If you are a member of the Just Tatting facebook group, you can read and see the entire post.

{{{
…and about continuous threads...

Extending thread in CTM or CTM with Extra Shuttle 2 thread!
A post without a pic is like a faceless body! So here’s a little trick to extend the length of shuttle 2 thread when winding continuously. 
Pony shuttle bobbins are fairly small. For the Split Ring Heart I didn’t want to have to reload later. 
So, after cutting and winding the Sh2 bobbin fully, I wound the remaining length of Sh2 thread on a spool between the 2 shuttles (red is Sh1 & yellow is Sh2). Look closely and you can see which thread goes where.
I started with the inner clover, working it as mock rings, thus saving on Sh1 thread.

{{{


Wednesday, 4 March 2020

climbing out with mock picot

Pin It now!
A question was posed in a facebook group and my first answer was incorrect. Got my shuttle, thread and beads out, and gave it a few whirls. Wahoo, got it! (I'm getting good with bead solutions ;-P) Later, Lee Buchanan posted another option.

Climbing Out with a Mock Picot …
with a bead at the base!
What’s special or new about climbing out with a mock picot, you ask? Well, this time there was a bead at the base of the ring and a long picot over it. Looking back it seems, huh, what’s the big deal. Try it with a normal ring, and you’ll discover the issue.
This may have been done before but I’d like to keep a record on hand for future. Sharing both methods here.

For this pictorial, only 1 shuttle is used, with a long thread left attached (ctm).

Method 1 : Mock Ring
1. String beads on the shuttle thread and start a mock ring. I find the self-closing mock ring (SCMR) is neatest and the closure almost ‘invisible’.
Leave a loop and slide a bead after each double stitch (or as per pattern). I have 6 beads here. 
2. After sliding last bead, do not make any more ds, pass shuttle through loop ...
3. ...and close the mock ring. 
4. Leave bare space for the mock picot and make a lock stitch or overhand tie (SLT). Continue with pattern.


Method 2 : Reverse Ring
Lee Buchanan got into the swing of things and offered this RR solution!
1. Start a reverse ring (tutorial links here). A reverse ring or wrong-way tatting starts on the opposite side of a normal ring, and has reverse or unflipped stitches. Make sure the beads are within the loop of the ring, and slide a bead after each reverse stitch. 
2. After sliding the last bead, close the ring. 
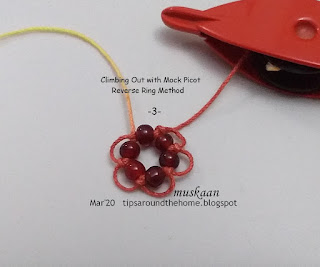
3. Threads emerge on either side of bead. 
4. Make a mock picot by securing the bare threads with a lock stitch or SLT and continue with next element in pattern.

As you can see, the end result is the same. Of course, getting that last picot to look unbroken is unavoidable, Unless the next element is a split ring in which case no lock stitch or shoe lace trick is required.

TIP : If beads are on the picot (up beads), one can climb out with a mock picot as in this beautiful Sitka Rose motif here.

Thank you Sheetal. Each time a question is asked, 
there is an opportunity for mutual learning and improvement!
Thank you Lee, for being such an enthusiastic and adventurous tatting sport! 

PLEASE NOTE: If you wish for a pdf of any of my posts, let me know. I now have a mail app thatnallows me to convert any post into a pdf easily.