Showing posts with label books I read. Show all posts

Thursday, 10 November 2022

on balance

Pin It now!
I wanted to gift a couple of bookmarks and it was a good excuse to try out some of the threads Madhur had gifted (https://tipsaroundthehome.blogspot.com/2022/09/joy-of-succumbing.html)

Madhur will understand why I especially chose this book as a background. 'On Balance. An autobiography' by Leila Seth. 
But first a bit about the bookmark ...
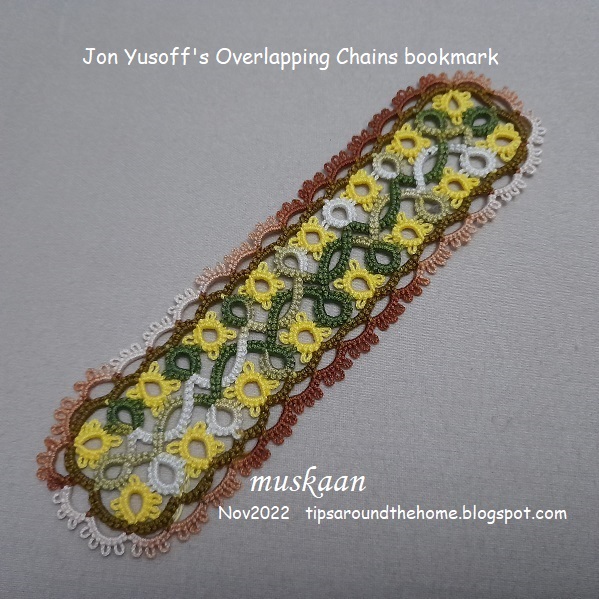
Pattern is 'Overlapping Chains' by Jon Yusoff and can be found here for free -
I enjoy overlapping elements and went for a flower and leaf kind of story (hence picots on the yellow 'flowers') surrounded by a trellis.
The first row became fiddly on the way back with a tendency to twist, till I wove it as I went. That kept it in place.

I chose Red Rose size 20, since it appeared to be the same size as Lizbeth size 20. Wrong. It was closer to Anchor size 20, which is thicker than its Lizbeth counterpart.
Hence too thick to gift, especially with the overlapping chains adding to the thickness.
Final measurement - 15cms x 4cms

However the threads were a pleasure to work with. Smooth and a bit soft. Very easy to handle, manage, close rings; even stitches. 
At one end, I placed a picot incorrectly and noticed much later. It was easy to pull up each half stitch till the picot was shifted to the correct position 3 ds away.
The final lace is not as crisp or 'stiff' as when done with Anchor. 
On balance, there's a place for every thread!

'On Balance' is Leila Seth's autobiography. It is a very simply written book and it is this simplicity and straightforwardness that I liked. No attempts at being an 'author'; merely a walk down memory lane. Somewhere somehow I kept sensing glimpses of my mother in her character, her approach, her strength and values. And this bound me at a deeper level. 

As the chapter title shows, Leila Seth became the 1st woman Chief Justice of our Supreme Court in 1991. She has other firsts to her name, too. https://en.wikipedia.org/wiki/Leila_Seth. I even chanced to meet her on my 50th birthday when we went to watch a movie and she was there with her husband. And as an achiever in her own right, she was later also known as Vikram Seth's mother.

Many thanks Jon and Madhur - an enjoyable journey!

Wednesday, 23 March 2022

linked hands trial

Pin It now!

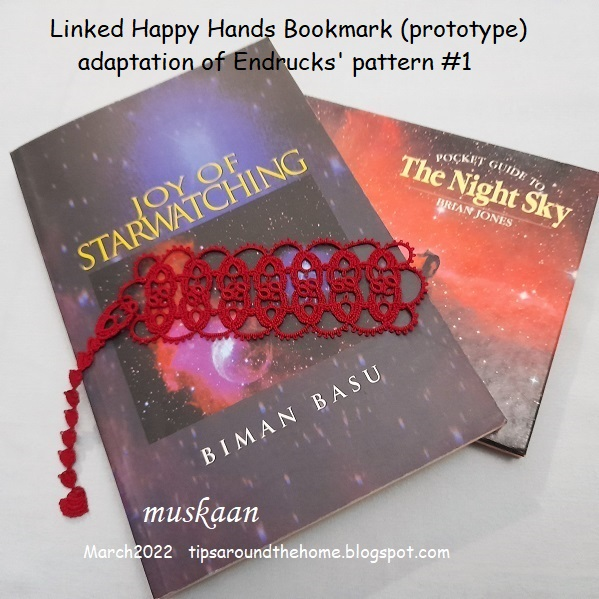
 I had finished this prototype bookmark soon after this post (https://tipsaroundthehome.blogspot.com/2022/03/one-month-several-years.html) but look how long it has taken me to upload the final pics! Too much going on ....

In Anchor size 40, it is 12 cms long and 4 cms wide, all tatted in one pass.

Since the linked hands are not joined, look how they can stand up like an elongated teepee! One could also imagine hands joined in prayer?

Simple bookmark without a tail. 2 side chains (on the bottom right) are shorter (count the 5 picots instead of later 6). This was the start and I didn't like the soft stretch of the chain. Hence from the 3rd repeat onward, I added another 3ds for a better curve. 
I had made the edging for the pattern pdf here - https://tipsaroundthehome.blogspot.com/2021/11/from-one-to-many.html
Playing with a filter. This is how it looks horizontally, in case someone is thinking of an insertion. I haven't blocked it to shape. This is merely my trial piece after all. I like the simple chain trim around. A balance between dense motifs and airy edge.

What's a bookmark without a tail?! Several ideas had been spinning through my head as I worked the body. However, when it came time, here's how I went about it - made a Happy Hands motif, linking it through the top chain.
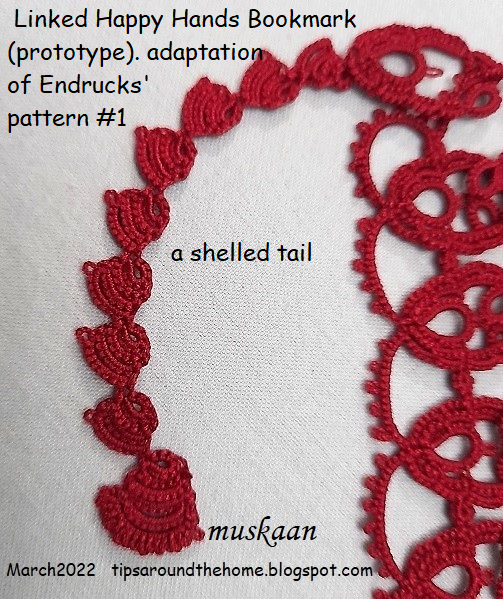
Then followed these shell-shaped blocks. The first one wasn't a nice shape, but eventually they took on a better shape. The final 'charm' is simply a larger version of the smaller shells, with a final row of picots for a wavy effect. I was playing a tight game of thread chicken at this stage.

UPDATE (July 2023) - Pattern for the tail 
pic showing tail detail and charm
Start with a ring (4 vsp 5), then a graduated block of 3 chains (6, 7, and 8) (the last chain has a decorative picot), and repeat. Please note that I used Endrucks' method of climbing to next row of block chain, viz., 1ds vsp, followed by chain stitches.
The charm at the end follows the same principle but with more number of chains (5 or 6) of which the final chain has adjoining decorative picots for a dense frill.


I would've like to continue for a longer tail, but was running out of thread on one shuttle. And sometimes one just isn't in the mood to find the ball, wind the bobbin and ....

What do you think? Should I add this tail in my final bookmark or should I add a  long tassel? 
I have a colour scheme in mind and am hoping it will work.

Hoping to post a few more blogs in quick succession ....


Tuesday, 17 November 2020

arranging motifs

Pin It now!
Oh what fun!!! Working pattern #37 from Endrucks' 1920 book. The beautiful motif in the center of that doily really caught my attention and I went to town with it. Not merely for it's beauty, but for it's clever construction! I will speak of the construction in another post, sharing only the numerous arrangement ideas here.

Presenting the Square Diamond Motif in possible arrangements - 

The yellow motif below is in Anchor 20 while the other 2 are in Anchor Pearl size 8. Hence the difference in dimensions. and I think the orange one may have been tatted too tightly. All motifs also served as trials and experiments. 

 
arrangements #1 & #2 : Simple linear joining of motifs - vertically or horizontally. Keep going, adding more columns and rows for a larger lace fabric.

 
arrangements #3 & #4: Attached tip to tip, in different sized threads and decorated with beads, could make a beautiful mobile or window ornament.
I like the triangular placement!
arrangements #5 : But this is an arrangement I think is new in tatting, as far as I know? Tip to center joining. 
I noticed that one can add a 2nd row using only 2 motifs in a triangular arrangement, and then the 3rd row with this offset joining. And so on, alternating rows/columns with one motif less. It creates a very interesting rectangular fabric with negative triangles.

 
Square Diamond Motif Bookmark : I made a 4th motif in size 8, inserted a satin ribbon at the tip for tassel and a cute bookmark took shape.

Square Diamond Motif Bracelet : Here a white satin ribbon is laid below the linked motifs, and crystals added in center and on ribbon.

Here I hadn't yet placed the crystals in the center. 
I used Reverse Join to change colour placement in the outer rounds in each motif. And the last 2 rounds are worked a bit differently in each motif, although not immediately visible since the rings are small.

So here's a little exercise if you are interested (this post was intended to showcase it, but I couldn't get the presentation completed and I like opening it up ...) :
Disregard the colours. Consider the last 2 rounds and specifically the 5 small rings and 1 thrown ring in each arm.  Can you identify possible pathways/sequence to work these rings and chains? How many ways can you trace?


Meanwhile, finished projects and samples are trickling in from participants around the world. Ninetta and I are engaged in finalising presentation, guiding, interacting, and so on. Lots of activity! And only about 5 patterns left unclaimed so far! Tatters have returned for more patterns after doing one - they have discovered the magic and cleverness of Eleonore Endrucks!!!
Do take a few minutes to check the samples and the final patterns in modern format in the Endrucks 1920 Project doc here - https://docs.google.com/document/d/17LEVftXweztBIOWh4sL4BB7bX65ssoOsOn4oXIgCepY/view
The document also contains links to the 1920 book (with tatted models) and another book with diagrams and pattern - both can be downloaded either from there or from Georgia's archived books.


I am so thankful to Martha Ess for scanning and uploading the book, to Georgia Seitz for introducing me to it, and to Ninetta Caruso for joining And more importantly for converting it into a Community Project ! And of course, how can we forget the volunteers and their lovely creations?!

Friday, 4 September 2020

two clever

Pin It now!
Too clever by half! Definitely not. They are truly two very clever tatters, teachers, designers and keep inspiring us with their creativity - Ninetta Caruso and Edda Guastalla!

Ninetta Caruso's Gold Rope Chain - my Rose Gold version

For my interlocking split ring and rope chain pictorials, I had used thick thread. Further, in order to avoid a bare thread spanning the side of each ring, I left the bare thread space shorter than required. Both factors created a gentle spiral, not the rope chain effect in Ninetta's original. I Had to satisfy my scientific curiosity, hence a quick tat with metallic thread.

TIP : The length of bare threads between successive rings determines the amount of twist; and the visible effect can range from a gentle wave to a tight woven rope.

Stringing beads on 3 strands of Anchor metallic embroidery thread that kept splitting was taking too much time. Hence no seed beads.
Much happier with the twisted effect, though could've been better. These are certainly addictive and I stopped only when the shuttles ran out. My fear about the thread were unfounded - the rings closed easily - and only 1 or 2 strands could have worked smoothly as well.

Edda Guastalla's Two Rings (Interlocking) Bracelet/Chain (catenella 2 anelli)
I was very impressed with Edda Guastalla's easy interlocking rings! Such fun, too, besides being practical....
  • no need to string beads, except the one (or more between the twin rings).
  • can use up leftover thread lengths to empty shuttles
  • no need to hide tail ends
  • only one shuttle required
  • easy travel or 'handbag' tatting project
  • several variations possible - colour, size, symmetry, etc. 
  • TIP : eg. One can create a diamond shape instead of simple straight chain. Start with twin rings, then make 2 sets of twin rings within the same (these could have an asymmetric stitch count to move the edges further apart), and a 4th set within both 2nd & 3rd sets to bring them together again.
Red Rose metallic thread size 20. Used up several leftovers that were at least up to 25" long.

TIP
: These twin rings can be used effectively as connectors! Remember these curled ring connectors (CRCs) which are essentially the same twin rings curled around motifs to link them? Instead of curling the rings, one can simply insert thread to make the twin rings.

Two lovely addictive interlocking rings! Vastly different in execution and skills, yet brilliant in conception and creativity. Many many thank to both ladies.


The rope chain reminded me of the double helix structure (closer to the quaternary structure) which led me to these books ...

A team that revolutionised the scientific and medical world comprised James Watson and Francis Crick when they unraveled the DNA structure based on Maurice Wilkins' results. Of the 3, the former 2 are more commonly credited.


Francis Crick. Discoverer of the Genetic Code by Matt Ridley
This paperback is a 2008 Harper Perennial edition of the original 2006. It is a rare insight into the life, work and thoughts of Crick. An engaging read, as are most of Ridley's books.

A Passion for DNA. Genes, Genome, and Society by James D Watson
2000, Oxford University Press. This paperback, with high quality paper, is a collection of Watson's lectures, essays, commentaries on diverse topics and the wider impact and implications of the discovery. 
Having already read Craig Venter's autobiography, it was interesting to compare notes from both perspectives. 

I found Watson was the more conventional and conservative one compared to Crick, though I admired the latter's principles and highly intelligent mind.

Rummaging for all these books brings bittersweet memories - the happy hours spent reading and discussing (hubby & I love Genetics!), but the sadness that I cannot now recall all details. A poor memory that needs huge refreshers ;-D

Wednesday, 2 September 2020

influential intrusion

Pin It now!
It all started when Grace Tan saw the intruding picot and brought out her long-stalled pattern. She thought it could be used in her serpentine pattern and simplify the working instructions. And I was one of the first few she roped in to test tat Endless Hearts Braid with Corner.
Grace adapted her heart patterns into an undulating length of lace - a clever symmetry - and a larger heart for the corners. The frequent directional changes take a bit of getting used to, but soon one can set a rhythm. It still needs some concentration, especially if one resorts to fs/bs tatting as I did, in two colours, trying to keep the blips at the back. I had to draw my own diagram for reference initially.
 
Inward facing  picots - She substituted the Intruding Picot (ip) with Ninetta's Face Inward Picot (FIP), although the ip worked for me (above pics) in the 3rd and 4th corners. FIP was my first time and it was not easy to tease out the leg in perle cotton. I followed instructions for the braid, using FIP in first 2 corners.
Encapsulating Picot Join (EPJ) - I got to try out this new blipless join that can link several elements together at a later time. As the term suggests, it is a picot join that encapsulates or traps another element or picot. More elements can be linked to the same point later as well.
Sometimes I got the EPJ looking almost invisible from the front, at other times a thread bulge was visible. I played with many tweaks, such as up and down loops, etc, but need more study in thicker thread to figure out how best to avoid that thread to make it consistently indistinguishable.
Layered Picot Join - My 'easier' alternate to EPJ -
1. Make a longer picot on the ring such that it can span the chain(s) that it intends to encapsulate.

 
2. Keep this picot at back of work and make a normal picot join through Both picots simultaneously. 
3. This is how it looks from the back. 
Note - these pics were taken when I was working backside. 

 
4. This is how it appears from the front - the join is invisible here.
5. This is how the hook will be inserted through both picots when working frontside.
And a 4th element can be joined to that same picot through the back. I love how clean the chains look - the join is invisible.
Drawback - the rings tend to lie slightly below the chains, but with sufficiently long picot, it can be avoided. Mainly, there is a colour bar at the back (clearly visible in #3).
Turn Chain (tc) - Of course there are several other ways to work this, as outlined in Grace's post. Overall, I limited myself to very few tweaks and substitutions, trying to largely stay true to the pattern. I have used many ways to turn a chain, but stayed with her version of turn chain which was to simply rotate the stitches in such a way as to reposition them, like this Twist Work (TwW).
There are also several applications to this versatile pattern! -
Add a drop crystal and beads for a beautiful V-shaped necklace or collar; or a square collar to sew on!
Without the corners, it is easily a braid, bracelet, bookmark, ring, choker, etc. 

In Anchor Pearl cotton size 8, the braid is 1" broad ; 2 hearts = 1.5" long. The entire frame is 3" on the inner edge and just over 5" at the outer edge.
All in all, a good learning experience with tons of ways to work it.

Romancing With Life - an autobiography by Dev Anand -
This all-hearts pattern seemed a fitting frame for this true karma yogi's life, work, and joie de vivre perspective. Ageless, who died at 88 with his boots on and with more energy and curiosity than his juniors by generations.

Dev Anand needs no introduction to Hindi film buffs and Indians in general (isn't that top left pic just great?! - the 3 great contemporary heroes). But my international friends, can you identify who he is with in the top right pic?! This hardbound book is a feel-good read for the most part, dwelling mostly on his various loves - be it nature, mountains, films/film-making, women, beauty, etc. There are more areas and depth one would have liked to read about, but it is understandable how the entire focus was on romancing.


Saturday, 15 August 2020

free together

Pin It now!

The florets fell off the tree and got threaded into a bracelet! This is my Independence Day bracelet, with a stylised representation of our tricolour (or Tiranga,  as in Union Jack or Stars and Stripes).

I remember using the Indian flag colours in tatting twice before - unintentionally in the Spring Garland , and intentionally in Ninetta's Girotondo . But neither had any blue in it.

Each colour has a meaning attached to it. Saffron for strength and courage; white for peace; green for growth and prosperity. The blue crystal in the center represents the Dharma Chakra - wheel of truth, or righteousness.

I'm sure you can choose colours to symbolise your own flag if you end up tatting it.

FREE  TOGETHER  BRACELET (aka Tiranga bracelet)

This is a very simple pattern. Worked in Anchor Pearl Cotton size 8. 

Each of the 12 rosettes is tatted separately. 5 rings of 5-15-5, linked in a circle, made with one shuttle.

The 'toggle' is made as follows :

Rosette : [4-12-4]x5 . To reduce tail ends, work the last ring as a split ring (4+12/4), joining to 1st ring. Then add new colour to make the chains. Each chain is 14ds, lock join. After completing the round, snip off one thread and add 3rd colour. Each chain here is 16ds, lock join.

Tat over tail at the start of each round, and hide previous tail within new element or whip stitch. Refer False CTM and/or Adding new thread to chain (tutorial links In case a link does not work, substitute .in with .com)

I had to improvise a lot while assembling the flowers! Lots of false moves and backtracking, but I am more than happy with the result - the overlapping of flowers is exactly how I'd visualized it.

Without boring you with details, here's how the final assembly happened - Start 3 spiral or Josephine chains, one in each colour. At the beginning, I held open each chain with a paper clip. In the end, it was through these tiny open spaces that thread was inserted to secure the tassel.

We no longer need the shuttles. Beads and flowers are strung through these 6 strings in this order - blue crystal, flower, 2 pearl beads. Repeat till all 12 flowers are strung. End with desired length of pearl beads, 1 blue crystal, the 'toggle' flower, 1 more pearl, knot together, leave a length like a stem for the flower, and knot again. Snip. 

This bunch of threads makes it easier to grip and insert through the spiral chain spaces and pull the flower through, to hold the bracelet in place.

Now here's a behind-the-scenes solution. It turned out that the blue crystal could carry only 4 threads, and was small enough to pass through the flower center. My solution : Depending on the colour of the flower which follows the blue bead, thread the crystal and flower with 4 threads of the other 2 colours. The 2 remaining threads are inserted Between 2 rings of the flower, on 'opposite' ends, and knotted securely Behind the flower. This holds the beads in place, takes care of the unstrung threads, and maintains the overlap!

I could've snipped off 1 thread in each colour, but I liked this solution and nothing is visible. Hence, make sure you have everything pre-planned and pre-measured ;-D

@@@ 

Almost every Indian household starts the day with "utterly butterly delicious" Amul butter ;-P

As I scroll through this 50th year celebration book (2012) - Amul's India - it is like refreshing and revisiting the various facets of India and Indians - a fun way to review history through their weekly slogans! It would not be an exaggeration to say India's Amul. 

They usually avoid controversial topics, focusing more on the positives and achievements. To tell a story in a few short words using clever puns, portmonteaux (mostly bi-lingual), and wordplay - just too good! It is a great book to spend some moments with any time of the day!

To my Indian readers, how many of you look forward to Amul's ad every Wednesday? I still remember almost leaning out of the train on my way to college, to catch a first/early glimpse of the new hoarding every week! Now of course, I quickly skim through the newspaper to see what the polka dotted girl has to say.