Showing posts with label This Way or Tat. Show all posts

Friday, 9 December 2016

all in rings

Pin It now!

Sharing 2 more patterns . It’s all about rings this time, though the piece turns into a perfect square.

Inchies are 1 inch squares. I’ve seen them made with paper & fabric, but not yet with tatting. I Loved designing them. (How about Twinchies – 2 inch squares - next?)
And for photographic effect, in keeping with the season, they have been paced over baubles as embellishment. Now if only there were some beads in there !!!

Inchie - One

Most of the prototypes (& patterns) shared in last couple of months were created with This Way or Tat? in mind – I wanted something quick & small, incorporating the rules presented in TWoT diagrams. Little pieces that one could tat & explore with thread left over in shuttles. The difficulty level ranges mainly from beginner to intermediate.

Inchie One is a simple single-shuttle square with inward facing rings. Tension is important, though, to get the exact dimensions of a square. 
The pdf provides details of tension, considering the difference in individual tatting, thread brands, etc. But it would be a good idea to draw a square or use a grid. Use this as a template to cross check while tatting.

Realised only now that I haven't even blocked this piece.


Inchie - Two
(a prototype)
Inchie Two can be worked with split rings, thus avoiding lock joins. But
  1. the direction of the split rings would change – I wanted all rings to seemingly radiate from the center.
  2. It would necessitate knowledge of working the split ring.
  3. I wanted to see for myself the antique tatting style – I’ve been an admirer of Mme Reigo’s Bunch of Grapes !
For these reasons I chose to go with the old world style of tatting. Antique patterns use a needle to attach bare thread to picots, before the chain was invented; I chose to make a lock join where required. The lock join helps me manipulate the position of the small rings, without resorting to split rings, yet gives an idea of how directions & sides (front, back) change between elements.

Reverse Work (RW) between each ring.
Inchie One is tatted all from the front.
Inchie Two can be tatted using directional or frontside/backside tatting. The small rings can use reverse order of double stitches (RODS).
Take care to hide the bare thread behind the 3DS of small ring before joining to picot of that ring. This will remain hidden on the back side of the piece.
Also make sure that there is just enough slack to cover the distance – thread will show if too loose; tatting will warp if too tight.
This requires a bit of practice the first time.
In my sample, the rings to the right are properly made with the traversing threads carefully hidden. This really Has to be tatted again properly!

I like the old world charm here, but would certainly like to see how the SR one would look.
These are not glued down or secured - only inserted for a photo-op - an inspired idea last night !
I think both Inchies can be used as charms for bookmarks. Or they could be joined to make a larger fabric; or joined tip-to-tip to make a bookmark or a headband adornment. Or simply sew on as embellishments.

happy tatting :-)


Rings of Wool 

Remember my August pinterest challenge? I took it a notch further and completed my wool yarn inventory this month ! That leaves only beads and related accessories, for which I bought containers last week.
These tiny crochet rings are all 6 Chain using size 13 or 2.25mm crochet hook, for consistency and comparison. Many of these are between 5-10 gms only, after their inclusion in my Memory Afghan.
That afghan used up over 60 colours/shades/yarns includig all my old stash (most of which did not even make the grade to 5gms !), and around 6-7 brands . That was part of the ojective - mission accomplished !
By the way, the afghan weighs 1.25 kg - not as heavy as my earlier ones. But oh so pretty!

I may be forced to hold off on commenting as well as a lot of my desktop work, coz now my keyboard is playing hookie!  Have ordered a new one but will be delivered only next week ! Even this post has been corrected on my tablet. Many slip betwixt the cup and the lip ! 

HEYYYYY ! I'm back for a quick update. DH was chatting, saying I must've uploaded 100 posts & I said they are closer to 200. And guess what, when I checked, this is my 201st post ! In 3 years precisely. Not bad, eh?!


Related Posts
TWoT - Rings Only
complete TWoT at present
Organizing Thread Stash
Memory Afghan


Tuesday, 6 December 2016

All in chains

Pin It now!
free chains-only tatting pattern and prototypes

Numerous circumstances have ensured that the last couple of months were fairly unproductive for me. I haven’t touched a shuttle for the major part of this duration. Even presentation and working at the desktop was limited. Well, backlog is about to suffocate me, but things are finally settling down ;-P
Hence, deviating from my usual style, I have decided to start sharing the patterns that were meant for Set II of the TWoT series, while I continue to work on the latter at an intermittent pace. I was so hoping to get all snowflakes & other patterns up before the holiday season, but the Grinch is at play; so proper pdfs may have to wait for a bit.  

Bangle Enchained pattern is final & written on the picture itself for sharing at this point. 
The other two are prototype doodles, with the pathway and main details notated. The stitch count can be personalized.
The last is an old prototype which I never got around to reworking again (hope to soon).

There are many personal firsts here !!!

Bangle Enchained
My first attempt at Tatting over a ring/bangle and embellished jewellery. Marie's (West Pine Creations) excellent Embellishment Tatting tutorial gave me the immediate impetus to overcome my dithering.
My design process - I had started with the blue one, but didn't like it. 

Materials :
2 shuttles
Bangle
Gold Metallic seed beads – 10 per repeat
Anchor Mercer Crochet size 20 – 4054 00046 (red)
Anchor Embroidery Thread – 3 strands of M101 (gold!)
(Well, it’s supposed to be gold & my old skein is definitely golden. But these new 2016 skeins are closer to copper!)

Techniques:
Lock Join 
SLT (shoelace trick) or Reverse Join 
covering  plastic (cabone) ring with tatting – Jennifer Williams & Jane Eborall 
Block tatting – you can choose your favorite method of block tatting.

I covered the bangle with tatting - it was quite mesmerizing! There are tiny picots for the next round to join to. Covering is optional - one can join directly on to the bangle/ring as one tats, as seen in the design process pic.
I think the abbreviations are self-explanatory or can be referenced from the tatting model. In case of any difficulty, free free to ask.

To get the Oriental arch/curve in the block instead of a well-defined angular block, I used a combination of Julie Patterson’s and Patty Dowden’s methods of block tatting.
The only changes made to Julie’s instructions: instead of a 1 double stitch (or reverse stitch) riser before each chain, I used 2 half stitches
(two unflipped second half stitches when starting red chain ;
two first half stitches when starting gold chain)
Two similar half stitches causes the chain to fold slightly, thus decreasing the sharp edge of a block.

TIP : After the 3 beads are brought forward in the block, and lock joined, make SLT in order to switch shuttles IF working with 2 colours. In single colour, this step is not necessary.
Moreover, instead of (lock join & SLT), one can make a Reverse Join which is basically encapsulating the other thread when making a lock join. This automatically switches threads. It is what I used for my tatting.

Second shuttle was joined after covering the bangle. 
The 3 strands of metallic embroidery thread tend to show a white inner core at times. Hence care needs to be taken when tatting.

I think this might look fine as a tree ornament,  if suspended ?


Block Leaf (a prototype)
Recently I did a comparative & exploratory study of block tatting, and this leaf form emerged from it. It starts out as a regular 5-chain block of 6 stitches each, then moves down & around in a broadening V-shaped block, with CWJ at center. The stitch count increases as required. Reworking of stitch count is required to bring a few loose chains lie more compactly. The short stem is a chain folded twice using same half stitches.
Pathway is indicated with numbers & arrows on the picture of the tatted model, and the 2 colours used. After joining the 5th chain normally, it continues down in the V shape …. I followed Martha Ess' excellent notes for the increase.


Snail Doodle (a prototype)
This coil is another first for me. Oh, I’ve made (and love) curlicues/dead end chains, but to make a closed coil using the CWJ and without any picots, was a first. Coils are also known as Catherine Wheels (and a gruesome story behind it), hence the name of join – Catherine Wheel Join. Other names for the same join – Dora Young Join, onion ring join.
I had fun making it in size 20.


Heart Block Doodle (a prototype)
Here’s a little puzzle for those interested … trace the pathway of this tiny Heart block doodle. I had tatted this back in 2014 – my 3rd block ever (the first 2 are seen on the left side; I was following Jane Eborall’s tutorial) & when I was asked for the pattern recently it took me while to confirm what/how. Reworking & pattern will have to wait till I can pick up my shuttles, though I did find the starting stitchcount & diagram !
I had designed this for a very specific purpose - it was meant for the I Love Tatting doodle. Later changed it to a dimpled heart.


FYI – I got stuck during the process of changing my patterns & design page . Please consider a work still in progress. I had decided to change it in order to make space to accommodate all the patterns that will be included. I’m trying to make the pics thumbnails. Any help & advice is highly valued !

That's it for the present ... more soon :-)

happy tatting always :-)

Tuesday, 4 October 2016

TWoT 2 : Back to Basics !

Pin It now!
That’s exactly how it felt ! I don’t remember tatting many rings-only patterns when I first learned, especially not with bare thread space. This time it was different – it felt like I was starting from the basics of tatting design.  I have learned (and am still learning) a lot while working on this series.

The This Way or Tat? series starred with a Preface – Quo vadis ;
then an Introduction with practice patterns (pdf here)
Continuing from where we left off in the Introduction, here is the first set - diagrams for Rings Only scenarios.

UPDATE (Oct 15, 2016) : In case the link does not work, here is an updated, revised pdf with new link --- TWoT? Set I Rings Only updated
This part consists of a guide to read the diagrams ; many small but graded (difficulty level) patterns for practice and exercise ; and questions scattered throughout the document.
Answers will be shared in the next post.

I am grateful to Rachael Mohler & Eliz Davis for graciously & enthusiastically sharing their patterns, 
and to Renata who equally enthusiastically permits me to share her doily links for this series.

I hope you have tremendous fun playing with the patterns, while keeping a close eye on the whats and whys.
I will share my own thoughts, pics and working of the wreath and square motif patterns in next post, along with some links and answers.

My own practice patterns are pretty basic, while incorporating some application of the diagrams.
These 3 patterns constitute this collage-in-the-making called …
Ring In The Bouquet !

The bouquet comprises of rings-only patterns worked with a single shuttle in size 20 thread.…
Wiggly Flowers
Forgot to join the picots in the 5-petalled yellow flower, making it fidgety. Noticed only when I started to work on the pics at my desktop. Hence the name. Maroon flower is the prototype.

Butterfly Liberated
I have struggled to design a simple butterfly. This time, it wasn’t that difficult! Hence this name.
The maroon one in topmost pic was the prototype where I deliberately left out picots.

Laurel Leaf
 Shape of this leaf had always appealed to me....
 but I joined the leaflets a bit differently, to create that mesh-like effect.

I can’t believe these or similar ones haven’t been done before; even so, I created them from scratch. 
Wiggly Flowers were easy. 
Butterfly Liberated took 1 trial. 
Laurel Leaf took 3 trials. 
When I started to design and tatted a prototype of leaf and butterfly, I searched Google, Craftree & Pinterest. The way I worked them is a bit different from the ones I found. I will willingly give credit to any designer if you can guide me....


These patterns are deliberately shared only as diagrams in this file. However, I will upload all patterns to My Patterns page, properly formatted, with written notations. These are all free to use, even if one does not want to follow the exercise.


pdf for pattern only : Ring in the Bouquet

All feedback and criticism is appreciated and welcome – it will help me improve on the next diagram sets.

Inchies 

While comparing the Set diagrams to practice patterns, I wondered if I could design a square using outward facing rings. These 2 Inchies (yes they are exactly 1” squares!) are the result of a quick tat. The right (pink) one was made first, then the beige one. These are prototypes, and I need to better them … but I like the potential of these simple airy square medallions that can be joined into a larger fabric. 


Meanwhile, I am thrilled to see at least 3 tatters working this series (3, or at least 2 More than I had anticipated,since Eliz had committed to it :-D !) 
Read Eliz’s excellent observations and applications of the previous exercise and how Ninetta has applied the exercise to her current doily project with curled rings !!! Mama Martin left a nice comment here, on how it helped her.

Set II comprises of Chains Only diagrams. But I doubt there will be these many practice patterns ;-) Hope to share it in about 10 days ...

happy tatting always, whichever direction you take :-) 


Related Posts : Preface – Quo vadis

UPDATE (April 2021): While I try to find the time and focus to complete this series, please check out these links:
Practice patterns: 
Rings & Chains: Minarets in the Sky; Aspiration snowflake; Hidden Rose Snowflake (rings & chains) - 
Mark Myer's Luster Snowflake  Paths/choices when climbing out with a split ring . pictorial pdf.
Lock Join Plus series - several methods that can result in change of direction, colour, etc. including when climbing out. https://tipsaroundthehome.blogspot.com/2020/07/lock-join-plus.html


Monday, 26 September 2016

TWoT-1

Pin It now!

So, here we go ! The TWoT series begins !

This Way or Tat?

Read the Preface here.

The Introduction consists of : bullet points to give an overview ; snowflake patterns (2 versions) as a practice or baseline piece ; and a worksheet or table to jot down your observations.


These Dotted Snowflakes have been designed specifically for this series to establish a sort of personal baseline. You can choose to tat any version or continue to tat whatever you have on your shuttles. Just be mindful of the way in which tatting is progressing at each step.

The table will give you an idea of what to look out for. This is a prototype table. You can use, alter, adapt it as you wish. 
I think the table itself , or a modification thereof, can be used by tatters & designers to keep track of any new project. I know I’ll be using it for my future designing !!!

These and future patterns for this series will be fairly small, simple, quick to tat.
Any resemblance to known patterns is purely coincidental and unintentional. I have not referred to any pattern, any stitch count, but one can never be sure of the subliminal influences and inspirations that seep in. 

Both are tatted in Anchor size 40 thread and measure 2½”

This 2-round pattern can be tatted in one pass.

In Round 1, the starting ring has a ¼” picot to which the 5 rings will be joined.

How to Estimate the Length of a Central Picot ?

Thread size, tatting tension, etc. make it difficult to standardize the length, despite a designer's best efforts. 
A thumb rule has emerged (but needs more confirmation). 
TIP :    length of central picot = 1DS span/width for each future ring.
Make the picot loop and fold back along the first part of ring. Going along, if 5 more rings need to be attached, the folded loop should span at least 6 DS ie. it should be 6DS wide. 
Similarly, if there are to be 8 rings around a central picot, the picot loop (doubled) should span at least 8-9 DS.
If you are tatting these snowflakes or any similar medallion, what has been your experience ? I would love for you to experiment and confirm or reject. Please do share.


In Round 2, I have deliberately used both dots & Josephine rings in this pattern. Interestingly, they have the same total half-stitch count, yet the JR is larger than the dot, as I had discovered here ! Dots are very small rings with normal double stitches. Now you know why the snowflakes got their name! Perhaps 'Dotty' would've been more appropriate ;-)

Both versions stacked together :
Love the way the 2 snowflakes stack up! Idea for a new version, using both ?!!

Download the complete pdf of Introduction to ‘This Way or Tat?’ here.

Set 1 (Rings Only) will be uploaded in a week's time. 

Feel free to ask any questions. Your feedback, criticism & inputs can benefit us all. Please take a moment to share your thoughts and observations. 

happy tatting :-)

Related Posts :


Wednesday, 21 September 2016

In the dark of night , quo vadis ?!

Pin It now!
(this post has two parts - scroll down for a preface to a soon-to-be-posted series)

Well, no, I wasn't tatting in the dark, but the light in my brain/mind was surely switched off! How else can this be explained, how else can it be rationalised ?! This is the third snowflake in a row that has a fraternal twin !!!


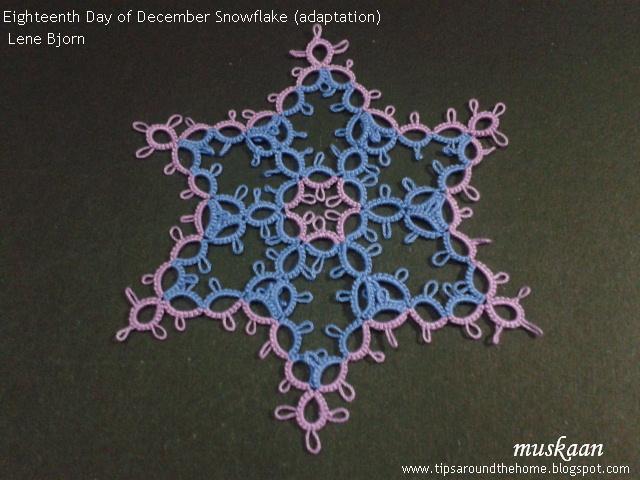
Reflected Nights
Pattern : Eighteenth Day of December Snowflake
Designer : Lene Björn
For : 2016 Snowflake Challenge on Craftree
So happy was I to have finished one WIP, and so eager was I to strike it off this list. Sat down to write the post and while referring to the book, a glaring mistake dawned on me!

True, I was tatting this in very short, interrupted spells – a ring here, another there.
True, I was getting a bit uncomfortable following the sequence.
True, I had been having trouble with the inner trefoil cluster - kept wondering why there was so much overlap.  Cross-checked not once, not twice, but almost every time ! Yet no light shone through :-( and I put it down to the joining picots being too small.

Sigh, nothing to it but tat again. There's a saying in Hindi idiom that fits in perfectly. It basically bemoans the fact that at a time when one is totally broke (financially), the dough (flour/food) too gets ruined. In my case, I was ‘broke’ for Time.  

Might as well make the most of it & bring in a bit of change. But first things first ….

Materials used : 2 shuttles; size 40 Anchor cotton (blue-4054-00131, lavender-4054-078); picot gauge (⅛th inch vertically or ¼th inch horizontally).
Techniques I used : directional tatting (RODS – reverse order double stitch), rings, split rings (SR), double core single shuttle split ring (SSSR), turn work (TW), switch shuttle (SS)

The Mistaken One !
As others have noticed, it is simpler to start with Ring 2, then Ring 1 (both normal rings), & continue thereof, all tatted in one pass, from the front side.
The inner round is worked clockwise while the outer counterclockwise.

To tell you the truth, I had started this snowflake in green & cream ! And I took a printout of the pattern in order to play with colour placement. The different rings (normal, SR, double core SSSR) were also marked on the sheet. Since I kept making mistakes, & unknotting, retro-tatting, this was boxed & I picked out 2 different colours more in keeping with my darkening mood.

I was working with 2 colours, hence all 6 innermost rings are SRs.
To climb out to outer round, 2 rings were worked as double core SSSRs, enabling me to hide (encapsulate) the lavender & get all-blue rings.
To work the rings at the tips, TW, SS, RODS ring, TW, SS & continue.
Shuttle 1 with blue thread  consumed 1 full bobbin load ; Shuttle 2 with lavender used up only half a bobbin.
Measures : 3½” 


The Un-Mistaken One !
Measures : 3¼” 
Switched colours to see effect.
Tatted outer round in clockwise direction.  Yay, worked really well !!!! The tatting went much faster & smoother. Mental grasp was easier, too.

Used the picot gauge horizontally (parallel to the core thread). Again, worked much better than vertical, especially since the thread was not easily visible.  When I first did it for the Elizabeth medallion, it didn't appeal much! Goes to show that one can always reset one’s comfort zone. Perhaps when working with finer thread, it is advisable to use the gauge horizontally ? What is your experience ?

TIP : One interesting observation : In first snowflake, when tatting went counterclockwise, the outer ring at tip had to be worked in RODS ; in this piece, where tatting was in clockwise direction, the ring at inner end had to be worked in RODS.
Both snowflakes together …. love the effect ! In above pic they are placed on a chikankari saree with mukesh work. Below, the correct version is placed above the 'adapted' one.

Related Post : double core SSSR


Quo vadis ?!
This Way or Tat - Preface

For the above two snowflake repeats, I deliberately chose to tat in a different direction. (And it threw up interesting ‘changes’ when combined with directional tatting, as pointed out in the TIP). I had experienced the same discomfort when tatting the Melt into Spring Snowflake in counterclockwise direction as the diagram called for.After snipping and re-starting in clockwise direction, the tatting went very smoothly.

But have you ever faced this dilemma where you Think you are going to be tatting a row/round in one direction, but turns out it wants to go in the opposite direction ?!
I have had this encounter many a time, in projects that have multiple rounds, irrespective of whether I was tatting with regular double stitches throughout or with directional tatting; whether I was cutting off the thread after a round or climbing out. All four of my Renulek’s doilies are witness to this dilemma and I have detailed my direction enigma for most of them.

Always wondered why, but it was my Scarlet O’Hara moment ‘hmm, I’ll think about it tomorrow’! Well, many tomorrows came but no thinking ensued. After all, an experienced tatter can easily make the shift - much easier to do for a simple symmetric pattern, but can be done nevertheless. 
That tomorrow finally arrived when a question was forwarded and I had to sit down and really think about it. 
Started with a few illustrative diagrams, it soon stretched to a series of diagram sets detailing situations and options. It even led to the discovery of some common rules/observations and the factors that affect the outcome.

But before I start with the 'This Way or Tat' series, the following scenarios might strike a chord somewhere?
  1. Whatever you are tatting right now, which direction is your tatting going ? Seems like a simple question, but there are 2 answers/parts to it. I’ll let you figure it out for now.
  2. Are you working directional tatting (frontside/backside with reverse order of double stitch) or simple double stitches all through? Do you think the former would make a difference to the direction of progression?
  3. Do you sometimes use direct tatting (reverse or unflipped or wrapped stitches as when working the split ring)? Have you noticed any difference in direction?
  4. Has it happened that the pattern/diagram calls for you to take a certain direction, but you find yourself tatting in the opposite – either deliberately or accidentally ?
  5. Have you faced the same dilemma when you climb out of one row/round to the next using a split ring or split chain? You thought you’d be going this way, but the shuttles are wrongly positioned?
  6. In multiple row/round patterns, how would two colours be positioned for next round after we climb out with a split ring or split chain?
  7. Similarly when working with colours in regular tatting. Have you wondered how to get the right colour in the right position/element ? There are some that flow naturally in a certain direction but in others we use a SLT. Are there other techniques or tweaks that could accomplish the same? How to decide what to employ and when?
  8. Would you much rather work from the front? How will the traditional pattern behave and how would we apply our choice?
  9. Do you sometimes wish the pattern diagram had given some indication of the direction in which to go?

If you think these questions deserve answers, and the answers interest you, look no further. I will start posting soon, along with practice patterns for all who are interested. The first post will be an introduction to the document with a quick practice pattern where the tatter can choose her/his own path since I will provide only the stitch count with no other instructions.

Are you up for the challenge ? Do I hear a resounding YES ?


happy tatting always :-)

UPDATE (Oct 8) : INTRODUCTION pdf with exercise posted here
Set I - RINGS ONLY post with pdf
Left-handed tatting by Eliz Davis