Showing posts with label dot picot. Show all posts

Saturday, 19 May 2018

I love butterflies

Pin It now!

Garden soil had been split open to sow seeds and now those seeds have split into plants with lovely blooms, attracting butterflies to split open the pollen sacs and carry on the circle of life.
Hey, don’t split!!! Promise, I’ll behave … Just trying to clue you in :-D


You have already enjoyed & appreciated the lovelies made by friendly tatters. These are my versions of make me pretty butterfly fun. And the ‘split’ comes from this month’s I Love Tatting task set by Justyna – split chains, curlicues, etc. She has compiled an incredible list of tutorials and free patterns for inspiration!
I actually have something more in mind for the task, but till I find time to tat it, this will have to do. 

Tutorials for most of the prettifying techniques mentioned here are listed on these pages -

In chronological order … I have literally used scrap threads for most.
Venetian Picots for antennae, dot picots and graduated picots
Here, I made the same mistake Lavi made, but didn’t bother to rectify it. 
These were my very first venetian picots!!!
3¼ x 2½ cms in Anchor 20 cotton

Graduated picots and twisted picots (floating)
2 x 1½ cms in 2 strands of Anchor embroidery thread

Venetian picots for antennae & 4 picots
2 x 1½ cms in Anchor size 40 cotton
The Venetian picots worked out much better in this finer thread.

Right after posting the pattern, I tatted the above 3 versions. Some of the following versions were inspired by the butterflies flying in (Anita, Denise, Ninetta).

Twisted (floating) picots and seed beads
3 x 2 cms in 3 strands of Anchor embroidery thread.
This was inspired by Denise’s 3 beads in the lower half.

Dot picots and decorative picots
This is based on Anita’s stitchcount. I like the broader span of top wings.
2¼ x 1¾ cms in Lizbeth & Anchor size 40 cottons

Since this project was a spin-off from the Common Mormon caterpillar, there just Had to be a couple of butterflies in black and yellow ...
Beads and floating beads in different arrangements
I tried something different – beaded string wrapped around the lower rings. 
These are longer than I had visualized, but let them be.
The antennae uses floating beads (FB) or fringe on chain method.
2½ x 1¾ (or 2 with bead string) cms in Anchor size 40 cotton

The wooden black bead was too large and unseemly. So I decide to remove it. 
Wasn’t as easy as I’d thought. The FB method really does hold the beads in check ;-P
Then I remembered a tip on Jane McLellan’s blog about breaking unwanted beads. 
Yes, that worked! Once broken, I inserted a scrap thread for better grip, and knotted the tips.

Onion rings (Josephine rings inside the upper & graduated picot rings inside the lower halves), twisted (floating) picots, and Curlicues (dead end chains or SSSCh) for antennae.
3 x 2¼ cms in Anchor size 20 cotton
I started with a knot for each curlicue, serving to hold in pinch, 
and worked back with unflipped stitches.

Inward picots, decorative picots, long picots, a head ring, and Venetian picot for body. 
I followed Ninetta’s directions. 
2 x 2¾ cms in 3 strands of Anchor embroidery thread.
  
 
A couple of side views to show the 3D effect.
When making the Venetian picot, I left the scrap thread in it and 
this served well when joining the next ring to it.


I include the Venetian picot in this month’s kocham frywolitkę task because both the curlicue and this picot are standalone or floating chains. Although in the former the stitches are unflipped and wrapped manually, in the latter each half stitch is flipped but moved in place manually over the previous stitches.

I couldn’t resist a couple more pics.
 
The background is Monet’s White Clematis an oil he painted in 1887. 
The image is in this amazing book The Life and Works of Monet by Susie Hodge.

UPDATE : My latest butterfly with floating chains tipped with Josephine knots for antennae....


Do stop by to welcome this batch of butterflies :-)

UPDATE - New arrivals (2020) from talented tatters -
 https://tipsaroundthehome.blogspot.com/2020/07/welcome-intrusions.html

Wednesday, 27 December 2017

Vetoed

Pin It now!
I thought I had it all figured out. 
Nope.
Turns out shuttles have veto power, just as I feared last time.


This round was visualized in cream all along, so that the doily could be finished off with the aqua blue. But after doing a couple of repeats, it didn't look so good. The round seemed to cry out for the aqua blue right here.

But I did veto the application of picots -- scuttled down to just a pair of dot picots per repeat Can't leave everything to shuttles ;-D
Reason - so I can have more picots in the final round.

This was completed many days back & Agnieszka sent me the last round pattern. But I haven’t started - dithering on the colour choice ….
Should I add that dark green for the final round?  
Or should I continue with this aqua green – a broad round reflecting the inner one?
Decisions :-(
I won't be able to complete this before the new year. But if anybody wants to join in, 31st is the last date to inform her. 
And I might have a surprise guest - if my convincing powers can crack her shell ;-D With fingers crossed ...

My journey so far –

Who holds veto power in your tatting journeys ?

Saturday, 9 December 2017

whizzing past

Pin It now!
I wanted to share the next few rounds of Agnieszka’s Doily #10 (zabawa pikotek) together in one post. But Round 7 may take a while because I’m busy with a pictorial and don't want to lose focus. So might as well get this off my list.

I returned to dot picots for 6th round. A ‘repeat’ of the 2nd round.
Surprisingly, even with all that switching between shuttles for dot picots the round went smoothly and quickly.
I tried to make the dot picots mock rings (SCMR) instead of thrown rings, to avoid switching shuttles But the latter was easier and came out better for me. Moreover, I kind of got into the rhythm and didn't mind at all. 

In Anchor size 40, it now measures 8” or 20½ cms.

Next round is again flowers. 
Carollyn suggested different colour for the center of the flowers. I've been thinking of interspersing all pinks with a cream center to avoid an overload of pink. Think it will work???

Check out Frywolaga's latest post. The invitation is open till the end of the month. I think it's a cool way to begin designing. With the pattern all laid out, and no trials/tribulations for stitch count, etc. all one needs is to play with the picot and create our own version!

Don’t you love when the day’s tatting & designing is stress-free and relaxing!


Related posts

Friday, 10 November 2017

Am I the right person?

Pin It now!
Especially where picots on tatted lace are concerned?
I generally go for minimum decorative picots, preferring clean lines that show the design clearly. Not that I don't admire the lacy, airy effect of picots.

A couple of weeks back Agnieszka (Frywolaga) invited her readers to a fun picot challenge.
She usually makes 2 versions of her beautiful patterns – one with and other without decorative picots. This time she shared a picture of her Doily #10 without free picots and those interested need to put in picots where they wish. She sends out instructions for the next round when the previous is finished.

When I first set eyes on her doily I loved the simple lines and didn’t want to muck or clutter it up with picots (sorry, dear picot-ists, no offence ;-D). But when I received the 1st round pattern, I had to think slightly out of the box and came up with the following …

Here are my first 2 rounds worked in Anchor size 40 …
I used a double picot in round 1 enhancing the floral effect.
Measures 2.5cms
She shares her suggestion here. 

Dot picots in the 2nd round.
Measures just over 5cms


I hope to repeat both type of picots in later rounds.

It really is fun! And knowing the complete design, it becomes easier to plan ahead. Just hope I do a good enough job while enjoying the journey. If you wish to join in, the links above provide all the information.

What I did muck up, though, was this simple pattern - the Onion Ring Magic Square #2. I had no problem following the pattern or direction, yet stumbled on simple joins! Thrice rings are attached incorrectly. Noticed only in the picture when the negative space seemed wonky. 

Since I wanted only the one square, most joining picots in outer chains were discarded. (Next time I might even discard the free picots on inner rings ;-P)

Onion rings were tatted with same shuttle. Inner ring from backside, turn work, outer ring from frontside. Outer ring is looped from Behind the inner ring as I had done for the marigolds here.. I found it much quicker to work especially when not using 2 colours. This is the onion ring join used - very effective.


with or without picots, tatting is always lacy fun J

Sunday, 5 November 2017

layering effects

Pin It now!
I’ve been revisiting a few techniques – both using layered or stacked rings - to refresh my memory.

Ninetta’s modern adaptation using a floating layered ring was my first stop. I converted it into a flower pattern. DH thought it looked like a lotus! Lotus motif is a fairly common sight in temple architecture, decorative ceilings in buildings/rooms, Jaipur-style paintings, etc. That settled the name ....

Lotus Medallion
(prototype)
In Anchor size 20, the finished flower measures 6cms across.

The inner medallion uses the same stitchcount and process as Dillmont’s original motif. Except that I made 6 rings instead of 4 – which meant I had to add 2 more picots to the floating ring. All details here. This center can be made with a single shuttle and a long tail pulled out to work the floating ring and 2ds of split ring.
This is a modern variation of the rosette or enclosed space medallion.


I hadn’t planned anything specific. But this looked so forlorn that I had to do something to cheer it up ;-P
I continued with the layering theme, this time with chains. When did I last use 4 shuttles? Time to set them up :-D Tried out my idea with some scraps and ran out of the red at this stage. 

Starting again, I used light and dark shades of the same colour - this contributes to the 3D effect. 

Yes, those are dot picots in a diamond arrangement! Can't stay away from experimenting ;-P Here's how I worked it ... Dot Picot tutorial links here

Work a string of 3 dot picots with shuttle 2, and 1 dot picot with shuttle 1.
Note : When making this dot picot with shuttle 1, leave a very tiny bit of thread on both sides.

In order to make the make the single picot clearly visible, 
I used the Floating Beads with tatted rings method, tying an overhand knot around the base of the dot picot. 
The faux bead now rests at a slight distance from the chain.

Now start the chain close to the faux beads. 
When the chain is tensioned, the 4 dot picots form a kind of diamond shape. 

If one is using beads instead of dot picots, this round can be worked with 2 shuttles attached to respective balls. Pre-string 18 seed beads in each ball, and 6 seed beads in each shuttle.

Chains on either side of the faux beads have 10 stitches each. But this can be changed to suit one's taste.  
Chains are lock joined to the picots on inner medallion. But remember to overlap the new chain Before making a lock join with the previous one. Also keep the overlap direction consistent throughout. An under/over overlap as in the model helps when making the final chains and joins.

If using single colour throughout, one can climb out of the inner round with a split ring.

So what's your verdict ? And suggestions ? Colour choices? 
Once I have your opinion I will work another model and present the final pattern. 

happy tatting always J


Saturday, 30 September 2017

charming in pink

Pin It now!
Encircled Charm
Usha Shah
Another beautiful medallion pattern from Usha ! Well, it would’ve been, if I hadn’t been in such a hurry. Using some leftover threads, I managed only 6 rings to her 8.

A very clever pattern and 2-colour effect ! The dot picot cluster is overlaid midways through tatting a ring. It is a variant of Alternate Thread Tatting (ATT) and Ikuta’s Picots (method 2).

I deliberately tried to increase the bare thread space (from 6mm to 7mm), intending for it to look more like a flower. But it didn’t work out properly. This was tatted in a hurry before class, using some leftover threads – wanted to be prepared before attending.
Notice the pink thread beneath the cluster on the topmost ring? That is the core thread which lies across the cluster at the back. In this first petal I tried to decrease the space, tugging the ring hard. Wrong ! Close the ring normally and let the bare thread lie behind.


Future Idea - Can you see this around a Gem or Penny or a Button – a new Ice Drop pattern?

Many many thanks, Usha, for sharing this adorable pattern !

Charming view ! 
Jack’s Beanstalk ?!


These are a few pics of the Rangoon Creeper just outside my window. I love the flowers and the rapid and luxuriant growth of these climbers (there is  a 4-day gap between the 2 pics). We have these on every building in our complex – climbing up a rope right up to the terrace. Every year for one reason or other a climber may fall down. But like Jack’s Beanstalk they grow back in no time !!!
DH kept prodding me to cut and put a bunch in a vase and I kept telling him this is one inflorescence that shouldn't be vased - there are always ‘ants’ inside them. Would he listen – Nooooo! 
So anyways, here’s a bunch on the table. True to modern times, this was a quick photo-op set-up. I was working quickly to avoid any critters showing up – didn’t even wait to properly arrange or for the flowers to straighten out. 
Even as I was clicking, the Hubster noticed a couple of the bugs crawling out on to the leaves. Rushed them outside! I can triumphantly say – told ya - but am saddened to see such a beautiful bunch thrown away :-(
This was taken only 4 days later. The climber had climbed up out of range !
Now another 4-5 days later, some of the flowers have started to wilt. But they've spread their joy and fragrance :-) Waiting for the next flourish, while still enjoying their fading beauty ...

Have a great weekend J

Monday, 26 June 2017

hiding in vein

Pin It now!
Stepwise pictorials for dot picot leaf
and how to use dot picot strings as fillers

I’m forever playing catch-up with my blog posts; this time, too, it is ‘in vein’ :-D That did not stop me from taking a much-needed net break. Not in vain! 
Spent some relaxed de-cluttered time tatting a lot (which means more catching-up ;-P) and watching another net - the grass court season in tennis ! I'm sure this is Federer's swansong year and wouldn't want to miss his matches. And what a match the Halle final was - a glorious Master Class !!!! 


In my previous post, I was asked how the veins were joined to the leaf. Posting a pictorial showing my ‘hack’.

Dot Picot Leaf and Veins
Step-wise pictorials 

This freeform leaf is worked in size 20 thread, and the veins in size 40.
Techniques : large ring, dot picot on ring, dot picot string, whip stitching end tails, tatting over tails (knotless start. this is optional.)

I already shared how the leaf was worked, with 1 dot picot on ring at the tip, in this collage. Posting again to bring it all in one place. 
Dot Picot Leaf (with Dot picot on ring) pictorial
Complete sequence is notated in pic#11 below

1. What is ‘missing’ in the collage is that I started with both the leaf and the vein threads joined at the base as seen in this pic. The vein thread is merely 15-18 inches long. I used knotless method, but a weaver's knot can easily be used.
2. After completing the leaf to desired size and shape (it is not bilaterally symmetrical), I turn it over and work the veins from the back side, tatting over the tail in the first few dot picots.
Vein is simply a dot picot string.
3. We make the middle vein first & when the desired length is reached, unwind thread from the shuttle and thread the end through a tapestry needle.
4. Insert needle at the tip (point B) - specifically at the base of the dot picot on leaf and ….
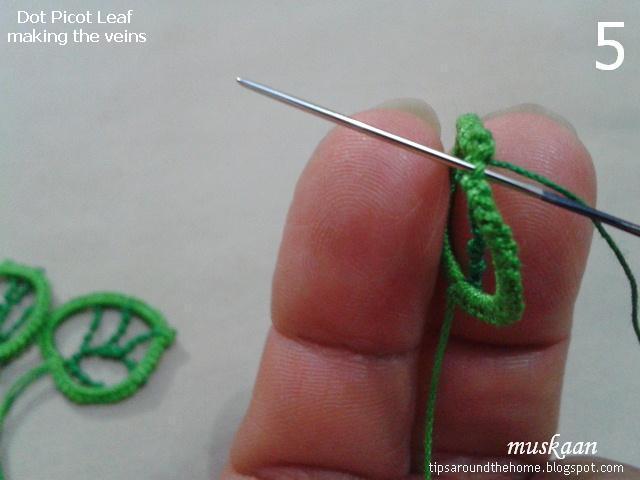
5. whip stitch under the caps on the right edge for a few stitches.
((Yes, the entire vein can be tatted on a needle. But I’m not that skilled/confident yet.))
6. This is how it looks on the older leaves – invisible ! Despite the different shades, the dark green does not show up at all, only partly because it is thinner.
7. At desired point (point C) , I rewind the thread on to shuttle and tat the shorter vein.
8. When the required length is reached, pull a loop around the main vein, pass shuttle through and ….
9. tension carefully. Something like a lock join. It stays in place due to the notched texture.
10. Continue with the left side vein for required length and join to the edge (point D). With a needle, whip stitch along the left edge for next pair of veins.
11. Tat the vein, join to main vein & continue last vein which is attached to the right edge. I continue to whip stitch down this edge right up to the base. This pic shows how the entire pathway. Black arrows depict whip stitching.
12. This is how the leaves look from the wrong side.
These measure just about 1 inch.

NOTE : Instead of dot picot strings, one can make the veins in Lock Chains, Twisted Picots (as in rustic leaf), or simple bare threads ! Even regular chains ! Improvise & enjoy :-)
This effect can be used as a filler for any ring or mock ring ! Fancy some petals, wheels, et al ?!

The leaves are freeform, asymmetrical, & I eye-balled everything. 
If you wish, you can draw a sketch-to-size as reference. Remember this rustic leaf sketch turned into tatting ?

no tatting is ever in vain J