Showing posts with label TAL. Show all posts

Friday, 6 January 2023

tat-along doily

Pin It now!
Our new game in the Endrucks 1920 Project FB group has started. This time it's a tat-along of the cover doily. We are following Reiko Akamatsu's reworking of the original. And we are sharing 2 options. I am tatting it in 2 or more colours without climbing out. Ninetta is working it in one-pass using split chains, etc. to climb out. Of course Frau Endrucks herself tatted it in one pass using shadow/extra chains to climb out.

Tat-along of endrucks' cover doily #TALmeEndrucks jan2023 
Part 1 - Rounds A,B,C. I used the measured mock/inward picot to climb out of the central ring which can be tatted as a true ring or a mock ring.
Interestingly, this is the only pattern where Endrucks starts with a chain (aka mock ring)!!! Hadn't noticed it before. There is always something new cropping up.

Actually this was my 1st attempt where I used false ctm to climb out of the central blue ring. I kept the blue on the shuttle and continued with green ball. So not happy with the work which becomes even more glaring in the pic. 
PART 2 - Rounds D,E.  This is where the difference between individual rounds and continuous tatting emerge. Details are in the notes in the Part 2 pdf.
I tried Frivole's Ending on a Chain to avoid hiding ends but the thread broke and I had to start over.

Tatting as separate rounds gives us the freedom to increase our colour palette. Both rounds can be tatted with one shuttle and ball, including block tatting.

I am going for a peacock rendition, hence the choice of these colours. I chose size 40 and this time all 3 colours I used are from different brands! Green - Swati; Purple - Anchor; Blue - Gopal.

Doesn't the top make a nice little basket?! Would love to tat it separately and fill it with flowers. 

All links in the top right panel of my blog. You are welcome to participate. 


Sunday, 20 November 2022

lets play tag

Pin It now!

 At the beginning of this month, I told you about our new game for November #tagmeEndrucks - https://tipsaroundthehome.blogspot.com/2022/11/tag-along.html
We've had a splendid response! And before we get into our new game in December, we're throwing this game open to all our non-FB tatters. 

Following are the 4 parts, each part shared every 2nd day. You can play it in parts and try to guess what each part is or what the ultimate model will become. If you are the curious cat, try to guess which of Endrucks' patterns this one has been derived from. 🔍 EP doc - https://docs.google.com/document/d/17LEVftXweztBIOWh4sL4BB7bX65ssoOsOn4oXIgCepY/view

There is a pdf link under each pic which has the written pattern, a tip, stepwise pics, the legend, and bead placement, etc. This was done deliberately to cater to every type of tatter.

Part 1 pdf link: https://drive.google.com/file/d/1muyffntd2LD3U7JRM3ZZHg4_7SuJcaK-/view

Part 2 pdf link: https://drive.google.com/file/d/1ycV0ifafPJiBHdRg7d9H8lprfBTGNsBy/view

The model has been deliberately tatted using 2 colours only for the sake of clarity. You are free to use any thread, colour, beads, etc. 2 shuttles, continuous thread.

If you complete the model, do send me a pic so that it can be added to our album and roundup! And if you are a first-time Endrucks' tatter, you get a small gift!

I will share the complete pdf link and name of the designer in the next post.

There were also teachable moments that I will share in the next post.

Happy tatting 💖


Thursday, 3 November 2022

tag along

Pin It now!

 So, our new game for November 2022 has begun!!!

Game of the Month - TAG ME NOV 2022

This time we have a short 4-part tat-along kind of format and tatters have started sending in their first part which was released on the 1st. Today Part 2 will be uploaded. You can find all the relevant details in our FB Group - https://www.facebook.com/groups/1235560633606162

If you are not on FB but would like to play along, please leave a comment and how to contact you, and we will send you the link(s). Have fun trying to guess what each part looks like and what the final model might be. And this is an adaptation of which Endrucks' pattern.

Scroll through the patterns in the EP doc for images and links to help your search  - https://docs.google.com/document/d/17LEVftXweztBIOWh4sL4BB7bX65ssoOsOn4oXIgCepY/view

What is even more fun is that you get 2 patterns in one! And we are confident that you will definitely tat it again!

Each pdf contains a diagram, short form written pattern, and stepwise pictures in an attempt to reach out to all tatters.

Please share your versions and use the hashtags #tagmeEndrucks and #Endrucks1920Project when you post on any platform. And don't forget to let us know - Ninetta or myself - so that we get a chance to admire your work. As a first-time tatter in the Endrucks Project, we also have a gift for you when you complete any E pattern!

I have tons more to share with you - models, versions, patterns, etc. Hoping to squeeze in some time to do it all ;-D

Looking forward to your participation

Saturday, 13 August 2022

har ghar tiranga

Pin It now!

 Celebrating 75 years of Independence (August 15th) with a tatted version of my flag.

Har Ghar Tiranga campaign is about flying a flag in each home. I chose to tat a flag around a 1947 coin.
It's so good to look out the balcony or window and see flags flying merrily in the monsoon breeze. 

I've been sharing my tatting progress this entire August. Now it was time to assemble. 
 
Saffron - I used marigolds to symbolise sacrifice and auspiciousness. My original intention was to have the 'petals' raised up. Couldn't accomplish it since these flowers are so tiny.

White - waves in water symbolise peacefulness, serenity, peaceful coexistence.
Glued in overlapping layers.

Green - I used leaves to symbolise prosperity though it denotes faith and chivalry.

As expected there are gaps in the green rectangle, which were later filled with single or double leaves, as required.
For the pole, I tatted an onion ring using metallic silver thread, size 20. Then I couched over doubled up strands. The pole could've been thicker, but oh well ....

Ashok Chakra - the emblem represents the eternal wheel of law. I used the 1947 coin from hubby's old collection. It was the discovery of this coin that flagged off my idea early this year.

Flag tatted in Anchor Pearl Crochet Cotton, size 8, measures 13.5cms x 9cms.
saffron - 00316 ; white ; green - 00245 ; blue - 00133

This is how the edge of the coin looked after the split ring braid was wrapped around it. I had wanted to outline the coin, but without adding bulk. Since I didn't know how to go about it, I had left it as is.

Then inspiration struck! Wound my shuttle and threaded a long tail through a needle. This tail acted as the core thread and I worked chains between rings using reverse stitch (direct tatting). The needle came in handy to slip under each ring.

And this is how it looks with a chain passing through the SRs.

A close-up of the simply encircled coin.
There should be 24 spokes on the wheel which could easily be sewed in with finer thread, but I left it open so that the coin face and date is clearly visible.

I was pleasantly surprised that gluing everything together was accomplished in a single day! Today I merely filled in the gaps with extra leaves and flowers, and worked the pole.
And I sewed down the coin instead of gluing it, to keep my options open.

The Aida cloth is mounted on an embroidery hoop (25.5 cms diameter along the inner edge).
So this is it. My artistic Indian flag in tatting. 
Hope you enjoyed my 10 day journey as I join my country in celebrating Azadi ka Amrit Mahotsav!


Related Posts -

Thursday, 11 August 2022

saTATisfaction

Pin It now!


Another productive day of tatting, foregoing my exercises and the newspapers, shhhh ;-P

The Ashoka Chakra in the center of our flag actually has 24 spokes. Using Anchor Pearl Cotton size 8, I was happy to get 12 in cabochon tatting. After all my tatted flag is an artistic symbolism, though proportions are maintained.

Started the morning by working on the 3rd wave and completed it by afternoon, despite all chores. Since I had the pattern jotted down, it was easy and quick to tat.

All 3 waves together.
In the evening, the waves as well as the leaves were all blocked. 

And this is how they will be arranged, with some overlap. Difficult to capture in a photograph.

And this is how I did worked tatting around the coin. A spilt ring braid.
SR1: 3 - 6 - 3 / 3 - 6 - 3.
All subsequent split rings -
SR2: 3 + 6 - 3 / 3 + 6 - 3. 
The final ring I worked as a regular ring, joining back to the first SR.

Has this been done before? I seem to have lost track of so many things.

UPDATE: I've been told that Edda Guastalla published this SR braid method of encapsulation in a book. She did it on an large gem (like in ice drops). 

And here is how I finished off the coin to get a smooth edge https://tipsaroundthehome.blogspot.com/2022/08/har-ghar-tiranga.html


I have revealed each step of design and progress over the last several days. Now we'll all have to wait and see how they come together finally!

However, before that, there is a fun game you are all invited to .... I will post about it tomorrow.

***************

Those who subscribe to my blog via email, have you been receiving the email notifications for each post? The last one I received was the July 24th post!

waves of satisfaction

Pin It now!

 As I said, the day was a washout in terms of tatting. I barely tatted a few chains. However yesterday (which I will call Day 8) made up for it in some ways.

I finished the 2nd wave and started on the 3rd.

This 2nd wave has a long flat trough and a slightly flattened crest.
When I placed the 2 wave lengths on the flag, there was a larger gap to cover.
As you can see, I did not bother with hiding ends neatly since the tails can be hidden under while gluing ;-P
Hence in the 3rd wave the lower segments are all 6ds instead of 4ds.
I kept getting so many ideas for variations - too many to ever try out! 

These are the 3 waves together for comparison.
One of my friends on FB shared sketches/graphics of waves and boy so many possibilities! Do I even have the skill to translate a few into tatting? Can't say, but it would certainly be an interesting challenge.

Today I will complete the 3rd wave and might have time to start with the coin. Assembling (gluing) will take an entire day if not more. And then to fill in any gaps with respective tatting. Guess I'm well on my way to completing it by 15th, phew.

Tuesday, 9 August 2022

alternate

Pin It now!


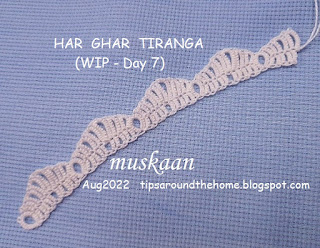
 Day 7 was pretty productive tatting-wise. I completed this entire strip of a symbolic wave. And even wrote down the pattern.
The crests are a bit flattened compared to the trial piece in the previous post.

However, the troughs are too angular. I'll use this strip, but am trying to lengthen the troughs. And this time no rings - only chains. Let's see how that tat's up. I managed only a few chains today. So Day 8 is a washout tatting-wise.

Meanwhile I do have a question. 

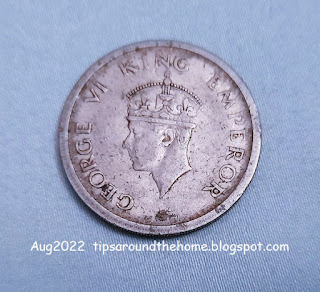
This is the 75 year old coin from both sides which will be used for the center of the flag.

 Should I clean it to a sparkle or leave it as is? Is there anything to keep in mind while cleaning?

I also want to apologise for not answering the comments in my recent posts. I will do it soon. Thanks for your support 💕

Monday, 8 August 2022

wave trial Endrucks style

Pin It now!
WHITE - stands for peace in our Indian flag and to me water and waves symbolize peace and serenity.
This is the first motif of Day 7 but more have been accomplished and I hope to do one more before lights out. No pics, yet.
If time was on my side I would've tried to change the straight lock join line to a curve reflecting the crest. For another day.
This was my trial last night (Day 6) and I adopted Endrucks' style of block tatting.  The crest is too pointed here, which I smoothened a bit in the final version above. Besides this, only 2 minor counts were altered.
Doesn't this look like a crown though? The portion from ring to ring. All it needs is some embellishments.

Off to tat! Waving tata ....

Sunday, 7 August 2022

mirroring

Pin It now!

 Only 8 more days to go and my heart is beating fast ....

My messy heart after 6 days 💗

This is how I intend to place the leaves. In the background is the sketch for reference. The center is an outline of the coin. And there's one extra leaf but who knows it might come in handy once I start gluing.

Some of the initial leaves are shorter 'coz I added 2 extra leaflets along the way.
I have a shuttle filled with scrap lengths. Once glued, the empty spaces will be filled with the required number of leaflets.
This is the Laurel Leaf pattern (on page 7 of this pdf - https://drive.google.com/file/d/0B5MqI5ByadI4cjRaV3h3Qjgyajg/view?resourcekey=0-OQ9HULLWS0raSHIL0dR4Tg) In case it does not open, send the automated request.

TWoT Notes: Notice how the 4 leaves on left side face left while the 5 on the right side are bent towards the right? I followed the exercise set out in the pdf. Instead of starting the first ring frontside, simply start it backside (RODS or reverse order of double stitch ie., 2nd half st, then 1st half st.) and continue with the pattern working fs/bs tatting throughout. The leaf will curve in opposite direction.
No need to work out the mirror-image in the pattern!!!

Tonight I will try out the white pattern before working it for real. I've diagrammed it, but need to confirm stitch count, size, etc. 

Saturday, 6 August 2022

day 4 and more

Pin It now!

 This is my progress on Day 4 or rather the 4th night! ... 

Days 1 to 3 - https://tipsaroundthehome.blogspot.com/2022/08/flagging-off-new-project.html

GREEN - This is the colour of prosperity and what better than leaves to convey that symbolism!

I chose my Laurel Leaf pattern 
(pdf .. pattern on page 7 - https://drive.google.com/file/d/0B5MqI5ByadI4cjRaV3h3Qjgyajg/view?resourcekey=0-OQ9HULLWS0raSHIL0dR4Tg - in case it does not open, send the automated request).

The only tweaks made - shorten the bare thread space between rings for a compact effect; and increase the length with 2 additional rings at the  base.
When I finish the leaves, I will show how I intend to arrange them.

Speaking of leaves, here are the leaves from my balcony garden (in no particular order) - we now have 10 pots with no room for any more if we wish to sit and bask in the winter sun, LOL.

Our green chilli plant is finally flowering and there are tons of buds waiting to peep out.

Our new guava plant bought 1 week back. It is a Bonsai from Kolkata and had 2 fruit but the smaller one fell of yesterday. 
An asparagus fern in a smaller ceramic pot.

Have to look up what this ornamental plant is called. And does it bear tiny red flowers? This is the 2nd small ceramic pot. The rest of the 8 pots are 12 inch diameter.

Doesn't this plant need less sunlight to maintain the mottled effect? Again need to research it.

Our Ficus is flourishing, too, and we pruned it a few days back.

These are the fresh new leaves of the Curry leaf plant.

Ajwain (oregano) 

This is the first time our Tulsi (Holy Basil) plant has prospered so much and we had bought this almost a year  back. I used to prune, but then the new leaves would become smaller and smaller. 
The reason is a tip we saw in a gardening show on TV - Nip off the inflorescence as soon as it appears or as soon as you can. Hubby has been diligently doing it and the plant is such a pleasure to watch.
Of course, I do use the leaves in my tea.

Last but not least a portion of our lemon tree. The 2nd oldest lemon ripened and fell off, too, yum! These 2 are the next in line, though it might be well nigh 4-5 months before they ripen.

So this is a stroll through our potted plants in our balcony. Hope you enjoyed it as much as I enjoy it every morning.