Showing posts with label DRR 2018. Show all posts

Tuesday, 24 September 2024

DRR long time

Pin It now!

 Can't believe its been six years since we worked the Design Round Robin (DRR) doilies in Craftree and I find that I have posted round-wise pics of only one doily! Time to rectify the situation. However, I will have to limit myself to pics, 'coz it is too much work to hunt down my notes for each round I either designed or tatted. Good for you, huh, less to read ... but plenty of pics! ;-D 

Dancing Peacocks
Design Round Robin 2018 (DRR 2018), Craftree
Muskaan, Coretta, Kathleen, Tim, Coretta.

Worked in Anchor embroidery threads, 3 strands equivalent to Lizbeth size 20.

Round 1 - Muskaan. I designed the center for this doily. 

The green/blue one was made first but not being happy with my tatting, I started over with the bottom one. This pattern is originally from my enclosed space medallion phase with only minor tweaks to add picots for joining subsequent rounds. It has triple onion rings where the innermost Josephine ring is made using the floating beads method so that it stands a bit apart. 
Dancing Peacocks Medallion design process - https://tipsaroundthehome.blogspot.com/2018/01/mad-or-maddening.html
Dancing Peacock Earrings derived from the medallion -https://tipsaroundthehome.blogspot.com/2018/01/floating-with-tatting.html  Later that year Anita Barry taught this pattern at the Palmetto Tat Days.

Round 2 - CORETTA L.  

I like how she opened up the design!

Round 3 - KATHLEEN M.  
So much to learn in this round. However it started with me having to snip off quite a length and restart because of some mistakes - https://tipsaroundthehome.blogspot.com/2018/06/rotten-core.html

She used her tweak on the Captured onion ring technique, which I have been using since. 


Round 4 - TIM K.  
He designed the round in such a way as to fit any tension.

He used Split SCMR and also shared a video on how to make it in his blog - http://timtatstoo.blogspot.com/p/the-split-self-closing-mock-ring.html
However I remember discovering that the split scmr was not really needed in this case and explaining how to go about it. 

This completed our round robin of four designers. Started in Feb 2018 and finished within the same year. Design round robin entails we each tat all the rounds of each doily sequentially designing and tatting by turns. No need to mail off the doily ....
I felt we could do with another round or two, but was not sure how to go about it. In March 2023, Coretta worked out a 5th round and shared it!!! I tatted it early this month.

Round 5 - CORETTA L.  
After mulling over the colour scheme since I wanted the round to reflect the earlier colours, yet not be too overwhelming or bright, I came up with the following solution... 

The onion rings are tatted in three peacock colours but as separate motifs. Carrying 3 extra threads encapsulated within the chains would add too much bulk and skew the arches.
The tails are hidden or sewn, but left untrimmed. Couldn't risk any tail being pulled out when the outer chain round was tatted and joined! 
Green for border would make the entire composition too greenish which is why I chose to repeat the inner round blue; it also carries forward the peacock impression.

All trimmed and done. However, I used 4 strands of blue after realising that 3 might not allow the doily to lie flat since my chains are usually tight.

Anchor embroidery 3 strands equivalent to Lizbeth size 20.
Orange - 0333 ; Yellow - 0306 ; Green - 0258 ; Purple - 097 ; Blue - 0170 (4 strands in last round).
Final diameter - 17 cms or just under 7 inches.
This additional round has really brought the entire design together and I love how it looks. What do you think? Too many colours or ....

You can find the Dancing Peacocks doily pattern here - https://docs.google.com/document/d/1LBml-8Q0WYbCQyBrSLVKg713T9D3HE9YAPlKmg3wxTo/view

Many many thanks to Coretta, Kathleen, and Tim and a very special thanks to Grace Tan for her forethought in creating the Google docs for each doily!  

I am also entering this doily for both the 2024 games ....
Small Decorations hosted by splocik - This doily is my submission for September.
The August gallery of submissions is posted here - https://splocik2.blogspot.com/2024/09/male-dekoracje-2024-galeria-sierpniowa.html  with such a diverse range of projects!

And this doily also crosses off several blocks in Natalie's PICOT Bingo!
- Tat a Doily
- Josephine Ring
- Onion Ring
which means I have a 2nd BINGO - the 4th column is done!!! My first bingo was posted here - https://www.patreon.com/posts/picot-tatting-we-110762797
Actually I've finished tatting some more but blogging is taking a backseat ....

Thanks for the fun Natalie and splocik!

Thursday, 11 July 2019

bunch of pattern updates

Pin It now!

There are quite a few updates I need to share. I will be updating the respective posts, too. This is the reason I suggest going through the related blog post even if there is a pdf, since it is easy to add updates :-D.

Recently I realized that the pattern link was corrupted and irretrievable. This gave me a chance to add the Patchwork bookmark pic.
Here’s the new link : Snowflake (6-pointed motif) pattern

This doily has long measured picots which are Functional. I worked the doily in Anchor size 40, but what if one wants to use a different thread size?
I worked a short chain with same thread and found that a 7mm picot is equal to the width of 7 double stitches! And so on. Easy to remember and convert.
Just substitute 1mm tall picot with 1ds width.

You may remember that this is the round robin doily which Coretta had started. She graciously accepted to share the pattern link. It is a Google Docs link and the pattern presentation is a mix of 4 different styles, but will take time to clean up. 
Coretta also invites you to a new round of designing – continuing from the 5th round onwards. If interested, please leave a comment here or on her blog here (or on facebook or Craftree)
Here’s the pattern link : Hexaflower Doily pattern 

In the beaded version of this snowflake, there is another way to work with ball and shuttle, if you do not wish to use direct tatting (unflipped stitches). Simply make a SLT & reverse work to tat that chain segment. However, you may have to pre-string the large bead on to the shuttle thread, instead of unwinding. Many paths, but be vigilant.
I added the tip the next day, but blame the oversight squarely on my lack of focus due to fever.

And what's a post without some visual masala?! So here's some unfinished work.

Intertwining Bracelet - Anastasiya (Hobby Point)
Inspired by Aliona Racu’s bracelet in facebook several weeks back, I started this Ankars/Celtic  bracelet in June. 
For the pink pieces, I loaded one bobbin, then kept pulling out a length of thread to work the chains. Thus I got ctm with a single shuttle and fewer ends to hide. 
I’ve had all these pieces ready but need to continue watching the video to assemble them. And I just haven’t been in the mood – what with being consumed designing snowflakes et al ;-P

Boxy Maple Leaf – Vicki Clarke
Like last year, Vicki again did a very Canadian tat-along which I started immediately - twice in fact (the one on left is in size 40, the one on right is pearl cotton size 8). But somewhere along the way, I lost the will to continue. I didn’t like my colours, I didn’t like my tatting, and I couldn’t focus. I still haven’t cut off the threads, so I might get around to completing it someday. My apologies to Vicki for my bad outcome.

She then shared a 4th of July tat-along pattern – Rockets Red, in 3 stages, which turned into a lovely flower! Saving it for a future date.

On a happier note, though, I have done my trial for the next snowflake - well it turned into a star - and just need to work out the center. So stay tuned :-D

Tuesday, 28 May 2019

accidentally

Pin It now!
a happy design accident
Remember the butterfly that wished to become pretty and my dear tatter friends obliged? And the subsequent Butterfly edging? The origins of that pattern accidentally emerged from this 2018 Design Round Robin (DRR) doily …. Read on.

HEXAFLOWER 
Design Round Robin 2018 , Craftree
Coretta,  muskaan, Tim, Kathleen
Pattern (unedited) link

Coretta Loughmiller designed the center or Round 1 of the Hexaflower doily. Notice how the small rings are left unattached! I love the shape of the inner rings despite the fact that mine didn’t turn out as neatly as hers. They are mock rings made with a shuttle & ball. 
TIP: Working with 2 shuttles, ctm, I threw the central ring from 1st mock ring, making a mock picot. 
Worked in Anchor size 40.

I was next in line. These are my various trials (with numerous elemental tweaks) trying to get a design going. I had intended to work an all-white doily. But the thread didn’t agree with me and I switched to the yellow above.

I got valuable feedback & suggestions/insight from Craftreans which finally led to this. Notice that I did Not set out to incorporate butterflies. But as I tweaked the count during trials, the butterfly emerged. I’ve already shared my tips here on how the colours were switched to highlight shape. 
The orange chains (worked in 2 strands of embroidery thread, but yellow size 40 core) were added to anchor the free rings. 
TIP : Kathleen made a lovely variation by joining directly on the central ring to look like stamens.
This beautiful 3rd round was designed by Tim Kaylor. Clever use of split rings!
Considering it’s shape, I chose to continue with yellow so that the piece looks like a large flower.
Kathleen Minniti designed the final round. A bit of denseness to hold down the openness of the previous round. Well, in my version, it is perfect as foliage. A sober shade of green keeps the focus on the flower.
Final measurement in size 40 - 4½”.
Techniques used : mock rings, lock join, split rings, colour placement.

I snipped off the orange from below, shifted it above, and added a new calyx at the back.
As seen from the back. Inward facing chains topped with a ring for calyx.
All except Tim's round can be tatted with single shuttle and ball.
I’m very happy with the way this floral story in tatted lace developed, doing justice to it’s name.

In size 20, the doily measures 5½”. Considering it is small, Coretta has designed another round. I am waiting to see how it develops and will participate only if I think the flower story can continue.

The pattern is free to share. However, since it is not ‘cleaned up’, for now it is accessible only within Craftree. Hopefully Coretta will convert it into a pdf soon.

UPDATE (July 2019) : The pattern link is shared, though still unedited, and you are invited to continue the design round robin. You can contact Coretta on facebook, Craftree, or her blog. 

Related Posts

Sunday, 24 June 2018

rotten core

Pin It now!
… or rotten pulp ?!


I've been spending the last couple of weeks bringing my four Design Round Robin doilies up to date. They had been neglected for the last couple of months, but now I am finally at par. I will share them in more detail gradually.
This post is merely about one rotten evening.

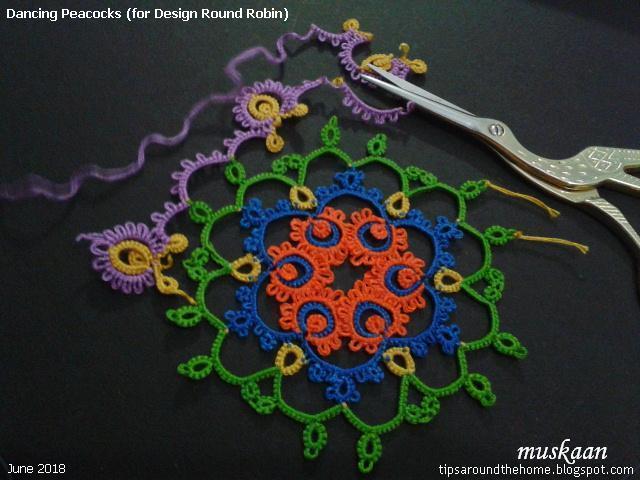
I was tatting the 3rd round on my Dancing Peacocks doily. Half way through I realised I’d been attaching it on the wrong side ! Much as I love fs/bs tatting, herein lies the disadvantage.
Not only can you see the colour blips in previous rounds (in pic below), but also how the stitches in the last round look more like rolled tatting with misplaced picots (purple in above pic) – a visual reminder that there is a distinct front and back side to tatted lace in directional and colour tatting.

About to snip off both threads, I remembered Jane McLellan's excellent pictorial directing us to snip rings and not chains.  I had stopped doing this ever since Carollyn's whip stitch method entered my tatting life, taking away all fear of hiding ends.

Fortunately, this round is mostly chains with stitches coming from the purple; tailor-made for the above technique. So off went the scissors on the mustard core thread and in no time I had rescued all the purple. Instead of cutting across the rings, I snipped through the core at the base of the ring.
For some of the stubborn points, especially near the lock joins, I inserted a fine crochet hook to make enough space for the scissor tip.

The unravelled thread is still wavy and vulnerable as seen above (these are 3 strands of Anchor embroidery thread). So I added another step -
I started winding this unraveled end on a new bobbin, giving it time to rest and recover. With the unused part of purple thread now at the free end, I started the round again with this ‘fresh’ thread. 
Turns out, I didn’t even reach the unravelled part in the corrected round - in a future post.

I lost my tatting and time, but did learn Aurora's method of capturing the inner ring in onion rings. Kathleen, who designed this round, used it and I followed accordingly. Aurora had shared it in the online class but I hadn't tried it out.
So not all was lost - new method learned, and pulp saved !!!  

Ahem..... the rotten core and pulp have twisted my arm to include their comment :
"Stop blaming the threads -- the fault lies in this tatter's scattered attention !"

happy tatting always ...
let's make sure our fruit and lace stay healthy :-))) 

Friday, 30 March 2018

I love tatting spring

Pin It now!
Spring – the season of new blooms, new leaves, stirrings of the avian community, flitting butterflies, love in the air and spring in the step! To top it all, is the Indian koel with it’s melodious cooing that starts out low and reaches a crescendo – one of the sweetest sounds (but don’t be fooled – it can be quite the mimic!).

Naturally, spring and/or Easter was the topic for this month’s kocham frywolitkę. The task was set by Justyna with a caveat – it must have yellow and green.

Recognise those dyed yellow feathers? 
Yes, they are from our trip to Boston and reenactment of the Boston Tea Party

My entry is this work-in-progress round robin doily. 4 of us are participating in an in-house round robin. It means the doily will not be mailed to the next person. We each tat each doily and only the design for each round is shared in the order of working.

We each got to start the center. This is Coretta’s center. I worked it in size 40 yellow. 
Mine doesn't show it, but she has a beautiful design with very interesting elements, including the free rings.

It was my turn to design the next round. After many trials and tweaks, without intending to, what emerged looked like butterflies!!! So I deliberately chose to highlight that group of elements to bring the butterflies to life.

TIP: To create the butterfly, instead of SLT, I kept making an unflipped 2nd half stitch in the colour that I wanted to show. This worked better for me.

I added a 2nd round in the center to secure the unattached rings of the central round. Although I worked them on the back like a calyx, these orange chains look good as a floret when worked from the front, too. And I might just cut it off and do it in the front once the other rounds are designed. This is how it looks from the back at present ....

This pic is shows the colours as they truly are. 
Scanning tends to subdue the richness.

But where is the green, you ask? 
Hey, I did place the doily on green leaves in the lead photo, didn't I?!
Okay, okay I know it is cheating.

Luckily, my eyes landed on the summer coverlet we are currently using. Huh, it is yellow with green lace!!! And although tatted ages back (and this photo was taken in 2013), I haven’t shared it on my blog yet.
This shuttle-only edging was tatted by my MIL much before my marriage (probably her first lace) and she used & reused it on her sarees, then got tired of it. When she gave it to me, I sewed it down to the new coverlet. 4 long rows, with 2 hiding the joining seams. I only had to tat a short length to cover the last mile.
Goes to show how durable tatted lace can be.

Both these are my entries to the March 2018 … 
Have I told you that each month's entries are summarised and posted by the task-setter on the 2nd or 3rd of the next month. You can check them out any time - real talent and creativity from all skill levels!

 Here’s wishing you good weather and friends
with tatting by your side always :-)