Showing posts with label tatting SOUP. Show all posts

Wednesday, 15 April 2026

literally out of the box

Pin It now!

and functioning as a threader holder! Why didn't I think of this solution ages ago?! Here's the full story ...

Going back a few weeks, Anita showed me a vintage edging she had picked up at a thrift store. A single shuttle trefoil/clover edging with a curious way of joining the rings. It looked so good, too. Thought I'd work a sample but somehow I let my shuttle take over and ended up with this medallion.

Now I wasn't in the mood to use a picot gauge despite having a few handmade folded picot gauges, which is why the bare thread spaces are not perfect.

Nevertheless the highlight of this medallion is the little twist at the base of each ring. 

All I am doing is attempting to make a 1st half-stitch (ie. bringing the thread from Under the previous thread) without actually transferring or flipping it. This leads to all that twisting. One has to be careful with it. As you can see, the stitch is not tensioned and snugged completely since I wanted a loose twist. 
There is ample scope to play around with the effect, adding more half-stitches, etc.

It then reminded me of something that Ninetta had done. Turns out she used a lock join to simulate a twist in this vintage motif here - https://ninettacaruso.blogspot.com/2020/08/locked-in-old-corner.html - from Emmy Liebert's 1916 book.

So coming back to the problem that was awaiting a solution. I whip stitch tail ends using tapestry needles and a threader to thread the needle. The latter is kept in a different box within the larger project box. I wanted a way to have both the needle container and the threader to be together - pick them up in one go. Didn't want to use tape; couldn't use a magnet; couldn't glue it down for obvious reasons. 

This medallion which happened to lie over the circular box struck me as the perfect solution. I glued it down with a spot of glue at 3 points, that's it! 

Being so open and airy, the threader easily slips through any space yet stays put! And no fear of the wire being bent or getting caught anywhere. A safe haven!
Anita called this the Threader Keeper!!! Now she's one to think out of the box and guess it is rubbing off on me, LOL.

Oh, and I am submitting this BTS medallion (my 5th submission) for Natalie Rogers' Picot Bingo 2026 Level 2, crossing out one box -  
  • Use Bare Thread Space. 

Thursday, 7 August 2025

celebration tatting

Pin It now!
We celebrate the brother-sister bond of Rakshabandhan on the 9th of August this year. So I had this strong urge to collect motifs into rakhis, as I have done a few times over the years. 

I had a collection of these rose and floral motifs from past test-tatting and tutorial exercises, and I had intended to arrange and attach them into a necklace or collar to celebrate International Lace Day (June 22nd, 2025). 

Both motifs are adaptations of the central rounds of Eleonore Endrucks' pattern E42 in her 1920 book, ‘Die Schiffchen-Spitzen’, and reworked by Paola Emilia Rotuletti (2021). (https://drive.google.com/file/d/1NgPuAzM83cjVoWvzFaiAIp7UDbuueBB0/view)

The small motif on top is the E42 Roses by Daniela Galli (2025) which she kindly shared for the ILD 2025. Pattern PDF - https://drive.google.com/file/d/1HiDjl4A_CkRcRGqpjhEItWqgEI1bGMhE/view 
There is a small and a large rose, both of which can be worked with a ball and shuttle in one pass.

The large motif below is the E42 Flower Motif by Muskaan (2023). It is my 6-repeat adaptation for my E42 Antiks Snowflake (2023). Pattern PDF - https://drive.google.com/file/d/1U5J5sjuAA7D0qGPOGnK9RJ83MKdNkWSZ/view

I had used the large motifs to demonstrate three ways of climbing out without the need for split chains. https://tipsaroundthehome.blogspot.com/2023/11/game-antics.html

I love lock stitch aka lock chains and simply picked up the knitting cotton size 10 threads in contrasting colours. I worked with one ball and shuttle. The rakhi motifs are all worked in size 20 crochet cotton from various brands.

 
Just so I remember for future, here's how I brought the motifs together with a Swarovski faceted bead (4.5mm) in the center. Pre-string the bead onto a length of thread and slide it to the center; bring both ends through the layered motifs; adjust and wind one end on a shuttle. 
Now from the ball pull off a length similar to one half of the first thread, leave it aside and start tatting a lock chain from the center. When desired length is reached, remove shuttle and again wind it with the other end and repeat the lock chain with ball thread on the other side. The bead remains locked in.

And for the tips, I inserted a bead through both threads at one end, tied a knot niched with the bead and trimmed off the tails. Repeated it on the other side. This seemed the quickest way to finish off the rakhi/bracelet.

The above large motif is from the original E42 center - notice it has 8 repeats.
In fact each E42 rose is also slightly different with tiny tweaks. It's fun to play around.

All together again. Rakhi traditionally has a thin string for tying. However, for a bracelet, one can use broader braids, which are shorter in length with relevant findings instead of ties.
Of course if tatted specifically for a bracelet or rakhi, one can embellish the motifs with beads, picots, etc. Mine are SOUP rakhis hence plain.
💥💥💥💥💥 

Now I had initially collected the motifs back in May with the intention of making a necklace or collar as stated at the beginning.
I played with arrangements using all the motifs at hand. The above could become a necklace with addition of beads and bling...while the one below could be a collar.

Besides these, I had several other arrangements, including asymmetrical ones but deleted the pics someway along the way.

After several possible arrangements, this is what I found the most appealing and settled on it. Tatted ring or curled ring connectors would be used to link adjacent motifs. However I couldn't get myself to accomplish even this simple task and the lace day passed by without any tatting. 

Who knows if the mood takes me I might even free the motifs from the rakhis and rearrange as a necklace. What is your verdict/preference? Leave as rakhis or make a necklace?

NOTE - These are free patterns but please name the designer and the pattern when you make and post And also use the hashtag #Endrucks1920Project.

Many many thanks to Daniela and Paola - always ready to help and share 💕

Related Posts
Antiks Snowflake pattern and more - https://tipsaroundthehome.blogspot.com/search?q=Antiks
Patterns for Rakhi/Bracelets - https://tipsaroundthehome.blogspot.com/p/patterns-designs.html - listed under Holidays, Festival and Jewellery - Hands.
Endrucks, Holidays and Jewellery directories also have some rakhi models -https://docs.google.com/document/d/1w1TZBg-HIzseGEUoJ-rko7tNbtSgZY5A18Oy2Y9Hh0Y/view

Wednesday, 1 January 2025

the years flow

Pin It now!


I've taken a few decisions for 2025 - objectives I hope to achieve. Focus on completing the book edit and hope for it to be published before this year is out, and also blog more. There's so much I learned in the past year but didn't get around to sharing.

This also means cutting down or pausing a few other tasks and projects. 

Hope you have sorted out your priorities for this year? May the underlying thread remain the enjoyment of self and also spreading the joy of the journey and destination.

💙💚💙💚💙 

The above collection of samples kind of symbolize my past year and perhaps even the future. These are all rings with the vapour stitch where I experimented with variables wraps, etc. Some look fine, others do not. While the bouquet looks fine, the unfinished/unpolished and incomplete nature also comes through. 2024 was a year spent in learning, exploring, experimenting, completing some projects while some remained unfinished. I chased a lot of projects, wanted to take up more than I did, and enjoyed almost all despite the paucity of time. I was happy to push through my comfort zone, too. And you have joined me in all my journeys. Hope to read your comments again this year!

💙💚💙💚💙 

UPDATE: I had sent this to Natalie to cross off the Vapour Stitch box in her PICOT Bingo game. However I could not complete the game.

Saturday, 30 November 2024

SOUP catcher

Pin It now!


I haven't touched my shuttles for almost 3 weeks now, but I needed a small decoration for splocik's monthly game. So, I did a quick search in my stash and found motifs I had tatted in September. I hastily put these together to create some kind of ornament. It resembles a dreamcatcher somewhat, but could just as well be a suncatcher, a window decoration or a tree ornament. And overall, it could've been better! This will have to do for now since only a few hours remain of November.

Being made of pieces in my stash and with no clear identity, I was tempted to call it my SOUP* catcher! Remember what SOUP stands for? - Sewing On / Using Pieces of tatting. However a few of my friends say it does look like a dreamcatcher. And these are the component pieces ....

Motif #1 Mituko Ikuta's 1994 book 'Shuttle Lace: Tatting and Beads 1' has several picot effects which became popular as 'Ikuta Picots' through Georgia Seitz's tribute to the designer. The above motif is from Ikuta Picots Diagrams 1  by Georgia Seitz (https://www.theonlinetattingclass.com/technique-tools). Worked in Lizbeth size 20.

Motif #2 And this is from Diagram 2 same link as above. In the first motif the long picots appear like adjoining or continuous picots, being joined at the same distance. These are double picots and the two threads can be arranged to better resemble them - I did not. Worked in Anchor Pearl Cotton size 8.
In this 2nd motif the very long picots are joined to adjoining elements (rings here) and form overlapping layers with careful interweaving.
This time I pinned the long picots in 2nd motif while blocking in order to achieve the points. I like this better since it opened up the picots - what about you?
My pictorials for her overlapping picots effect - https://tipsaroundthehome.blogspot.com/search?q=Ikuta+picots
Motif #3 I was inspired by Corina Meyfeldt's beautiful Sakura pattern (https://cmhandmade.blogspot.com/2014/11/pattern-sakura.html). I had started out to tat the sakura, but pre-stringing the beaded picots (notice I put 3 yellow beads at the tips?) was quite time-consuming so I went freeform with only 5 stamens. Worked in Anchor Pearl Cotton size 8.

There's a backstory to this. When I did the post about Tatted Fringe (https://tipsaroundthehome.blogspot.com/2024/08/on-fringes.html) Stephanie W told me about her beaded fringe which she made using Nina Libin's 'single file beaded picot' and even sent me a pic! It reminded me of Corina's Sakura which had been taught in Georgia's class. The method is exactly the same, though for a fringe the picots would likely be longer.
Motif #4 The large mustard 4-petalled motif in the center of the bangle is an adaptation of Eliz Davis' motif (https://tatknot.blogspot.com/2016/05/mock-ring-by-joining-chain-back-to.html) which I made before in blue (https://tipsaroundthehome.blogspot.com/2016/05/of-long-chains-large-rings.html). After everything was assembled, I realised I hadn't taken a pic of the motif separately. Worked in Anchor size 20 (¬size 10).

Motif #5 There was a prominent negative space in the 4th motif so I sewed in the Fringe Star 

I wanted to take a short video of the SOUP dreamcatcher but it wasn't to be. 

How fast this year has slipped by! Only one more month left, one last submission left. Do check out the range of October entries in splocik's 'Small Decorations' game - https://splocik2.blogspot.com/2024/11/male-dekoracje-2024-galeria.html

Many many thanks to all mentioned in this post!  

Tuesday, 16 April 2024

gaming bookmark

Pin It now!

 An insertion as a bookmark is my entry for the two 2024 games I am playing.

Main body is from 'Tatting Techniques' by Elgiva Nicholls (p27, 1976) and the charm is from Rebecca Jones (fig123, 1985).

I have too many variegated Lizbeth, mostly with shades of pink/magenta. Difficult to always use for fear of eclipsing the pattern. But I took the leap and it came out okay I think. Lizbeth size 20. 

Learning from my past experience, where my chains are usually tighter/shorter than vintage patterns, I increased the chain stitches beforehand and it worked out well.

Pearl Tatting tail for the bookmark using Anchor perle cotton size 8. I didn't use any picot gauge since my main aim was to enjoy uninhibited tatting on International Tatting Day, 2024.
In order to avoid sewing in ends, I ended with two heavily picoted folded rings, hiding the other colour within each.
Pearl tatting is one of the blocks in Natalie Rogers' PICOT Bingo game which you can join here - https://www.patreon.com/posts/picot-bingo-95729145?  This is my fifth submission so far. Need to speed it up a notch!

The tail was attached to the #123 medallion from Rebecca Jones , shared here - https://tipsaroundthehome.blogspot.com/2024/03/happy-itd-2024.html

Turning an insertion into a bookmark is nothing new or unique. Bookmarks, being short, are a good way to enjoy a pattern with a different use. 
The large rings are linked through a common picot. I think the colours are doing fine together.


And the bookmark is also my entry to splocik's Small Decorations game that was first announced here - https://splocik2.blogspot.com/2024/01/mae-dekoracje-galeria-grudniowa.html
She shared the March entries here - https://splocik2.blogspot.com/2024/04/mae-dekoracje-2024-galeria-marcowa.html

Many thanks to all mentioned here for lovely patterns and fun games!

Thursday, 21 March 2024

counts

Pin It now!
A bit of mixed media card for my March 2024 Small Decorations entry. My heartfelt thanks to splocik for graciously accepting the earring I made in February and I hope this card meets the requirements of the game. 

This is where it all started with a counting error I frequently make, despite my cautious counting! Notice that one daisy has an extra petal.

Pattern for the classic daisy is from 'The Complete Book of Tatting' by Rebecca Jones  (Fig. 122 page 47, 2011). Worked in Olympus size 40 (equivalent to Lizbeth size 20).  

Elgiva Nicholls calls this medallion a Classic Daisy formation, made with a single thread/shuttle, in 2 rounds. Olympus size 40). 

The more modern style  (coloured motif) is worked in one go, using two shuttles to throw rings off a mock center. I used the exact same pattern for the petals, but added 2 ds in the SCMR between each petal. 

Which version do you like? The Classic or the Modern?


A few more pics of the card ---


Actually when I opened my box of watercolours, I found most of the jars empty! Hubby quickly ordered a box online and while I waited for the delivery (about 15 minutes), I doodled this with the watery remains. And was too impatient to wait for the leaf to dry, hence the smudging.

Probably the last time I painted was 15 or 20 years back! 


I painted the leaves, then glued the daisies. The little orange florets are from my 2022 flag project (link below). After trying out a few arrangements, I painted the brown twigs and glued the florets. Added a few more twigs, leaves, .... and finally the diamonds. Can't even remember when or where I bought those highlights!
TIP: I deliberately glued the orange flowers on the frontside, coz the backside is more dimensional- the picots curve up a bit.
You can easily see how amateurish my painting is! Nevertheless, it felt good to hold and reacquaint myself with my brushes. This was a very hasty project - probably a half hour from start to finish. Hopefully it has opened the gates to some more doodling in the future. 

Check out the Feb gallery here - https://splocik2.blogspot.com/2024/03/male-dekoracje-galeria-lutowa.html


Related Posts
https://tipsaroundthehome.blogspot.com/2017/10/meddling-with-medallions.html
https://tipsaroundthehome.blogspot.com/2022/08/har-ghar-tiranga.html   https://tipsaroundthehome.blogspot.com/2025/01/last-and-first.html

Wednesday, 12 July 2023

SOUPy vine

Pin It now!
Our game of the month for July was to tat a bookmark from any of Endrucks' patterns. Her book has a lot of edgings making it easy to choose one and adapt into a bookmark. I've done it with a few of her patterns already. However this time I went with a SOUP* (*Sewing On / Using Pieces) bookmark.
Bookmark directory (soon more models will be added): 

I was actually rummaging for another project through my Endrucks' models stash which is now so huge that it is stored in several different truffle boxes! My eyes landed on these hearts (these include trials and prototypes) and it felt like a good opportunity to use them. It would keep them 'in line' and also be of use.

Not wanting to make it 'permanent', I tatted something that can be cut off if required.
This is my SOUPy Vine Bookmark from E37 for the game ....

Tatted with only one shuttle using teal shade, it is made solely of rings. A bit free style. 
The two large 'leaves' are lock joined to both heart motifs and joined somewhere along the edge, too, for stability. However since the heart edges did not have picots, I had to pierce a fine crochet hook into the space and make a join while tatting the ring.

In her book, Frau Endrucks advises: 
Should you have forgotten a picot, poke a needle between the respective double knots. The picot created that way is large enough for joining. 

Wanting to avoid cutting and hiding ends after each pair of rings, I went with a half-closed ring string! 
TIP: Half-closed rings (aka half rings, scallops) act like split rings with thread(s) emerging at a point away from the start. 
Each HCR is 3ds.
The leaf rings range from 20 to 30 ds.

The heart motifs were worked in Anchor size 20 which is like Lizbeth 10. Adding this connecting 'vine' in the same size would make it too bulky for a bookmark. Hence the vine is worked in Anchor size 40.

The tassel is made of short leftover lengths in brighter colours. And another HCR string or vine is inserted to sort of bring it all together.

The entire work took me less than 2 sittings and was a fun task. I now have one more bookmark to use!
In different colours the leaf rings could've been butterflies 🦋 .

PATTERN: Eye Spy Hearts #1 derived from Endrucks' #37 (E37). All hearts derived from Endrucks' book are collected in the Hearts Directory - https://docs.google.com/document/d/1MpYw9XMB8Asz8zusj1ZpHvX8A8Ww424-rEVORtxcL1w/view

Related Posts -

Saturday, 24 June 2023

simple samplers

Pin It now!

 Like I said in my previous post, I'm trying to do a bit of everything so as to make progress on each simultaneously instead of letting one project get left behind totally. Following are samplers I did for Interlocking Picots. When one needs an extreme close-up of a model, the warts show up, LOL. So, try and try again! And use them as a SOUP idea.

I've done these before and even compared similar picot styles at least twice. See list of related post links below. Yet the interlocking this time didn't seem as obvious as before. 
Interlocking picots are picots made after every half-stitch in a Josephine ring and they should be within a certain length range for the interlocking to show up clearly.. 
Watch Karen Cabrera's video - https://www.youtube.com/watch?v=V7XbtXhpN-4
and my Measuring the Picot -

Anchor size 20 threads were used. I intend to glue them on a card, adding in some greens and perhaps a ribbon. They cannot be sewn down neatly because the lovely ornamental picots are easily pulled out of shape! These are certainly handle-with-care picots, for show only ;-D

Monday, 3 January 2022

feeble firsts

Pin It now!

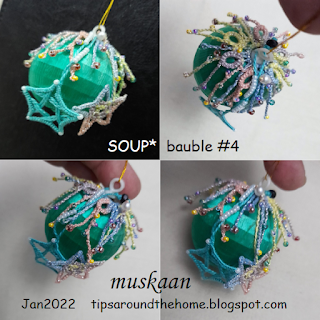
Believe me, I have never done bauble tatting! Oh, every year I think I will embellish at least one bauble, but all for nothing. In December 2021, the admin of the Italian FB group 'Chiacchierino: Filo Amore e Fantasia' held an online event with my MatheMagical Star pattern and several tatters used it to cover their bauble ornaments. All this really inspired me to do one..er 2, er 4.

Due to paucity of time and energy, I settled on using whatever motifs I had on hand - a SOUP (Sewing On/Using Pieces) moment. These 4cm ornaments will soon celebrate their 20th buy-day! At the time we didn't have a lot of options in this city and since the tree was decorated only the 1st 2 years, I am hesitant to buy. Next time I will certainly include more beads and crystals, more flamboyance. Perhaps I Should buy a few good quality and larger sized baubles. This little exercise has got me excited and more confident.

In chronological order - 

Bauble #1 - This edging is draped diagonally and temporarily taped down behind. (don't look behind!). But in Anchor size 20, it is too thick. A daintier edging/insertion would look better. And a tiny motif or 2 on the bare side spaces? 
Interlaced Cumulus pattern - https://tipsaroundthehome.blogspot.com/2020/05/puffy-clouds.html
Bauble #2 - There is no good angle to capture both flakes in a pic. These are in Lizbeth 20 and perhaps the reason I put them together. Spin Away above and ConcentriCity below.
I used a matching blue metallic thread to join the 2 flakes together. It really isn't difficult! Without cutting the thread from the reel, I sewed through the picots, and finally adjusted the tension and positions before snipping, tying, and hiding. Keeping the thread on the reel gave me a lot of leeway with no fear of running short.

Bauble #3 - This is the small version of the MatheMagical Star in size 40 - the only one that ... the others were too large for this bauble. And I kind of liked how the crystals sat like a crown on top.
On the underside is the Folded Fun Star. I hope you can see how I went a bit adventurous and joined the 2 stars.
Bauble #4 - Messy but looks better in real. I was going for an organic look by not tying down each twisted picot. But very difficult to photograph.

I simply sprinkled a few of my snowflakes instead of suspending them - yup lazy. Hubby even offered to put up a string of lights but I hope to be better prepared next time.

It happens Every year! I let the sunny days slip by and when I finally get around to decorating the tree, the sun gives me the slip! So the pic comes out insipid. Oh well, this should be a staunch reminder to start early this year!

I really want to thank all the wonderful versions shared by tatters around the globe - in the event (one tatter inserted it inside a transparent star ornament; and others who used beads in exciting arrangement) as well as ornaments in general - that got my juices running, finally. Feeble firsts, but determined to be better later this year!

All the star and snowflake patterns can be found here -https://docs.google.com/document/d/1r4OmXX_c5LjFebMN2UbSNiYqXYETLmoridK0X1YIQco/view