Showing posts with label folded rings. Show all posts

Monday, 14 April 2025

playful tatting

Pin It now!

I had started tatting these cute balloon dog doodles couple of days before ITD and realised that there were a couple of elements left to tat, which started off my 'shagun tatting' for the day! Of course, I later found the time to tat the heart, too! Actually my list had contained a different heart which I still haven't gotten around to tatting. Some other day, soon, perhaps. 

Sarah Nielson shared two versions of her Balloon Dog Doodles - 2D & 3D. You can download the pdf from her blog here - https://laceandbees.blogspot.com/2025/03/balloon-dog-doodle.html
Quick to tat with lots of split ring practice. And one doesn't have to hide ends! Simply tie an overhand knot and snip close for the nose or 'balloon' end. 
I chose this tinted colourway for the added fun factor. Size 20.

The model starts at the tail end. 
My piece doesn't much resemble a dog here, does it? Is it how the shades spread themselves out ... how the darker shade pooled at the lower half? Or is it my tatting tension?

Now this 3D version I like. It does look like a dog frolicking in the park or flying high! Very happy indeed.

Technically, the highlight of this 3D doodle is the Folded Split Ring. 

Overall, I am happy with these doodles - fun and quick and excellent doodles to embellish cards, etc. Some time in the future I will paint some background to give them a context, a story ;-D

Many many thanks to Sarah for these innovative and fun doodles!

Related Posts -
https://tipsaroundthehome.blogspot.com/2025/04/shagun-tatting.html
https://tipsaroundthehome.blogspot.com/2017/02/in-fold.html

Tuesday, 16 April 2024

gaming bookmark

Pin It now!

 An insertion as a bookmark is my entry for the two 2024 games I am playing.

Main body is from 'Tatting Techniques' by Elgiva Nicholls (p27, 1976) and the charm is from Rebecca Jones (fig123, 1985).

I have too many variegated Lizbeth, mostly with shades of pink/magenta. Difficult to always use for fear of eclipsing the pattern. But I took the leap and it came out okay I think. Lizbeth size 20. 

Learning from my past experience, where my chains are usually tighter/shorter than vintage patterns, I increased the chain stitches beforehand and it worked out well.

Pearl Tatting tail for the bookmark using Anchor perle cotton size 8. I didn't use any picot gauge since my main aim was to enjoy uninhibited tatting on International Tatting Day, 2024.
In order to avoid sewing in ends, I ended with two heavily picoted folded rings, hiding the other colour within each.
Pearl tatting is one of the blocks in Natalie Rogers' PICOT Bingo game which you can join here - https://www.patreon.com/posts/picot-bingo-95729145?  This is my fifth submission so far. Need to speed it up a notch!

The tail was attached to the #123 medallion from Rebecca Jones , shared here - https://tipsaroundthehome.blogspot.com/2024/03/happy-itd-2024.html

Turning an insertion into a bookmark is nothing new or unique. Bookmarks, being short, are a good way to enjoy a pattern with a different use. 
The large rings are linked through a common picot. I think the colours are doing fine together.


And the bookmark is also my entry to splocik's Small Decorations game that was first announced here - https://splocik2.blogspot.com/2024/01/mae-dekoracje-galeria-grudniowa.html
She shared the March entries here - https://splocik2.blogspot.com/2024/04/mae-dekoracje-2024-galeria-marcowa.html

Many thanks to all mentioned here for lovely patterns and fun games!

Wednesday, 22 December 2021

tiny angel with big message

Pin It now!

 Recently Margaret shared a memory of her cute mini tatted angels (https://margaretsdesignercards.blogspot.com/2015/12/decembers-pinterest-challenge-choir-of.html) and it reminded me of the ones Anita Barry had shared last year (https://tipsaroundthehome.blogspot.com/2020/02/happy-birthday-georgia.html). 

Huh. turns out neither of us remembered to upload the pattern for the white ones, after Anita taught them at the Palmetto Tat Days 2020. Got the wheels in motion and no better time than the present to present these tiny dancing angels.

Itsy-Bitsy Angels pattern (click to download)
https://drive.google.com/file/d/1jWQGGWH5E5hMKZGG_cWkbEQ26o1Q0Lad/view

As you can see, this can be worked as a single angel or a row of angels. A rings-only design, the pattern uses a single shuttle, working the wings as folded SSSRs to work continuously. However these can be worked as split rings if one wishes to tat with 2 shuttles. 

The flexibility of this edging adapts to any shape we desire - a round or oval garland, a straight edging, a square or any other polygon! It can make a cute frame.

And, Laura Angel pattern- 
https://drive.google.com/file/d/12NJtxEWk6jyl_H0i2upSi_CNWZfWpaR9/view?usp=sharing

Hope you enjoy these quick tiny tats that carry a big message within them (read it in the pdf).
So get out those shuttles with leftover threads from all the snowflakes you tatted, and quickly belt out these little angels!

Many many thanks to Anita for sharing her patterns. 

Tuesday, 24 November 2020

spinoff fun

Pin It now!

In Jan this this I tatted 2 more spinoffs from Folded Fun square and star. 2 six-pointed versions. I'll try to add a pattern when I get around to it, but don't hold your breath! Because as I peeked into my diary where the 25 Snowflake projects were documented, I cannot find the new ones, sigh!

This is the snowflake version, not much different from the 5-pointed star. The main difference is additional stitches in the inner rings so that we now have 6 instead of 5.

This is the Stupa version - the folded rings on the outside reminded me of the 3rd century BCE Sanchi Stupa - a world famous UNESCO world heritage site - part of Buddhist holy pilgrimage.

Here they are all together (one of the stars is a prototype), positioned as a cross. I loved tatting the two 6-point versions, even during my slump phase and the colours cheered me up.

Worked in Anchor Pearl Cotton, size 8.

I have a lot of rummaging to do! Be it patterns or actual lace. I barely complete a project than jump on to another and keep forgetting along the way. Which is why I will be uploading pics of several of my designed lace, even if sharing the pattern may come much later.

Thursday, 19 December 2019

monkey business

Pin It now!
Snowflake #23 in Land of Laces’ 25 Snowflake Project

Why did I title this post ‘monkey business’? I’ll tell you in a bit. Let me start from the beginning.

It was an amazing start in a sense. After a few beaded trials that needed more figuring out, I finally decided what I would do. But no lessons learnt, sigh. It ended up as a square. I think it looks superb as an ornament – pendant, earring, brooch?
While it holds well, if one wants to wear it, I think some stiffening will be needed otherwise the swinging beads will fold down with gravity. 
I wish I could capture the beautiful sheen & shine.

For the snowflake project though, I started a new one without beads. Folded rings are not often seen in snowflake patterns and I repeated the top ring inside the negative space as well. Lots of folded rings (need to practice, so don’t look too closely) and I like the overall design! 
Anita Barry spoiled it for me!!! I was pretty happy with my latest star but she saw a monkey face in it! She’s such a Goose. Now all I can see is a Monkey, too, or perhaps even a Lion or Tiger face. She even suggested a name like Monkey Mania and is determined to call her's 'monkey face'! Grrrr, I’m too Chicken to use it because then all everybody will see is that darned monkey!
I still know which name will stick, though ;-P
And do you see a Butterfly? I saw it while tatting and is worth pursuing.

While I have finalised the count, this star model can be considered a prototype since there is a bit of tweaking going on. So if you have suggestions, please do share. I might incorporate them.

It is too cold for me to work at my desktop for long, hence pattern will have to wait. I also want to make this a 6-armed snowflake. Then all 3 patterns can be uploaded in one go.

Meanwhile I have worked the first trial of #24. Should be able to work and share in a couple of days. 

Friday, 31 March 2017

fresh fragrance of jasmines

Pin It now!
second of the 3 spring garland patterns ...
(the 1st can be found here)
UPDATES (April 2017) : part 3 shared here  ;  compete spring garland shared here ; and
Jasmine braid diagrammed pattern pdf

Spring Garland 2 –
Jasmine Braid/‘Gajra’

Many Indian women love to wear a string of fragrant flowers in their hair. The most common and refreshing ‘gajra’ is made with white mogra buds or jasmines.
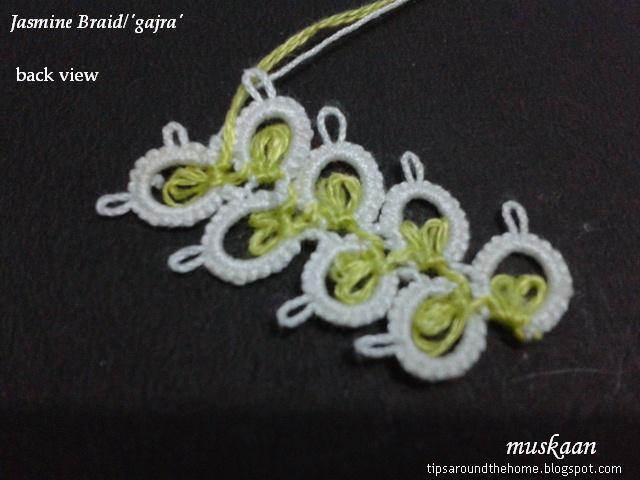
This tatted version is a split ring braid where each ring is folded inwards at the base to represent sepals.
The braid tats up straight, but can turn corners with minor adjustments (this will be shared in a later post).

Size 50 Anchor white. For the calyx, I used 2 strands of Anchor embroidery thread. Besides the right shade, the 2 strands also give a fuller look.

Materials : 2 shuttles; white in shuttle 1 & sap green in shuttle 2
Techniques : Folded split ring, long picots, very small picot, lock join, turn work
Measurement : ½ inch wide in size 50 thread
Abbreviations :
SR
split ring

p
picot

LJ
lock join
ushs
unflipped 2nd half stitch

vsp
very small picot

+
picot join
TW
turn work

fs/bs tatting for even rings optional

Important Notes :

1.  When working the next ring, do not start the shuttle 2 stitch very close to base. Leave some bare thread space allowing the segment to fold inward.

2.  Post shuttle 2 from front to back, through the ring, before closing it. It defines the fold and brings shuttle in position.

3.  Keep the green thread at the back/wrong side of the braid throughout.


Basic Pattern :

Join both threads and start with shuttle 1 :
SR1: 10 p 6 vsp 2 / 2ushs (p,1)twice . TW
SR2: 10 p 6 vsp 2 / 2ushs (p,1)twice . TW LJ to vsp of previous ring

Repeat SR2 for desired length, following all instructions.

Optional :

fs/bs tatting: I tatted the even-numbered rings using reverse order of stitches (RODS or backside tatting) only for the white segment. The green segment was tatted same throughout. And I posted both shuttles through the ring before closing it.

Blocking : While the braid lies flat, I did block it in order to pull the rings into a longish shape.


Pictorial :

Starting the first split ring .
In order for the green segment to fold easily, leave some slack at beginning, and ....

... post shuttle 2 through the ring before closing it. If required, turn the green picots inwards with fingers before closing ring.
1st jasmine bud made. Turn work as in turning the pages of a book (see next pic)
Related post : about folded rings


TW. Start 2nd split ring. Before starting the green segment, leave bare thread space. Post shuttle. Close, lock or shuttle join to previous ring and turn work again.

3rd split ring made and lock join being made. Ensure that the green thread stays at back of work.

TW, and repeat ....
Odd numbered rings (along left of braid) are worked from front. Above pic shows a close-up of the braid from front.
Even numbered rings (along right of braid) are worked from the back. As mentioned above, these rings can be worked with backside tatting. Always remember to post shuttle.
This backside close-up shows the zig-zag of green bare thread between rings.

UPDATE (Apr 10): There was some confusion about the direction in which 3rd ring was formed, and a suggestion to add a diagram or arrows showing direction. In response, I have diagrammed the pattern, along with main instructions. This one-page pdf is a complete pattern.

Yet again, this is a basic braid pattern and playing with beads, colours, and sizes, can broaden the scope & effect.
Ideas for 3D : 
One idea is to add a very short Josephine/spiral chain between rings and twist the ‘buds’ around. 
Another idea is to use 3D Josephine rings for buds as used here, and maybe a curled ring for calyx. I would love to give this a go sometime!


Wishing everyone a fun-filled, fragrant, fabulous

International Tatting Day 2017 (April 1)

This pattern was shared with the Online Tatting Class on April 3, 2017


Friday, 17 February 2017

in the fold !

Pin It now!

It's always fun to learn a new technique.  And then experiment, compare, ....


In Tatting Design class, Susan Fuller introduced the half moon split ring as a design element.  I had tried it only once before, then forgotten about it. This time was different, having acquired some more experience and understanding of multiple techniques.

Splitting Rings

The half moon split ring (hmsr) , to me, is worked like an upside down split ring (SR) !!!
The shuttle 1 flipped stitches and colour show up on the Lower/right side ; in Split ring, they show up on the upper/left half.
Stitches in both halves face the same side in hmsr,  while they face outwards throughout the split ring.


 It forms a double arc like a crescent or a half moon, depending on stitch count of the 2 arcs.
If 2 colours are used, we can tat up a scalloped braid or a wavy row of rings.
Add a bead in the notch and you have yourself a neat little bracelet !!!
Decorative picots or seed beads on the outer arc create even more interest.
In center of 1st pic, 3 hmsr joined back form a kind of triangular inner line (ecru), and scalloped on the outside (pink).
And notice the wavy line undulating around an almost straight line  in 2nd pic ?
Many possibilities and effects.


Folding Rings 

While practising the hmsr, it was pretty natural to compare it with Folded Rings .
(Curled ring is another way to "fold' a ring, and is compared with Folded Rings here).


And after figuring out how to create a table on my tablet, I prepared a comparative and characteristic tabulation. (Table format gets lost when copy-pasted here, hence the pdf route)

Download  Table comparing Folded Ring and Half Moon Split Ring  (revised Feb 17, 2017 in response to Martha's comment below) 


The pics show practice and experimental pieces, hence not of best quality, nor consistent.  Stitch counts, though, were kept largely consistent for comparison.
HMSR braid (2nd pic) : shuttles were switched between rings.
1. (SH1 loop) 12/8
2. (SH2) 12/8
3. (SH1) 12/12
4. (SH2) 12/6
5. (SH1) 12/16
Compare hmsr #1 & 5, both made in same manner, but with more stitches in inner arc. And suddenly the inner arc becomes the outer arc !!!
What if the both halves were equal ? Wouldn't it look like a double scallop, but with one colour hidden ? Nice way yo carry a chain effect !


Folded Rings (3rd pic)
1. 12 set a 8
2. 8 set b 12
3. 12 set a 6 set b 12
These are only a few. So many more can be found on Martha's tutorial.


Related posts - Other comparisons :
Padding the stitch (s-pds, BDS, DDS, pds)
Folded rings and Curled rings
Rings on Ring
Reverse ring and SCMR

I apologise for not staying in touch - down with the flu . Hope to get back in the loop soon. Till then, happy tatting :-)
Oh, and there just might be a surprise introduction to another "project" I have involved in this past week. 


Monday, 16 May 2016

Of long chains & large rings

Pin It now!

I keep telling myself that I will Not be distracted. Huh, as if that resolution lasts for long!
Yesterday I got this cute angel pattern in my mailbox & recently some experimentation on Mock rings held my curiosity. Of course I had to jump in ! You know the feeling, right ?!

by Sheila Heneise    
On May 16th, Georgia Seitz is revisiting this cute angel pattern as she some story to tell !
I took the opportunity to tat this minimalist, but happy angel.
This time I went with single shuttle & ball thread, in Anchor size 40 white.
Techniques I used : direct tatting, directional tatting, decorative picots, Join to Smooth Side (JSS), inward picot (held by pin), long picots, very small picots, turn work.
Size : approx. 1¾” x 1 ¼“
Instead of reversing work each time as instructed, I used direct tatting (reverse stitch) for many of the segments. It is a fairly quick & fun tat, but I could’ve done better with the chain shapes.
One can make the wings using Martha Ess' Folded Rings.
TIP : Switching from normal tatting to direct tatting (and vice versa) can create a distinctive pointed chain/tip at the turn. 
OOOOOOOOOOOOOO 

Large Ring Options

Each of the 4 large rings in the motif has been worked differently using the stitch-count given by Eliz. (links to respective posts & tips in the discussion below).

RING 1 : Normal Ring
Working large rings has become very comfortable ever since I came across Patty Dowden’s technique. I have my own version of it – looping the thread round the entire hand (all fingers) gives me lots of room & slack, without having to wind extra thread.
Conditions : stitches should not be tensioned too tightly ; 6-ply tightly twisted thread works best

RING 2 : Mock Ring with inward picot
Jane McLellan’s experiment with normal ring, self-closing mock ring (SCMR), & mock ring, led her to choose the latter for the large rings’ motif she was tatting. She used an inward picot (picot on the core thread), held in place by a pin/clip, at the start of a long chain which was then joined back to the picot to simulate a ring. She also used a SLT/overhand tie to change direction of chain for the ring. Instead of SLT, I switched shuttles.
TIP : SCMR is a ‘fancy’ Mock Ring (MR). The only difference is that the inward picot loop is drawn out & held on a finger, allowing the whole shuttle to pass through at the time of linking & closing. In MR, we make a normal picot join.

RING 3 : Mock Ring with scroll/overlapping effect
This was followed by Eliz Davis' mock ring where instead of an inward picot, she used a normal picot, tatted the long chain, curved it back into ring shape & linked it to the picot below as in stacked rings. She also shared the stitch-count which I used.
This was an interesting ‘twist’ not only in terms of visual effect, but also in terms of working it. In Jane’s MR, we continue to tat the chain & join to previous elements in clockwise direction, since the SLT or the switch shuttle made the directional change right at the beginning.
In Eliz’s MR, the chain is continued as normal, hence it is looped back in counterclockwise direction & joined to previous element accordingly !
TIP : Visually this is very similar to a Running Scroll in Elgiva Nicholl’s book . And one can choose the direction of overlap. The overlap in my trial is opposite to that of Eliz’s. Also, instead of a picot, one can use an under-over or alligator join.
UPDATE : Mock Ring pictorials and options in series of posts starting with .... https://tipsaroundthehome.blogspot.com/2018/05/mock-rings-1-under-and-over-join.html  

RING 4 : Folded Chain Mock Ring
I’ve used the folded chain many times, eg. in the Super 17 Butterfly. Would it simulate a ring ? At the point where ring has to start, make a very small picot and 2 SHS (2nd half stitches). The chain folds immediately, leaving the picot protruding outward for joining at the end. I counted the 2SHS as 1DS (but it is optional). Continue with chain & join back at base to the picot.
I could’ve made the picot even smaller.

Factors that may determine choice :
  • Thread colours & desired position in pattern
  • Individual ease & comfort with particular method
  • Whether working with single shuttle & ball or with 2 shuttles (The above motif can be tatted with a single shuttle & ball, irrespective of the method !)
  • Thread characteristics
  • Desired visual effect
OOOOOOOOOOOOOO  

Update

In the previous post, Set 1 of Common Threads has been renamed ‘Overhand Tie’ (instead of overhand knot) after a discussion on Craftree. Two ties in succession create a knot. A knot conjures up the image of something that has been tightened, whereas a tie is like a ‘half-knot’ with slack that can be loosened easily if required.


Related Posts : butterfly patterns


Monday, 7 December 2015

Thorny Wreath pattern

Pin It now!
Wreath Ornament 
(Reworked, Revised, & Updated)

It’s that time of the year, & there has been some activity on this pattern for a few weeks now. I wasn’t too happy with colours & working when I first made it. So, it was time to rework the pattern, as well as create a proper pdf, with diagram, to download.

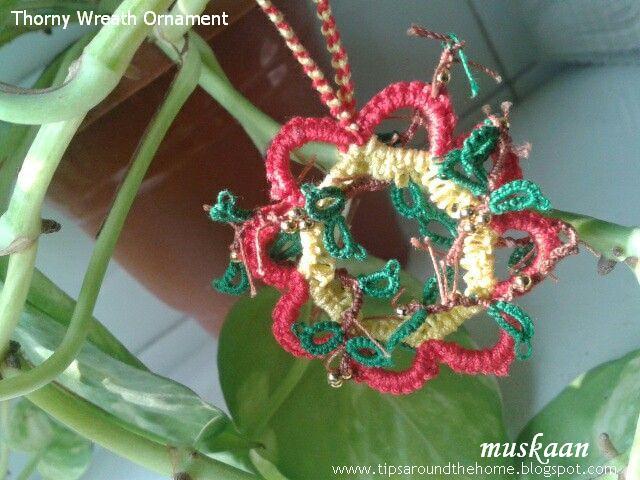
This time I used more Christmasy colours & added a sprinkling of beads.
Being fairly small at 4½ cms diameter, it can be used as a tree ornament, a decoration/adornment for gifts, sewn on to a headband, or be used as a pendant, a brooch, or earrings ; embellishments & colours can be customized.

(click to download pdf with diagram)
This is a 2-round tiny motif where the base 1st round, made of split rings, forms a large flower, and the 2nd round is freeform, interweaving a chain through the center of the flower medallion. The freeform weaving lends a 3D interlaced effect to the 2D flower wreath & makes each ornament unique.

Round 1 is made of 8 split rings, in 2 colours, size 20 thread, and uses padded double stitch, ending in a Lock Chain loop for hanging.
8 SRs are needed to get a central space large enough for normal shuttles to pass through when interlacing Rnd 2.
TIP : Padding the stitch (pds) can cause some twisting of thread. Suspend shuttle to remove twists.
VARIATIONS : Only 6 petals make a beautiful flower medallion with a flurry yellow in centre & red petals around. Add large cabochon, pearl or gemstone for jewellery piece.

Unlike the earlier attempt, this time I used size 40 thread for the freeform round. Beads were also added to represent berries. 
Load more beads in both shuttles than strictly required so that one has plenty to play around with.

Bring forth beads, tat folded rings leaves, & add the thorns using scrap thread. Instead of making long picots & snipping them, this time I used my spot addition of Corina's fringe.
            TIP : The thorns can be frayed for a different look.
                                                           
The 2 versions together. 

I guess I could've made the vine less dense. ...
One can use just the freeform vine pattern for a bracelet in customized colours/embellishments. ! It is, after all, the freeform that makes each piece unique & exclusive. No two will be the same !

For complete pattern download : Thorny Wreath   
I'm sorry for the blank 4th page - tried my best but it just won't go :-((


Some Techniques used (click for link to tut) : 
Padded Double Stitch (pds)
Martha Ess' Folded Rings
Corina's Fringe  This can be used if one is not using beads . Instead of beads, preload the fringe thorns.
My spot adaptation of Corina's Fringe

Happy Tatting 


Related Posts : Wreath Ornament

Motif # 13/III for 25 Motif Challenge