Showing posts with label motifs. Show all posts

Tuesday, 14 July 2026

incredible spirit

Pin It now!

Indomitable, indefatigable, inspiring spirit! This is how I see Donna McDade, my incredible 86 year old friend! You might remember her previous participation in my DAL 2023 where she belted out 5 Celtic snowflakes. This time she broke her own record. Read on to be impressed again .... 

All the DAL 2025 challenge entries can be found here - https://docs.google.com/document/d/1mQmdXWXQmcbXQ48nRz9FBeTJf_DoJqKz/view

This post is long long long delayed! My main delay was because I wanted to diagram all her versions for clear patterns. Unfortunately only one has been done so far. But the task is still in my to-do list, just pushed further ... And then I couldn't get my head to cooperate and so many other distractions kept creeping in. There is also lots of celebratory news from Donna's creativity, too, which I will share in a 2nd post. 

Donna started by tatting 6 DAL 2025 motifs as seen below ... Note that there are only 6 motifs here while later she added a 7th and a larger 8th, too.

And following is how the outer rounds designed and tatted by her turned the basic motif into such lovely versions!

Version 1 - Curled Ring at Chain

This is very interesting. At first glance it looks like a repeat of the previous round. However, using two shuttles, she makes two rings one of which curls over the previous ring. I think it is a clever application. 

Version 2 - Topped with Trefoils

I was able to complete the diagram for this single-shuttle round that she designed.

Version 3 - Spot Me

I chose this name because I couldn't really spot the 'mistakes' which had Donna cursing the 'Evil Tat Demon'! The pink shade, though, is the red bleeding into the white. 

Version 4 - Flower

The model says it all!

Version 5 - X & O Rings


This is what Donna called her 5th version (A and B) with simple split ring round and then weaving another split ring braid through the former. It suddenly gets uplifted from a simple split ring round, doesn't it.

Version 6 - Curls and Folds

Can you identify the variety of rings used in this version? Besides the normal rings in the center, there are curled, split, and folded rings and well as folded chains! Some of the folded rings didn't quite measure up since it was her first attempt at them inspired by my Folded Fun motifs published in the IOLI Bulletin.

Version 7 - Beaded

Quite festive! With plenty of potential for more embellishments.

BONUS! Curled Rings Cross

Donna increased the repeats from 6 to 8 enabling her to design the cross with lots of curled rings. The cross is already sewed on to fabric. 

And all the 7 versions together. These motifs also found their spot on a quilt as seen in the lead pic above! Donna's twin passions - quilting and tatting. Most of her tatted motifs are appliqued to her handmade quilts.

I would like you to return to read my next post and see the creative talents of this incredible lady. Adding it here would not do justice to her work and accomplishments.

💦💦💦

If you wish to try your hand at designing more rounds, jump in any time and contact me with your version.
Pattern: https://tipsaroundthehome.blogspot.com/2025/02/dal-2025-challenge.html
1st round-up: https://tipsaroundthehome.blogspot.com/2025/03/colour-me-happy.html
2nd round-up: https://tipsaroundthehome.blogspot.com/2025/06/design-tatting.html

Many many thanks for your enthusiastic participation ... hope your indomitable spirit rubs off on me, too!

Tuesday, 7 May 2024

is it a plane

Pin It now!

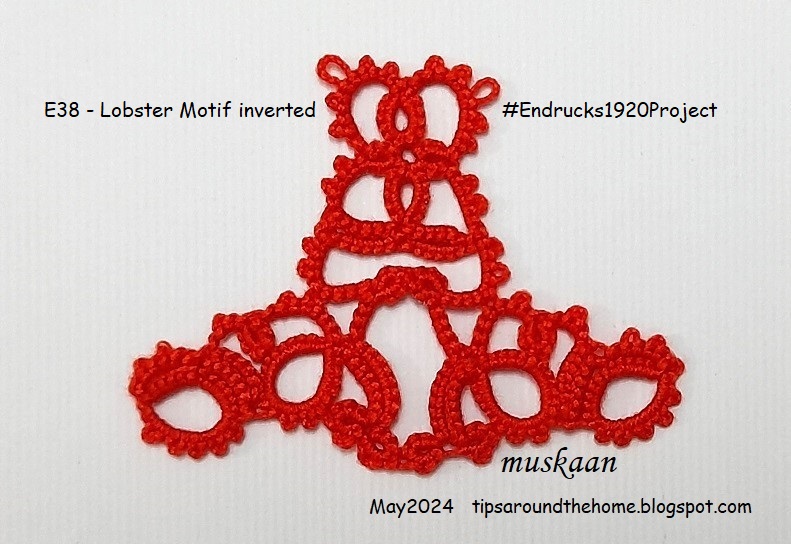
or is it a lobster?! 

It's always fun when we can get a two-in-one pattern! And this time it was simply a matter of perspective. What for so many years appeared to be a lobster, turned out to be an equally impressionable light aircraft, merely by shifting the angle!
Add a few necessary embellishments to further strengthen the look you want - that of a plane or a lobster.

I tackled two tasks simultaneously. Updating the E38 pdf with a diagram and two-shuttle instructions, and tatting this 3D figure for our May2024 game called 'Inflate Me Endrucks' in our Endrucks 1920 Project FB group. 
All relevant links are at the end of the post.
Sharing the process here ---
1. I tatted one motif of the E38 Lobster edging. However, all along the edge, small picots were made after every 2 stitches in the element/segment. It is through these picots that the 2nd motif will be attached.  
2. A second identical motif was tatted and joined along the edges of the first one.

3. Leave sufficient space open at the end to insert stuffing. Notice how the inner space is all hollow.
4. Tails of the second motif are hidden.

5. Through the open space, stuff cling wrap, filling the hollow.
Then sew in the opening using a different coloured thread (the mustard ends are visible)

6. Stiffen the model. I used a 3:1 PVA glue to water ratio. I made enough solution to dunk the model in it, turning it over and over till I was certain every portion had absorbed the diluted glue. Then I left it to dry on the little rack above the bowl itself.
I was supposed to dab out the excess glue from the tatted stitches, but forgot.

7. When completely dry, snip off the stitches in the opening and remove all the stuffing. Then sew in the opening again using appropriate thread.

8. Seen from the other side.

9. I consider this the Lobster side and even though lobsters are caught in traps/pots, I exercised some creative licence to hook it!

10. This is the plane or light aircraft side. Inserted a jump ring and then a larger hoop on top to allow it to dangle. Although dangling it at the tip of a wing would work so much better!

The 3D version can be used a pendant, brooch, charm, or simply displayed as a collectors' model .....

11. This is the motif upended. It appears like a citadel or those huge silos or oasts of old. There's always more to an Endrucks' design than meets the eye!!!
🦞✈️🦞✈️🦞✈️🦞

PROCESS: In converting the flat motifs to a 3D model, I referred to Pitsibaa's (Tinna Hassinen) video on how to puff up tatted motifs - https://www.youtube.com/watch?v=X0MInK7b65Q . The only real change I made was to join the 2nd motif to the 1st while it was being tatted. However, it was not as easy, and sewing two separate motifs would've been quicker.
TIP: I found it easier to join when the edge chains were direct-tatted (reverse stitch).
Further, this motif has a large open space which can be bridged with a thrown ring.

PATTERN: Endrucks' pattern #38 (E38) - Lobster Edging pattern pdf - https://drive.google.com/file/d/1EiWX78pK8oY8shFVGBFjdJIO0a4Y7fLh/view
This was prepared by Douglas Hill in Nov 2020 using a ball and shuttle. Ninetta and I are in the process of systematizing the presentations to include whatever is missing - diagram, written pattern, etc.  Hence this E38 pdf has now been updated with a diagram and short notation pattern using two shuttles. It is our endeavour to retain the  individualistic character of the volunteer's presentation despite the updates 

GAME: Our May 2024 game for which I made this model is called Inflate Me Endrucks. If you wish to join, all details can be found in this pdf - https://drive.google.com/file/d/1A0hdxz54JbLCGLiDbI_-g53Xh7eNqeKQ/view
Now you see why I chose this particular motif/pattern - two tasks in one. Updated the pdf and participated in the game, LOL.
Ninetta prepared a biscornu-shaped pin cushion covered on either side with two E30 square motifs. We wanted to provide as many visual options and ideas as possible. 
While scrolling through the main patterns and the directories of derivatives, it was easy to spot so many possibilities! We hope our participants will also see them.

EP LINKS: All relevant Endrucks 1920 Project links can be found in this active doc - https://docs.google.com/document/d/1w1TZBg-HIzseGEUoJ-rko7tNbtSgZY5A18Oy2Y9Hh0Y/view

✈️🦞✈️🦞✈️🦞✈️
I am also presenting this plane/lobster as my submission for 'Small Decorations' game by splocik - 
Check out the April entries in the round up - https://splocik2.blogspot.com/2024/05/male-dekoracje-2024-galeria-kwietniowa.html  Since I do not celebrate Christmas or Easter, etc., my entries cannot relate to those decorations. However I hope they are still valid.

Thursday, 21 September 2023

happy Endrucks 1

Pin It now!

 Frau Endrucks would certainly have been a happy, satisfied designer to see what one tatter has done with merely one pattern from her collection of 44! Following is only part 1 showcasing what Krystyna Mura has accomplished with pattern #31 from the German book ‘Die Schiffchen-Spitzen’,1920, by Frau Eleonore Endrucks-Leichtenstern. 

Krystyna worked on the doilies and numerous derivatives from 2021 to 2023. Since the original pattern tended to cup, she worked on alternatives to flatten out the doily. All these patterns are now compiled in the following pdf - 
Endrucks' pattern #31 in modern format by Krystyna Mura - Doily of Modest Hearts - https://drive.google.com/file/d/1lcQrl0f6PdLYApe4YVM2ZVorLsHToAm1/view

The cupped original pattern was turned into a parasol for a doll. It also works well as a bowl or a basket! https://drive.google.com/file/d/1I7EEuylPwp5pqIvgI1yAUYlULukV0D8Z/view
Or even a lantern or lamp shade!

Krystna shares her thoughts and options to make the doily lay flat without compromising on the pattern per se. Above is Option 1,

Option 2, and
Option 3.
As you can see in her pdf, there are even more doilies she tatted than the 6 shown in the collage!

Further play with sequence and colours resulted in the above version. The possibilities are endless!

Of the 6 rounds, working only the first two rounds gives this cute motif.

Rounds 1 to 3 result in this gorgeous rendition, and

Rounds 1 to 4 result in another decorative motif or coaster.

Rounds 1 and 2 covering a cabochon.

And finally a heavily embellished doily as a window decoration which she calls Stained Glass Rosette.


Following the theme of this post, we would like to inform you that we have renamed our Coasters and Doilies directory to Circles and Doilies in order to cover all circular motifs and medallions alongside larger models. (https://docs.google.com/document/d/1Xc1hiwrg5yPEvi77jj2uxWqlkECuyZjFjuCJ08VcoLA/view)

So, please stick around for the next two posts showcasing more derivatives and applications of pattern #31 by Krystyna Mura!
...... to be continued .....

Monday, 31 May 2021

hopping around

Pin It now!
Bunnies and Tulips for Easter 2021
pattern - Kathleen Minniti

Couple of months back I was in a tatting funk - had lost the will to pick up my shuttles. And then suddenly patterns sprang into my inbox from generous friends! One such was from the very talented Kathleen Minniti. She sent me these bunnies and tulips pattern as an International Tatting Day gift on April 1st!

My shuttles came to life! Tried these, adding a bead for nose. The one on the right has whiskers and a dense tail which was supposed to have been frayed, but haven't gotten around to it yet. These were straight off the shuttles, without blocking or shaping or trimming the whiskers (made from sewing thread)
I still have thread left in the shuttle for a 3rd one, this time with a bead for eye.
Although I made little tweaks - so many what-ifs floating around in my head - there are no notes to share. I went with the flow and pleasure of simply tatting away.....

I Love the sense of movement this pattern has. Almost as if the bunny is about to hop, or is already hopping! Above, the black-nosed bunny is enjoying the fragrance of the tulip while the red-nosed bunny wouldn't be left behind and hops closer ...

... and displaces the smaller black-nosey who switches to the other side, awaiting it's turn again.

Aha, our curious red-nosey has found a new flower to explore, so black-nosey gets right back to it's original perch!

Although tatted around 4th/5th April, it's taken me so long to take pics and post. There's a whole lot more I wish to try out which was one of the reasons for this delayed post. There are lots of little versions to choose from or to tweak for our pleasure! Kathleen's genius in designing is evident in the use of simple techniques and effects to create several versions of swaying tulips and hopping bunnies.
And the great news is that all these patterns are now public - shared with the Online Tatting Class recently - https://www.georgiaseitz.com/2021/lessons_loglinks_reg2021.html 
You can be sure I'll be getting back to this again some time to make a proper composition!

Many many thanks to Kathleen, a generous friend and constant inspiration !


Tuesday, 24 November 2020

spinoff fun

Pin It now!

In Jan this this I tatted 2 more spinoffs from Folded Fun square and star. 2 six-pointed versions. I'll try to add a pattern when I get around to it, but don't hold your breath! Because as I peeked into my diary where the 25 Snowflake projects were documented, I cannot find the new ones, sigh!

This is the snowflake version, not much different from the 5-pointed star. The main difference is additional stitches in the inner rings so that we now have 6 instead of 5.

This is the Stupa version - the folded rings on the outside reminded me of the 3rd century BCE Sanchi Stupa - a world famous UNESCO world heritage site - part of Buddhist holy pilgrimage.

Here they are all together (one of the stars is a prototype), positioned as a cross. I loved tatting the two 6-point versions, even during my slump phase and the colours cheered me up.

Worked in Anchor Pearl Cotton, size 8.

I have a lot of rummaging to do! Be it patterns or actual lace. I barely complete a project than jump on to another and keep forgetting along the way. Which is why I will be uploading pics of several of my designed lace, even if sharing the pattern may come much later.

Tuesday, 20 October 2020

multiples of 7

Pin It now!

 and a voracious scissor!

My journey leading to this destination - https://tipsaroundthehome.blogspot.com/search?q=swirling+butterflies  

Ta-daa! My variation of Ninetta Caruso's beautiful and multi-technique Swirling Butterflies doily, with due apologies. But let's continue from the last post where I had worked split round 10 to make all motifs similar, preferring to work the butterflies separately.

I've used numerous little tricks to keep my working smooth but those are mostly personal preferences, not compulsory.

ROUND 10 (part 2) - Cedronella, and 'Hugging' Butterflies variation.
Each of these 3 butterfly motifs has no tails to hide, since threads end at the head and tails are snipped into antennae. In each case, a short length was left at the start to finger-tat the final few stitches in the split ring head.
The profile butterflies are identical mirror images, one worked frontside, the other backside (optional).
To attach the side butterflies to green chains, I used the luggage tag loop at start and Dora Young Join, thus showing a complete stitch at both ends of the body.
TIP : For maximum overlap of wings, keep the joining picot in previous ring as small as possible.

Remember the lasagna I showed last time? Well, what does this look like, with the motifs turned under? I couldn't resist the sensation of autumnal forest floor.

ROUND 11 (a variation) with butterfly (Cedronella) and leaflet motifs
Oh, the heartache of having used that dark green! None of the lighter colours worked for the final round. Following are the 3 trials I did ....

Hubby gave me a lecture that the final round should be a dark shade, DUH (the all yellow was his choice)! But in 20/20 (or was 2020 at work?) hindsight, the flower motifs should have included cream, leaving me with the dark green or brown for round 11.

I was so disgusted by the end of this that, with the gracious permission from Ninetta, I worked on a different final round which was required in order to link the adjacent flowers. I visualized inserting cream leaf and flower motifs (from the earlier cream rounds) on the outer margins. 
But when Ninetta sent me her idea of placing the florets on the inner side, I loved it. And the free butterfly I had fit perfectly! So I made 7 of these between the 14 large flowers. I attached the wings directly to the green chains in a bid to decrease the darkness.
And then inspiration struck. What if I make an EPJ (Grace Tan's encapsulated picot join here). Even though there is no layering. The one on right neat, but the one on left shows the picot - my insertion was incorrect, but I didn't re-do.
Always options!
On the outside, I went with my original idea of leaflets linking adjacent flowers. This is similar to the ones on round 4, with an extrapair of rings. One shuttle. Attach thread with a luggage tag loop, tatting over tail. The 1st ring is joined to the next green chain. On the way back from the tip, 5th and 7th rings are joined to adjacent motif. I deliberately layered it slightly to hide some green.
Again 7 such motifs. And love the gentle swirl they create.
Going for minimal instead of inserting 14 motifs inside and outside.

UPDATE : For a continuous swirl, the leaflet motif can be worked between all 14 motifs.
But if one works 7 motifs in the opposite direction, they can appear like a laurel wreath over Motif A (the ones without butterflies) - like those on Roman Emperors!
It was fiddly to insert these motifs, though. And my scissors had a field day! There are still 2 butterflies I'd like to change, but it's a wrap. Hence if a tatter wishes to make this variation, it is advisable to do it simultaneously rather than at the end. 
After soaking to block, I remembered a snipped chain! Oh well, Mr Downplay decided to let it be! Can you spot the snip?
But in a moment of weakness, Mr Meticulous took over and I fixed it ;-P

The final doily just touches 14 inches across the widest part, worked in Anchor cotton size 40.

This is the colour palette. The black labels indicate the threads are about 15-20 years old - vintage. 
It was already late night and I 'threw' the doily on my dining table in order to keep it flat. And suddenly the swirls and butterflies came to life! Quickly took a couple of pics. Hubby is happy, too, and approves the choices ;-P

My sincerest thanks to Ninetta for choosing me to tat this wonderful doily. It kept me happily engaged (except for the last stages where it kept my scissors engorged ;-P) as a tatter and learner. Hope some of the learning rubs off in my future designs. 
Her pattern presentation (in Italian at present) is Stupendous! What an eye for detail - both in the text and and the schem
https://ninettacaruso.blogspot.com/2018/08/spiral-rings-with-treble-tatting.htmlatics. She also included detailed pictorials of elements and techniques used here (many of which are already shared in her blog). I just wish my colour placement had been a bit better. Oh well ...

Complete list of posts so far (chronologically) (click on blue link) : 
Ninetta - 

My posts (including the tat-along) -