Showing posts with label kitchen tips. Show all posts

Friday, 31 May 2024

inflating the leaf

Pin It now!

 As part of the ongoing #InflateMeEndrucks game in May, I couldn't resist inflating this leaf! The E15 leaf doodle post was among the top 5 for several days, enticing me constantly. The motif is such a quick tat, that I succumbed.  All links at the end of post ....

This time I made it into a pendant. Although I wouldn't mind tatting a pair as earrings.
The original motif on the left. However since there were absolutely no picots along the edge, I ended up tatting 2 motifs, adding tiny picots on the outer chains.
TIP: If the Chain H is reduced from 6 to 4 stitches (left motif), the leaf comes out flatter.
TIP: Notice that the two motifs are tatted as mirror images. I followed the same diagram, but started with a backside ring.

I had also sewn in the bugle bead vein in both. 
This time I followed Pitsibaa's instructions to the T. And as I had stated, it is certainly easier to sew individual motifs than to join as one tats. More freedom, hassle-free tatting, ....
And I also remembered to blot out any extra glue solution, LOL.
After it had dried, I added the beaded chain for the pendant.
I didn't stuff the center, since I wanted the beaded veins to show through.

Future Idea - Increase the length of the joining picots between the motifs instead of keeping them tiny. So that when it is stiffened for inflation a filigree effect is visible along the seams! 


Relevant Links -
All about the Inflate Me Endrucks game -https://tipsaroundthehome.blogspot.com/2024/05/is-it-plane.html  (including my first model and pictorial)

🍃🍃🍃🙐🙑🙐🙑🙐🙑🙐🙑🍃🍃🍃

And on a side note, here's another way to inflate leaves, LOL. 
This savory snack or side dish is called 'patra' or 'patode'. Arbi/colocasia leaves are layered, rolled, steamed, and sliced. They can be eaten as is (ones on the right), tempered, 'roasted' in little oil for crispiness (like the ones on the left), or deep fried. In Delhi, we don't normally get arbi leaves in the market, so I used to grow my own in pots every monsoon, using the vegetable bulb itself. Then the bought veggies were probably treated and they stopped germinating. Seeds didn't work either. 

Yesterday, my lovely hubby surprised me by finding the leaves in an online store (they have a couple of outlets as well) based in Delhi and bought them without my knowledge! He paid more than the cost of the 6 leaves as delivery charges but it was so worth it. Very good quality, large leaves. The rolled log was at least 12 inches long. After 15 to 20 years, I finally got to make and eat these. Thankfully I hadn't forgotten how, LOL. Plenty of slices still in the fridge. 

TIP: I used the soft silicon spatula to apply the paste between layers. It was so easy, quick, and mess-free!

Saturday, 4 June 2022

lemon juice in a jiffy

Pin It now!

I love the tangy sourness of lemon juice - a few drops perk up almost any dish. Yet, laziness often gets the better of me, since it also means taking out a lemon, washing/slicing/squeezing/deseeding. and then storing the rest of it back...yadda yadda yadda.

These are my 2 quick-fix solutions - tried and tested for decades now. Open fridge and voila, no cutting, no seeds, pure fresh juice!

1. Lemon Juice -
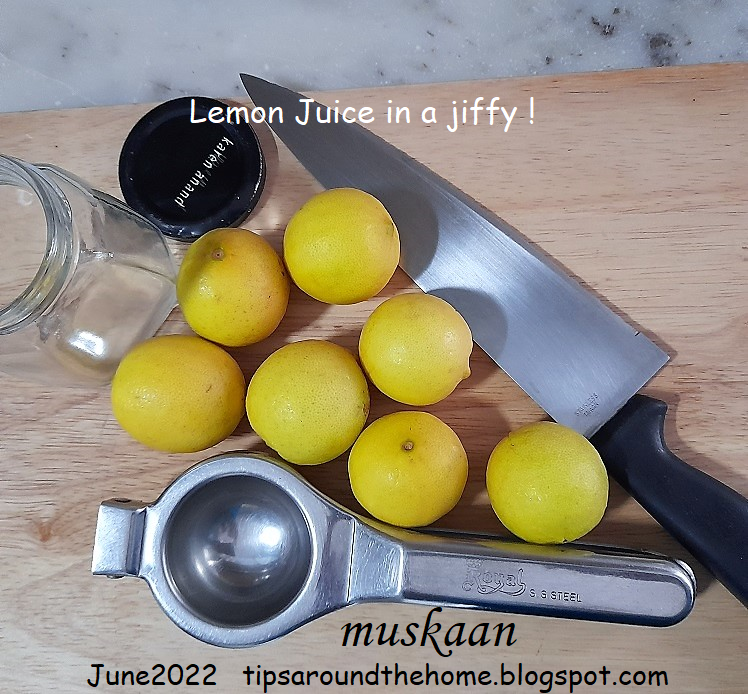
I buy veggies for the entire week, lemons included. Here I've gathered the materials I'll need - knife, lemon squeeze, and an air tight container. And lemons, of course! 

Cut each lemon in half, squeeze the juice in a wide-mouth utensil. Sorry, no pics with my messy hands! 

Pour into the air-tight jar. Sieve if there are any seeds. Refrigerate. It lasts easily for up to 2 weeks and still tastes fresh!

2. Lemon wedges/slices - 
When I don't have time to squeeze and store the juice, but need lemon juice immediately ....

Slice the lemon off-center so that the seeded part remains. Notice how I got 4 seedless slices, and I can choose the size of each slice depending on the requirement. Store in air-tight container.
However, seedless is not the only reason I do this. A half-squeezed lemon tends to spoil easily - it might have something to do with the skin being crushed. 
Hence, always store a cut slice that hasn't been squeezed, and it lasts for a long time.
The above 4 slices are for this pictorial. In practice, I simply slice off what I need and store the lemon. It works fine.

What tips do you have to store lemons?

Tuesday, 29 March 2022

homemade oregano

Pin It now!

It is unbelievable how profusely and quickly the ajwain/oregano plant is growing! Something had to be done. I didn't want the leaves to grow yellow and wilt! And since the cooking experiments with fresh leaves didn't really work for us, drying the leaves seemed a good option. I do it for other herbs, too, but these leaves are thick and have a lot of water and needed a different approach. 

I snipped off a few twigs, rinsed and dabbed them dry on a kitchen towel. And plucked off each leaf.   

Time for the microwave. Placed the leaves flat on a stoneware dish. At 30%, nuke them for 2 mins, flip, repeat. Do it 1 or 2 times more till the leaves are completely dry. Tweak the time as required. Within a few minutes the entire bunch was dry and crispy.

TIP: In fact we can nuke and flip them twice, then gather the semi-dry leaves and after all batches are similarly done, gather all those leaves and give  or 2 final nukes till completely dry and crispy. Saves time and effort.

Crumble and store in air-tight container. I used an empty herb bottle. 

The one on the left is from my previous batch on the hot girdle. I was experimenting with about 8 -10 leaves and followed this Foods and Flavors video on How to make oregano seasoning - https://youtu.be/Zp6k29TSuSo (from 1.00 min onwards) She places each leaf on a warm flat girdle, flipping them frequently. It is fine for a limited number of leaves. But cumbersome for a bunch of twigs laden with leaves.

The colour is darker but would need to be made in small batches; each batch requiring the almost the same amount of time as the mirco-wave ones, along with constant vigil.

I've used the powder in salads, etc. and hubby likes it! Yay!

And this is how the plant is after 10 days! On the right you can see the the snipped twigs, while on the left the leaves are ready for picking and drying.  

Tuesday, 30 November 2021

peel the beet

Pin It now!

One of the staples in my fridge is raw beetroot pickle. Ages back my friend had shared this simple recipe but the tip on how to peel raw beetroot was my Mom's. Mom had such a curious nature and never stopped learning and experimenting.

Scrub and clean raw beetroots in water. Dunk them fully in clean water and refrigerate overnight. I often leave it for longer, depending on my mood or if I get busy. The thickness of skin might also affect the time, so try it out...
Notice that hardly any colour has seeped out.

Next day, cut off the tapering portion (not on the leaf side) and with a simple knife start peeling the skin back like a banana! No need for a peeler, etc. I actually enjoy it ;-D

Well the next step is grating the beet. Make a solution of cider vinegar, sugar (I use either brown sugar or boora), pinch of salt, pepper. Mix in the grated beet, put in an air-tight jar, and refrigerate. It can be eaten immediately, but certainly the next day onwards.

I hate cooked beet. So this recipe is something that appeals to me and is a quick replacement for a proper salad. A healthy side adding tangy sweetness. It goes well with so many cuisines!

How do you prepare and eat your beets?

Friday, 20 August 2021

ginger fresh

Pin It now!

 Fresh ginger has such an alluring aroma and taste and is good for digestion, etc. However it has a hot essence, and is best consumed during winters when it generates heat within the body. 'Adrak ki chai' (ginger tea) is a staple in most Indian homes during winter months and to ward off cold and cough.

Stephanie Wilson and I have intermittent discussions on cooking and food - she has acquired quite a taste for Indian spices, and dishes! She shared how she grates and freezes fresh ginger (in tiny globs) to simply dump into the dish that is cooking.

Here is what I've been doing since, in order to get the freshness of ginger in my tea! And to understand why I am not a monkey, check out this popular Indian saying/muhaavra for an interesting read - https://www.quora.com/There-is-an-Indian-Hindi-phrase-that-says-Bandar-kya-jaane-adrak-ka-swad-Why-was-this-made 

I use a planar to slice the root. This time you can see the pink freshness of the new root.

Because it is a new root, there is more moisture.
So anyway, I spread the slices on the tray and left it on the table for a few hours for this extra moisture to evaporate.
Then I place the tray in the freezer. This step ensures that the slices do not stick together.

The next day or so, I fill an air-tight mason jar with the frozen slices and shove it back into the freezer.
Since I forgot to take pics earlier, you can see the frost on the cool bottle.
Slicing gives me the additional option of crushing or julienning them if I need it for any recipe.

Each morning, I pick out a few slices, and along with 1 clove and 2 black peppercorns, and sometimes a couple of tulsi leaves (holy basil) in my mug of water, I microwave it for absolutely fresh-tasting herbal tea!
Yes, we've tried many commercial brands (hubby's choice) of ginger tea, etc. but there is absolutely nothing like this (in my opinion). Freezing the slices reduces my prep time each morning, yet gives me the full fresh aroma of fresh-cut ginger.

So, are you a monkey or not?!

Thank you, Stephanie, for making my life easy 😍 

Friday, 2 July 2021

luscious lychees

Pin It now!

 The male of the human species can be quite the baby when it comes to eating berries or peeling fruits! They much rather not eat such fruit. At least the specimens around me show these symptoms, sigh. So as a good housewife I have to find ways to keep my sanity .... errrrr, keep fruits fresh for longer and also to serve them with least amount of effort to both genders.

So here's how I store and peel lychees.....thankfully, I no longer have to deseed and slice away the pulp. My specimen has been tamed a bit ;-P
After several different ways, here's the one that works foolproof for me (the batch above had been bought and stored 4 days before taking these pics and one helping already served)

1. Do not cut away the twigs and leaves... keep the lychees attached. 

2. Put the entire bundle in a cotton bag and wrap nicely. 

TIP : I use old cotton pillows, folded and sewn along the sides to give me an open bag with double cloth layers. These are ideal to store select fruits and veggies. My MIL handed me her spare new cotton pillow covers for use, like the one photographed ;-D 

3. Place inside any air-tight container, be it a zip lock pouch or lidded container, and refrigerate.
The berries stay fresh easily for 10 or more days! 

Now comes the serving and eating part where the male specimen cannot be bothered! 
4. Break the berries from their stems, rinse, and soak in clean water for a couple of minutes. With your bare fingers, simply tug the stub and start peeling. Voila, the hard dry skin has softened and peels off smoothly. 
Gone are the days when I used to struggle to peel the skin in small bits and pieces.

Notice the new batch of pre-soaked almonds in the bottle?

Lychees served with cherries and soaked almonds. The condensation is still visible on the cherries! That's how quick this entire exercise was.

Other berries such as cherries and Indian blackberries (jamun), strawberries, too, are best stored in similar fashion. Line a container with paper towel5/napkins or cotton cloth, place the cherries, cover with another sheet of paper napkin, then close lid and refrigerate. They stay fresh for days.

Monday, 24 May 2021

instant soaked almonds

Pin It now! No, I'm not talking about that whole dunk in boiling water then in ice water crap - takes the whole taste & texture out of almonds! I have my own method that locks in the taste, yet can be eaten at a moments notice or slivered for garnish! Freshness guaranteed.

Eating nuts like almonds during winters generates warmth within the body. In summers, though, we prefer to eat soaked almonds which have a cooling effect. They take about 5-6 hours to soak completely, but I often forget to put them in water daily. So, here's my hack -

Rinse a batch of almonds and soak them for 5-7 hours which allows for even absorption of moisture. This batch should last me for about 5 to 6 days. Hubby snagged a few before I could click a photo!
TIP: Rinsing is important to remove any brownish residue, otherwise as the days progress, brown spots tend to appear.
Dry the soaked almonds on a kitchen towel - simply pat dry. 

Then store in air-tight container, in the fridge.

Next day, simply pick out a few of those presoaked & dried almonds, dunk in water for a few minutes (anywhere between 1-3 minutes depending on ambient temperature)....
... and skin them. Easy-peasy. And the taste and texture is Exactly like Day 1.

This batch is on Day 6. Any difference?

Usually they get over by Day 6. But this time I wanted to see how much longer. Finally this is on Day 12. Notice the few brownish spots? This is the only visible sign; the taste remains unaltered!!!

Try it and tell me if it works for you. Munch on them or use as garnish - all at a moments' notice. 

Tuesday, 23 March 2021

2 quick tips

Pin It now!

Well tips are strewn about my blog - have to stay true to the name of this blog ;-D. Following are 2 quick tips, one of which you may already be doing.

Straightening Unravelled Thread - wind and rest!

  
When we have to unravel/untat stitches, the thread gains kinks (fig1) that are not merely unsightly but often affect future tatting. It happens because the thread balance/twist is disturbed. A quick fix is to simply wind that thread back on to the shuttle or the ball (fig2), allow it to rest for a few minutes (a minimum of 10 minutes), and voila, the thread is almost back to normal (fig3)!

In fig2, I wound the unbalanced thread partly on shuttle and partly on ball to show that either works equally well. To quicken the process, slide the unravelled portion gently between fingers, a few times while winding back.

Simple and quick, right!

Turmeric Powder for Cuts - rub and forget! 
Every Indian household knows the immense benefits of turmeric, one of the basic spices in our cuisine. It has antiseptic and healing properties - internal as well as external. You must've heard of the 'new' rage  'golden milk'? It is simple 'haldi' (turmeric) milk, an almost timeless legacy.  
What is known in Western world as 'alternative system of medicine' is over 3,000 years old based on the more than 5,000 year old Ayurveda (Science of Life) philosophy. 

So anyway, who does not get cuts, including bleeding ones? The quickest way to disinfect the area, stop the blood flow, AND heal the cut almost instantly, is to RUB turmeric powder over the cut. A gentle but deep rub in one direction such that the powder can enter the slit. Rubbing it in hurts obviously, but Do It.
In the above pic, this cut is 3 days old and it is still reddish, sore, hurt every time it came in contact with water and soap. I had Not used turmeric powder - simply used a tissue to stem the flow which took several minutes. 
But I'd finally had enough and rubbed turmeric powder. 
The above pic is taken one day later, AFTER I had spent the entire morning in heavy spring cleaning, with my hands in soapy water, etc.! But I had No problem, no reminder that there was a cut there! 

The trick is to do this deep turmeric rub immediately (I was actually surprised that it worked on a 3-day old cut). It seems to cauterize the tiny blood vessels, thus not merely stemming blood flow, but eliminating all soreness, pain, sensitivity. It kind of closes up the open capillaries and scar tissue starts forming immediately. 
It is like apply, rub, and forget !!!

Remember to try it next time - and rubbing it in is Extremely important, not simply sprinkling/applying it on top. This was my own discovery and my family/friends have become 'converts' ;-D. Turmeric powder is part of my first-aid box, besides the kitchen.

The only drawback is that there is a chance of yellow stains on anything you handle for the next few minutes until you wash it away. And for very deep arterial cuts, it may not work because the flow is much stronger.

Thursday, 31 March 2016

Keeping up

Pin It now!

Keeping up with upkeep , with so much tatting around ?! A Herculean task.
That is why the Pinterest Challenge is my ticket to keep at it, albeit at a monthly snail’s pace.


We bought this little wooden ‘antique-look’ chest about 8-10 years back. The brass overlay work was shining, the wood nicely polished . This is used to store hand towels in the bathroom. When an item is new, maintenance is so easy (and age was on my side)! Gradually, with time & eventual negligence, this is how the side facing the bathing area started to look ; the front is in no great shape either (leftmost in top pic). One can’t eliminate water splashes completely, despite the shower curtain ;-(


This pin has been on my DIY board for nearly 2 years now. It is among my most re-pinned images.
It was finally time to roll up my sleeves & get to work.
Materials : Oil, Vinegar, rag/towel
Quickly mixed up some vegetable (cooking) oil & vinegar (3:1), gave the jar a shake – it is an emulsion & sat down with a kitchen towel (the fiber roll type). That’s all one needs!
Applied the emulsion with the towel & left it in sunshine (for better absorption).
That’s it! Didn’t even rub it in.
Applying emulsion to left panel
Left panel after a few days
I’m sure if I do this regularly, it will get back all it’s original beauty. With a single application, there has been a marked change. With a few more applications spread over the next few months, the spots should disappear completely. 
TIP : I might even mix in some coffee powder to add colour! 
Top panel immediately after application of emulsion
This was my challenge completed. But the upkeep wasn’t over. The brass needs to be polished, too!


Easy Brass Polish

Simple tamarind paste as brass polish !
Materials : Tamarind Paste/pulp , toothbrush, rag, & water.

I had a few ideas in mind besides Brasso, which I do not like much (this branded brass polish does make the item shine but for a very short duration; and it is all chemical). For vases, etc. I use tamarind pulp. I tried store-bought salted tamarind paste (Dabur Homemade) . The paste worked quickly on the least affected brass parts. 

In the step 2 (top right) of process pic above, I have tried to show 3 areas within the same brass circle for comparison : (in counterclockwise direction) before any application of paste ; with tamarind paste ; paste applied & wiped off. 
More applications required for gunk build-up
The most difficult was the left side again. All that build-up took me many repeats before I realized that if a few drops of water are added after brushing, it wiped away the gunk easily. Repeat application, brushing, adding water, wiping for as many times as required. I think the before/after pics speak for themselves.

TIP : Lemon wedges & citric acid crystals (with a few drops of water) were the other two materials I tried this time. The results are inconclusive – they would work for regular cleaning & polishing, not for old & hard build-ups. I intend to scrub some areas regularly whenever I have a few leftover lemon slices.

With a bit more elbow grease & time, I could’ve done a better sparkling job. But my intention was to start with the upkeep & keep it up in future rather than tire myself out into distaste. I am very satisfied & motivated to regularly maintain the maintenance of this box !

So I’ve moved from the bedroom to the kitchen to now the bathroom. What next ?!

Before we answer that, don't forget to take a tour of what our other 
much more creative pin chicks are up to - 
Join us anytime you like - more chicks the merrier :-)