Showing posts with label spring garland. Show all posts

Sunday, 8 July 2018

revised and new

Pin It now!
So I completed the 4th motif and also changed the leaves in the 3rd.

Blossoms Garlands

I enjoyed playing with the 4 motifs to create 2 possible garlands for spring ! All that is required is to join them and perhaps add a leaf or two where necessary.
Garland #1 (on the left) has motifs 1 & 2 ;
Garland #2 has motifs 3 & 4.

Blossoms Motif #3 (revised)
I changed the colour of leaves in motif #3 and also tweaked the stitch-count. 
Much happier now. Revised leaf pattern is on the pic. 

Blossoms Motif #4
Stitch-count for the fourth motif is notated in the pic.
I added a different flower shape in the middle. 

Design TIP : I realised that as the number of motifs increase, it will become easier to design. In order to decide where to place leaves, and how many leaves, I placed one of the previous motifs under a white card paper; placed and positioned this new motif over it; and it was easy to see whether the leaf(s) looked good or not.

In Lizbeth 20, this motif also measures 2 x 1½ inches
What I cannot decide is which way to sew it on … which do you like better?


whatever the weather, spring is never far from a tatting heart !

Sunday, 7 May 2017

pattern updates

Pin It now!
Good news  I have finally updated all the patterns and links on my pattern & design page
(phew ! But this does not guarantee that all patterns are in pdf, teehee !!!)
Bad news – I still have to work the archives to update my tutorials page 
(shudder !)
Worse news – this is an admin post - dry, brut, sec! 
(sorry Y , but if you enjoy your wine that way, Cheers åå 


Pattern page overview

All patterns are first linked to the respective blog post in blue, even if a pdf (link in pink) is available. There is always so much more in a post than a pdf and I encourage users to check the post first.

It is over 2 years now that I have been associated with the inspiring, talented and helpful Online Tatting Class group (or “gang”, as Mel puts it) of creative tatters. I continue to learn a lot, and real time interaction is very exhilarating. Many of my patterns, projects, and tutorials have been shared with the class. If a pattern has been shared or published elsewhere, there is a link to the class index /publication in red letters. One can access logs for the class through the index.

I have shifted the Designing section from my tutorials to my patterns page. This includes design ideas, deconstructions, and some of diverse paths I have used in my design process. One never knows when a budding designer might find some path or design useful.


Pattern update
Many weeks this year were dedicated to the spring garland - mainly the presentation; actual tatting was quick and fun. And I recently wound it around my little bun which I wrap on a bit above the nape, and the tatted veni & hair looked gorgeous! 
I had hoped to add tassels at the ends, but didn't get around to it. 
I tried tatting 3D jasmine buds - the buds look fine, but the green needs working.

All pdfs for the Spring Garland pattern are now complete and uploaded to My Patterns page with the respective links. Each post is also updated. As I stated, I request tatters to visit the respective post for more tips, pictures, and explanation.
Here are the final pattern pdf links :
mustard fields pictorial in post (and as part of complete garland pdf)

Each part and complete pattern was shared with Online Tatting Class throughout April and lots of fun and wonderful ideas emerged (some quite ambitious as per moi ;-P ) - enough to keep one busy for a lifetime !

Judy kindly shared tips about working some parts of the pattern in needle tatting. I hope to get around to it some day. Many many thanks, Judy :-)


I also keep forgetting to mention that at the end of each post there is now an option (actually 3 options ‘coz I haven’t bothered to find out how to delete the extras ;-P) to print or save the entire post as a pdf. Click on that Print / PDF button to save the post as desired. 

Hope you enjoy your weekend with lots of lace being created :-)
Always have a muskaan on your face :-D


Sunday, 9 April 2017

sights n scents of an Indian spring

Pin It now!
a free tatting pattern

I had just finished my Block Heart patterns in early Feb when Georgia threw me a hint about thinking ahead towards spring, ITD, etc. (groan !!!)
Coincidentally, earlier that week the advent of spring had been celebrated in India . Having already tatted an an impressionistic collage for the end-of-spring celebrations called Holi, I looked up some details of the former. 
The beginning of spring ‘basant’/‘vasant’ season is heralded by a burst of flowers and celebrated in large parts of India as Vasant Panchmi, with floral tributes, religious ceremonies, joyous singing, dancing, kite flying,…
You know how I love tatting flowers – what better than a garland incorporating some of that joyous spirit in an Indian leitmotif. 
This pattern (and the mustard fields) is going to be shared with the Online Tatting Class on Monday, and length of post was unavoidable due to pics ...

Spring Garland
a tatted floral veni/jadai

This is my attempt to capture a few of the colours and spirit of this spring festival with attached symbolism – auspiciousness of marigold flowers, the swaying yellow fields of mustard, and the fragrant white jasmines – as a garland around neck or as a ‘veni’ worn by women in their hair. (pronounced ‘waynee’. A broad floral garland also called ‘jadai’ in Southern India and worn by brides)
Before I dive into the pattern details, I urge all tatters to please check out this video on flower veni making – the first few minutes will reveal something I'd never noticed before. I’ve seen many methods, but not this !   
The scents !!!! Pure floral essence or attars and an exquisitely hand-carved sandalwood box.

I have already shared the 3 stand-alone patterns. Here, they are joined to create a broader garland. 
Marigold braid acts as the foundation row ;
Mustard fields acts as a filler middle row ; and
Jasmine braid tops the ensemble. 


Recommended thread size : between 30 to 50. The tatted model is worked mostly in vintage 40 which is equivalent to size 50. The measurements work out to :
Marigolds : ½ inch wide; 3 flowers = 1 inch
Mustard : ¾ inch wide (~ 4½” long)
Jasmine : ½ inch wide; 8 buds = 1 inch

Row 1 : Marigold Garland
This row is tatted exactly as per pattern shared here, for desired length.
The first flower was mistakenly left unattached (see "Oops" below)
Part of this length is for the main body, the rest for a tail or tie.
One fully loaded bobbin is sufficient for the 23 flowers in size 50, and a bit less for the green.


Row 2 : Mustard Fields
Attach thread to any of the marigold flowers and work a fabric of these single-shuttle picot flowers as per pattern & instructions here. This row is worked from right to left overall, but in a to an fro fashion as seen in next pic ...

The work grows from side to side as seen in the marked sequence – this is only a guide. 
There could've been a couple more flowers at the beginning (see "Oops" below)

On one side, the flower is attached, using a normal picot join, to the row 1 marigolds before returning back to the other side. But leave some slack on the joining loop to resemble a picot, as described in pattern.

To keep the 'open' edge relatively straight, I initially used grid paper – place your work on the grid, and see that the work is aligned to desired width.
Continue for desired width and length.
One fully loaded shuttle (size 50 thread) sufficed for this 4½” long segment.
Since we are working with a single shuttle and flowers are randomly arranged, some bare thread is required, old-style, to span the distance between 2 flowers. This, however, stays hidden on the wrong side. (a wrongside view of garland is shared below).

For a dense effect, keep the flowers close, and bare thread minimal. The texture & feel in fine thread is quite exquisite !


Row 3 : Jasmine Braid
Attach threads to a marigold nearest to the edge of body. The first ring is joined to an adjacent picot after closing, to anchor the braid well.
Basic pattern, shared here, remains the same, except that the left column of flowers is attached to previous row of mustards as follows ...
SR (on left)  : 8 + 2 p 6 vsp 2 / 2ushs p 1 p 1 .
SR (on right): 10 p 6 vsp 2 / 2ushs p 1 p 1.


In response to some confusion about direction of 3rd ring, I have drawn a diagram : 

To turn the corner : after tatting the right-side ring (numbered 1 in above pic), tat another ring without turning work. This ring 2 is joined to the vsp of ring 1. After closing, lock join to the vsp of previous left-side ring, and without turning work, tat ring 3.


 Ring 3 is lock joined to the picot of previous left-side ring as shown by the + sign. 
(see "Oops" below)


Now turn work and tat a regular left-side ring, joining to previous row and continue to desired length.


A gauge from the practice pieceIt was not always easy to gauge where to attach the jasmine ring. A short practice piece of 5-8 flowers was very helpful in correct attachment! When it came time to join, I placed the gauge over the braid, matching the flowers, and knew which picot on row 2 would be needed.
When it was time to join, I placed the gauge over the braid, matching the flowers, and knew which picot on row 2 would be needed (crochet hook used as an indicator here).

TIP : If one does not want a straight-ish edging, join the jasmine at any stitch along the 10 stitches instead of after 8.


Only 2 instead of 3 continuous jasmine rings would've sufficed to turn this corner. The first ring actually got hidden under the previous right-side ring ! But 3 rings would work for a full turn.


 The jasmine braid is continued unattached to form a tail or tie. 

as seen from the wrong side.
I deliberately went with a different braid at each end in order to showcase them separately and also to keep a bit of freestyling. Obviously, the tatter is at liberty to use any combination of braids, or repeats of the same braid, to create many variations !
By altering the row widths, and combination/placement/addition of beads, or changing the thread colours, the pattern can become a necklace, a bracelet, anklet, belt, etc. or individual flowers/groups can be used as appliqué, brooch, and so on. How about a floral henna for a bride's hand ?!  
I am going to use it as a bookmark, hence no beads.


Oops !
Parts of this garland were tatted on the go, and a few mistakes crept in. Here is a listing to quell any confusion, hopefully :
1. Marigolds – the first flower is not joined. It was a mistake which I incorporated as a design modification in order to get the curve.
Since I did not know how long a tail was needed, the wip pics show 2 threads of this row at right end where I left the shuttles ‘dangling’, and completely the unattached braid tail at the end.

2. Mustard – the first few flowers are not as closely situated as the rest. I could’ve added a few with scrap thread later, but have left it for now.

3. Jasmine – the given pattern & diagrammed pdf starts with the first ring on the left, which is how I started the row initially. 


But it left an unseemly gap on the right side. Hence, for this garland, the first ring is on the right, BUT it is tatted backside just as in pattern. 
Close-up pics in Jasmine braid show that I did not keep the green thread at back of work while starting the next ring, thus the bare thread is visible on top.
Corner : For an gentle angle, instead of 3 continuous rings, 2 would suffice. The first of these is now hidden behind a previous ring on that side – one tatted & joined as usual, the next joined to the long picot of right side flower, and then turn work and tat the right side flower as usual.


Okay, I think I need a break from all these long posts, as do you my dear readers :-) 
Dear hubby misses my company due to the long hours spent daily in front of this PC ;-P


Hope you are enjoying fair weather and happily tatting away :-) 
see you in class !


Friday, 7 April 2017

yellow is the colour of spring

Pin It now!
3rd of 3 spring garlands.
the first 2 can be found here : Marigold toran and Jasmine gajra
UPDATE (April 10) : the complete Spring Garland

Spring Garland 3 –
The Mustard Fields !

Northwest India turns a bright yellow with advent of spring. It is the best time to take a drive down through the states of Punjab and around – bright yellow as far as the eye can see. Many communities make it a point to wear yellow on Basant Panchami to emulate and celebrate these yellow mustard flowers !

(UPDATE April 18, 2017: now that the entire spring garland is shared, I can show you the mustard fields in size 50 thread above)

This is a playful pattern where simple flowers create a fabric as broad and as long as we desire, and where we can romp carefree in any direction as in a field of yellow mustard !

The pictorial is lengthy, though pattern is simply one picoted ring, in order to show alternatives. 
It is quicker to tat than to explain/photograph :-)

Materials : 1 shuttle fully loaded with size 40 or 50 thread. (For the pictorial, I have used size 20 thread to better capture the steps)
Techniques : Ring on picot* , long picots , bare thread space , mock picot (optional) , lock join (optional) , beads (optional).
Measurement : ¾ inch wide in size 50 – between 3 to 4 flowers. Length as required.       

Please review :
*Patty Dowden’s video for How to work a ring on the picot of another ring
(I did not have to post the shuttle back before closing ring. Hence it is advisable to practice a few flowers with scrap thread before working the final piece)

Beads can be strung on shuttle thread or added on loop/picot, depending on effect desired.


Basic Pattern :

Ring : 1ds, (p, 1ds) 7 times.

The next ring is started at a distance equal to the picot.


In order to keep symmetry of first ring, one can use the tail to make a mock picot, and ...


... tat over the tail in next ring to hide end.


RING ON PICOT METHOD :
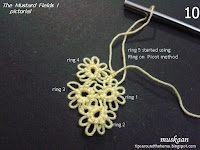
Start ring on a picot of previous ring using Patty's method. Pull up loop through any picot ...


pass shuttle from below to front, ...


and tat the ring.
Note : you may or may not need to post the shuttle back through the top before closing.

3 rings made.


LOCK JOIN METHOD :
Alternatively, one can lock join to any picot of previous ring and commence ring from that point :
pull up a loop through any picot and pass shuttle through it ...


... and tension it. Make certain there is some bare thread left under to span the distance between base of ring and picot.
Ring 4 made after the lock join.


Ring 5 started using the Ring on Picot method. This is the preferred method I used for most of the rings.

Continue in this fashion, creating a broad fabric of 3-4 flowers along the width


A  ZIGZAG  MEANDERING  PATHWAY :
Sometimes, one can start a 'free' unattached flower at a distance (notice the bare thread at beginning of ring) ....


and then lock join to any picot of an earlier flower.
Notice the arrows showing sequence of flowers . The work progresses from left to right and back to left and so on....
With the lock join just made,
take the thread back from below and bring up a loop through any picot of a previous flower or even through the bare thread we left in pic #12, and start another flower using the ring on picot method
We are now moving back towards the left for another row of flowers !


FINAL NOTES :

  • The ring pattern remains constant, though it may be necessary to join to another ring to cover gaps. In that case, maintain a picot length for the join, resembling other picots.
  • Try to keep as many picots free in each ring as possible for textural effect.
  • The pathway/sequence is zigzag but freeform. Let your shuttle free !
  • The entire pattern is worked from the front, hence there may be bare threads spanning rings on the underside. Try to keep them as short as possible, making the rings close to each other.
  • The picots in this pictorial should've been longer to cover up any gaps.
  • Beads can be loaded on to shuttle and brought forward between rings, or loose beads can be inserted over a loop pulled between rings. 
This piece was tatted in size 20 for purposes of the pictorial only. It looks much better in smaller thread as seen in the collage (top left & prototype in center which used split rings & beads on picots initially, till I decided to go freeform) . The beads in above piece were chosen to represent spots of green foliage peeping through the lushness of flowers, and golden rays reflected back.  

This fabric can take any shape one wants - straight, curved, or circular !
It can even be used as a filler, adding a lacy texture. Or simply make a small posy of flowers (I used the ring on picot technique to make a 3D carnation).
With beads, this broad fabric can be used as a bracelet, necklace, anklets, sewed on to a belt or headband,....


I have one last post to reveal the final Spring Garland with all it's floral fragrances. Hope you join me again.

till then, happy tatting always :-)

This pattern shared with the Online Tatting Class in April, 2017


Friday, 31 March 2017

fresh fragrance of jasmines

Pin It now!
second of the 3 spring garland patterns ...
(the 1st can be found here)
UPDATES (April 2017) : part 3 shared here  ;  compete spring garland shared here ; and
Jasmine braid diagrammed pattern pdf

Spring Garland 2 –
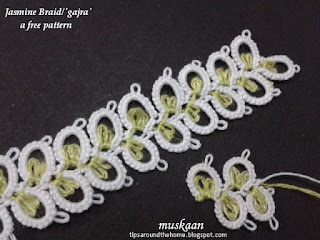
Jasmine Braid/‘Gajra’

Many Indian women love to wear a string of fragrant flowers in their hair. The most common and refreshing ‘gajra’ is made with white mogra buds or jasmines.
This tatted version is a split ring braid where each ring is folded inwards at the base to represent sepals.
The braid tats up straight, but can turn corners with minor adjustments (this will be shared in a later post).

Size 50 Anchor white. For the calyx, I used 2 strands of Anchor embroidery thread. Besides the right shade, the 2 strands also give a fuller look.

Materials : 2 shuttles; white in shuttle 1 & sap green in shuttle 2
Techniques : Folded split ring, long picots, very small picot, lock join, turn work
Measurement : ½ inch wide in size 50 thread
Abbreviations :
SR
split ring

p
picot

LJ
lock join
ushs
unflipped 2nd half stitch

vsp
very small picot

+
picot join
TW
turn work

fs/bs tatting for even rings optional

Important Notes :

1.  When working the next ring, do not start the shuttle 2 stitch very close to base. Leave some bare thread space allowing the segment to fold inward.

2.  Post shuttle 2 from front to back, through the ring, before closing it. It defines the fold and brings shuttle in position.

3.  Keep the green thread at the back/wrong side of the braid throughout.


Basic Pattern :

Join both threads and start with shuttle 1 :
SR1: 10 p 6 vsp 2 / 2ushs (p,1)twice . TW
SR2: 10 p 6 vsp 2 / 2ushs (p,1)twice . TW LJ to vsp of previous ring

Repeat SR2 for desired length, following all instructions.

Optional :

fs/bs tatting: I tatted the even-numbered rings using reverse order of stitches (RODS or backside tatting) only for the white segment. The green segment was tatted same throughout. And I posted both shuttles through the ring before closing it.

Blocking : While the braid lies flat, I did block it in order to pull the rings into a longish shape.


Pictorial :

Starting the first split ring .
In order for the green segment to fold easily, leave some slack at beginning, and ....

... post shuttle 2 through the ring before closing it. If required, turn the green picots inwards with fingers before closing ring.
1st jasmine bud made. Turn work as in turning the pages of a book (see next pic)
Related post : about folded rings


TW. Start 2nd split ring. Before starting the green segment, leave bare thread space. Post shuttle. Close, lock or shuttle join to previous ring and turn work again.

3rd split ring made and lock join being made. Ensure that the green thread stays at back of work.

TW, and repeat ....
Odd numbered rings (along left of braid) are worked from front. Above pic shows a close-up of the braid from front.
Even numbered rings (along right of braid) are worked from the back. As mentioned above, these rings can be worked with backside tatting. Always remember to post shuttle.
This backside close-up shows the zig-zag of green bare thread between rings.

UPDATE (Apr 10): There was some confusion about the direction in which 3rd ring was formed, and a suggestion to add a diagram or arrows showing direction. In response, I have diagrammed the pattern, along with main instructions. This one-page pdf is a complete pattern.

Yet again, this is a basic braid pattern and playing with beads, colours, and sizes, can broaden the scope & effect.
Ideas for 3D
One idea is to add a very short Josephine/spiral chain between rings and twist the ‘buds’ around. 
Another idea is to use 3D Josephine rings for buds as used here, and maybe a curled ring for calyx. I would love to give this a go sometime!


Wishing everyone a fun-filled, fragrant, fabulous

International Tatting Day 2017 (April 1)

This pattern was shared with the Online Tatting Class on April 3, 2017